• Main Menu
    • Feature
    • Showcase
    • Plans
  • Demo
  • Full Suite of Features
  • Inclusions
  • Blog
  • About Us
  • FAQ
  • Contact Us
  • Terms and Conditions
Editandprint
  • Overview
  • Features
  • Showcase
  • Plans

Orders

  • Orders Menus
  • List Orders
  • List Order - Order Filtering Basic
  • List Order - Order Filtering Advance
  • List Orders Bulk Action
  • Download Shipping Label
  • List Orders "Order Shipment"
  • How to Create Order Shipment
  • Ordering Process (IBS product - Customer Upload)
  • Ordering Process (IBS product - Websites template)
  • Ordering Process (IBS product - Graphic Design)
  • Process Non-IBS order (Essential Plan)
  • Process Non-IBS order - Assign Job (Premium Plan)
  • Ordering Process (Non-IBS product)
  • Introduction to Your Order Management System (Order and Job Status)
  • View / Update Order - Order Note
  • Modify Orders Artwork
  • Modify Orders Specification
  • Modify Order Specification - Add New Products
  • Modify Customers Details
  • LIst Order - Payment Request
  • LIst Order - Add New Order
  • Order Status Management
  • How to create Your Own Order Status
  • Coupon Creation
  • Multiple Coupon Creation
  • Discount Creation
  • Customer Group wise Discount/Coupon
  • Reward Points
  • What is Archive Order
  • How to add payment request
  • Reward Points Expiry Date
  • Customer Download Press Ready
  • Pay on Account Payment Status

Orders Menus

Order Menus

After clicking on the Order on the Left Page of the menu, admins will find drop-down menu lists of navigation menus related to Orders.

Navigational Menu for Orders

List Orders: This allows admins to check on the active, recent, or canceled orders in your store. Admins can also configure Order Messages and Notes from the List Orders.

Payment Request: This allows admins to create a payment request to the customer for additional features/options that are not included in the initial order or order details that might change the order total amount.

Add New Order: Admins can create new orders for customers on the customer’s behalf without going through the Front Store.

Order Status: Allow admin users to manage all the available orders and order product status.

Coupons/Discounts: Admins can create Coupons/Discounts for website promotions.

Reward Points: Admins can manage and configure the settings for reward points. Admins can also view the Customer’s Reward history for how the rewards points are given.

Unpaid Orders: Coming Soon

Archive Orders: Allow admins to view all completed orders

Staff Management: Allow admins to create a staff that can be assigned to a particular order for record purposes.

List Orders

List Orders

List Order is a menu that will allow affiliates to check, update, and modify the order and job status currently active on your store.


  1. Order Details.
    This area shows you the details of the customer for that order. Such as Name, Email, Company name, store name, and the order description icons.
  2. Payment and Shipping.
    This area shows what kind of payment the customer uses for this order.
  3. Date.
    This area shows the date that the order was received and the due date.
  4. Total Amount.
    This area shows the total $ amount of the order.
  5. Store Commission.
    This area shows the amount of money the store makes as a commission.
  6. Staff Name.
    This area shows the name of the sales agent for that order.
  7. Status.
    This area shows the status of the order. You can also click the “Pencil” to Update the order and Job status.
  8. Action
    This dropdown menu contains actions that can be performed for that order.
  9. Description Icon
    These icons show the order details icons.
  10. Expand Button to show Order’s Job
    This button will expand the Order details and shows the order’s jobs.


You can also check the Job Order by clicking on the Drop-down Arrow on the Order Details as well as view/update the order. Please click “Here” for more information about View/Update Order.


                          1. Job Number
                          2. Product Name
                          3. Job Status
                          4. Job Quantity


You can also update the status of an order or job by clicking the “Pencil” icon located right next to the order or Job status.


There is another piece of information that appears at the bottom of the order details area.
You can see icon meaning by hovering your mouse over the icon or looking at the legends for each icon trait located at the bottom of the Order Page.


On the top right of the page, there will be 5 Action buttons related to the Orders. 


Payment Request = Create a payment request to the customer for additional features/options that are not included in the initial order or order details that might change the order total amount.

Messages & Notes = Create a predefined message related to the Orders. ( Only available for the store product )

Bulk Order Update = Update the status of multiple orders or Jobs using an excel spreadsheet.

Job Board = To open the Job Boards page to check the available order in your store. Please click here to learn more details about Job Boards. 

Order Shipment = Set the tracking, packages, and shipping method for the particular order and update the status.


You can also print the whole List order page or export it into an Excel sheet. You can do this using these 2 buttons (see image below)


The print button will show only the orders on the screen so you can print it out without the other menus on the page. While the Excel sheet button will export the whole order into an Excel file that will be downloaded to you.
Remember, while using the printer and Excel button. It will print and shows all orders that you got.

List Order - Order Filtering Basic

Order Filter ( Basic )

At the top of the page, there will be a sorting menu on how you would like to search for specific orders or orders/job status.


1. Sort the filter by Order Date, Due Date, or Updated Date


2. Textbox that admin user can use to search for specific Order Number or customer name

3. Order Status dropdown, in this area the admin user can sort the order based on the selected order status. Please refer to the Order Status Page for more information.


4. Filter based on-time delivery or time production. For a Delivery time, you can select from today, tomorrow, overdue, and Specific FROM-TO.

For Production time, you can select from Today, Tomorrow, and Overdue. 

(Note: Clicking on Specific FROM-TO will bring down the advanced menu for filtering, and a new menu appears in the Advanced Filtering


Due Date Menu will appear once the Delivery option is set with Specific FROM-TO.


Selecting the Specific FROM-TO will filter the Due Date based on the date set.
There is also a preset time configuration by clicking on the Select button that admins can select.
The due date automatically changes to the preset time configuration by clicking one of the options.

Due Date Selection Menu for Order Filtering

Example of the Due Date with This Month selected


5. You can sort orders based on the Payment Status from Paid, Unpaid, or Overdue


6. The Search Button will initiate the filtering process based on criteria for Menu 1-5

7. The Reset will revert all the selected filter that the admin user choose.

8. Advanced Filtering Menu will show you more sorting detail that you can use.

List Order - Order Filtering Advance

Order Filter ( Advance )

Affiliates can open more menus for the Order Filtering by clicking the Arrow pointing up next to the Reset.


Expandable menu for Advanced Filtering


1. Order Job Status dropdown, in this area the admin user can sort the order based on the selected job status.

2. Select User Type = Affiliates can sort the orders based on Retailer Customers or Corporate Customers. 

By default, the setting for User Type only shows Retailers and Guest Customer, but admins can also put Corporate name so that admin can look for specific Corporate Customers. 

Admins can enter the Corporate name in the textbox to look for specific corporate customers, and The Corporate with its related assigned Departments will appear. In addition, admins can now click on the Search button to search for the specific Customer related to the Corporate Departments.


3. Select Workflow Admin = Affiliates can search orders based on which admins are appointed to the particular order. Please check here for more articles related to Workflow Admin

*Hyperlinked to Admin > Workflow Admin (but no link for Workflow Admin in Training Module)

4. Select Printer = Affiliates can search the order based on which printer has been selected from this dropdown. Please click here for more articles related to Printers

5. Select Sales Admin = Affiliates can search the order from which Sales Admins are assigned to the specific order. Please click here for more articles related to Sales Agent. 

*(Sales Agent supposedly in Business Partners, but no article about Sales Agent in the Training Module)

6. Select Staff Name = Admins can sort which staff has been assigned to the particular orders. Please click here for more articles related to staff

*Cannot find an article related to Staff Management from Order Management Training Module

7. Select Section = *Don’t know what this means/do as trying in the demo shows nothing 

*Should we include this as this is eprint exclusive only?

8. Select Delivery Collect = *Don’t know what this means/do as trying in demo shows nothing

*Should we include this as this is eprint exclusive only?

9. Order Date = Admins can select the orders with a specific due date. This dropdown is similar to the Filtering Date in Production, but this menu will focus on the Order Date instead of the Production/Delivery Date. 

Admins can select the dates FROM – too to narrow the filtering processor can use the menu Select to choose the preset time configuration. For example, admins can choose today, tomorrow, this week and last week, this month and last month, or this year and last year from the Select time preset menu. The due date automatically changes to the preset time configuration by clicking one of the options.


Selecting the date in FROM of the Order Date Filtering


Selecting the date in TO of the Order Date Filtering


Order Date Preset Time Selection


Order Date with This Month Preset Time Selection selected


10. Select Payment = You can sort orders based on the payment method that you select from the dropdown.

(Note: Clicking on the Select Payment will show several options that customers may not use, but when checking the Front Store, the Front Store will have a payment method that is set after creating the admin page, which is ANZ Credit Card for Credit Card Payment and Pay on Account).


Front Store Payment Method that admin sets


Payment Options for Select Payment menu


11. Filter Amount = You can sort orders based on the filtered amount. The filtered amount consists of Greater or Equal To, Less or Equal To, or Equal To, and in the Textbox, Admins can input the number of the required amount to filter the List Orders based on amount.


12. Filter by Traits = You can sort the orders by traits shown at the bottom of the orders details column.


Affiliates can look for more information about icon indication by hovering the mouse over the icon trait or looking at the legends for each icon trait at the bottom of the Order Page.

List Orders Bulk Action

List Orders Bulk Action

Bulk actions are the actions that you can set for multiple orders. Bulk Actions will allow admins to download multiple orders, download multiple invoices of the selected orders, make archive orders, download shipping labels, set the chosen Orders to the watch list, Order Bulk or Order Product Bulk Update.

The Bulk Order Action is located under the Filtering Menu in the List Order, with the Textbox with a caption of Action as a dropdown list.

Step by step on how to use the Bulk Order Action feature.

1. First Select orders that you want to update.

Note: The Yellow Box will select all the available Orders on the page. If there are multiple pages of Orders, please select one page at a time before continuing to the next page.


2. Select “Action” that you want to apply to all selected orders. For example “Download File”


3. Click the “Submit” button to apply the action

Download Shipping Label

How to Download Shipping Label

Shipping Labels are a type of identification label that helps describe and identify the contents of a container or a package. These labels contain crucial information, such as addresses, names, weight, and tracking barcodes.

After the Package Configuration has been created, admins can view the Shipping Labels by going to the 

View/Update Order Page > Order Shipments Tab. 

Then, Click on the Action button > Download Shipping Label.

The Shipping Label is usually printed and attached to the package. 

Steps to download the Shipping Label

Example of downloaded Shipping Labels


Admins can also edit and delete the shipping labels if admins feel that the admin is missing the quantity or entering the wrong number.

(Note: Editing the Package Configuration cannot change the Shipping from Order Level to Product Wise and vice-versa) 


Example of Editing the Package


Order Shipment Package Deletion

List Orders "Order Shipment"

List Orders "Order Shipment"

The “Order Shipment” menu allows affiliates to create shipping labels. There are two ways that affiliates can use the Order Shipment Menu.

1. Affiliates can go to the Order Shipment in the View/Update Order and go to the Order Shipment Tab. Using this method, affiliates don’t have to enter a specified Order Number, and the Order Shipment will focus on the selected Order Number


Accessing Order Shipment via View/Update Order Page


Note that the created Package Configuration from Order Shipment will appear on the left side of the View/Update Order page.


2. Affiliates can click on the Order Shipment button located in the top right corner of the List Order page. With this method, affiliates can look for specific Order Numbers to make an Order Shipment.

(Note: Creating Package Configuration from Order Shipment Page will give more visual space to work with compared to creating a Package Configuration from the View/Order Page, once you have created a Package Configuration from the page above, it also will be recorded on the View/Update Order Page)

How to Create Order Shipment

How to Create Order Shipment

To create Order Shipment, the admin must first choose the Package Configuration. 

In the Package Configuration, affiliates can choose whether the package has the shipment as Order-level or Product-wise. The Order level is configured with all the jobs in the order, while Product-wise, the affiliate can choose which jobs they want to have the shipment.

Package Configuration with Order Level Shipment selected


Here is the step for the Order Level Shipment

1. Select Order Level for the Shipment and put the desired Tracking Number if admin would like to.

2. Create your package weight and dimensions in the Package ( L x W x H)

3. If Affiliates require more than one package, affiliates can click on the Add button to add more. Else, affiliates can skip this step.

4. Click on the Save button when admins are done configuring the package.


Here is the step for Product Wise Shipment

1. Select Product Wise for the Shipment and put the desired Tracking Number if the admin would like to.

2. Select the Products (or Jobs) you would like to add as a Package in the Order Shipment. 

3. Set the Package weight and dimension. If the admin requires more than one package, admins can use the Add button on the right to make more package

4. Click on the Save button when the admin has finished configuring the package.


How to Finalizing Order Shipment

After the Package Configuration has been created, admins can begin to submit the Order Shipment.


Steps of Finalizing Order Shipment


Here are the steps of finalizing the Order Shipment

1. Select which package admin would like to choose

2. Select the Shipping Method

3. Some Shipping Methods have multiple Shipping Types. Admin can select which Shipping Type to use

4. Update the Order Status. (Note: If the Update Order Status is disabled, skip to Step 6)

5. Select the updated Status.

6. Submit the Shipment


Update Order Status from Order Shipment


The Submitted Order Shipment. Notice how the Form is now gone, and the status has been changed.

Ordering Process (IBS product - Customer Upload)

Edit / View the Order (IBS product - Customer Upload)

Step 1. From the home page, navigate to the Orders section > List Orders > List Orders

Step 2. Look for the order with the IBS product. Click Action and select View/Update Order to see the order details.


Step 3. In the View orders tab, you can see the details of the order (customers, shipping & billing, artwork, prices, and order history)


Step 4. For the Customer’s Upload order the default order status will be ‘Order Received’ and the job status will be ‘File Review’ ( you can see the job status under the Update Order Product tab). Before updating the status you will need to download the artwork first by clicking action > download file.


Note:
With an IBS order, you don’t have control of the order status as it’s linked to IBS’s status and will be updated automatically by IBS.

File Review status means that the order is now sitting on your admin side and has not been sent to the IBS yet as you will need to review the artwork that has been uploaded by the customers for its press-ready.


Step 5. Once the file has been reviewed, click the Update Order Product tab, and you will have the option to update the job status. set the status to Proof Approved in order to send the order to IBS. Click the Save button to apply the changes.


Status Info:
Proof Approved – you have checked the artwork and it’s press-ready and you want to send it to IBS for print.
Awaiting Artwork – if your customer’s artwork is not press-ready, you can change put some comments on the comment box and change the status to awaiting artwork.
Cancel Order – if you want to cancel the job

Ordering Process (IBS product - Websites template)

Edit / View the Order (IBS product - Websites template)

This is an automated process as the artwork created online using the online editor will be converted to a press ready artwork. The default status of the order will be under ‘Order Received’ and the job status of  the job will be under ‘Proof Approved’ which will triggers the job straight to IBS without you having to review the file.

Note:
With IBS order you don’t have the control of the both order & job status as it’s linked to IBS’s status and will be updated automatically by IBS.

The process of the order status will be as per below :
Order Received – when the customer placed the order > Order Completed – when IBS dispatched the order

The process of the job status will be as per below :
Proof Approved – when the customer placed the order > Print Production – when IBS received the file and flight checked the job > Job Shipped – when IBS already dispatched the job > Order Completed – when the whole job has been completed.

Ordering Process (IBS product - Graphic Design)

Manage Customers Graphic Design Order

When your customer placed an order via a graphic design request, there will be a step-by-step proofing process that needs to be done before the order sent to the printer.


The key point of graphic design request order is to understand what your customers want, and the best way to understand it is by creating a design brief.

Learn how to create a design brief here >


Once the customer placed the order, it will land on your admin side under the ‘Order Product Status: Awaiting Proof’ – which means the customer is waiting for design proof.


Step 1 – Review your customer design brief

-. Login to your admin side > search for the order > click action > view/edit order > click the ‘Graphic Design Brief’ button under the ‘Order Product Detail’s section – in order to see the customer’s design brief.


Step 2. Asking for more information from the customer

-. if you need more information from your customers in relation to the design brief – simply go to the ‘Update Order Product’ tab and write your questions on the ‘comments’ box > click save once you have completed.


Step 3. Upload your Design Proof:

-. Once you have enough information from your customers about the design, the next step is to work on the design and upload it for your customer’s approval.

-. Go to the admin side > Find the order > Click Action > Modify Order > Click Upload Design Proof Button


-. Upload the PDFs (if you have merged the PDF front and back in 1 PDF, you just need to upload it on the front side and the system will automatically populate the backside)

-. Tick the ‘ask for approval’ button to ask the customer for approval before sending the order to the printer.

Note: if you do not tick the ‘ask for approval’ the order will be sent to the printer automatically (for Admin Products Order)


Note: tick the visual proof to let the customers use the proofing editor online (screenshot below)


Step 4. Review the Customer’s Comments / Feedback & Upload the Final Artwork:

-. In a case the customers rejected the artwork, they will have to put a comment in order for you to be able to fix it before sending it to the printer.

-. Go to the product details page (Admin > Order > Find the Order > Action > View/Edit Order > Click the User Proof Comments)


-. Find out the customer’s comments to understand the changes required.

-. Once the artwork has been revised as per customers’ comments, you need to go back to the modify orders page again to re-upload the proof (see step 3)

-. The order will automatically be sent to the printer when the customers approved the proof.

Process Non-IBS order (Essential Plan)

Process Non-IBS order (Essential Plan)

Step 1. From the home page, navigate to Orders section, then click List Orders.

Step 2. Look for the order and click the Action button in line with the order.

Step 3. Click the following options: Download File, Download Shipping Label, and Print Job Ticket. Once you have these files, you can now send it to a third printer of your choice.  Make sure to update the status of the job and the order after.


Step 4. To change the order and job status, click the View/Update Order option under Action button.  Click Update Order Product tab to change the status of the order, then click Update Order Product tab to change the job status. Please note that once the order status is updated, it will automatically send an email and notify your customer about the status of the order.


Process Non-IBS order - Assign Job (Premium Plan)

Process Non-IBS order - Assign Job (Premium Plan)

Assign Job to Printer is a feature that you can use if you have multiple third-party printers and want to assign specific order or job to a specific printer that you choose.


Please check the step-by-step process of how to assign the order below:

Step 1. From the home page, navigate to the Orders section >> List Orders >> List Orders

Step 2. Look for the order. Click the Action button and select Assign Job to Printer.


printer1


Step 3. Select the Printer from the list. Add a comment and click Save & Back button to apply the changes and go back to the main order page.

Note: These are outsourced or a third-party printer.

Ordering Process (Non-IBS product)

How to Manage Non-Admin Product

Step 1. Login to your Admin side, navigate to Orders section from the left hand side navigation bar > Select List Orders

Note: Non-Admin Product Order will have ‘A’ icon on the Order Details column.


Step 2. Select the order > Click Action > View/Edit Order to process the order.

Step 3. On the View/Edit Orders page, you will see all of the information below:

Orders Date & Extra information:


Located at the very top of the page you can see when the order was placed, the order due date, and the customer name (click it for an action shortcut), right next to it you will also see the extra information (from the customer’s extra field), at the very end is the action button for update the order status, sending invoice and refund process.

Underneath it, we have a selection of tabs (view orders, update order products, order shipments, and order notes – please see below for more explanation).

View Orders Tab:
shows you all the details about the customer order  such as the customer details, shipping & billing, payment details, products & pricing, and also the order history (located on the right side) – see the example below


Important details – on this page you can see the breakdown of the pricing and also the order history when the order was updated. You can also see the type of order (whether it’s an upload artwork order, custom design order, or a quote order).

Update Order Products:
shows you more details of your online jobs under the order – this page allows you to be able to manage the status on job level to have a more accurate status update for your customer, you can also write comments if you want to ask questions or communicating with the customer.


Order Shipment Tab:
shows you all the configurations related to the order shipment where you can generate a shipping label for your order.


Order Notes:
shows you the interface to manage your internal or external notes related to the order.


Step 4. regardless of the type of the order, first you will need to review by downloading the file (downloading the file will also include the job ticket with the order details). Click Action > Download File


Step 5. Updating the Order & Order Product Status.

Click the Save button to apply the changes.

Note: as these is non-IBS products, you will have the responsibility to update both of the order and job status manually from your side in order to update your customers with their order.


By default the order status will always be ‘order received’ and the job status will either be ‘file review’ – (when customers uploaded their own artwork) or ‘proof approved’ – (when customers using the online editor).

Admin will have full control of both order and job status or the non-IBS products order.

Tips: update the job status first before the order status as order status representing the whole order status. i.e. change the order status to complete once all jobs are completed under the order.

Introduction to Your Order Management System (Order and Job Status)

Introduction to Your Order Management System (Order & Job Status)

Introduction to Your Order Management System (Order & Job Status).

There are 2 ways affiliates can view or update orders.
1. By clicking the Order Number from the List Order Page

2. By clicking Action > View/Update Order.


You can View / Update the order’s status and details on this page.


At the top, you can see the order number (A), the date the order was received, and the current status (B) the Production due date (C), Order due date (D), Customer Details (E), Update Order Button (F)


The Edit and Print ordering system come with default statuses, however, you can add your own order status & job statuses for your products. An email is sent to your customer every time you update the status of the order.
Please click “Here” to find the article “How to Create a New Order and Order Product Status”.

  1. Status (Default Statuses)
    You can change the status of the order from the drop-down menu. Default statuses available– Awaiting Artwork Approval
    – Pending
    – File Review
    – Awaiting Artwork
    – Artwork Approved
    – Order Received
    – In Print Production
    – Finishing Job
    – Cancel Order
    – Order Complete
    – Ready to pickup
    Store Admin Status (Customize/ Create the status text relevant to your business)
  2. Due Date
    You can update the order due date
  3. PO number
    You can add or change the PO number for the order.
  4. Shipping Method (Weight based)
    The shipping method used for this order
  5. Shipping Company Name
    You can input the shipping company name here.
  6. Tracking Number
    You can also input the shipping tracking number
  7. Select Staff Name
    logs the person who is updating/changing the information for this order.
  8. Select Section
    You can categorize the order by type. The choices are :
    – Small Format
    – Traditional
    -Offset
    -Design
    -Sales Order
    -Solvent

This aids the reporting functionality and analytics.

  1. Select Delivery Collect
    Select pickup or delivery options, If the product is set on collect. Choices are:
    -Local
    – City
    -Courier
    -Collect PWR
    -Post

NOTE: This is for record-keeping purposes only and does not produce shipping docs.

10. Comments
Any information relevant to the order can be communicated to the admin, the customer, or both – an email will be sent if the notification box is ticked

 11. Upload files on this page the upload button will work as an area for the admin user to communicate with the customer related to the artwork.
For example:
The admin user can upload a screenshot of the marked artwork so the customer can fix it from their side.
All the files that the admin user uploaded will be recorded in the order history area ( Included comment that admin user input ).


View Order

On the View Order Tab, you can see Customer Details (F), Shipping address (G), Billing address (H), Payment and shipping info (I), and Action Button (J)

(J) The Action drop-down menu allows you to:

    • Assign Job to Printer
    • Modify the Order – including changing the customer’s artwork and the order specifications after the order has been made.
    • Download Invoice
    • Download File – to download customer’s artwork & job ticket
    • Download Job Ticket
    • Archive – manually move the order to the archive.


By scrolling down you can see Order Product Details (K), Order History (L)


Order Product Details.

You can see the Order’s Thumbnail Image, Product specifications, Quantity, and the total price for the order.

Remember an order can consist of multiple jobs. For example, the order number in the diagram (Order# 111534) has 2 jobs (see Order Product Details).


(M) Order History

Order history gives you the history of any changes for the order (see Update Order Button). You can see Comments, Staff name, Section, Delivery Collect, and Time Difference between your newest update to the last one.

(N) Each update or change is marked with a timestamp and the current order status at the time. The icon on the right-hand side indicates whether the Printer and the Customer have been notified of the changes or the update. (Black means ‘NO’ and Green means ‘YES’)


Update Order Product tab (O)


Inside this tab you can see the job for this order, and also the details of each job, Within each job you can view the following:

  • Product Image
    Thumbnail of the job
  • Products
    Products specifications
  • Status
    displays your current job status and also the next possible status (for IBS it will automatically update when you sent it to IBS, but for non-IBS, you will need to manually update.).
  • Comment
    record any changes to a specific job within an order, choose whether to advise admin only or both admin and customer – with the notification button.
    Note:
    The upload file on this area is not for the order artwork file, it is used to upload relevant files for comment/note purposes.

Email example


Order Shipment (P)


In this tab, you can check/add the details regarding the Order Shipment, create a Package with different sizes and different shipping methods, and change the Order Status. 

Please click here to read more information regarding the Order Shipment 

View / Update Order - Order Note

Order Note

Order Notes is a feature that you can use for internal comments to communicate with other admin users or give the details such (Prepress, Shipping, Graphics, Invoice) note to the customer from email notification, and you can use this note as a record.

Note:
Order Notes tab is only available for the store product only.

Please find the step-by-step below on “How to add Order Note”:

  • Login into your admin side
  • Select the product that you want to work on
  • Click Action > View / Update Order
  • In the center of the page, you will find the “Order Note” tab
  • To add the note you must select the type of note that you want to add


(Note: All Other Types of Order Notes besides Generic can only be used once. If admins would like to use the same type of Order Notes, admins have to delete the Order Notes related to the desired Type before an admin can use the specific Order Notes Type)

(Notes: Sometimes, the Save & Back button will move to the Order Notes if the admin scrolls up, but both behave the same)

Modify Orders Artwork

How to modify customers artwork online

Sometimes you’re facing an incorrect artwork that was uploaded by your customer. Please follow the step-by-step process below on how to modify your customer’s incorrect artwork to the correct one before you are sending it to the printer.

Step 1. From the home page, navigate to the Orders section >> List Orders >> List Orders.

Step 2. Look for the order you wish to update. Click the Action button and select View/Update Order.


modifyorder1


Step 3. Scroll down to Order Product Details. Click Action and select Modify Order.


Step 4. Click Upload Design Proof in order to upload the correct artwork


Step 5. Once you have clicked the ‘Upload Design Proof’ you will see the pop-up window (below)


Step 6. Click ‘Upload Design’ button on the front side (if you have multiple pages, you don’t need to worry to separate the artwork as the system will automatically separate the front and back).


Step 7. After the artwork has been fully uploaded (you will see the thumbnail of the artwork), you will have an option to ‘ask for approval’ for the customer to approve the artwork first before it is sent to the printer. You also have an option to put a comment on the order to update the customers and an option on whether to notify the customers or not.

Note: if you tick the ‘ask for approval’ it will automatically make the job status to ‘awaiting proof’ for customers to approve the order first by logging in to their account.


Step 8. Click Save to continue with the changes.

Step 9. Back to the order details to review the changes (the status of the jobs and also you can see the new artwork thumbnail has been updated to the new artwork you’ve uploaded)

Modify Orders Specification

Modify Orders Specification

Step 1. From the home page, navigate to Orders section >> List Orders >> List Orders.

Step 2. Look for the order you wish to update. Click Action button and select View/Update Order.


modifyorder1


Step 3. Scroll down to Order Product Details. Click Action and select Modify Order.

modifyorder2


Step 4. In the Products column, you can enter additional option and it’s price. You can also change the quantity and the main price. Once you’re done, scroll down and enter your comments on the Comments field. And finally click Save & Back button to apply the changes and to go back to the main order page.

modifyorder5


modifyorder6


Note: This option is only available for Pay On account, and for non-IBS products.

Modify Order Specification - Add New Products

Modify Order Specification- Add New Products

There is some scenario where customers want to add other products to their order.
In this article, we would like to let you know that you can do that by following the step-by-step process below.

Before you try to modify the order. Please make sure the order still hasn’t been processed or is still at the status “Order Received”.
You can modify the Order if the job is not processed, like adding new products (existing or Custom products). 

(Note: Existing Product consists of both IBS and Store Products, while the admin can create a new Custom Product similar to the Quote Order).


Adding New Order Product – Existing Product


If Existing Product is selected, Affiliates must choose the product and the size. After selecting the product and size, The system will show a new window of additional options available for the product. After you are happy with the choices, you can click on the Apply All for the popup window and click on the OK button on the next Prompt window.


Prompt Up Window after creating New Order Product – Existing Product


Prompt Menu before adding a new Product to the Order for Existing Products


Custom Products have a similar layout as Existing Products with the difference that in the Custom Product, admins can upload and increase the page for the Artwork Files.


Adding New Product using Custom Product


Prompt Menu before adding a new Product to the Order for Custom Products


After choosing the sizes, affiliates can add the required artwork and click on the Save & Continue button at the bottom of the page. 


Using Custom Products, the options now appear as one big text box instead of a standard product that is divided the options into separate text boxes.

If affiliates add the wrong products, affiliates can delete the job by clicking on the Bin icon located in the top right corner in the Products column, then click on the Save button as confirmation.


(Note: Admins can revert the change if the admin accidentally clicks the Bin Icon by clicking the revert icon. Once you click the bin icon, it will make the color for the job red, indicating that the job will be deleted if saved)


Deleting and Reverting Job

Modify Customers Details

Modify Customers Details

How to Manage Customer Address from the Admin side.

Please find the step-by-step how to manage the customer shipping and billing address below:

> Login as Admin

> Navigate to Customer > Website Customer

> Select the customer the admin would like to change the address > the Action > Manage Address 

If customers have multiple Addresses, it will show up here.


(Note: This will include the shipping and billing address)

(Note 2: Admin can delete the addresses not used by the customer for their shipping and billing address. The Delete button will be available besides the address list)

Unused address that is not used for Shipping and Billing Address.


> Select the address the admin would like to change 

> Click the Edit button

The Add Address on the right side of the page will change to the Edit Address and have the data for the address filled.


> When the admin is happy with the change, the admin can click on the Save button to store the new data.


Customer Side:

Customers can also change their address on their own. Here is how the customer can change their address

> Login as a Customer

> In the Customer’s My Account Page, select Shipping Address

> Customers can choose which address they would like to change by clicking on the Edit button


> The information will be displayed on the right side of the page, such as First Name, Last Name, etc2

(Note: By default, the right side of the page is written as Add New Address, but when the customer clicks on the Edit Page, the right side of the page will turn to Edit Address, where the customer can change the desired field)

> After the customer has finished changing the required data, the Customer can complete the change by clicking on the Submit Button located at the bottom of the Edit Address section.


LIst Order - Payment Request

Payment Request

Payment Request is the feature that affiliates use if the customer adds extra options for the jobs or inputs an incorrect quantity. With this feature, affiliates can ask for additional payment that needs to be paid to customers, and the customers can pay them online by going to their order page.

To make a payment request, Affiliates must enter the Order Number that needs to have additional costs, followed by the Amount required for the payment request, and Remarks to notify customers what the extra payment. Affiliates then can use the Save button to send an email notification to the customer that the extra payment is needed to continue with the job.

(Note: The Order number entered for the Payment Request must appear on the List Order Page. If the Order number didn’t appear in the List Order, the admin user could not use Payment Request)

Once the Order Number appears, affiliates can enter the order number available, and the system can show more detailed information about the order.

(Note: The amount entered must already include GST)


Interface for the Payment Request


Example of Email Notification of Payment Request


Customers can also get redirected straight away to the Direct Payment Page by clicking the link from the email. If the customer hasn’t logged in, the customer is prompted to log in before going to the Direct Payment page.


Email Redirection to Direct Payment Page (with Customer have logged in)


Once the payment request has been created, The customer can see the payment in the Front Store and go to the Payment Request.


Payment Menu for Payment Request from Customer’s Front End


If the Customer decides to pay for the Payment Request, customers can process the payment by clicking the “Pay Now” button.
In the Payment details, the customer can put the payment descriptions and pay with Credit Card or Pay-on Account if available, and customers can click on “Click Here to Pay” button to process the Payment.


Payment Menu for Payment Request – Pay Now


On the admin side payment request page.

Admin users can find four tabs. Please find the details below

Raised Request = All Payment Requests initially will enter the Raised Request tab. In this tab, the store admin can see all the active payment request details and change the status by clicking the action button.

Completed Request = The Payment Request that has been completed will move to the Completed Request Tab

Canceled Request = The Payment Request that has been canceled will move to the Canceled Request Tab

Standalone Request = Standalone Request are Payment Request that has disturbance due to external factors, such as bad connections or network during the request resulting to stuck in Payment Gateway and are not marked as complete or fail.


Payment Request Table


(Note: If the customer rejects the request, the customer must fill in the confirmation text why the customer rejects the Payment Request and the Payment Request goes to the Cancelled Request)


The flow of Reject Payment regarding Payment Request


In Raised Request Tab, there will be an action to determine where the Payment Request process is going and whether the affiliate needs to change the amount or mark it as complete or canceled. 


Action Menu for Payment Request


The Action Buttons consist of the following functions:

Mark as Cancel = Move the Payment Request from Raised Request to Cancelled Request

Modify Request = Changing the amount for the payment request or changing the Remarks

(Note: If the Customer has a Pay-on Account, there will be Auto Credit Payon that can deduct the Pay-On Account to pay for the Payment Request)

Mark as Paid = Move the Payment Request from Raised Request to Completed Request

Send Reminder = Affiliate can send a reminder to the Customer to pay for the Payment Request.

Delete = Delete the Payment Request

LIst Order - Add New Order

List Order - Add New Order (Offline Ordering)

Add New Order is a feature that allows admins to create an order on the customer’s behalf without login into the customer side. The admin can use the Add New Order to create the order, get the order processed, and ask for the payment using the Payment Request. This feature will be beneficial as this will allow the admin to help and assist customers with their first order or if the customer needs extra assistance to order the custom product. 

(Note: The Payment always happened on the Front Store of the Customer’s login even though the admin can create the order from the admin side)


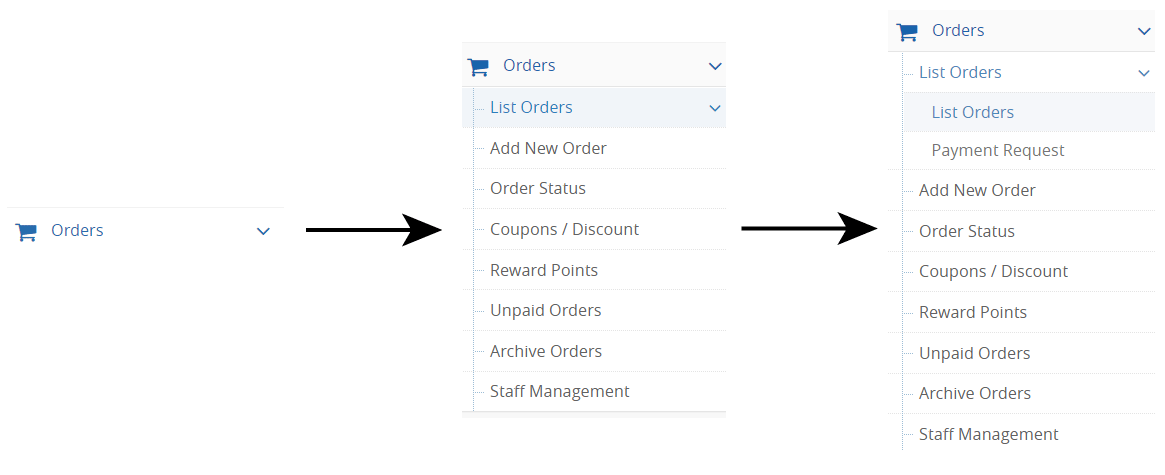
How to Create New Order from the admin side

> Login into the admin side

> Select Order List >> Add New order


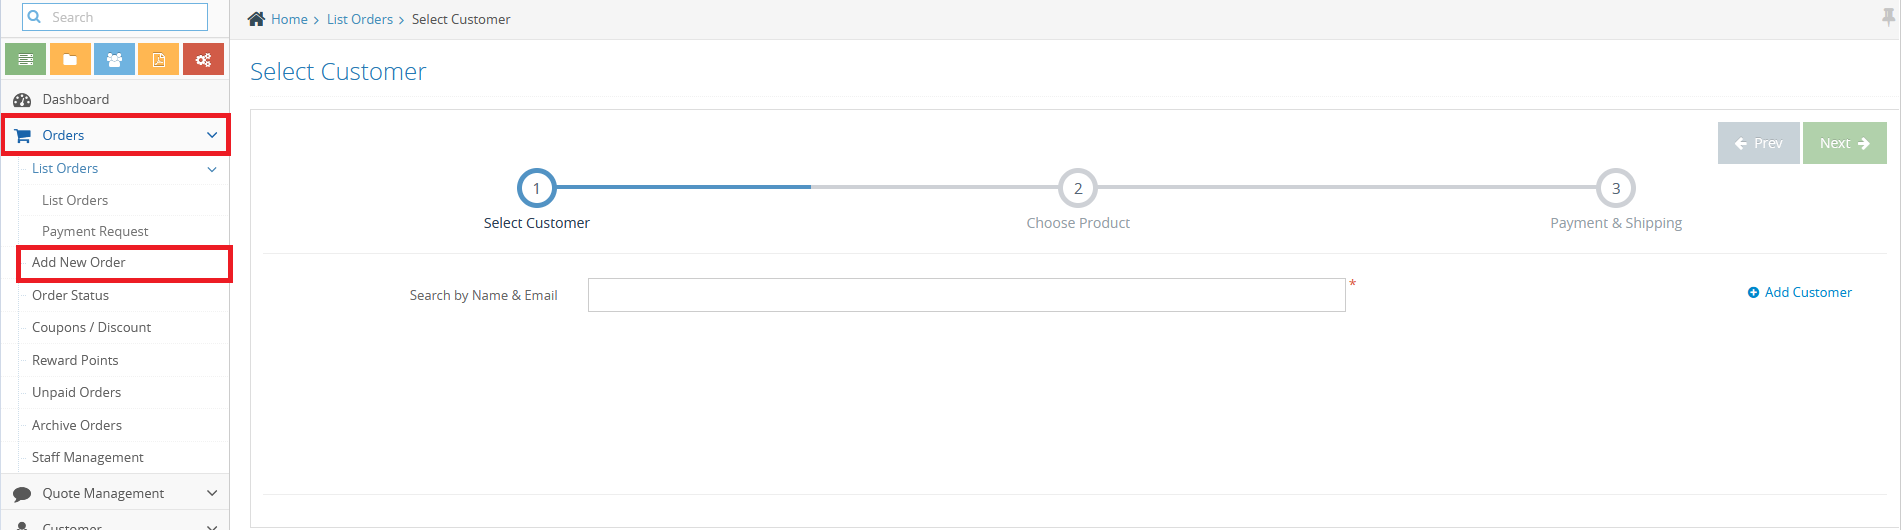
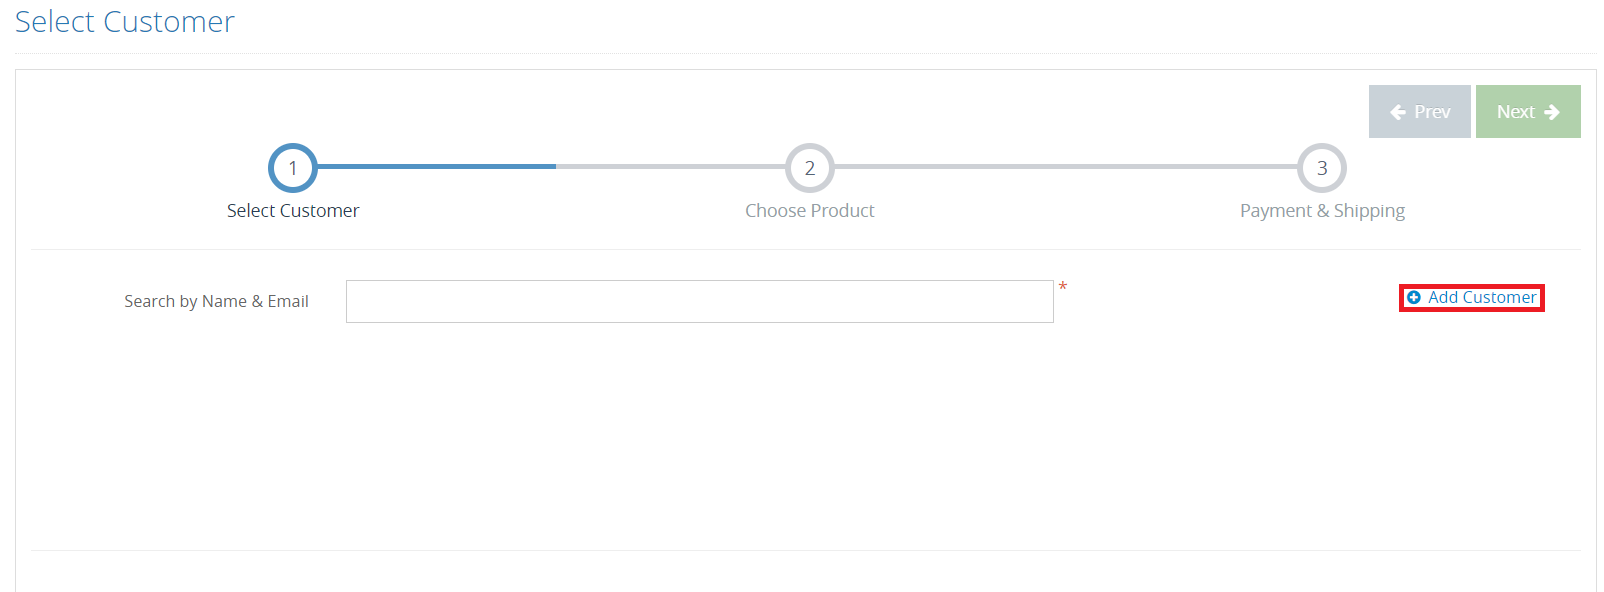
> Search the customer by inputting the customer’s name or email address.

(Note: If the customer hasn’t been registered, admins can click on the “Add Customer” link on the right side of the screen.)


The Admin can create a new Customer account.


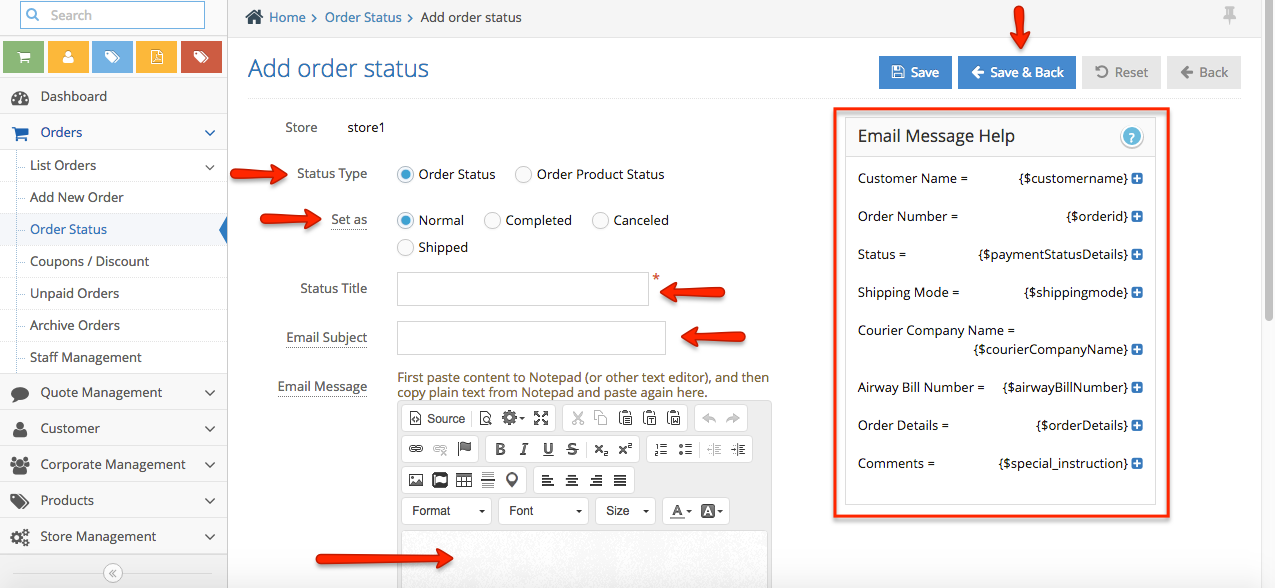
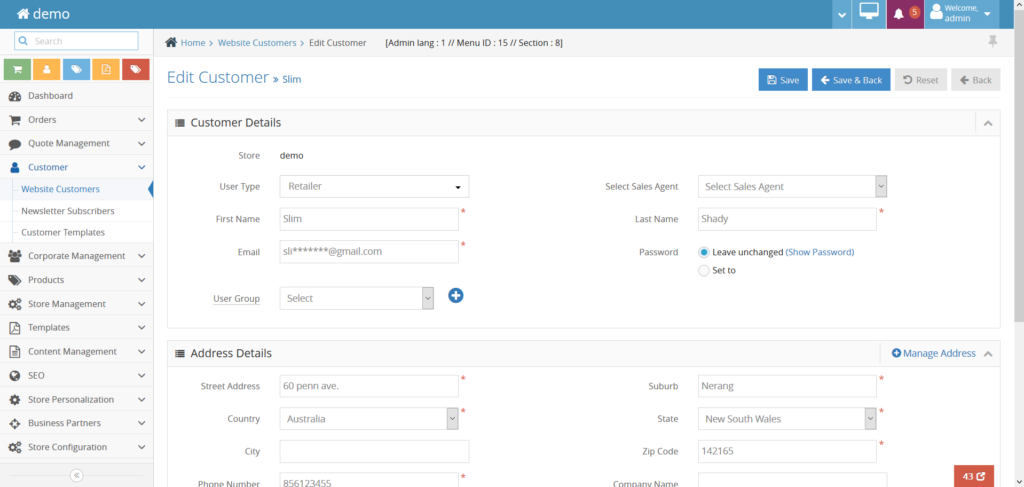
> After the admin has clicked the Add New Customer, the following pop-up window appears, and the admin can fill in the customer details. The fields required include: 

– Customer Details = User Type (Retailer or Corporate Customer), First Name, Last Name, Email, and Password

– Address Details = Street Address, State, ZIP code. Phone Number

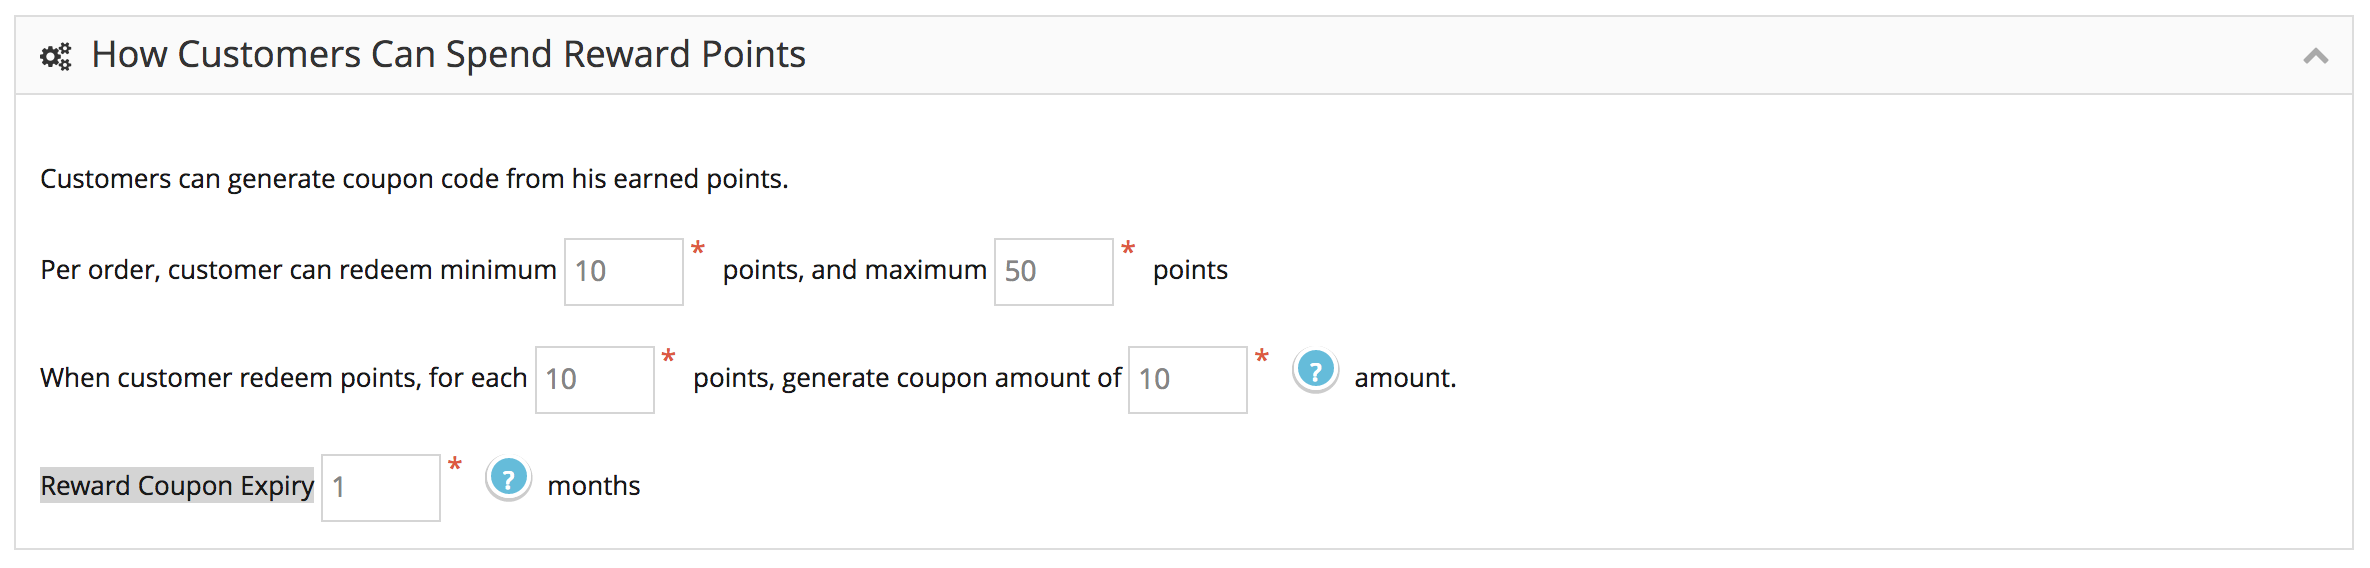
– Customer Settings = Pay On Account – need more details

(Note: Please make sure the field with the red marked is filled as the field required to continue)


Create a Customer window – Customer Details


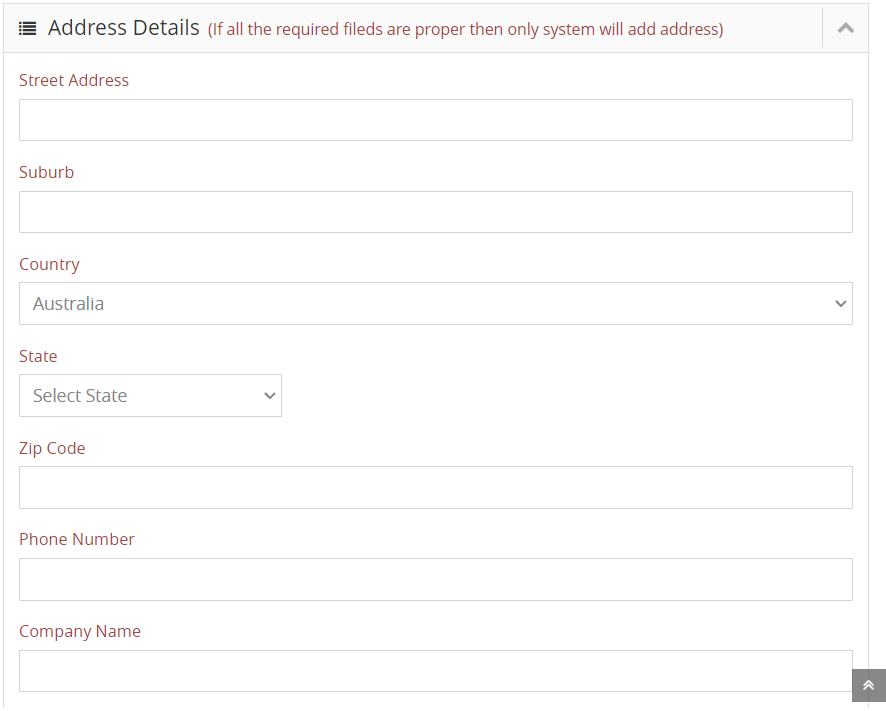
Create A Customer Window – Address Detail


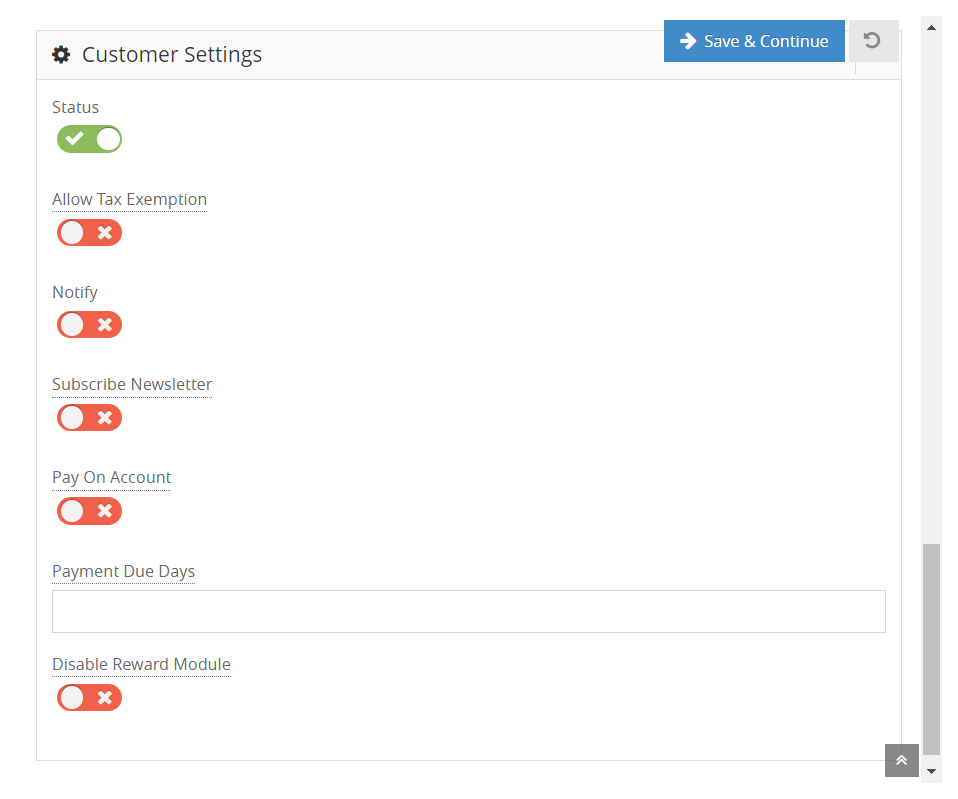
Create A Customer Window – Customer Settings


Once the customer details have been filled, Admin can click on Save & Continue to start making the order.


> If the Customer is already registered, the customer detail will be listed as shown below.
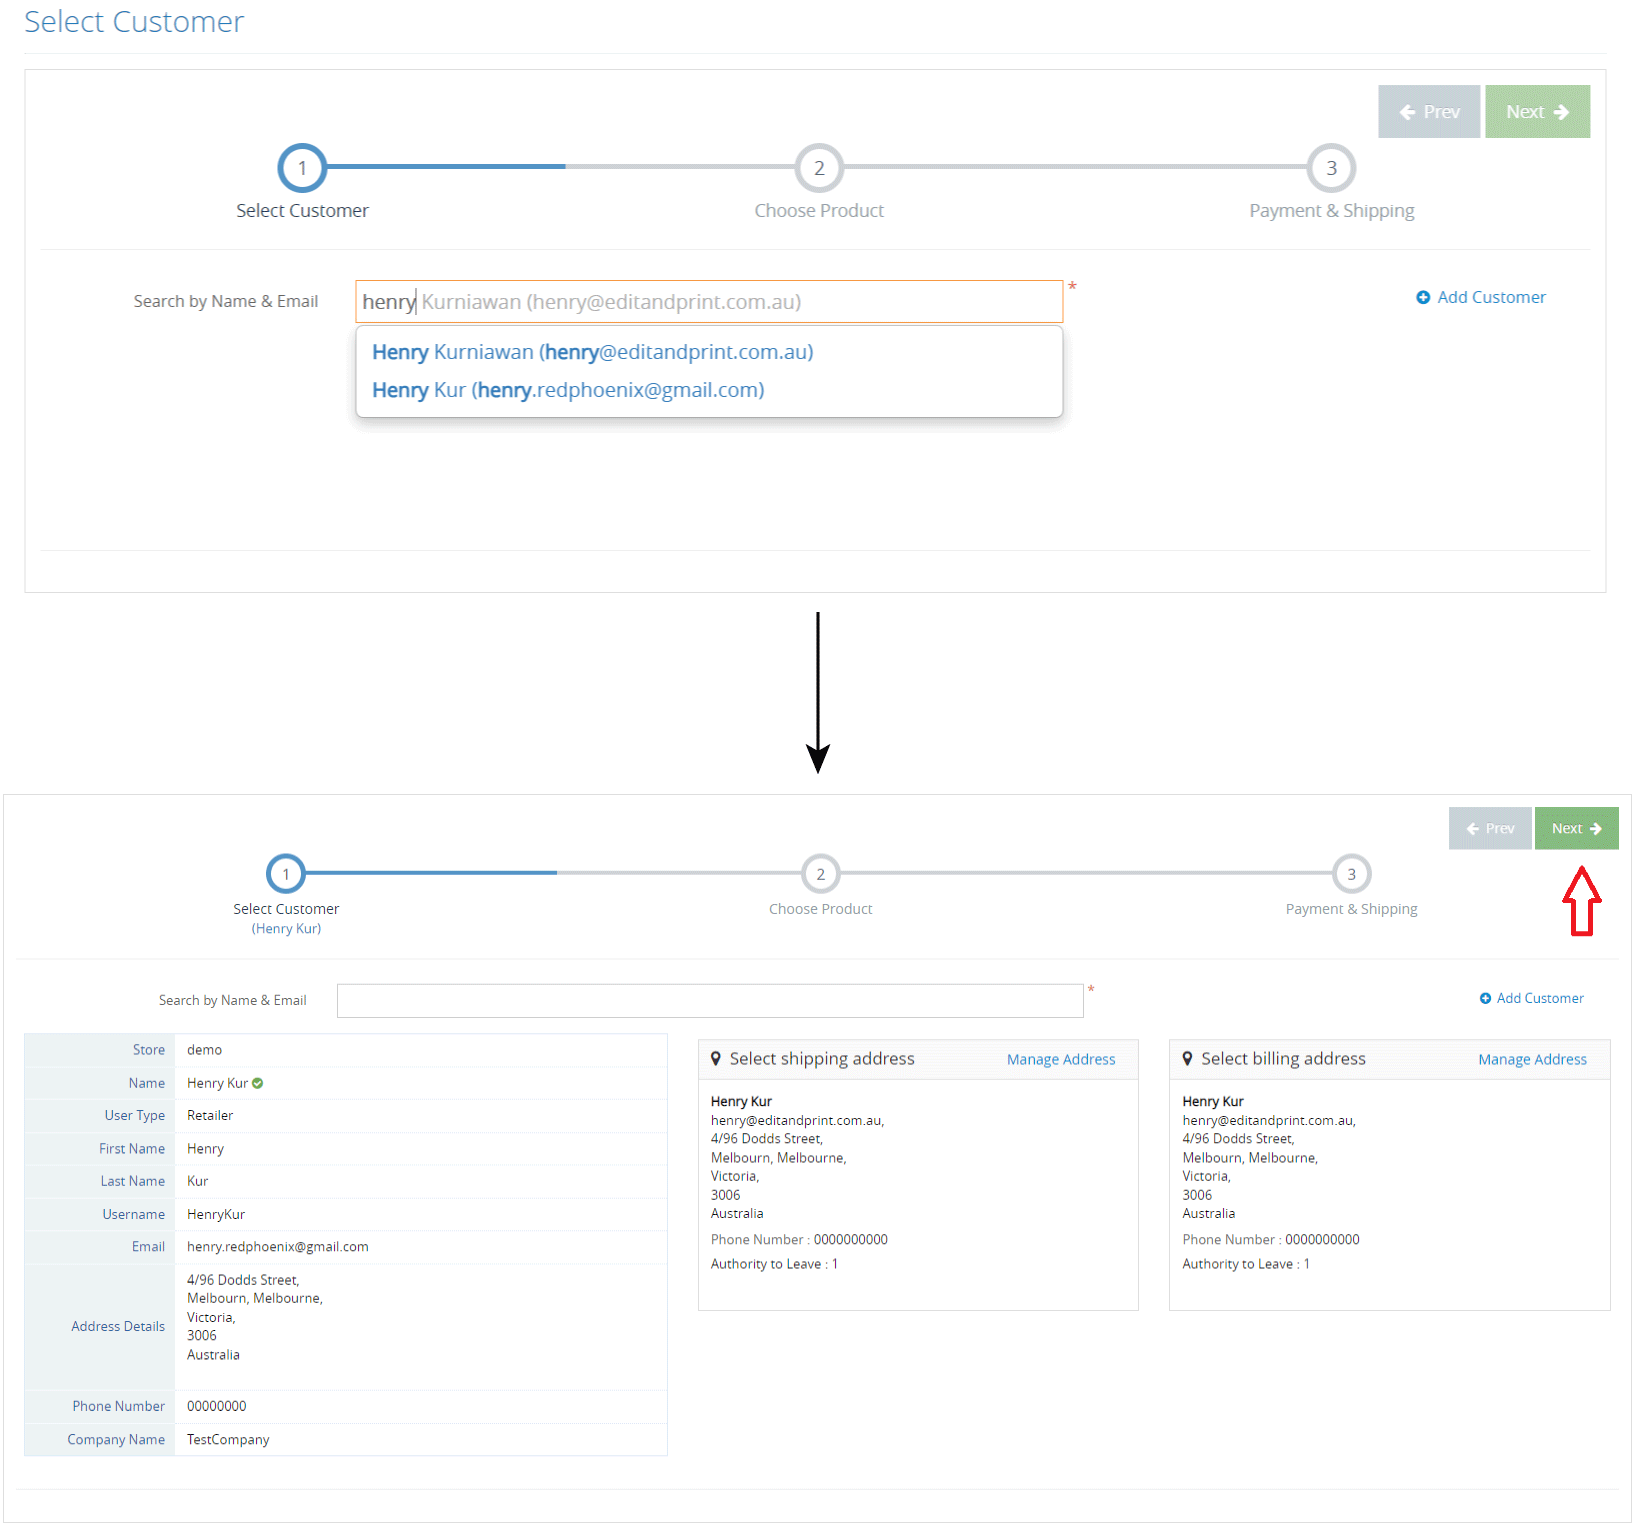
 

Registered Customer


> Click Next to Process the next page (Product Selection).

> On the product selection page, the admin user can select the product the customer wants to order (Existing Product or Custom Product).


Example for Existing Product


> Fill in or choose the product details that the customer wants to order.

Note: Some details will be generated once the admin user “Apply All” for the existing product.


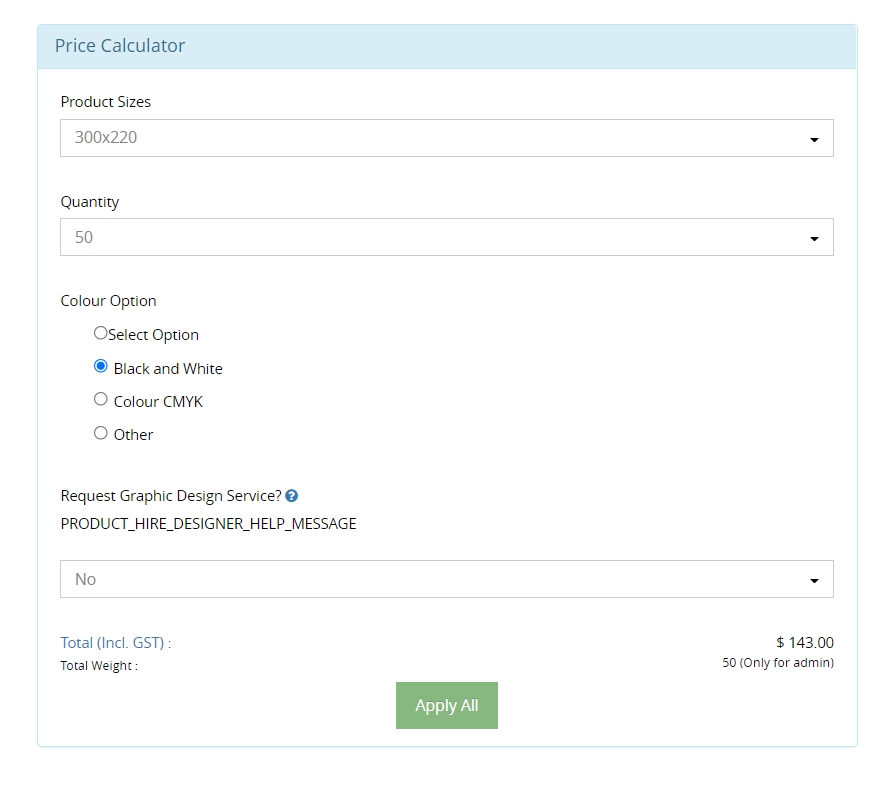
Example of the Existing Product (Pop Up page).

Here the admin can choose the size, quantity, and the options provided


> After choosing the product and filling in the details, admins can “Save and add another product or Save and Continue.”

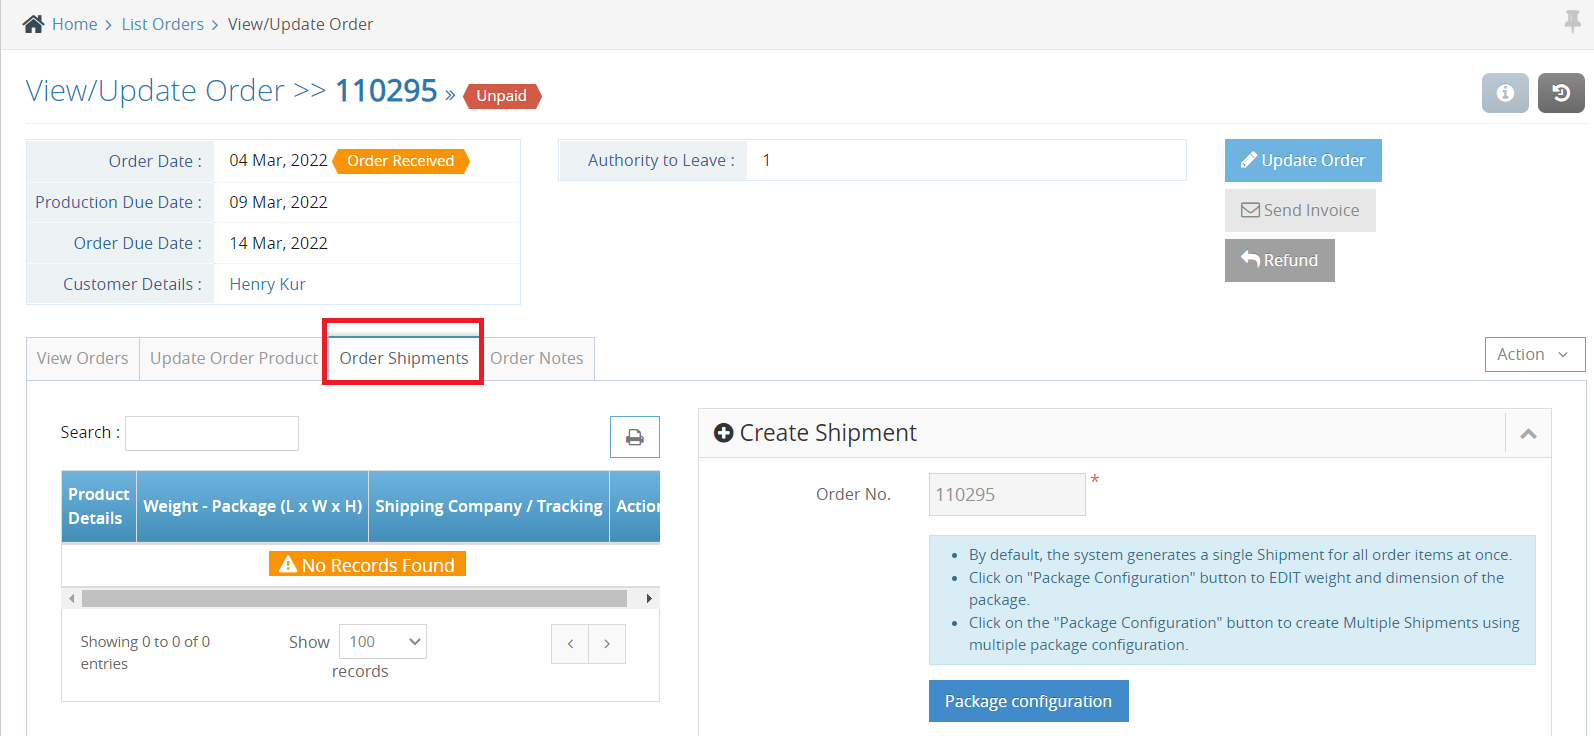
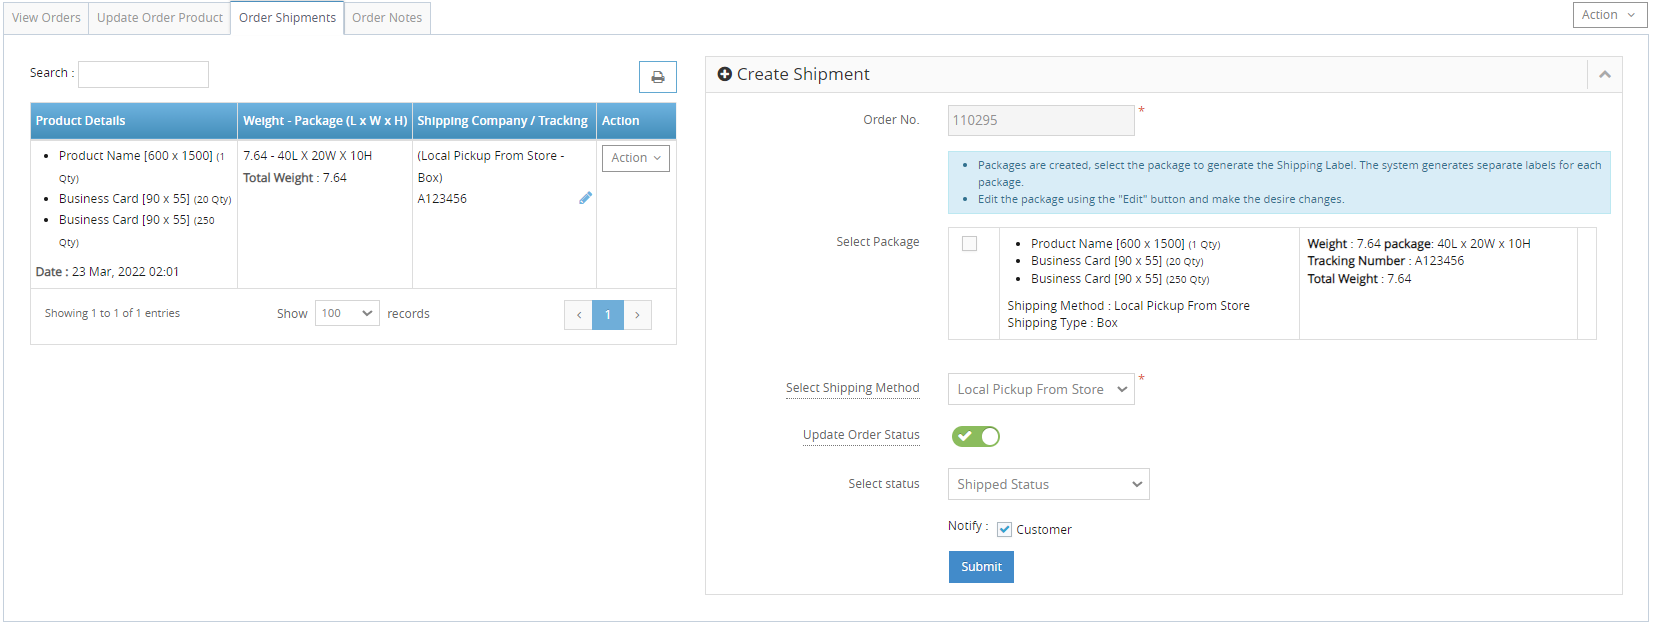
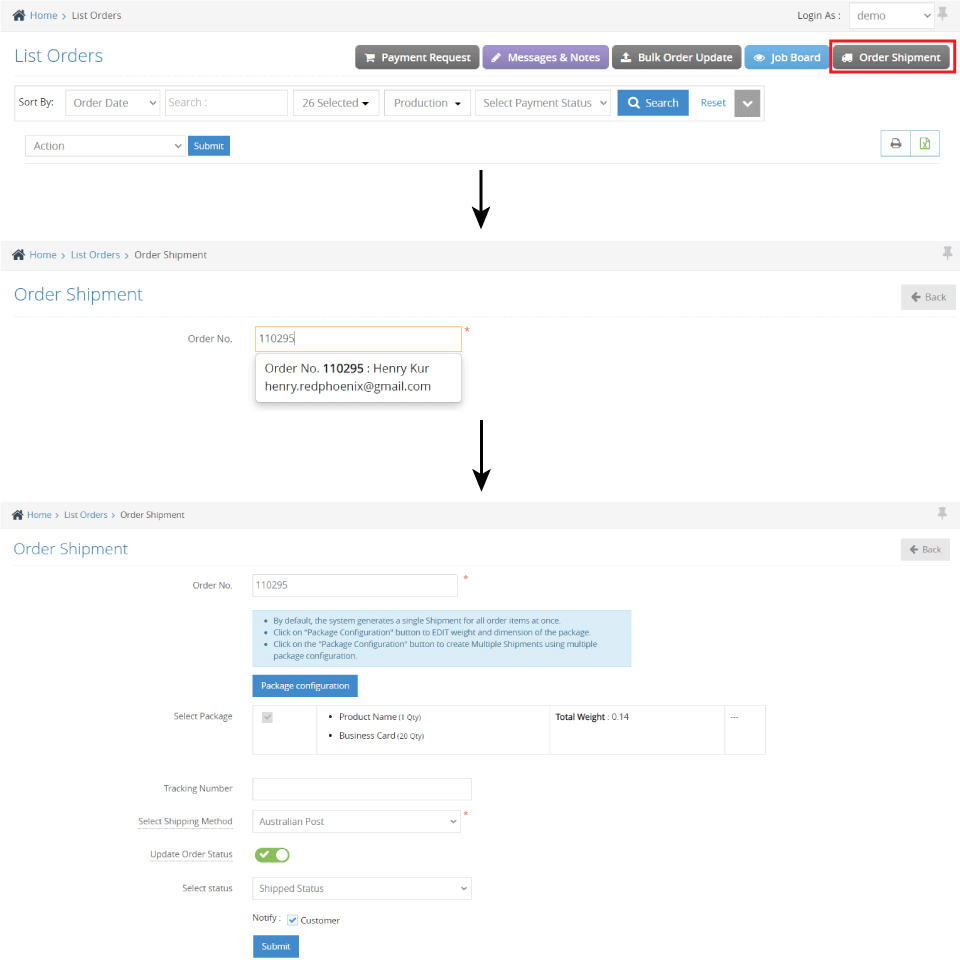
After the admin has finished making the order, the admin can go to Payment & Shipping to finalize the order.


Payment & Shipping


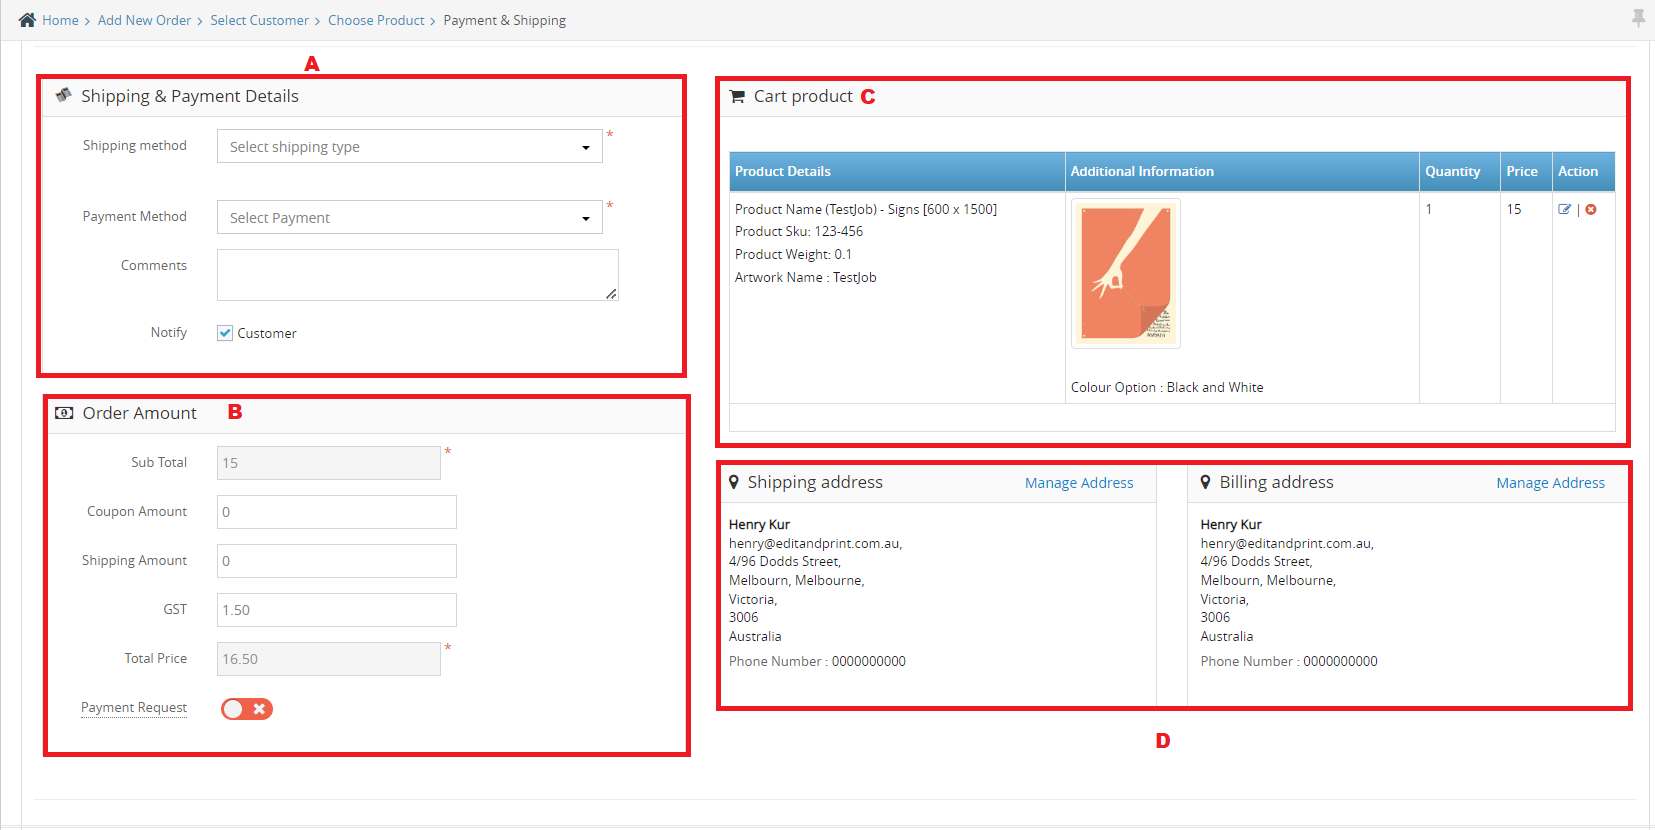
Payment & Shipping Page


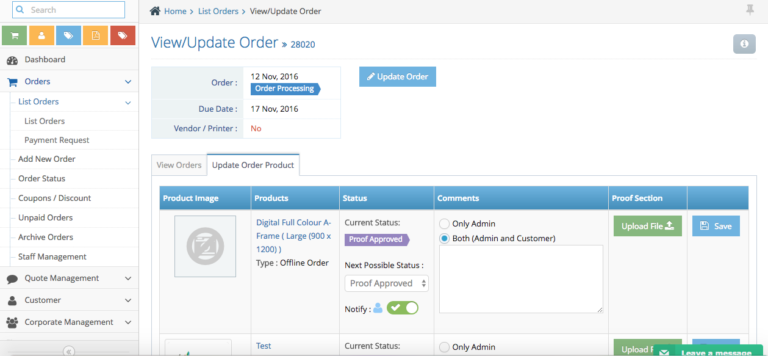
A. Shipping & Payment Details: In here, the admin can select which shipping type the customer want, the customer payment, customer comments, and also the option to notify the customer by clicking the checkbox


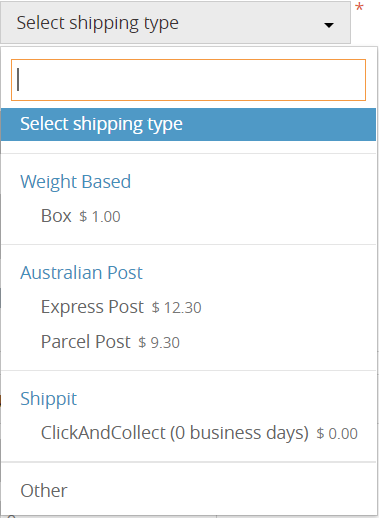
Choices of Shipping for Add New Order


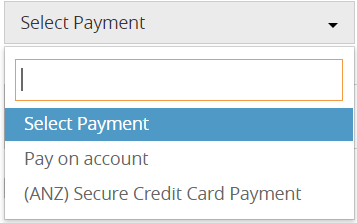
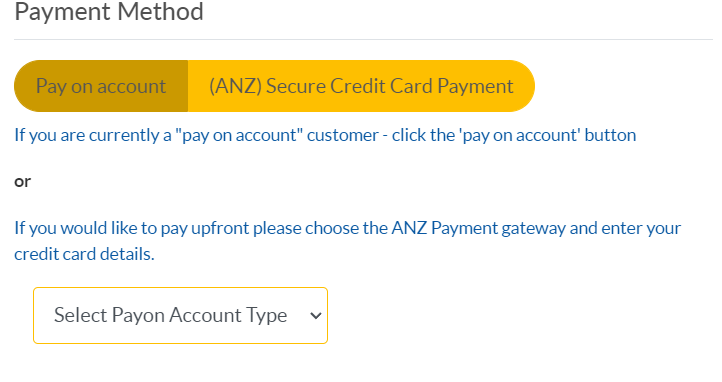
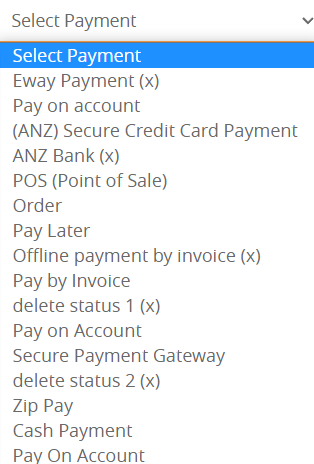
Options of Select Payment for Add New Order


B. Order Amount: The admin can check the amount for the product that includes Subtotal, Coupon Amount (If the customer would like to use the Coupon), Shipping Amount (This will be determined by choice the customer want), the amount of GST, as well the total price.

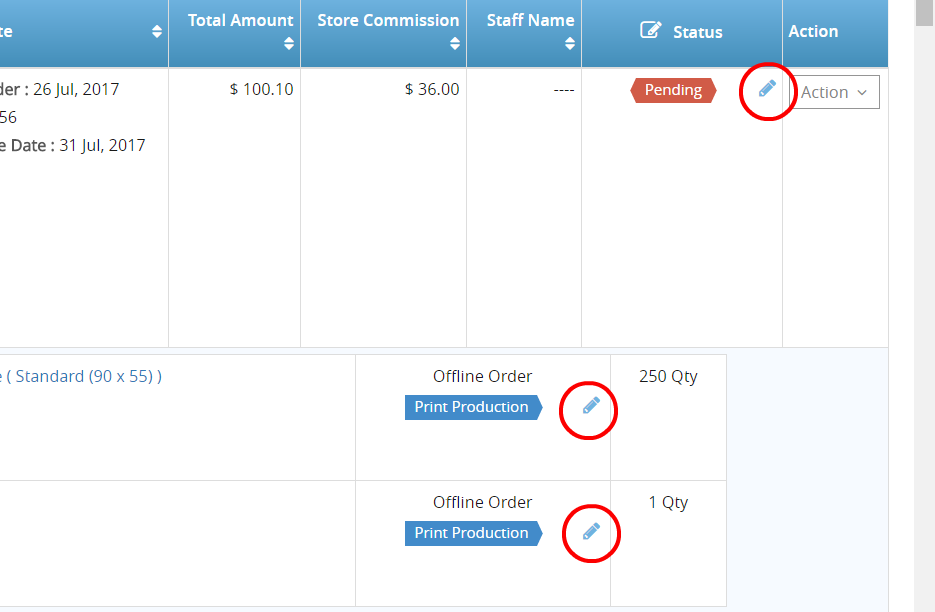
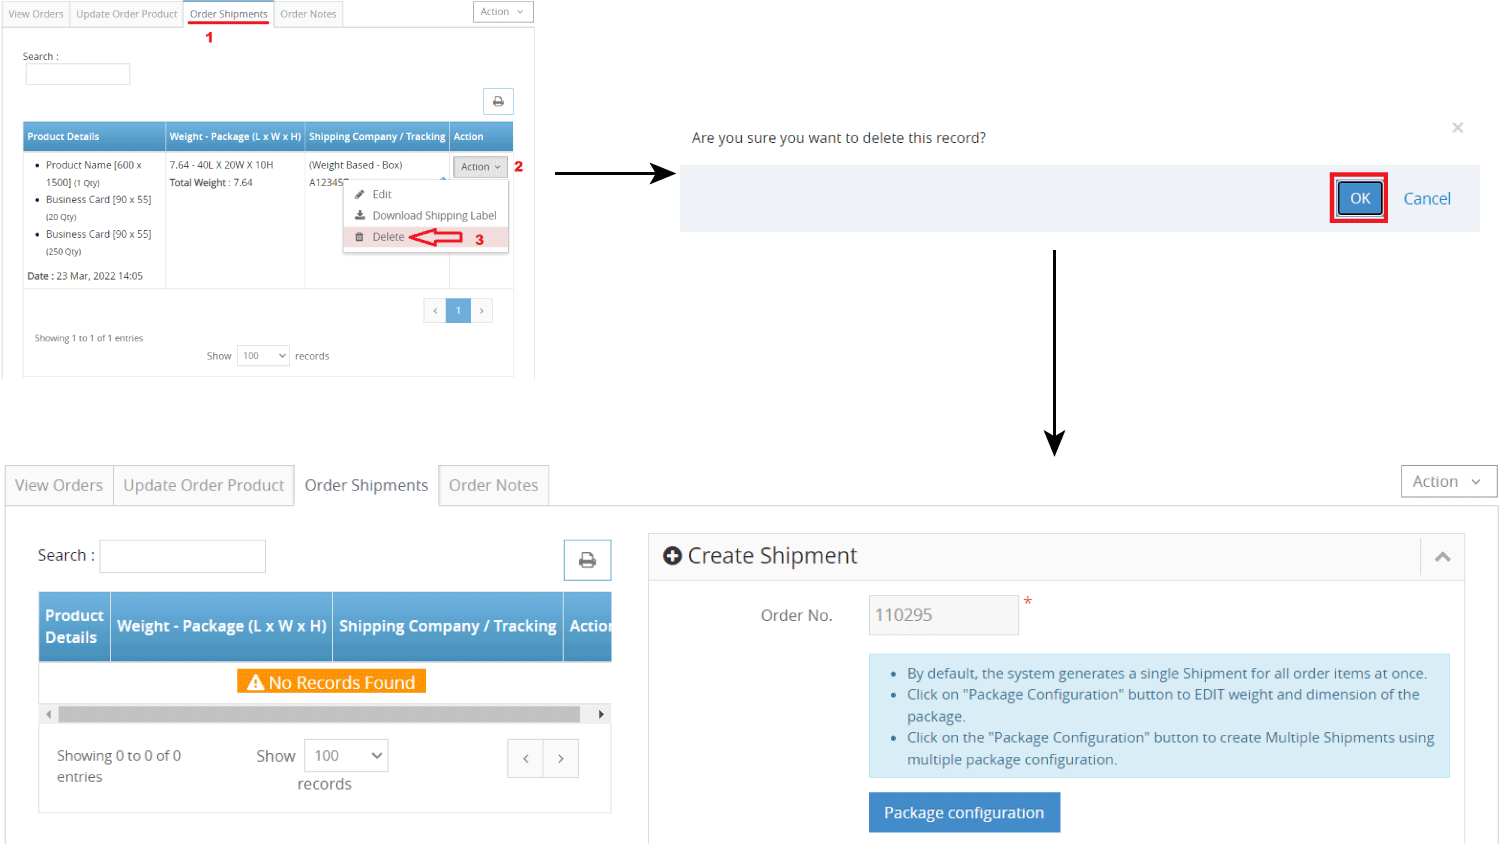
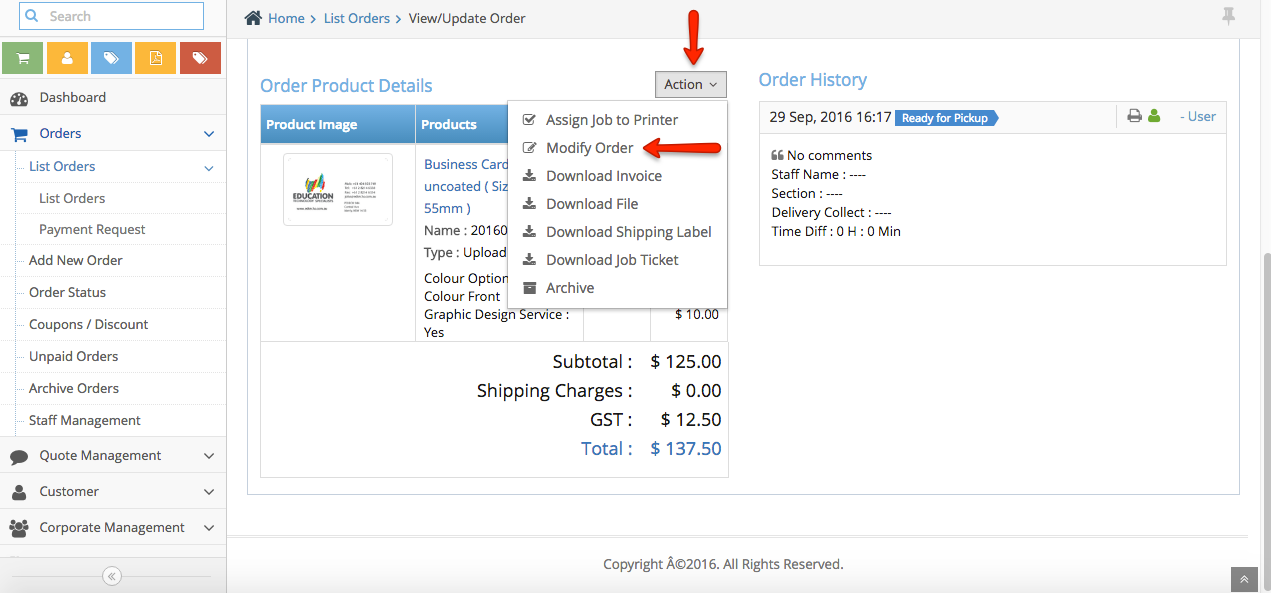
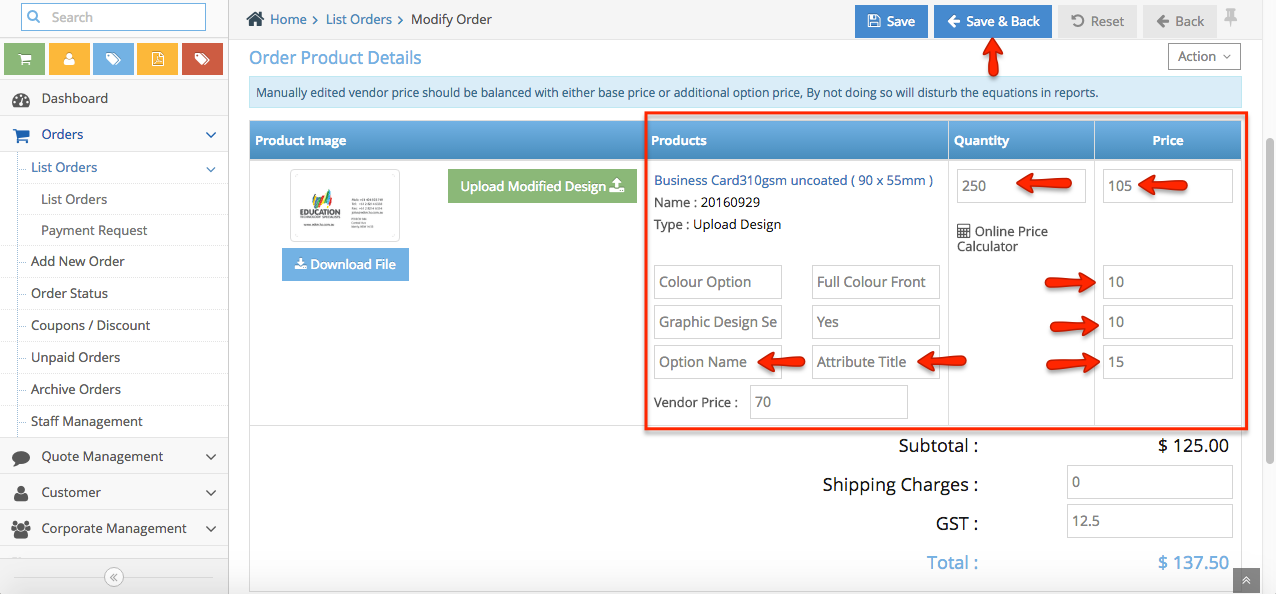
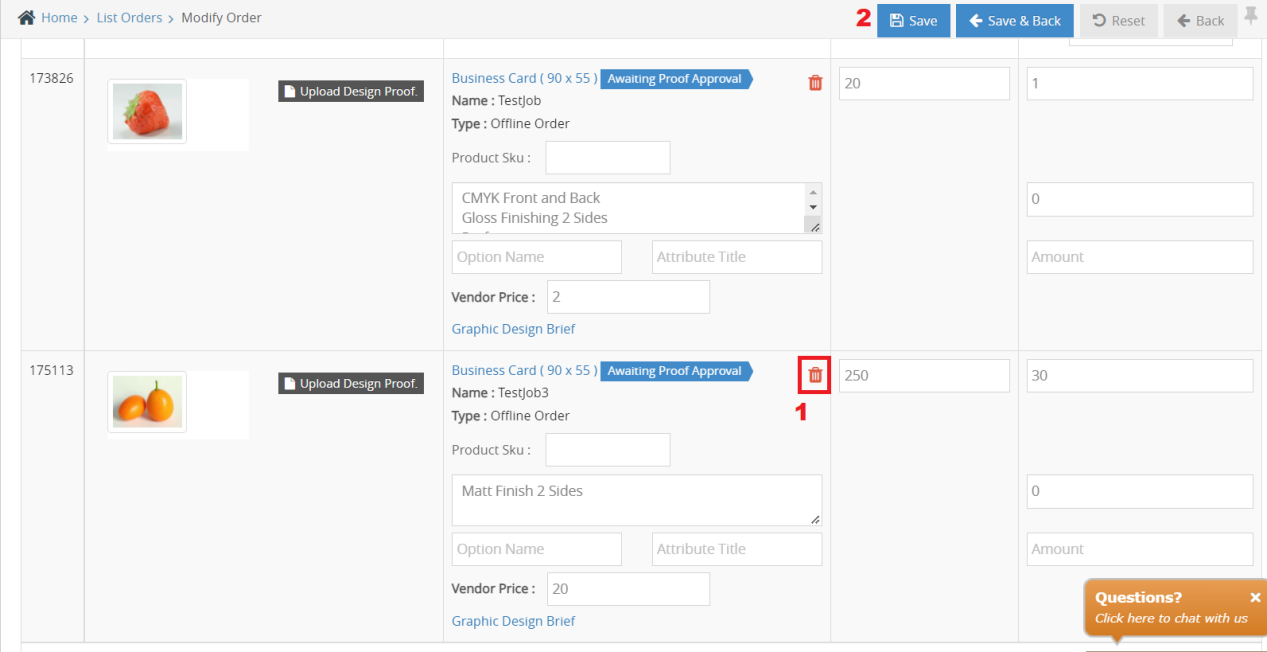
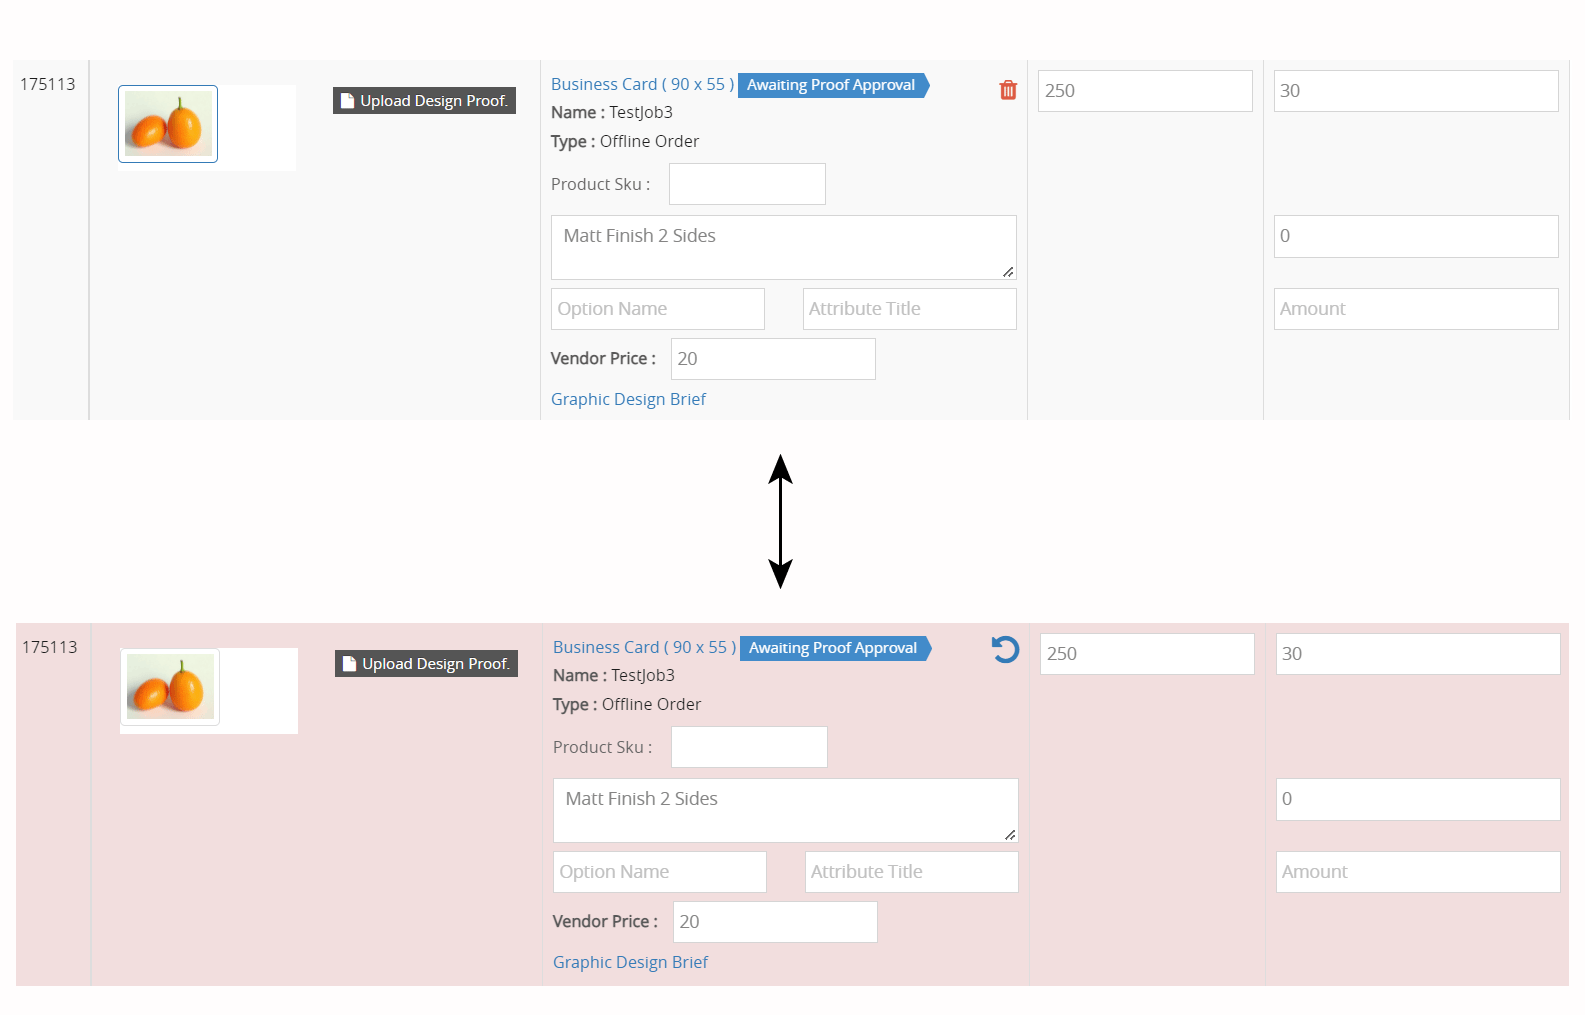
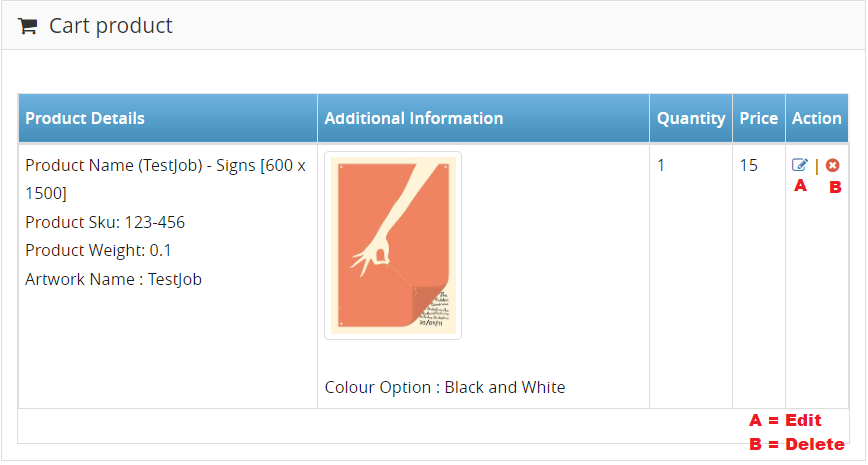
C. Cart product: The admin can check if the product that has been entered is correct. If by any means the product has an undesired choice, the admin can edit or delete by clicking the note button to edit or the X button to delete


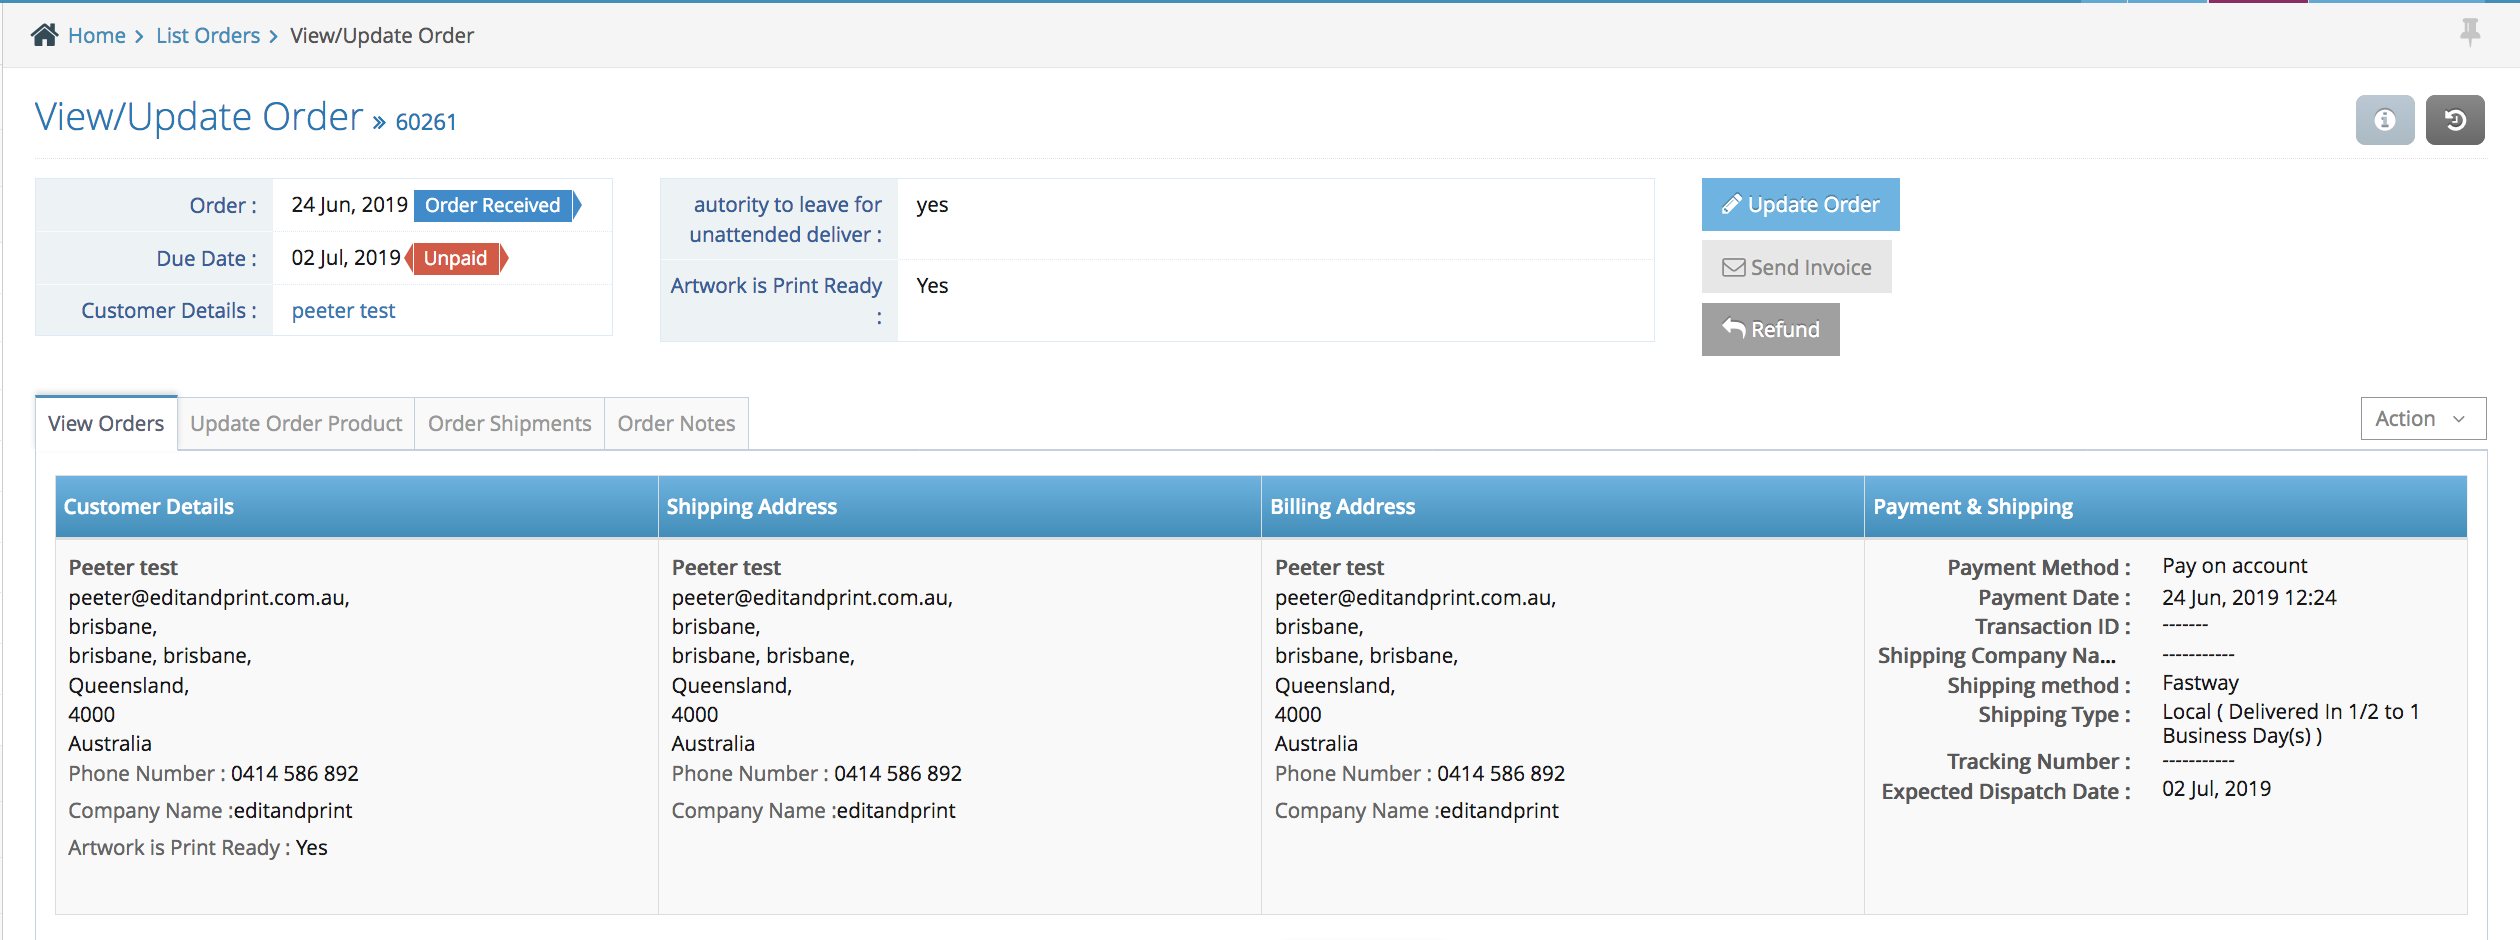
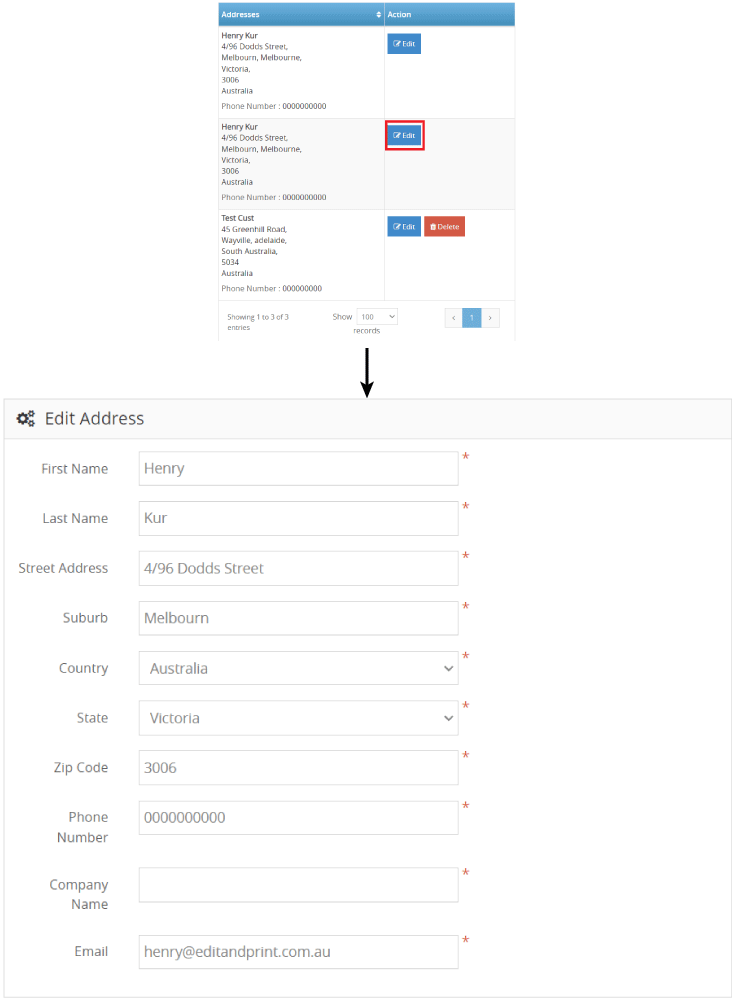
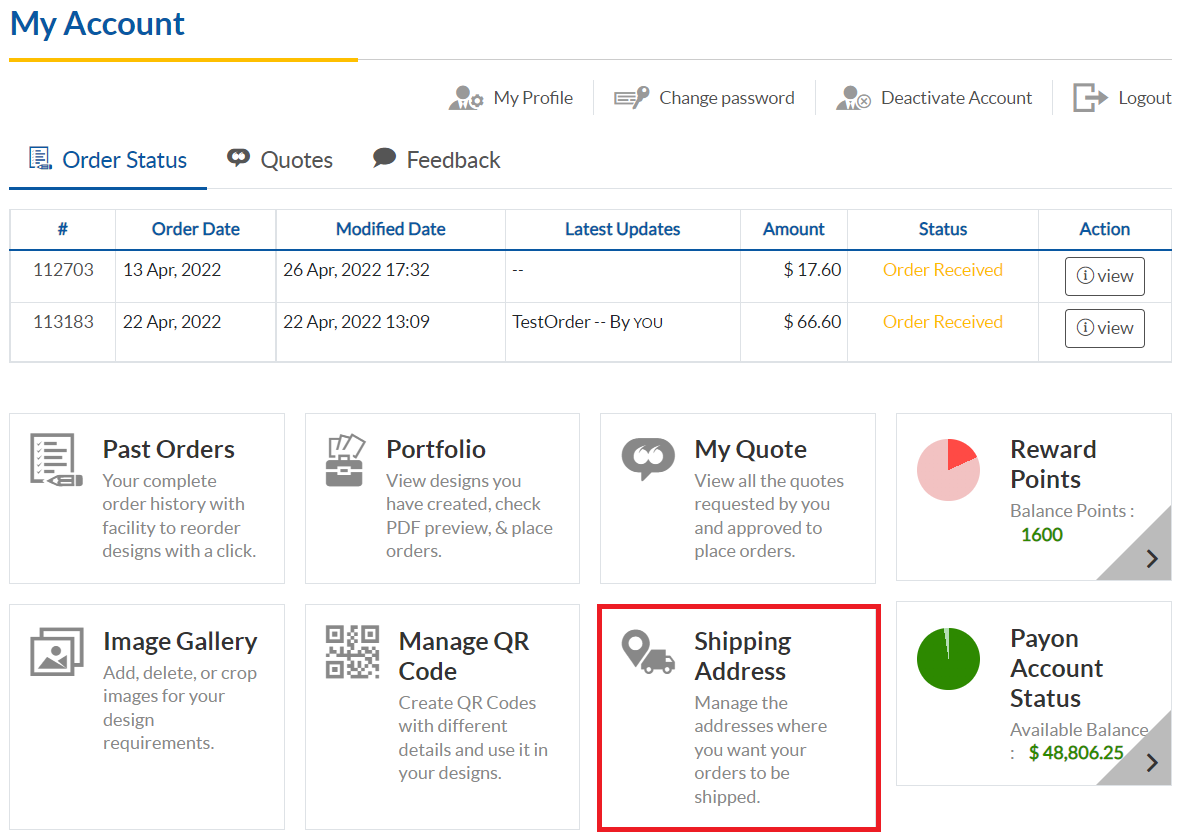
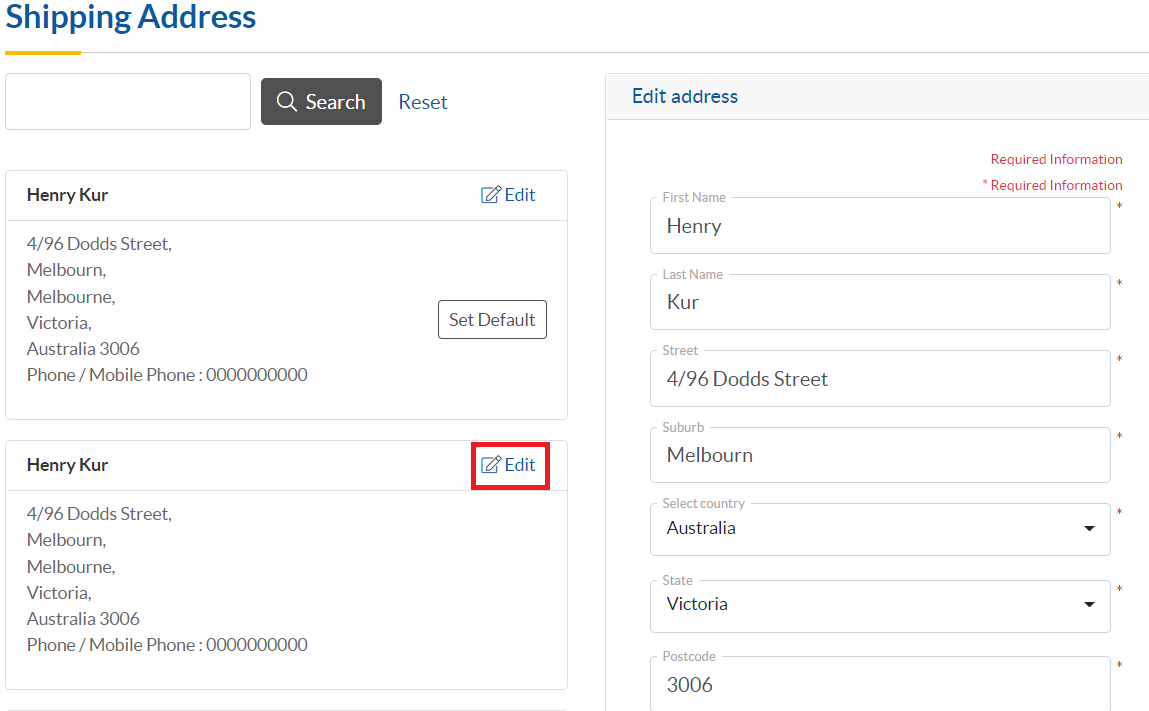
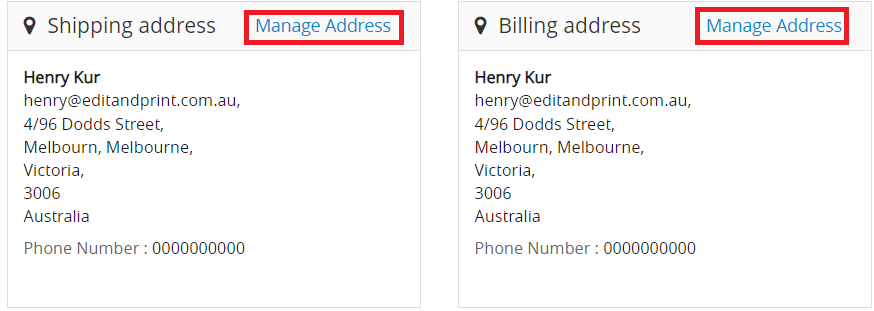
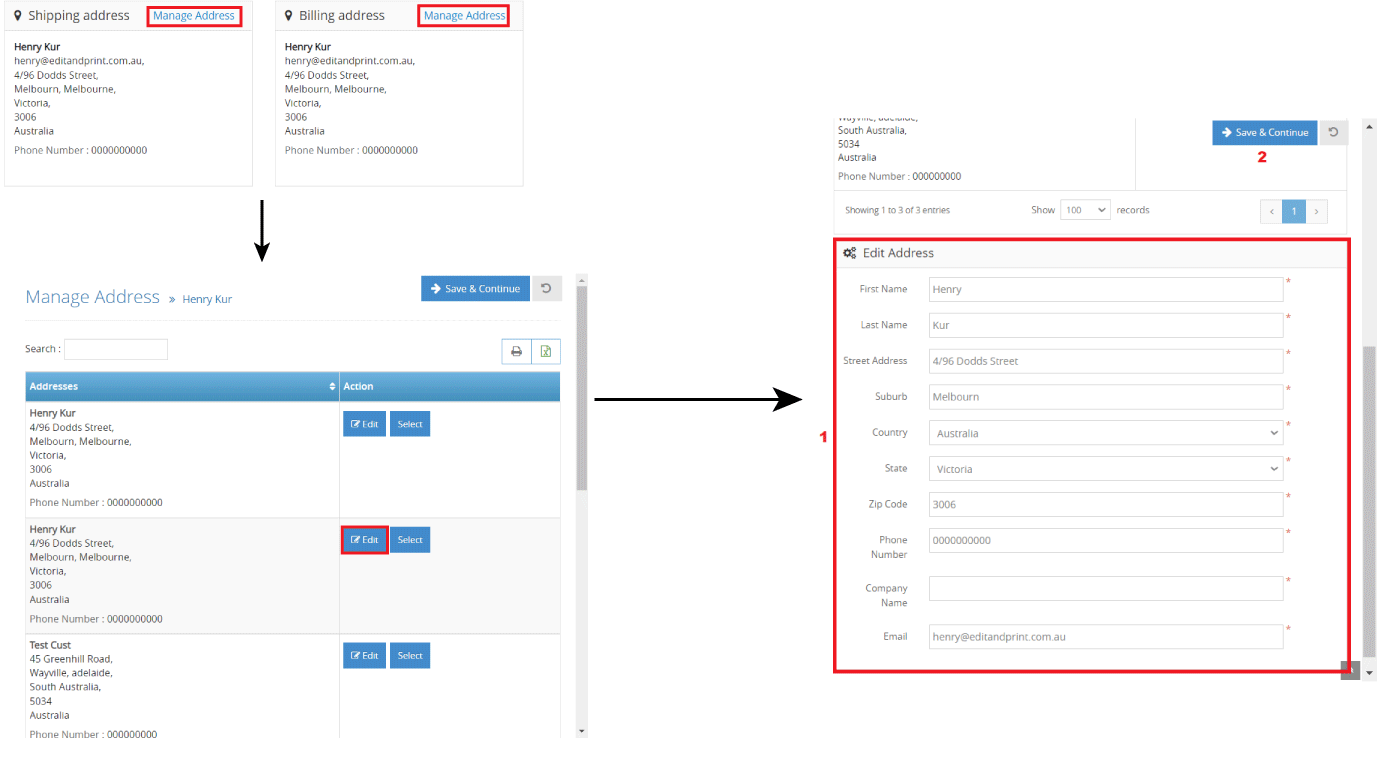
D. Shipping Address and Billing Address: The admin can check if the shipping address and the billing address provided by the customer are correct or not. Admin can also change the address by clicking on the Manage Address to make the Manage Address pop-up window appear. The admin can which address needs to be edited, and the details will be located at the bottom of the pop-up window page.


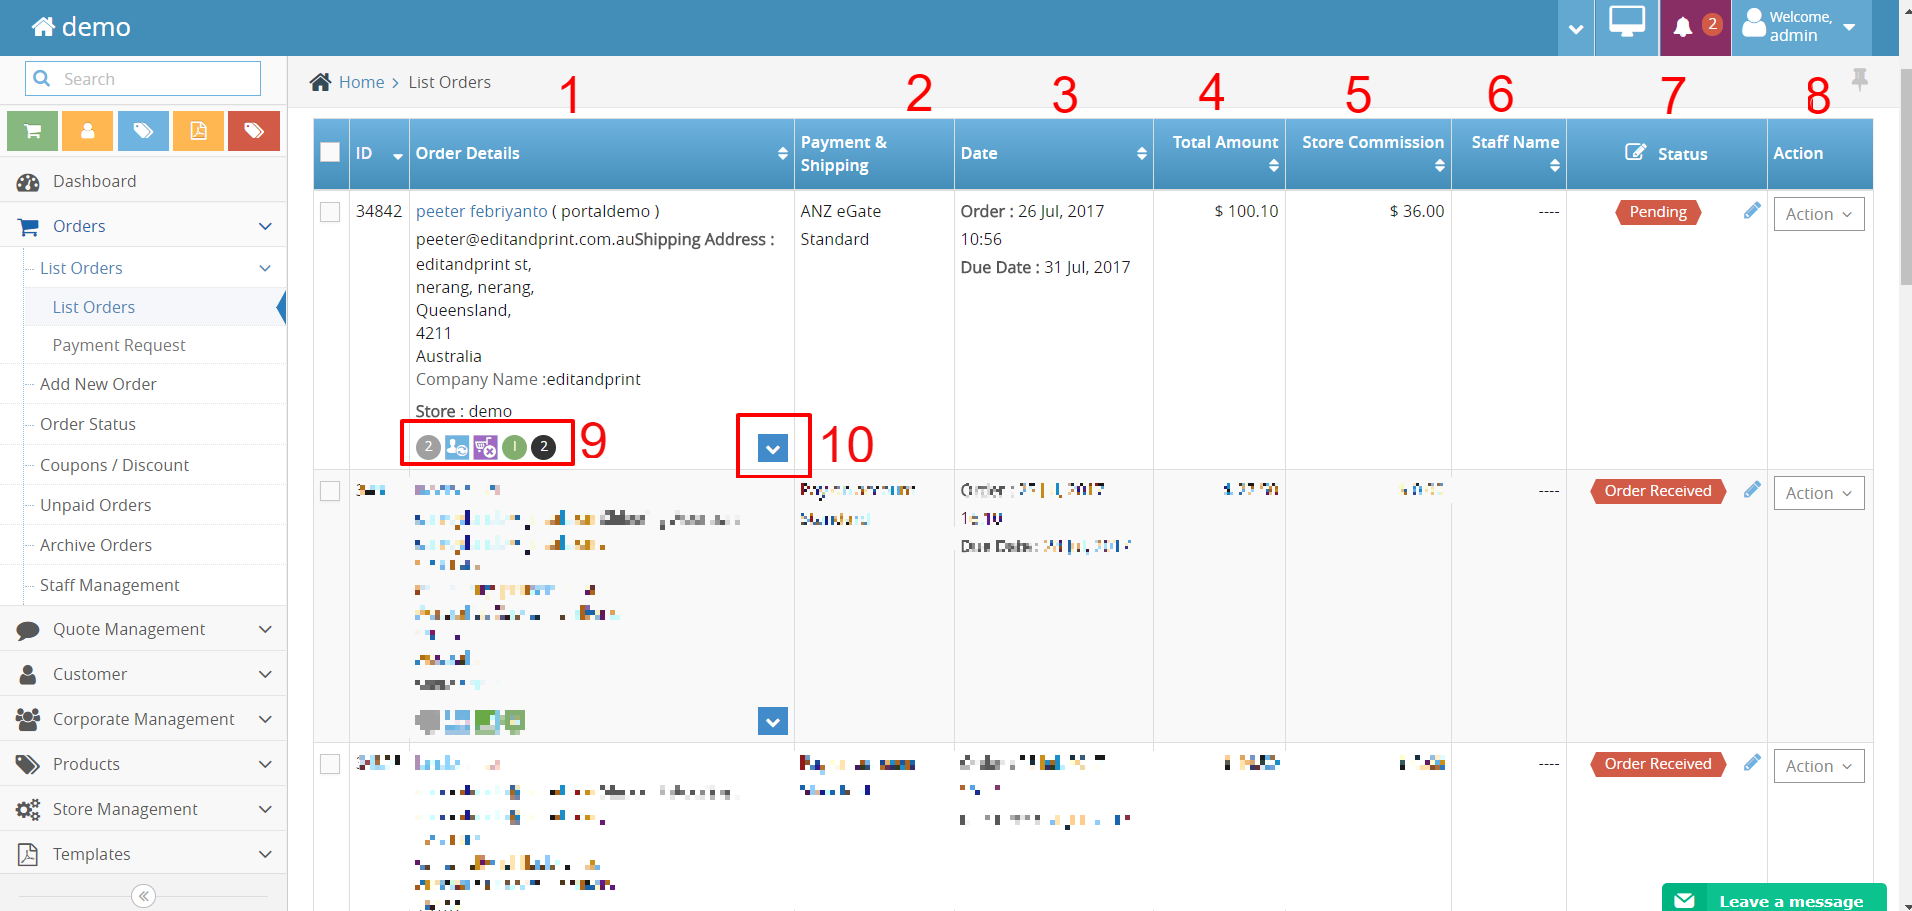
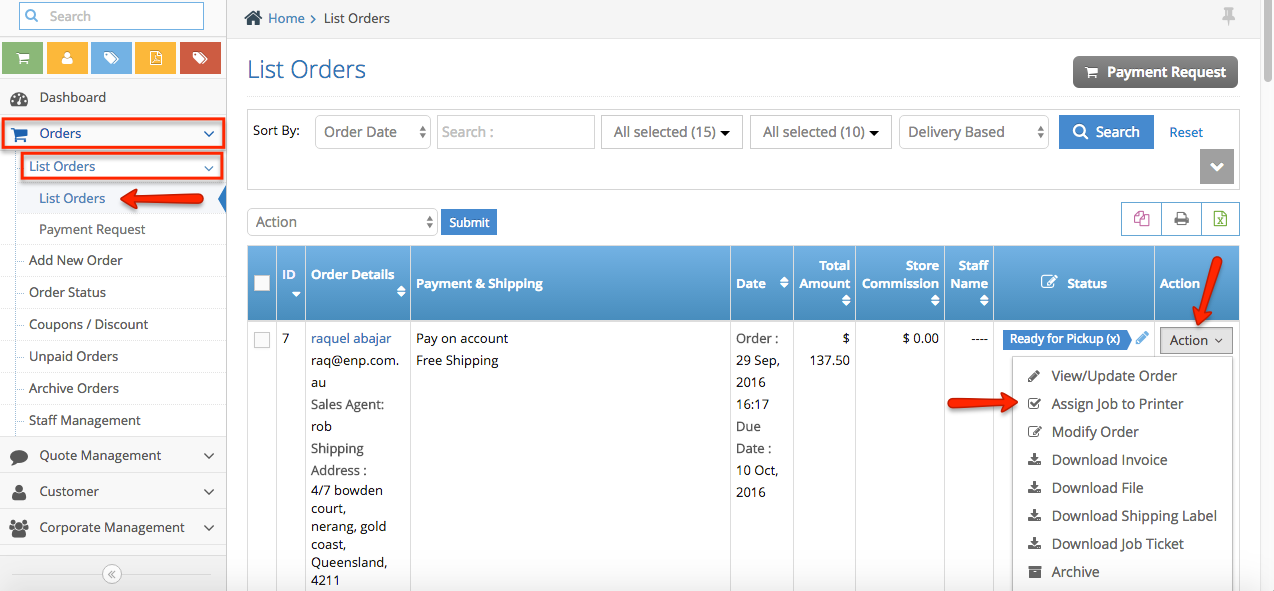
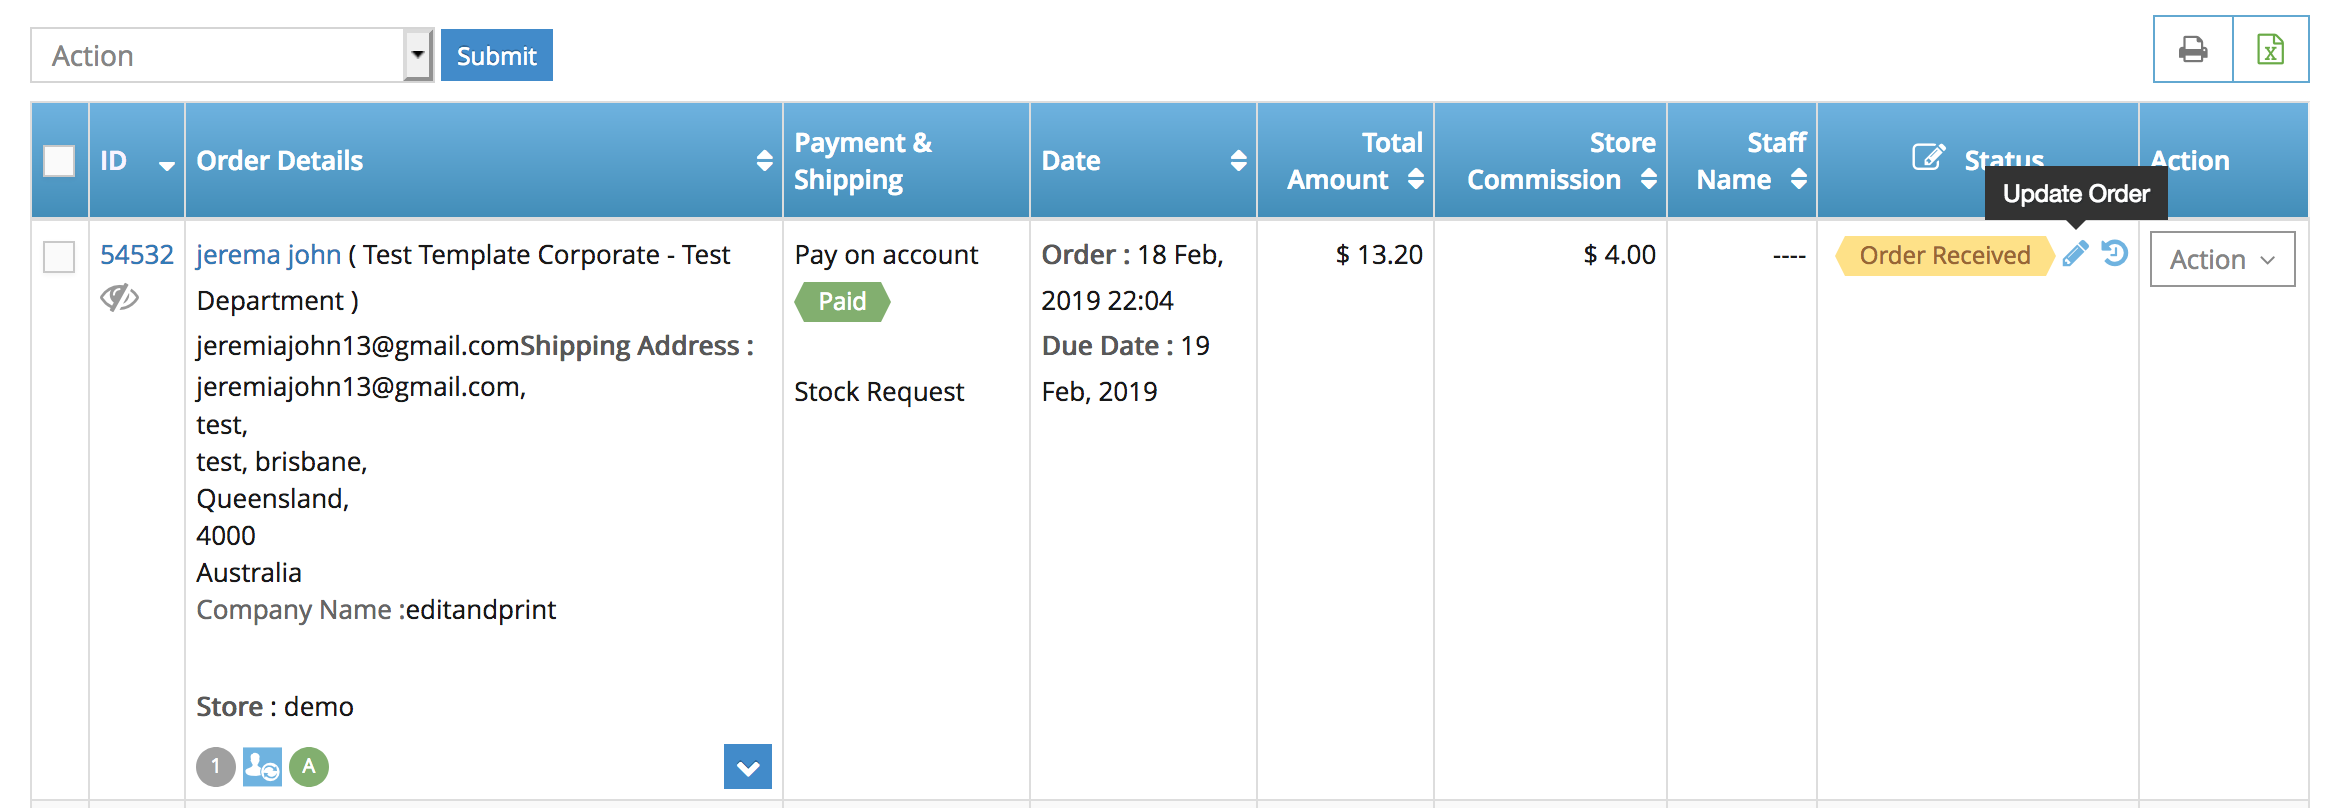
Once the admin has checked all the order details, Admin can process the order by clicking the “Confirm Order” button at the top right page. Then, the admin user will get redirected to List Order Page with the new order appearing on the order list page.

(Note: Please make sure that the required field with the red mark is filled before continuing)


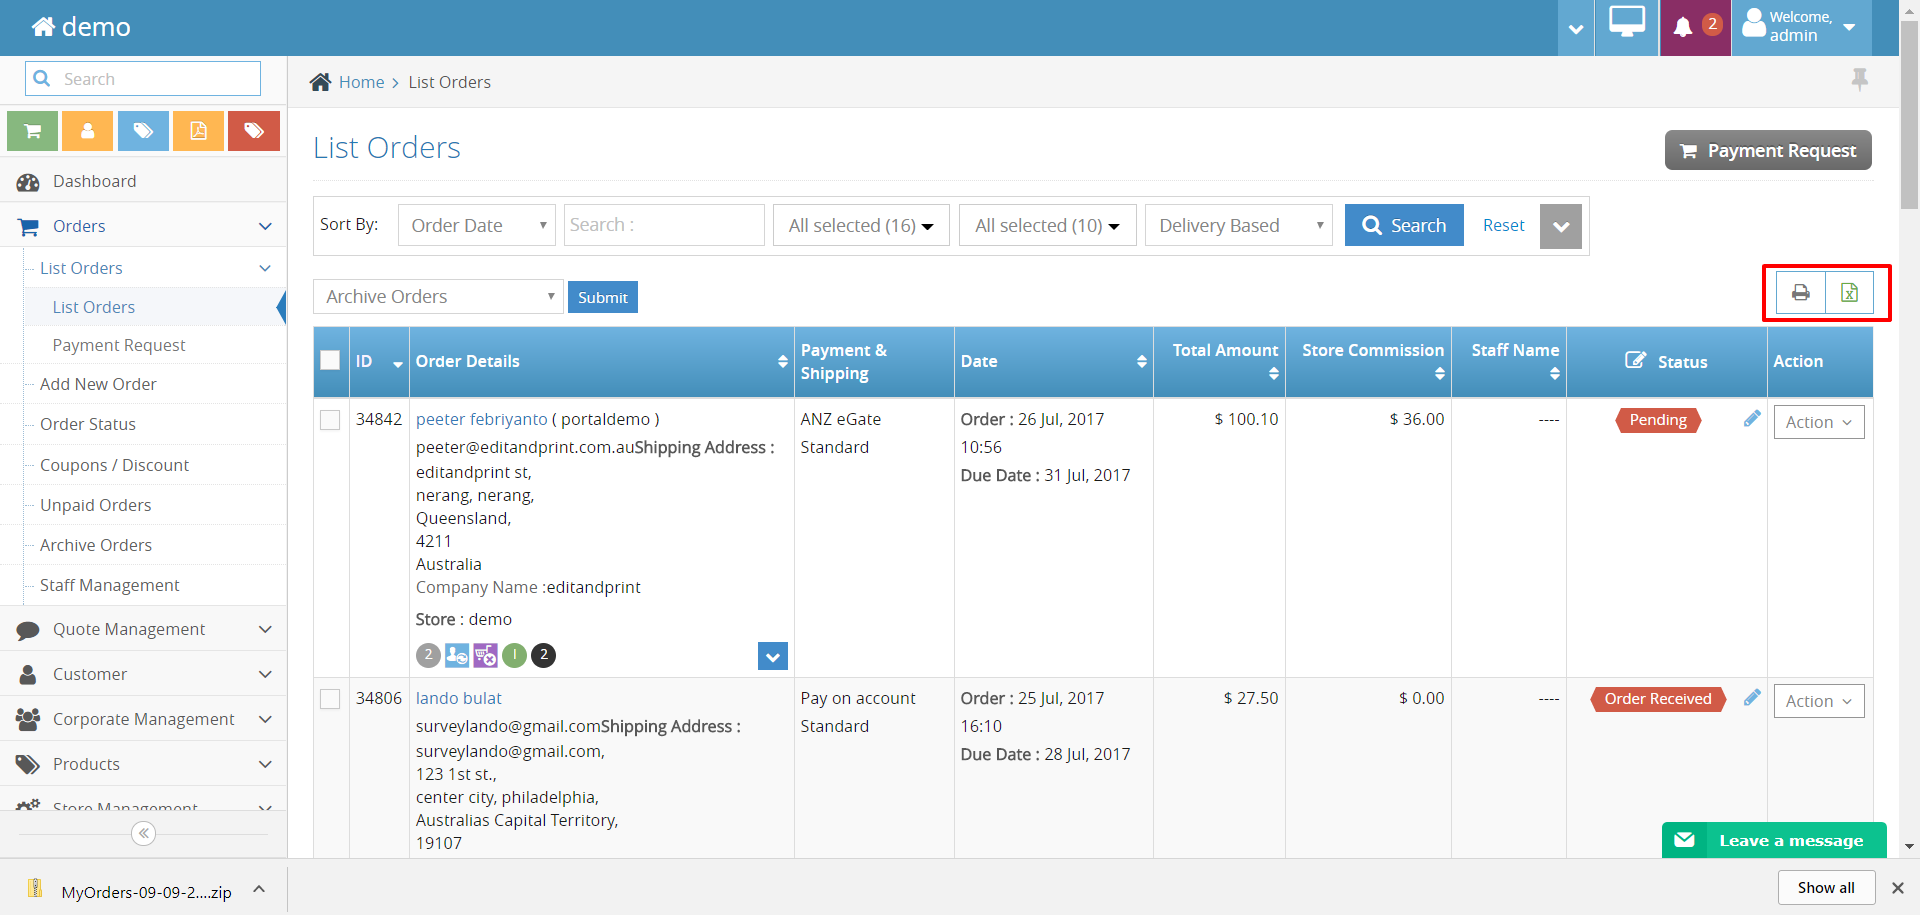
The new Order has been processed and appears on the order list page.


The new order appear from the customer side.


Order Status Management

Order Status Management

Order Status is the visual indication to alert an admin user of the orders that require action, like which order hasn’t been processed or which order is complete.

For the basic ordering process, we have pre-configured the basic order and order product status that has been greyed out as per the screenshot below.

(Note: The pre-configured order and order product status cannot be edited or changed from your side.)


Pre-configured Order Status


Pre-configured Order Product Status


Please click “Here” to check the article related to the ordering process.


However, each store is unique and usually has a different workflow.
In this feature, you can create your order and product status that is suitable for your store ordering process.


How to Manage Order and Order Product Status:

> Login into your admin side

> Select Order > Order Status


> Click “+Add”


Order Status page


> Select “Status Type”

> Select the option on the “Set As” area

– Normal = Standard order status

– Completed = Indicating that the order has been completed and will be moved to archive order.

– Canceled = indicating that the order has been canceled

– Shipped = indicating that the order has been shipped


> Input the unique “Status Title.” for example, Dispatched

 The system will show this status title on the admin and customer sides.

> Input “Email Subject.”

Fill in the email content that reflects the new status that you are working on.


(Note: You can use the available email variable at the right top of the page. By clicking the “+” icon at the end of the variable.)


> Input the sort order

> Choose the color you want to assign to your new order status.


> Notify Customer: this setting will notify the customer if the order/product status is triggered.

> Use on Job Board: The status will be displayed in the “Job Board” area.

> Internal Status: With this setting, the admin can only show the order status for internal purposes and show different statuses for the customer side. 

> Allow Invoice Download: The invoice can be downloaded when the order has been assigned to this order status.

> Allow Cancellation: This setting will allow the admin user to cancel the customer order. ( Only Available for the Order Product Status )


Internal Status

Internal Status Option is the status visible on the admin side but shows a different status on the customer’s side. 

For example:

We have created a new Order Status called “Processing Order” with purple-colored codes and set the status to be displayed on Customer’s side as “In Print Production.”

When we changed the Order Status from “Order Received” to “Processing Order”, the customer’s Status also changed from “Order Received” to “In Print Production.”


Internal Status Options enabled


Notice how the status is changed on the customer’s side.


How to Sort Your Order/Product Status.

There are multiple ways to search and sort your store’s order/product status.
Please find the options below.

> Search specific order/product status
You can search for specific order/product status by typing the status title into the search text box.


> How to sort the order/product status.
There are 2 sort options on the order status page.

– All Data: Show all the order/product status pre-configured and custom order

– Default Data: Showing the store pre-configured order/product status

– Store Data: Showing the store custom order/product status.


How to create Your Own Order Status

Create new order status

Step 1. Login to your Admin > Navigate to the left hand side navigation bar Orders > Order Status

Step 2. Click Add button to create your own status

orderstatus1


Step 3. Fill out this form:

Status Type – Choose if you want it to be an Order Status (Order itself) or an Order Product Status (Job).
Set as – Set the status as normal status update? completed, canceled or shipped (completed and canceled status will move the order to archive orders page) – Shipped status to indicate the order has been shipped.
Status Title – Add the title. (status of the order / jobs – i.e. awaiting payment, finishing,etc..)
Email Subject – Subject of the email when the status is triggered.
Email Message – Content of the email when the status is triggered.
Sort – Sort order of the status.
Color Class – Categorise the status by colour
Use on Job board – tick this box to display this status in job board at dashboard.

orderstatus3


orderstatus4


Step 4. Click Save & Back button to apply the changes and to go back to the main order page.

Coupon Creation

How To Create Coupon

Step 1. Login to your admin > navigate to Orders section, then click Coupons/Discount. This page shows all the coupons and discounts setup on the account. You can see the overview information about your discounts, you also have control over the status of the discount as well by ticking and unticking the status box.


Step 2. To add a new coupon, click Add button.

Step 3. Fill out this form:

Discount Title – This is the name of your coupon.
Type – Choose Coupon in this case.
Coupon Code – Enter your desired coupon code. If you leave this field blank, the system will generate the code for you.
Discount – You can choose between percentage (example: 10% OFF) or amount (example: $10 OFF)
Max. Discount – This is only applicable if you choose percentage in the Discount field. Basically, setting the maximum amount to give as a discount.
Validity – This is the period when the coupon can be use.
Product Specific Discount – You can choose to apply this coupon for all products or to specific ones.
Discount On – Choose where you want to apply the coupon. Will be it based on the product price or the shipping price.
Discount Usage – Set the usage of your coupon.
Coupon Max. Usages – The maximum number where the coupon can be used.
Customer Specific Discount – Choose which customer has the privilege to use this coupon.
Conditional Discount – This is additional option that will trigger how the coupon be applied.


coupons2


coupons3


Tips : create a conditional coupon that can works based on customer order count, by using the order count field at the bottom

This allows the customer to can only use the coupon when the order count is between a certain number to a certain number. There are couple more options of order count such as equal to, greater or equal to, less or equal to.

Step 4. Click Save & Back button to apply the changes and to go back to the main page.

Multiple Coupon Creation

Multiple Coupon Creation

Step 1. From the home page, navigate to Orders section, then click Coupons/Discount. This page shows all the coupons and discounts setup on the account.

Step 2. To add multiple coupons, click Import Coupon button.

multiplecoupon1


Step 3. Click Download Sample File button.

multiplecoupon2


Step 4. Open the sample file and edit the information based on the coupon information you want to use.

multiplecoupon3


At this point, go back to the import coupon page and click Next.

multiplecoupon4


This page will guide you through the process of updating the csv file. Just go over to the CSV Field Description.

multiplecoupon5


Note: Save this file as .csv format.

Step 4. On that same image above, click Next button.

Step 5. Click Import and upload your CSV file containing your coupons. Click Import button.

multiplecoupon6


Important Note: You might get something like this when you upload your csv file. It basically tells you that some fields are incorrect and need some checking. Only correct entries will be imported.

multiplecoupon7

Discount Creation

Discount Creation

Step 1. From the home page, navigate to Orders section, then click Coupons/Discount. This page shows all the coupons and discounts setup on the account.

Step 2. To add a coupon, click Add button.

coupons1


Step 3. Fill out this form:

Discount Title – This is the name of your discount.
Type – Choose Discount in this case.
Discount – You can choose between percentage (example: 10% OFF) or amount (example: $10 OFF)
Max. Discount – This is only applicable if you choose percentage in the Discount field. Basically, setting the maximum amount to give as a discount.
Validity – This is the period when the discount can be use.
Product Specific Discount – You can choose to apply this discount for all products or to specific ones.
Discount On – Choose where you want to apply the discount. Will be it based on the product price or the shipping price.
Conditional Discount – This is additional option that will trigger how the discount be applied.
Apply discount on – Choose between the base product price or apply the discount to the product subtotal (Including price of all additional option)

discount1


discount2


Step 4. Click Save & Back button to apply the changes and to go back to the main page.

Customer Group wise Discount/Coupon

Customer Group Wise Discount/Coupon

On this update, the admin can create a group for their customers and can create a discount/coupons specifically for a certain group.

For example, the admin wants to create a level group based on member benefits and need to set up 3 user group user who can benefit on discount/coupons specifically made for them.

To set up the user group you can:

Step 1. go to Customer > Website customer > on the customer name click Action> Edit

Step 2. There’s a field that called User Group, you can select on which User Group you want to put the customer into, After you’re done click Save.

Step 3. If you haven’t set up a user group yet, please follow step 4 through 7

Step 4. To make a new group you can click the + sign.

Step 5. In the Create new group pop up click +Add

Step 6. Put the name of the group and click Save

Step 7. Now you can put users into the user group you’ve just created.

Please see how to create coupon below here >

To set up a Coupon to a specific user group.

Step 1. Go to Orders > Coupons/Discounts > on the discount title click Action>Edit

Step 2. On the Discount Usage select Based On User Group

Step 3. Select the User Group you want the coupon is applied to

Step 4. After that Click Save.

Tips : when selecting customer specific discount you can select all retailer exclude group if you would like to create it exclusively for retailer. (only for per customer single usage and multiple usage only)

Reward Points

Set Website Reward Points

One of the most popular marketing feature in the admin side is reward points. The reward points allows you to set how the customers can earn an automated reward points and how they can spend it.

In order to utilise this, you have to activate the module first in the admin side.

Step 1. Login to you admin > navigate to the store management > configuration settings. The easiest way is to search the word ‘reward’ on the search box

Step 2. Change the drop down settings to ‘Yes’, click Save to save your changes.

Step 3. Refresh the admin page, navigate to orders > reward points.

Reward Points Page :

This page will display all the rewards points generated from the system automatically. There is also a settings for Reward Points Settings, History and Manage the Reward Points.

Reward Points Settings: the important page once you have activated the reward points module, this is the page where you can configure how the customer can earn reward points and how they can spend it.

how the customers can earn reward points :
there are 2 configuration where
1.  you can award your customers a certain points when they are registering on your website
2. when the customers placing an order on your website.

Based on the settings above, the system will start generating rewards points to your customers and display it on their account under the ‘My Accounts’ page (after the login).

The next one is how the customers can spend their reward points?
the process of using the reward points is the customers have to redeem the points they have and exchange it to a website coupon (the value of the coupon will be set in the ‘manage reward points settings’ under the how the customers can spend their reward points.

You can set the minimum and maximum points the customers can redeem and also the conversion of the reward points to dollar value.

Reward Points History :
This is a page where you can see how much reward points has been automatically generated from the system and how much points the customers has redeemed on the website.

tips : use the filter to find a specific reward points record (customer name, email address, time period, type of rewards points).

Manage Reward Points :
The last one will be Managing Reward Points, this feature will allows you to add reward points or coupon to your customers manually. Once it’s saved it will reflect on the customers side automatically.

Click Save to save the changes

What is Archive Order

What is Archive Order

Archive Orders are collections of orders that have been completed or moved by the store admin. When the order status is set by the store admin to Order Complete, the selected order will automatically move from List Order to Archive Order. The Archive Order will act as a record or reference that contains completed orders.

(Note: Store admin can manually move the order to Archive despite the order is not yet completed)

Archiving Order is different from deleting. If the order has been deleted, it can no longer be searched or removed from your store, while Archiving Order is moving the order elsewhere so the admin can manage which orders have been completed and which orders need to be processed.


How to archive an order?

Step 1. From the home page, navigate to the Orders section >> List Orders >> List Orders.

Step 2. Look for the order you wish to archive. Click Action and select Archive.

archive1


Step 3. A popup window will appear. Click Archive button to confirm and the order will be sent to “Archive Orders”


archive2


How to restore an archived order?

Step 1. From the home page, navigate to Orders section >> Archive Orders.

Step 2. Look for the order you wish to restore. Click Action and select Restore.

archive3


Note: If you choose View/Update Order, you can view the order details and you will have the option to Restore from there.

How to add payment request

How to add payment request

Step 1. From the home page, navigate to Orders section >> List Orders >> Payment Request.

Step 2. In the New Payment Request, enter the Order Number, Amount, add your remarks, enable Auto Credit Payon and click Save button.

Step 3. After saving it, the payment request will be added. You should be able to manage it by click Action button.

Reward Points Expiry Date

How to Set Expiry Date for Reward Points

An extension to the existing reward points for your marketing needs. We have added the configuration for admin to set the expiry date for both the points and the coupon after the customer redeem it.

Step 1. Login to your admin side > navigate to the orders > reward points (please see the settings to activate reward points if you can’t see it in your admin – here >)

Step 2. In the reward points page > on the top right of the page you can see ‘reward points settings’

Step 3. On the first block ‘How the customer can earn reward points’ you can see at the very bottom where you can set the expiry time (in month).

Same thing as well in the next section for ‘How customer can spend reward points’ . At the very bottom you can see the configuration for the expiry time (in month)

Step 4. Click Save to save your changes.

Customer Side :

Under My Account Page > Reward Points, your customers can see the amount of the total reward points and also the expiry date as well.


When the customer redeemed the reward points they can also see the expiry date for the coupon

There will be an automated email triggers from the system as well to remind your customers that the reward points or coupon will be expired soon (when the time is close to the expiry date).

Customer Download Press Ready

How to Allow Customers to Download Press Ready Artwork

Step 1. Login to your website admin and navigate to the left hand side navigation bar (Orders > List Orders) or go straight to the order details of your specific orders (from dashboard or job board)

Step 2. On the ‘Update Order Product’ tab you can see the checkbox to allow the customers to download press ready artwork

Step 3. Click ‘Save’ to save the update

tips : untick the notification checkbox if you do not want to notify the customers.

note : if the notification is ticked, the email triggers from the system will be the ‘Order Status Update’ email.

Customer Front Side

Once the allow customer download feature is ticked, the customer can see the ‘download’ button in the past orders page as per below

Pay on Account Payment Status

How to manage pay on account payment status

First we need to activate the payment status configuration :

Step 1. Login to your website admin and navigate to the left hand side navigation bar to Store Management > Configuration Settings > search for ‘payment status’

Step 2. Change the dropdown to ‘Yes’

Step 3. Click Save to save your changes.

How to Manage your Order Pay on Account Payment Status?

Step 1. Login to your website admin and navigate to the left hand side navigation bar (Orders > List Orders) or go straight to the order details of your specific orders (from dashboard or job board)

Step 2. On the list orders page you can click the pencil icon next to the order status

or click the update order status inside the view / update details page.

Step 3. In the pop up box, you will see the ‘select payment status’

Change to paid when the order has been paid by the customer, or unpaid when it has not.

Step 4. Click Save to update the payment status

Other Training Module :

Admin Dashboard
Quote Management
Customers
Corporates
Products
Store Management
Templates
Content Management
SEO
Store Personalisation
Business Partners
Store Configuration
Designer Studio
Reports
Support

If you can't find what you want please let us know

Contact Us

We're currently offline. Send us an email and we'll get back to you, asap.

Send Message

Main Links

  • Demo
  • Feature Index
  • Our Plans
  • About Us
  • Terms and Conditions

Contact Info

  • 0414 586 892
  • peeter@editandprint.com.au

Fresh from blog

  • Online Editor Help Message Update
  • Content Structure
  • EditandPrint V.7 – Phase 2
  • Gearing up for Online Promotion
  • Personalised Job Board

Find Out More