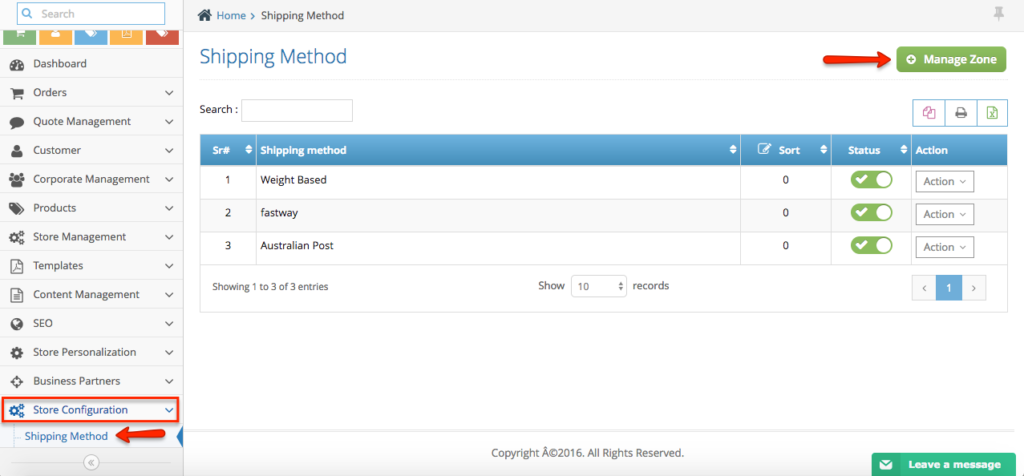
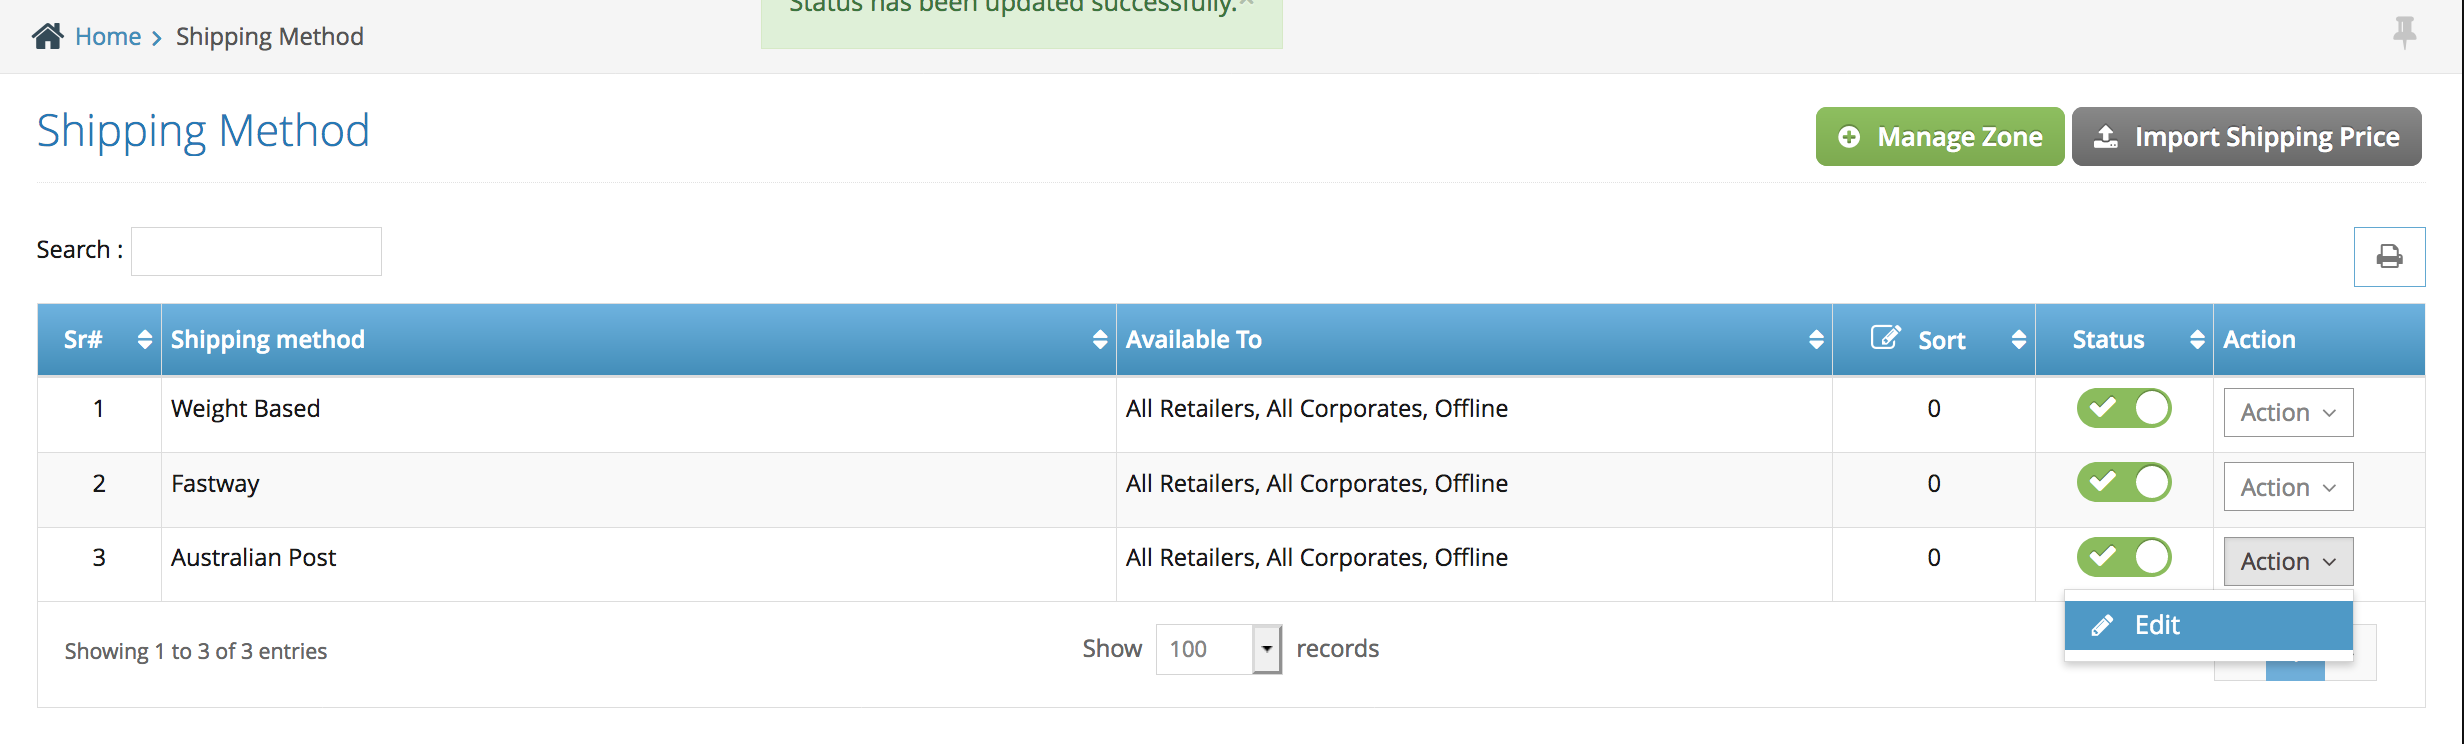
Step 1. From the homepage, navigate to Store Configuration and click Shipping Method.
Step 2. Click Manage Zone button.
Step 1. From the homepage, navigate to Store Configuration and click Shipping Method.
Step 2. Click Manage Zone button.
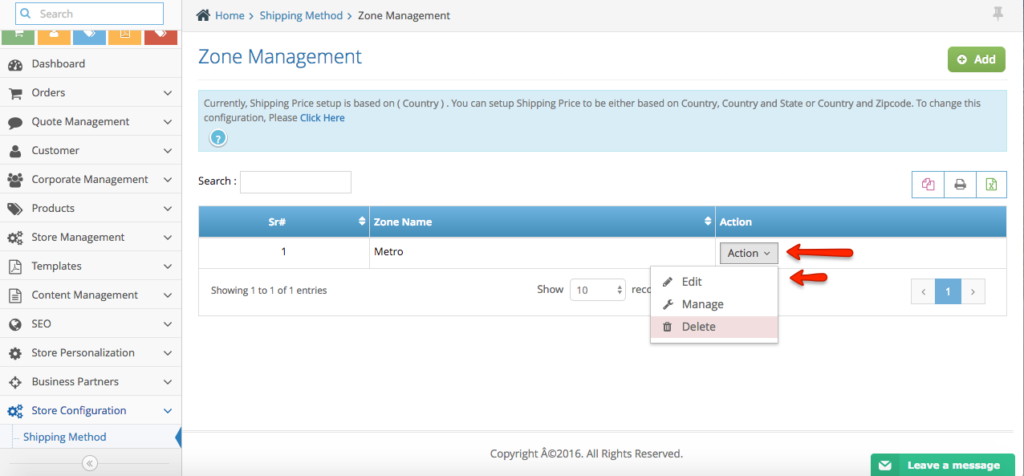
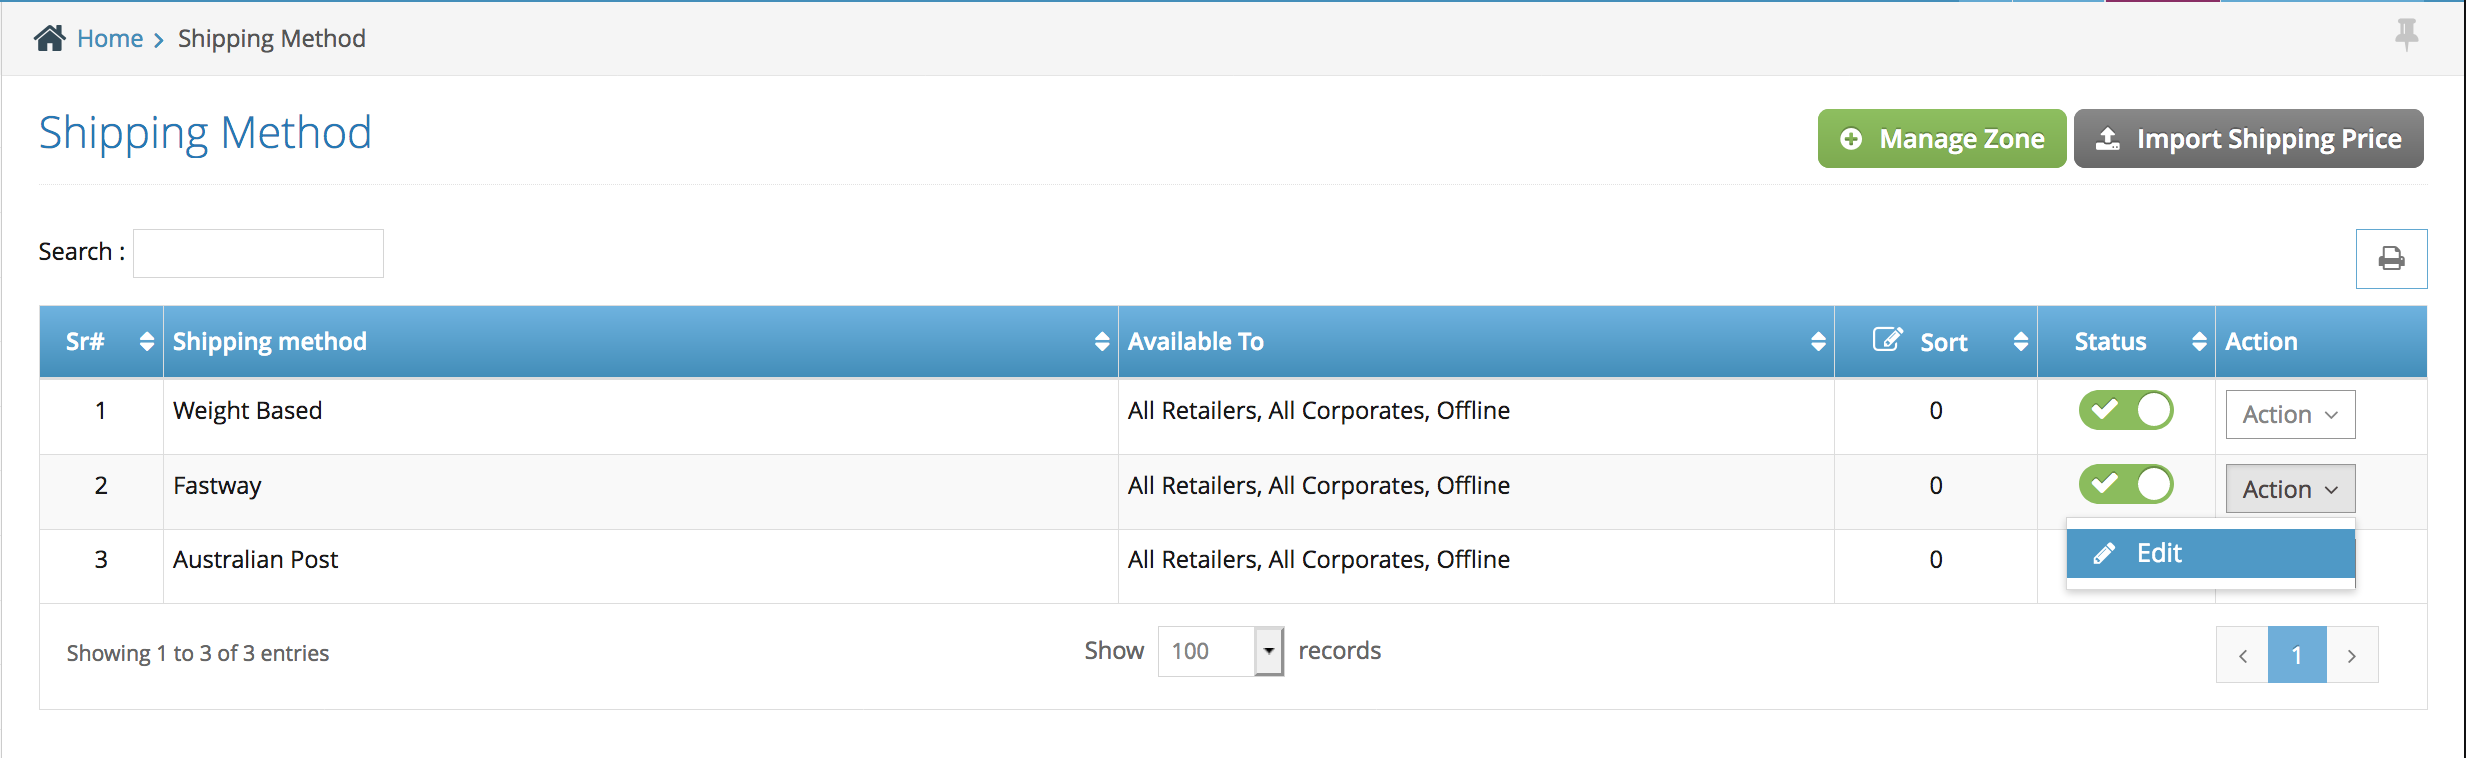
Step 3. To update the existing zone, click Action and select edit.
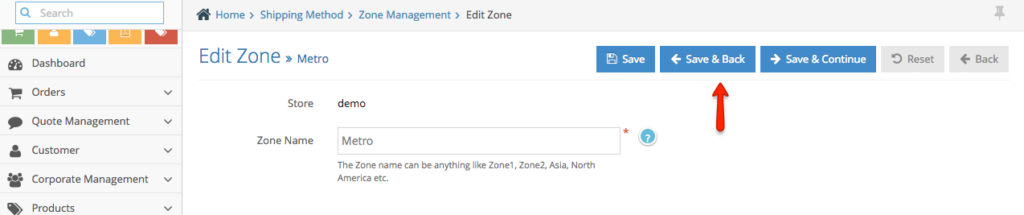
Step 4. Update the Zone Name and click Save & Back button to apply the changes.
Step 1. From the homepage, navigate to Store Configuration and click Shipping Method.
Step 2. Click Manage Zone button.
Step 3. Click Add button.
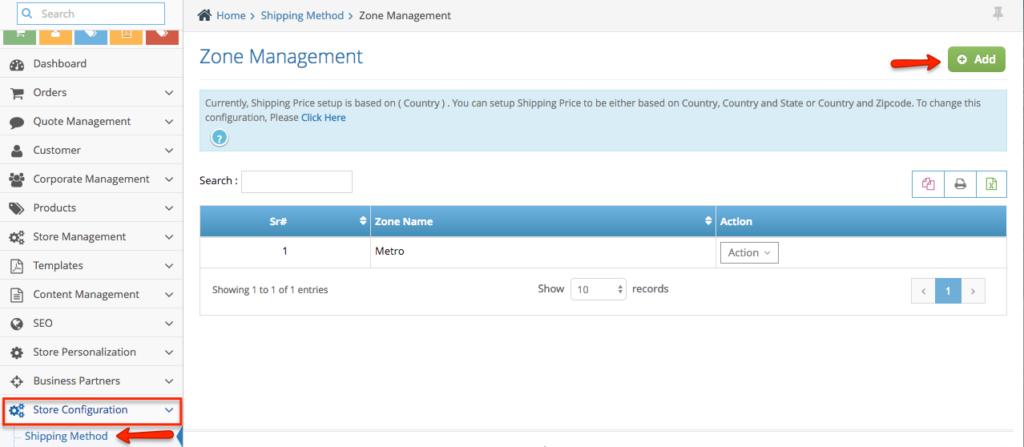
Step 4. Enter the zone name and click Save & Back button to save the changes.

Step 1. From the homepage, navigate to Store Configuration and click Shipping Method.
Step 2. Click Manage Zone button.
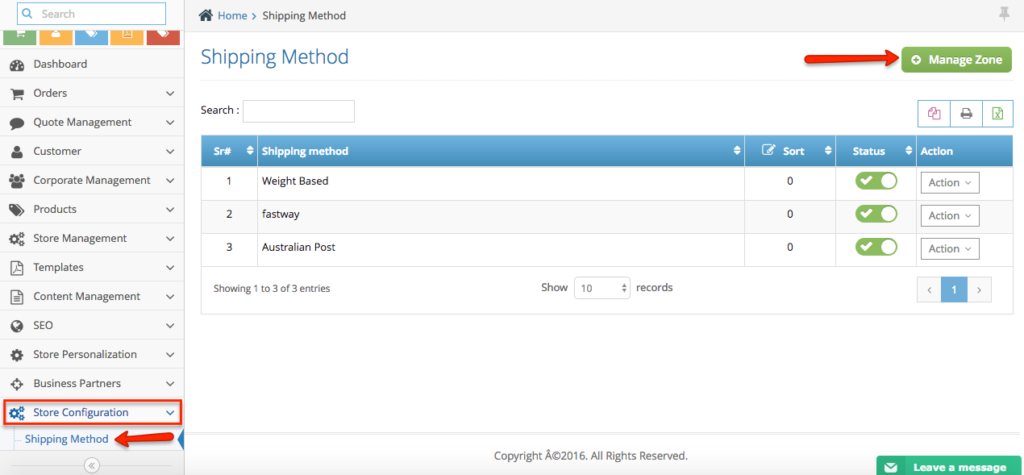
Step 3. On the existing zone, click Action button and select Manage.

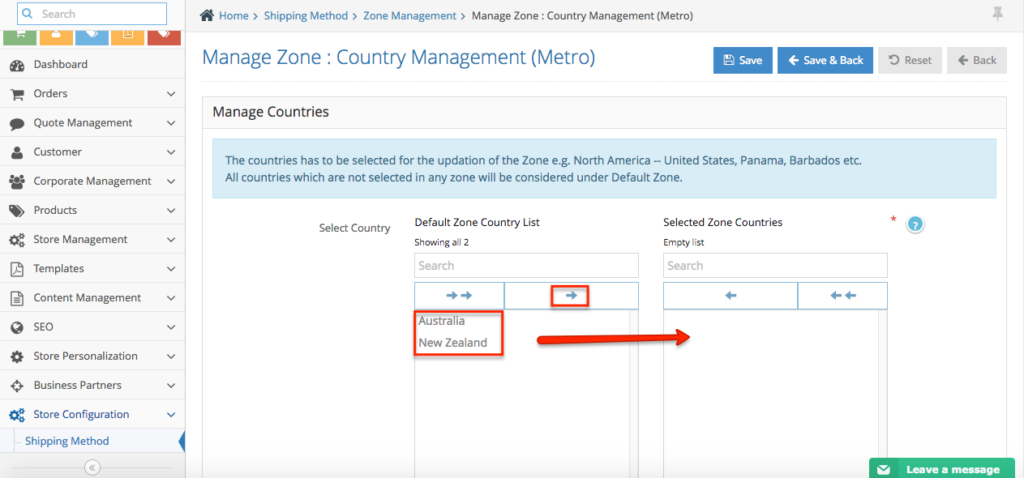
Step 4. Select Country from the default zone country list and click the Arrow to move it to the Selected Zone Countries. Once done, click Save & Back button.
There are multiple ways to set up shipping on your website and one of them is to create your own, the reasons why you create your own shipping is for you to have control over the shipping options available on your website, or setting up a flat rate shipping, etc.. Below will be the step by step process of how to do it.
Step 1. Login to your admin side > navigate to the left-hand side navigation store configuration > shipping method
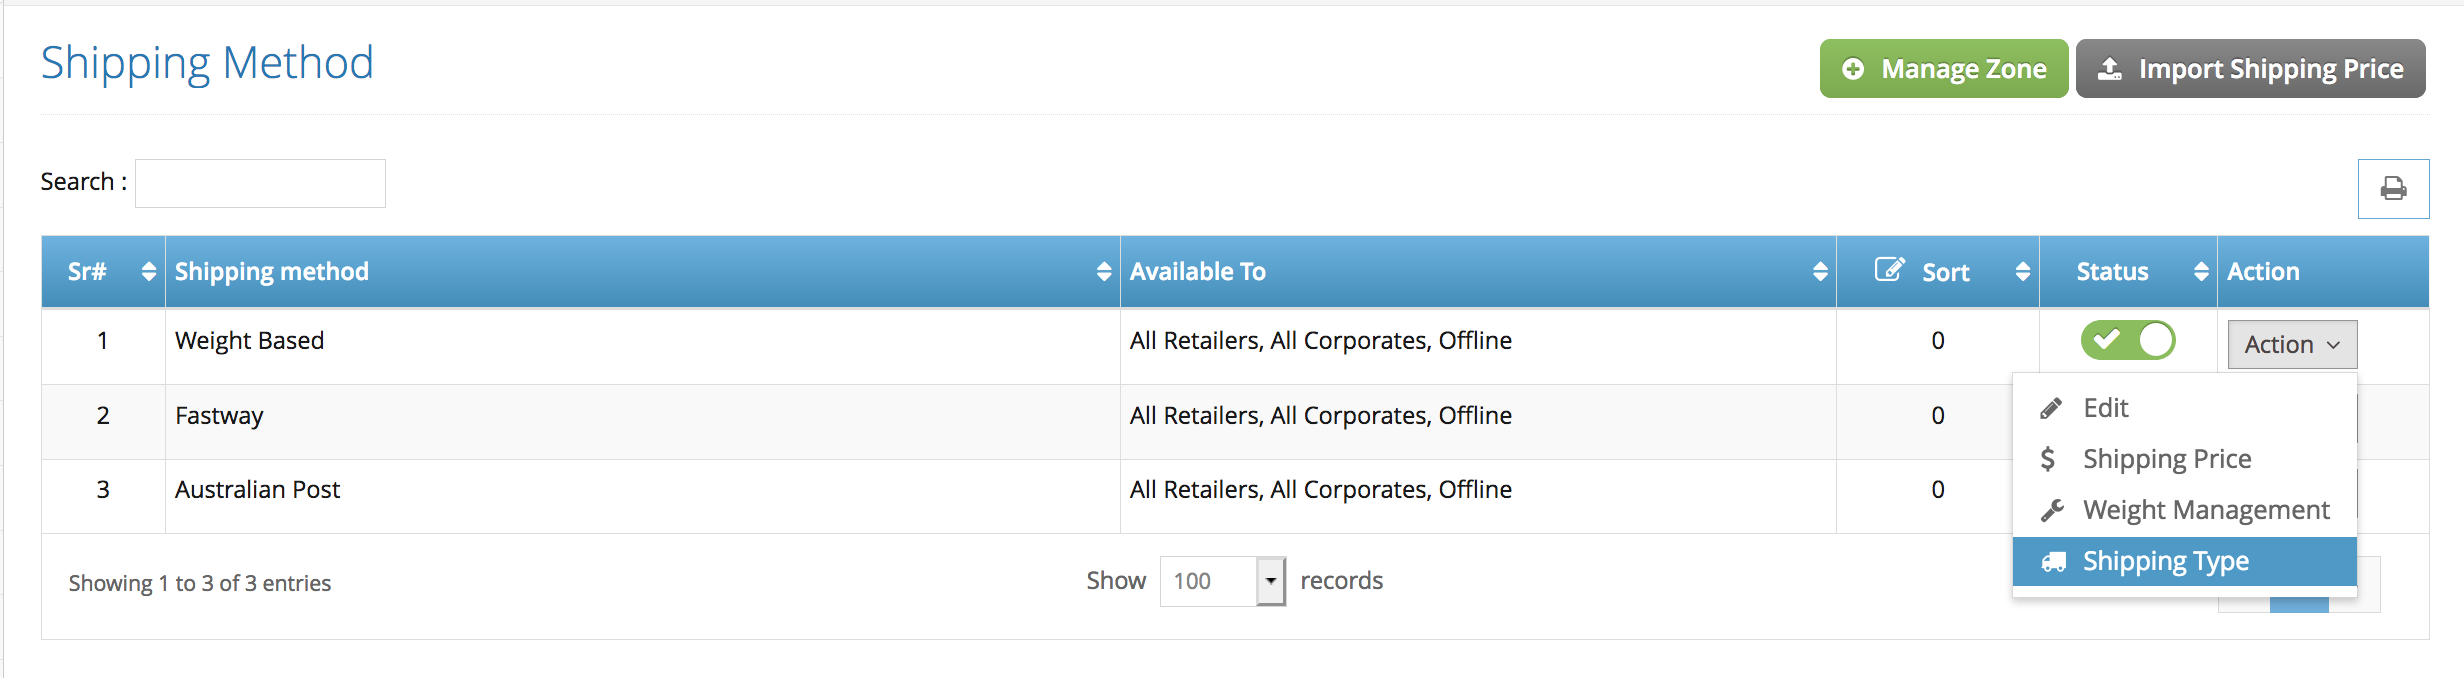
Step 2. Create the Shipping Type : click action > select shipping type > click ‘Add’ button.
2a. Fill out the shipping type form :
Shipping Type: options will be showing in the front end for your customers
Approximately Delivery Date: to set the Estimated Delivery Date for you when customers order landed in the admin
Sort Order: order of the options (when you have multiple shipping options)
Status: status of the shipping type (a feature to make the shipping type temporarily disable)
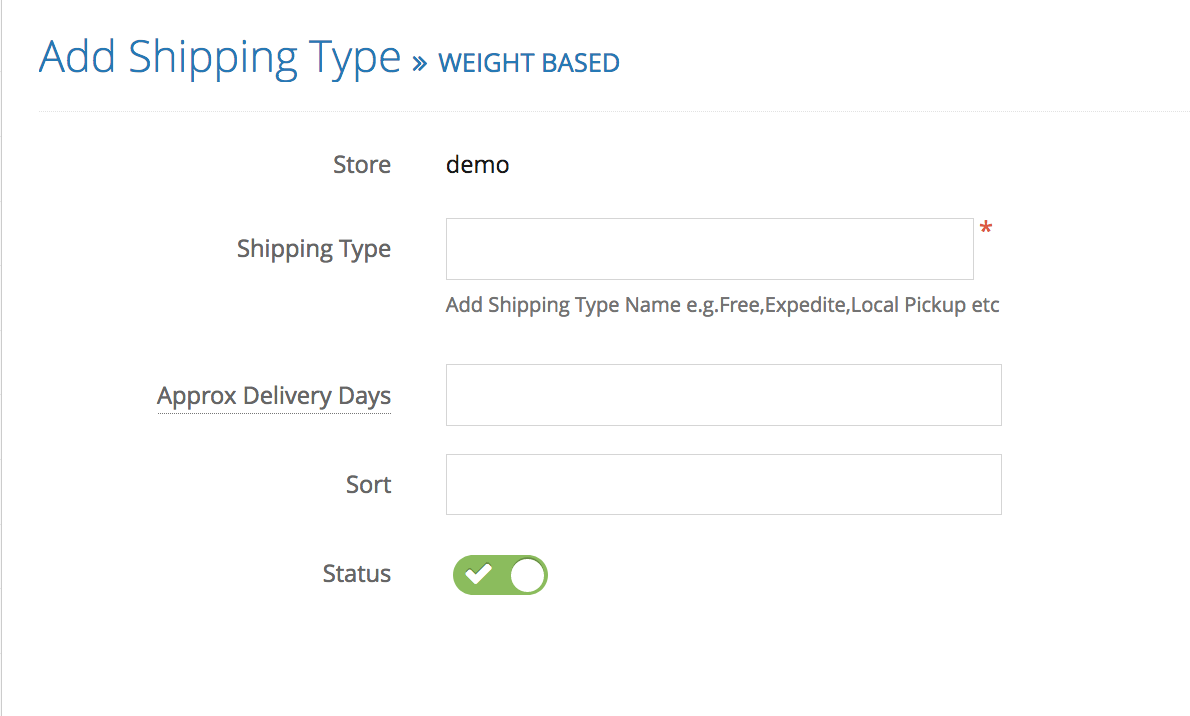
2b. click save to save your shipping type.
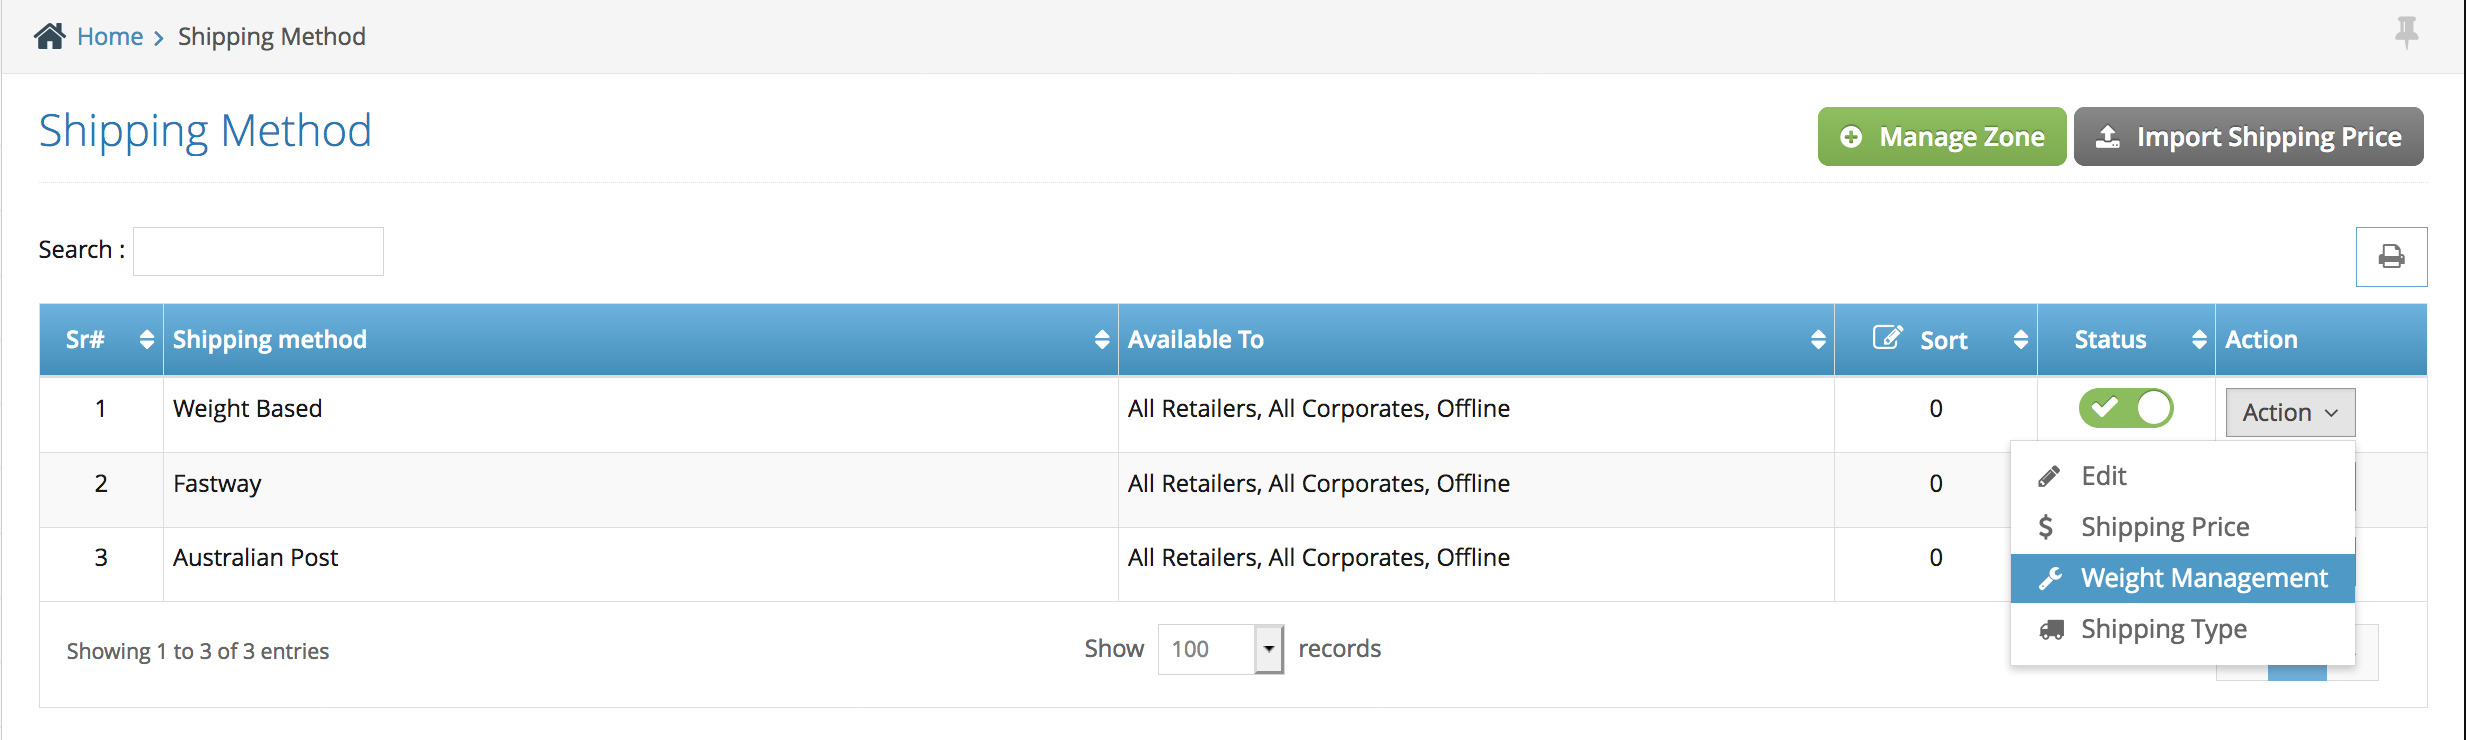
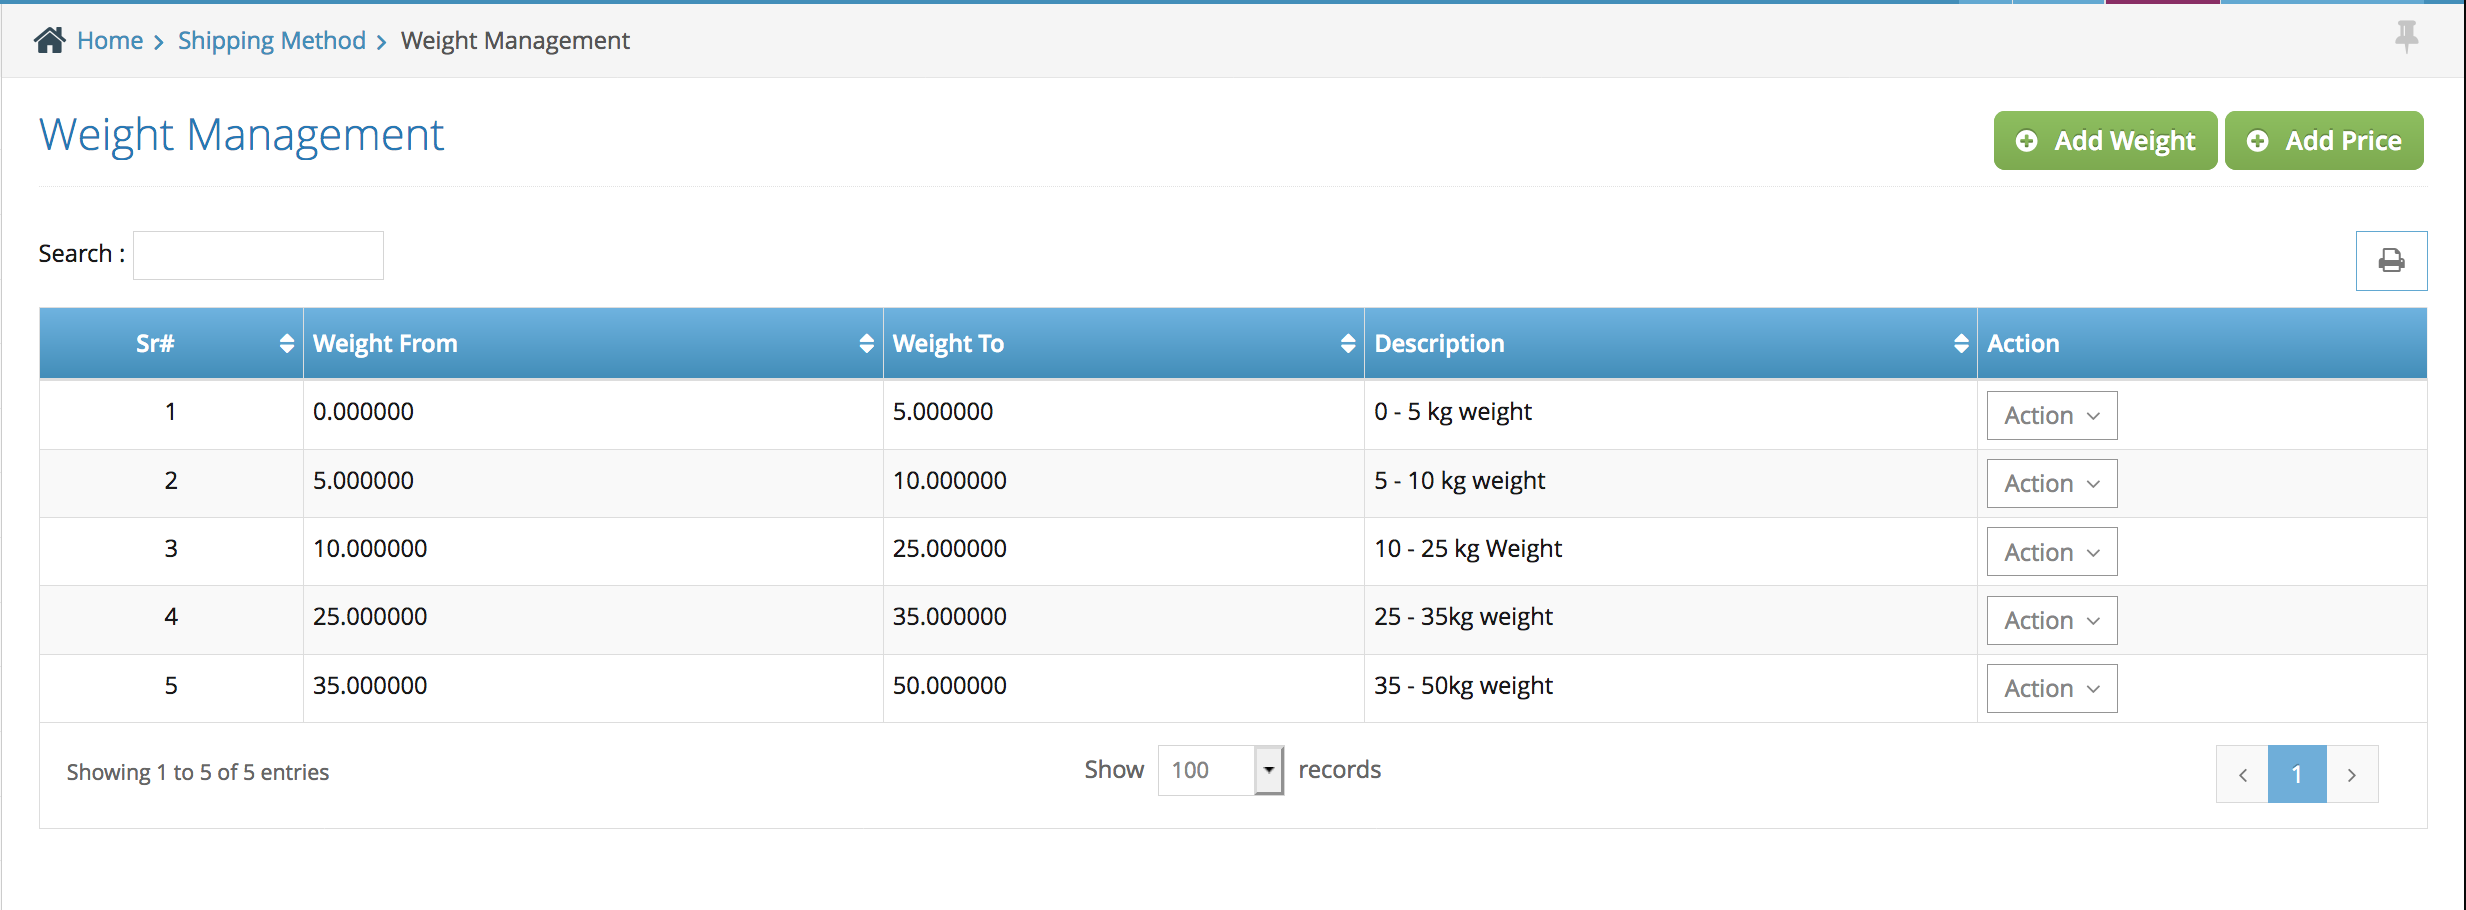
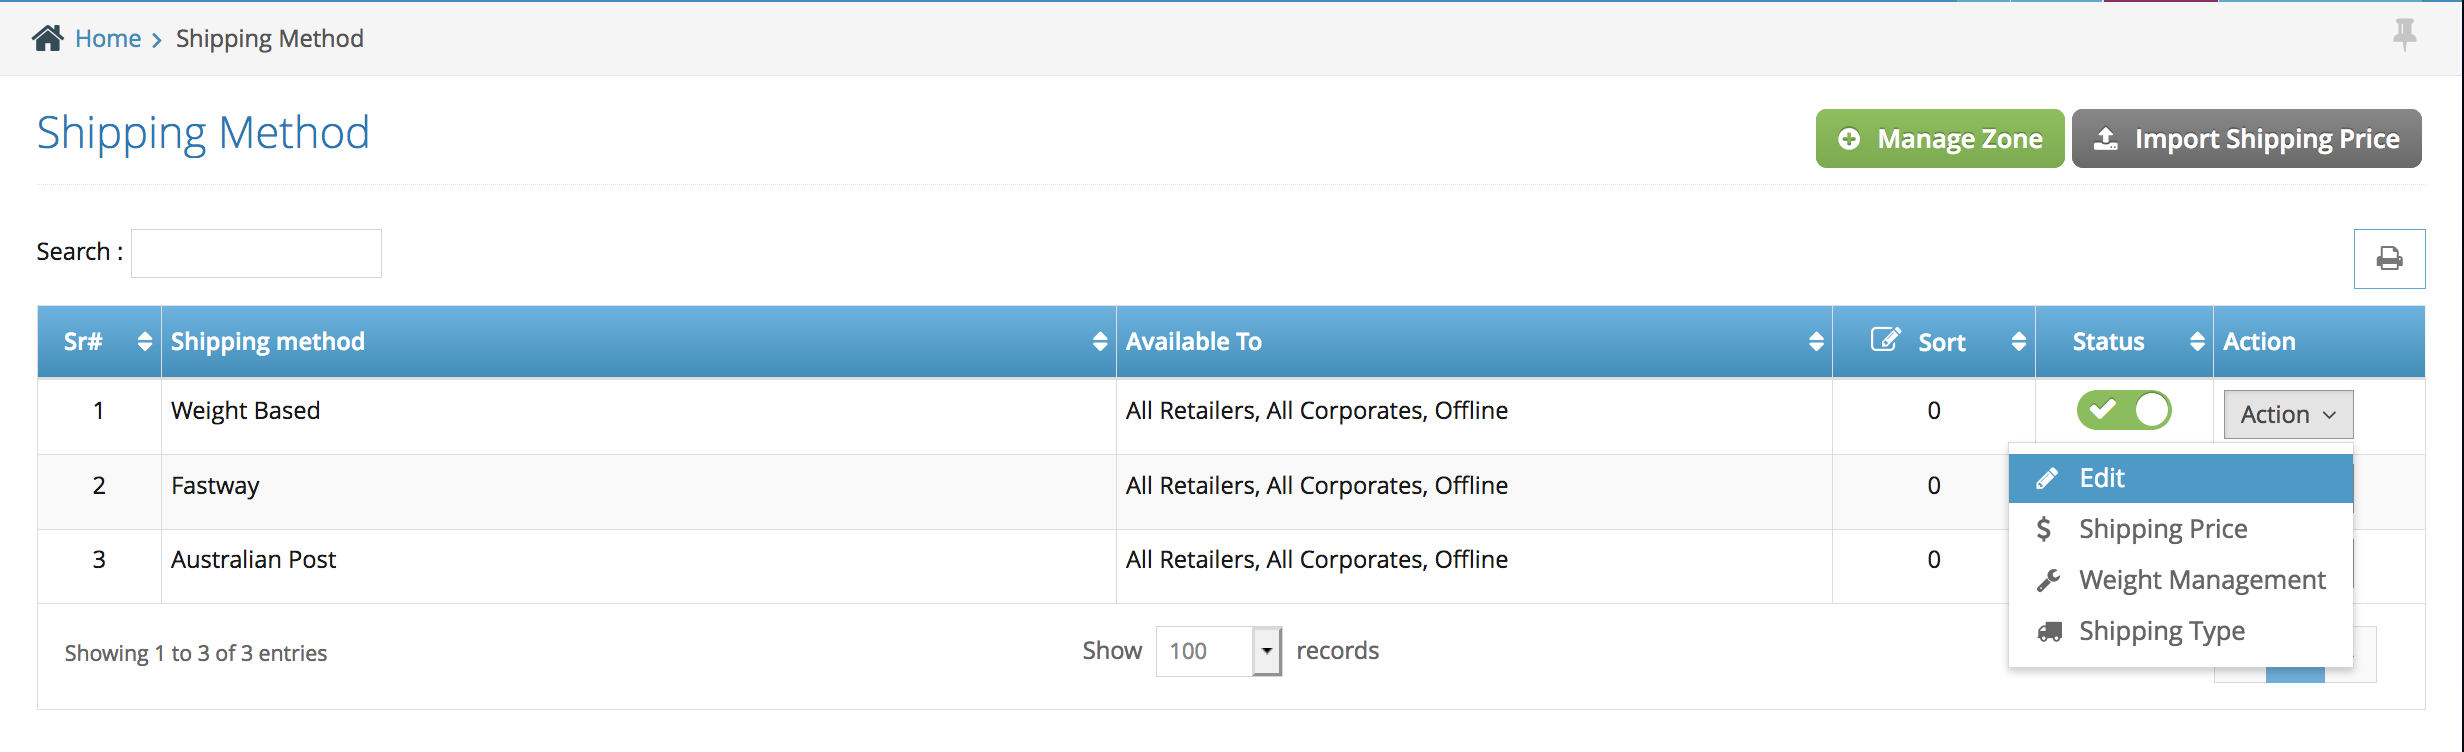
Step 3. Set up Shipping Weight Management: back to store configuration > shipping method > click action > select weight range
3a. Add new weight: click the ‘add weight’ – green button at the top
3b. fill out the weight range:
Weight from: starting weight range in kg
Weight to: maximum weight range in kg
Description: internal weight descriptions (e.g. local, satchel, etc..)
example of weight range :
weight from :0.5
weight to: 1
description: small satchel
3c. click save to save your weight range
note: you can add multiple weight range – example below
Step 4. Activate the Shipping Type: back to store configuration > shipping method > click action > select edit
4a. when you have created a new shipping type you will have to activate the shipping by moving the shipping type from the left-hand side to the right side
left side: the shipping is inactive
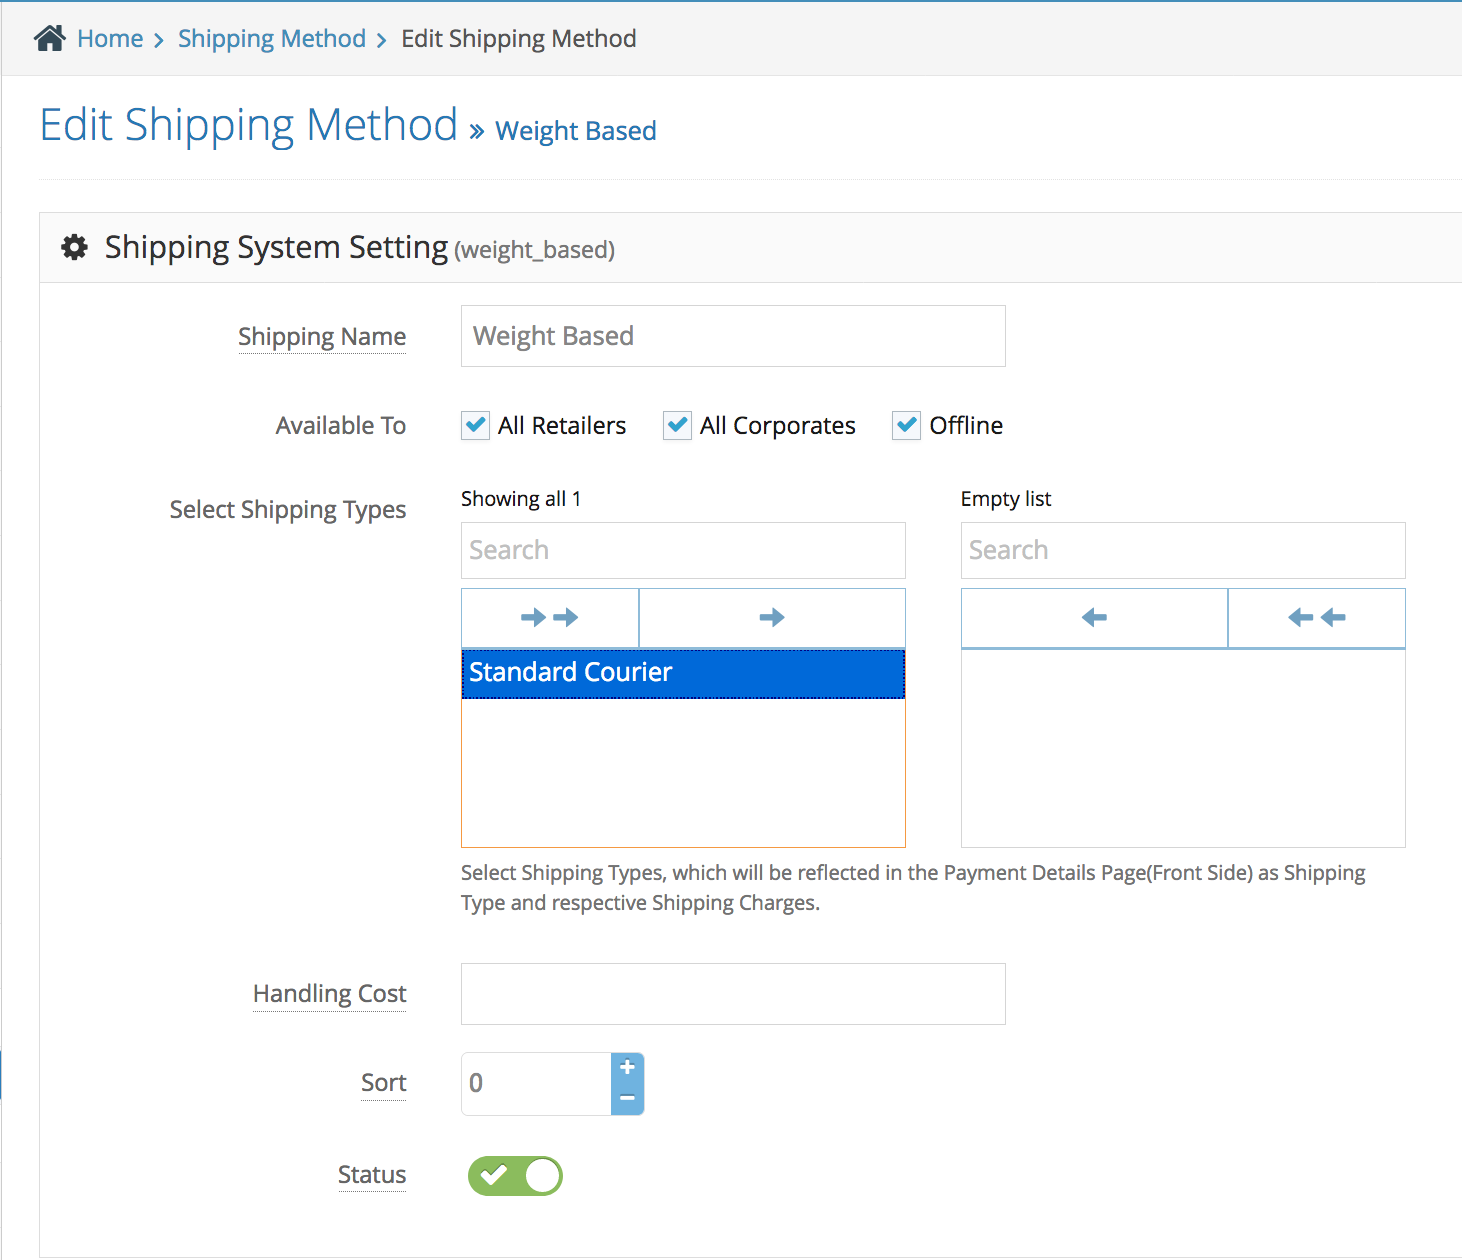
right side: the shipping is active
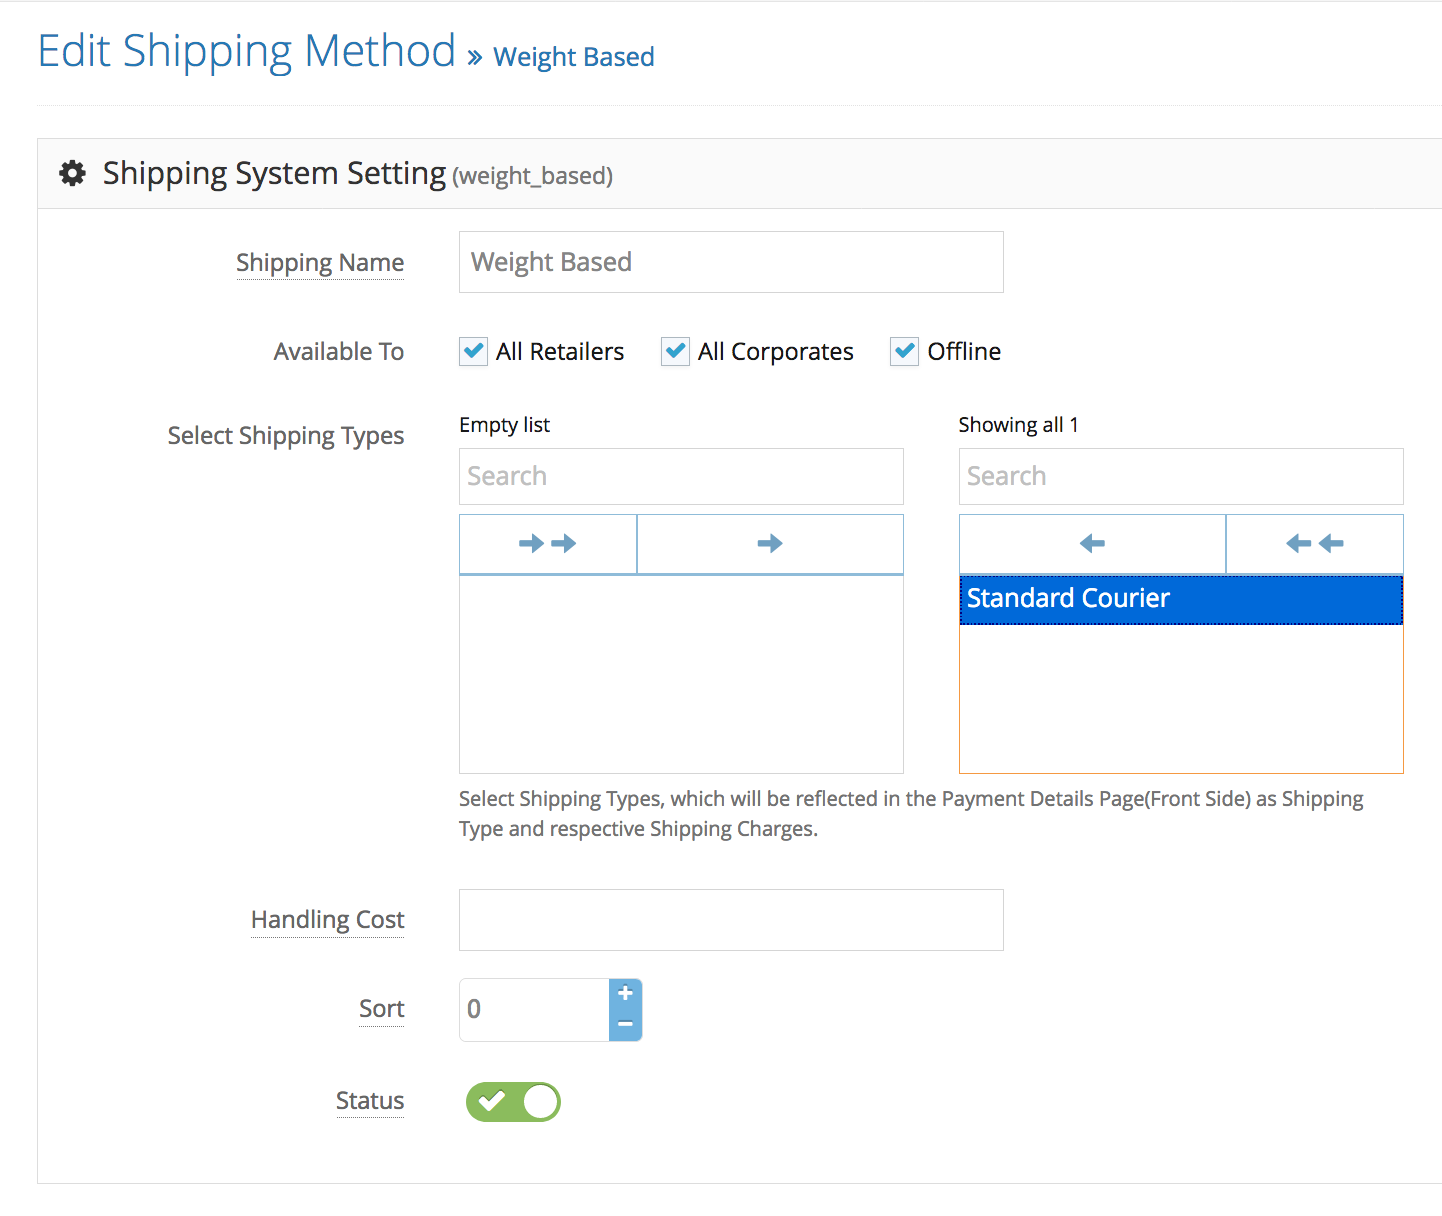
4b. click save to save the changes.
Step 5. Set up the Shipping Price: back to store configuration > shipping method > click action > select shipping price
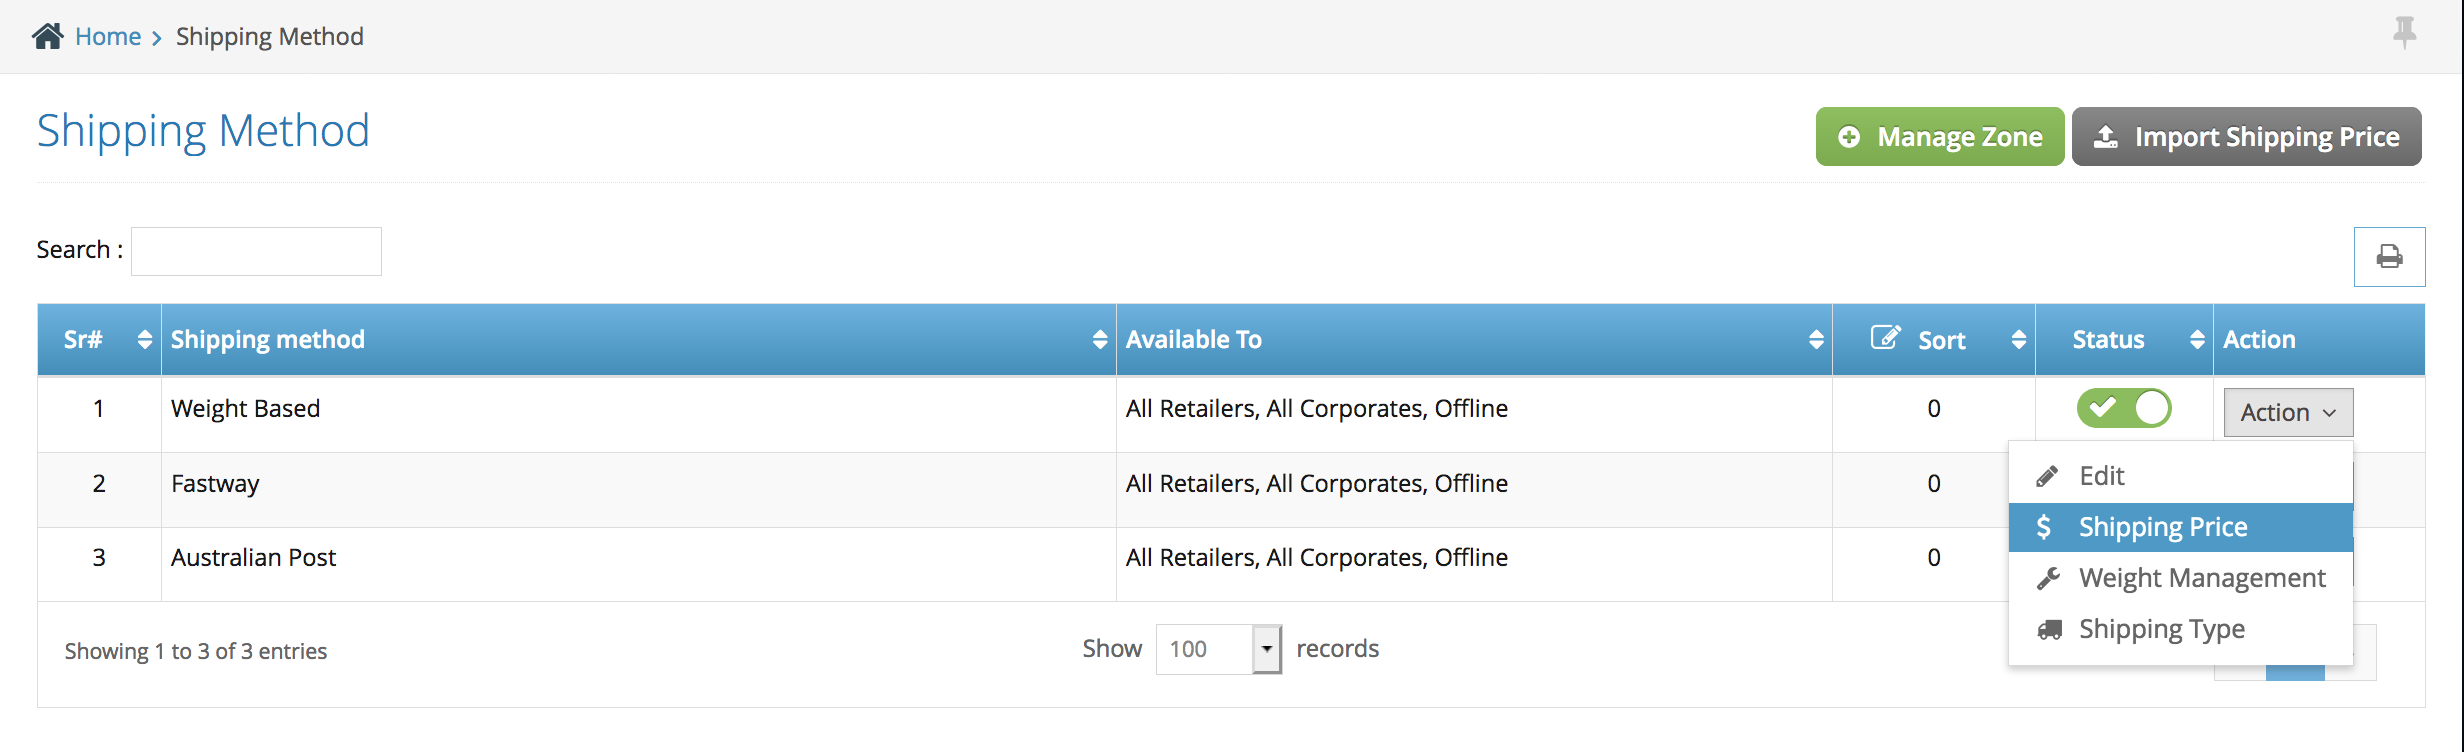
5a. input the prices on each shipping type (if you have multiple shipping type)
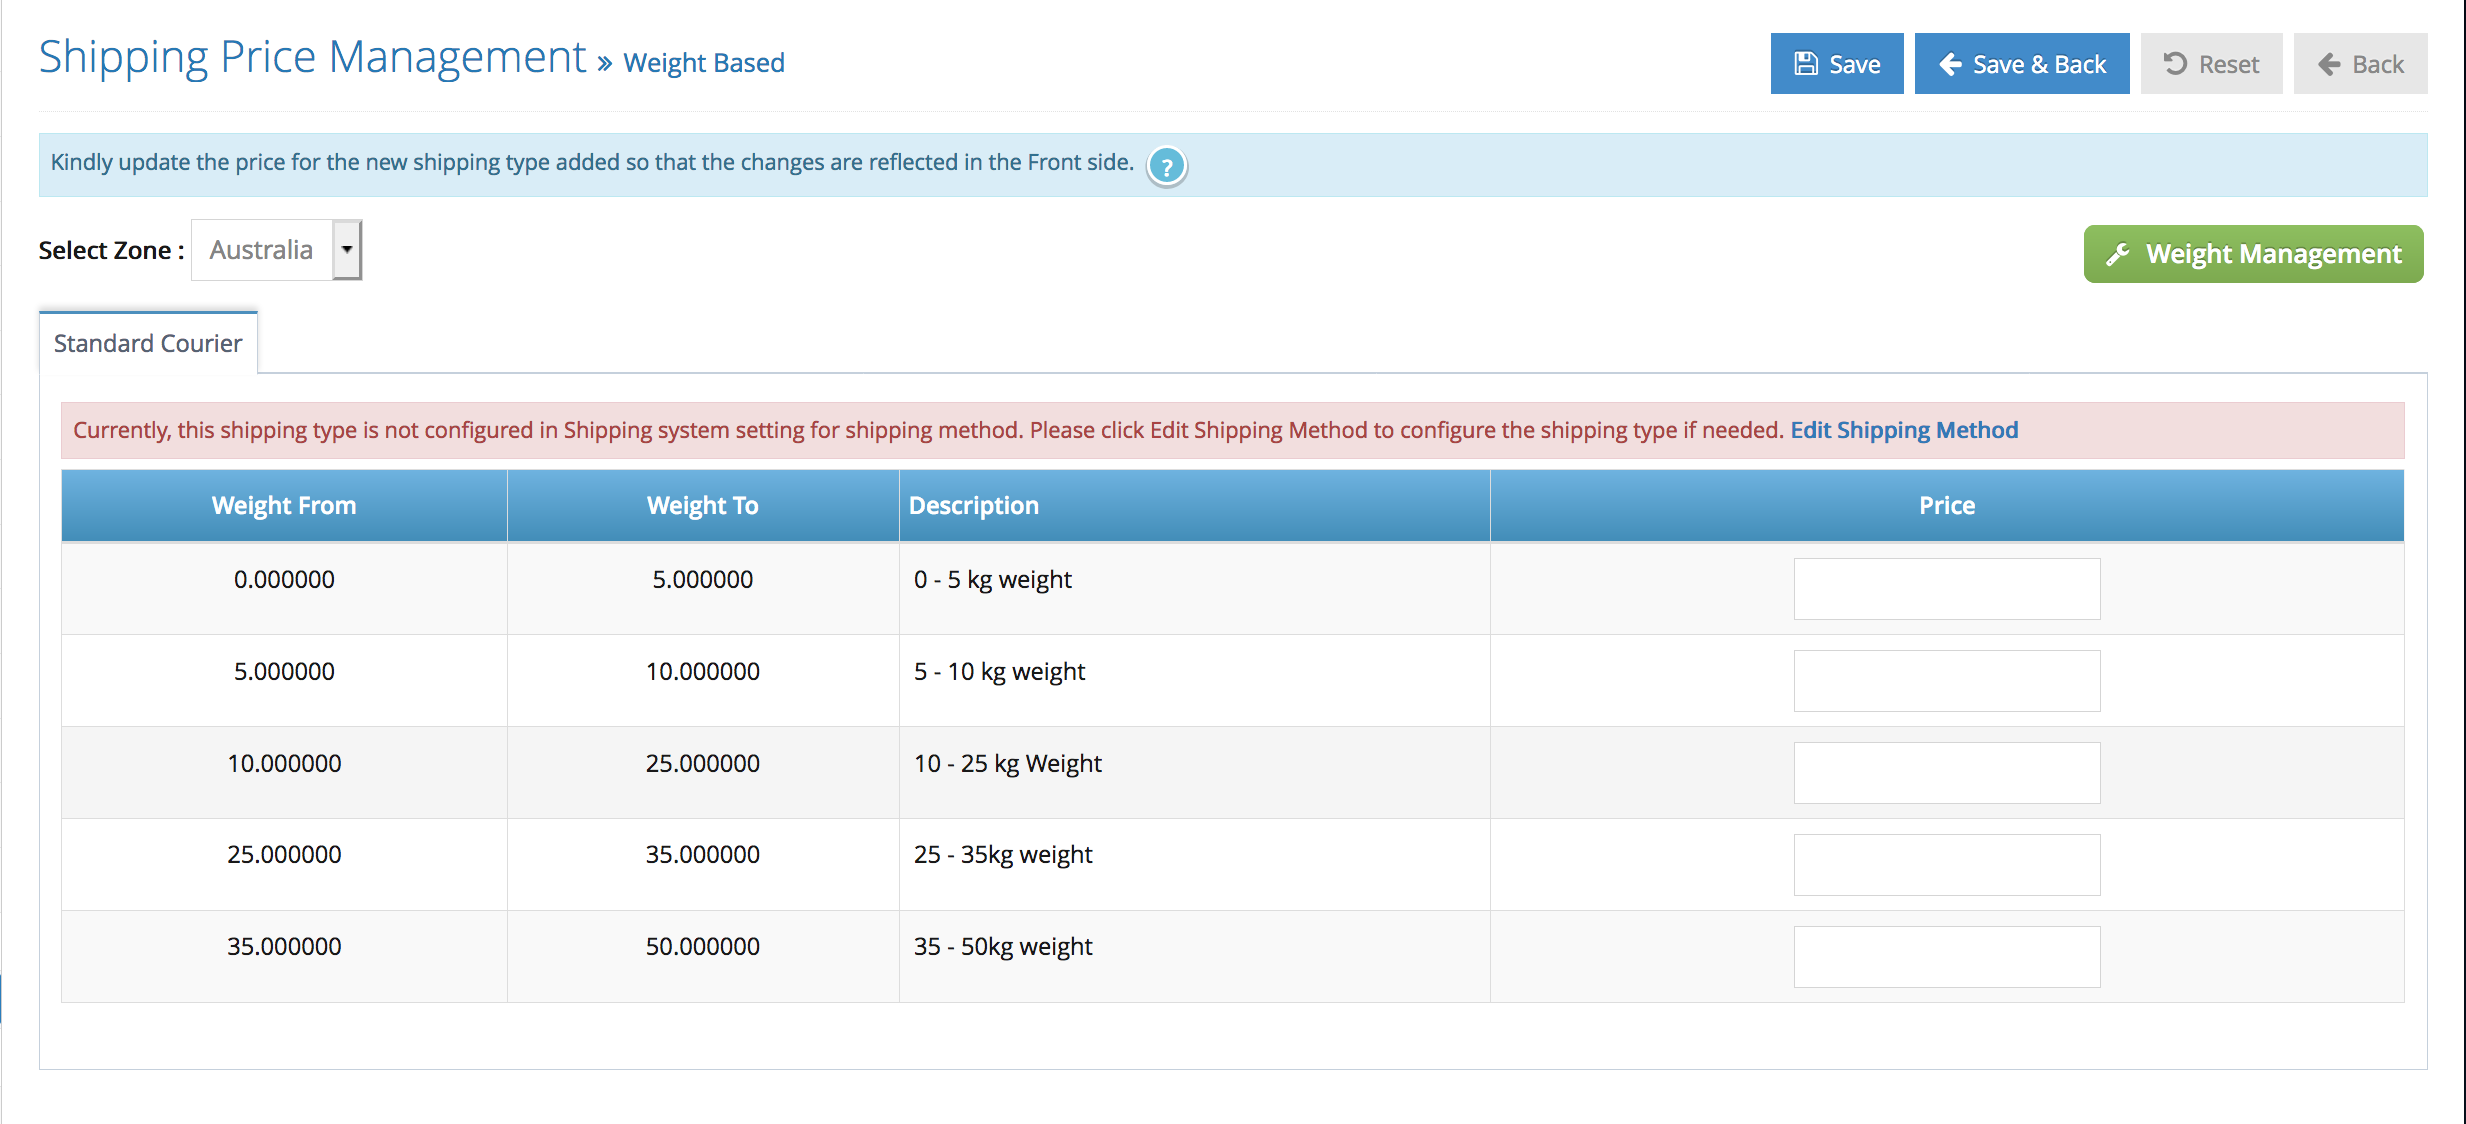
note: you have the ability of not offering a certain shipping type (when multiple shipping types are active) when the order has a total weight on a certain weight range by leaving the price blank – example case below
Study case: you have 2 shipping types (satchel and parcel) – satchel options are for anything below 10kg, and the parcel is everything above 10kg. This way you can leave the price blank on satchel options for all weight range above 10kg, and leave all weight range below 10kg blank on parcel options.
5b. click save to save your changes.
Step 6. test it from your front end side
Frequently Asked Questions
Q: How can i create a free shipping on my website?
A: Create one shipping type and call it ‘FREE SHIPPING’ (you can name it anything you want) > set the weight range from 0 – 999kg > make it active > and set the price to $0
Q: How to set a flat rate shipping on my website?
A: Create one shipping type and call it ‘Flat rate’ (you can name it anything you want) > set the weight range from 0 – 999kg > make it active > and set the price.
Step 1. Login to the Admin side and navigate to left-hand side navigation bar Store Configuration > Shipping Method > Select Fastway > Action > Edit
Step 2. Click the ‘Create API in Fastway’
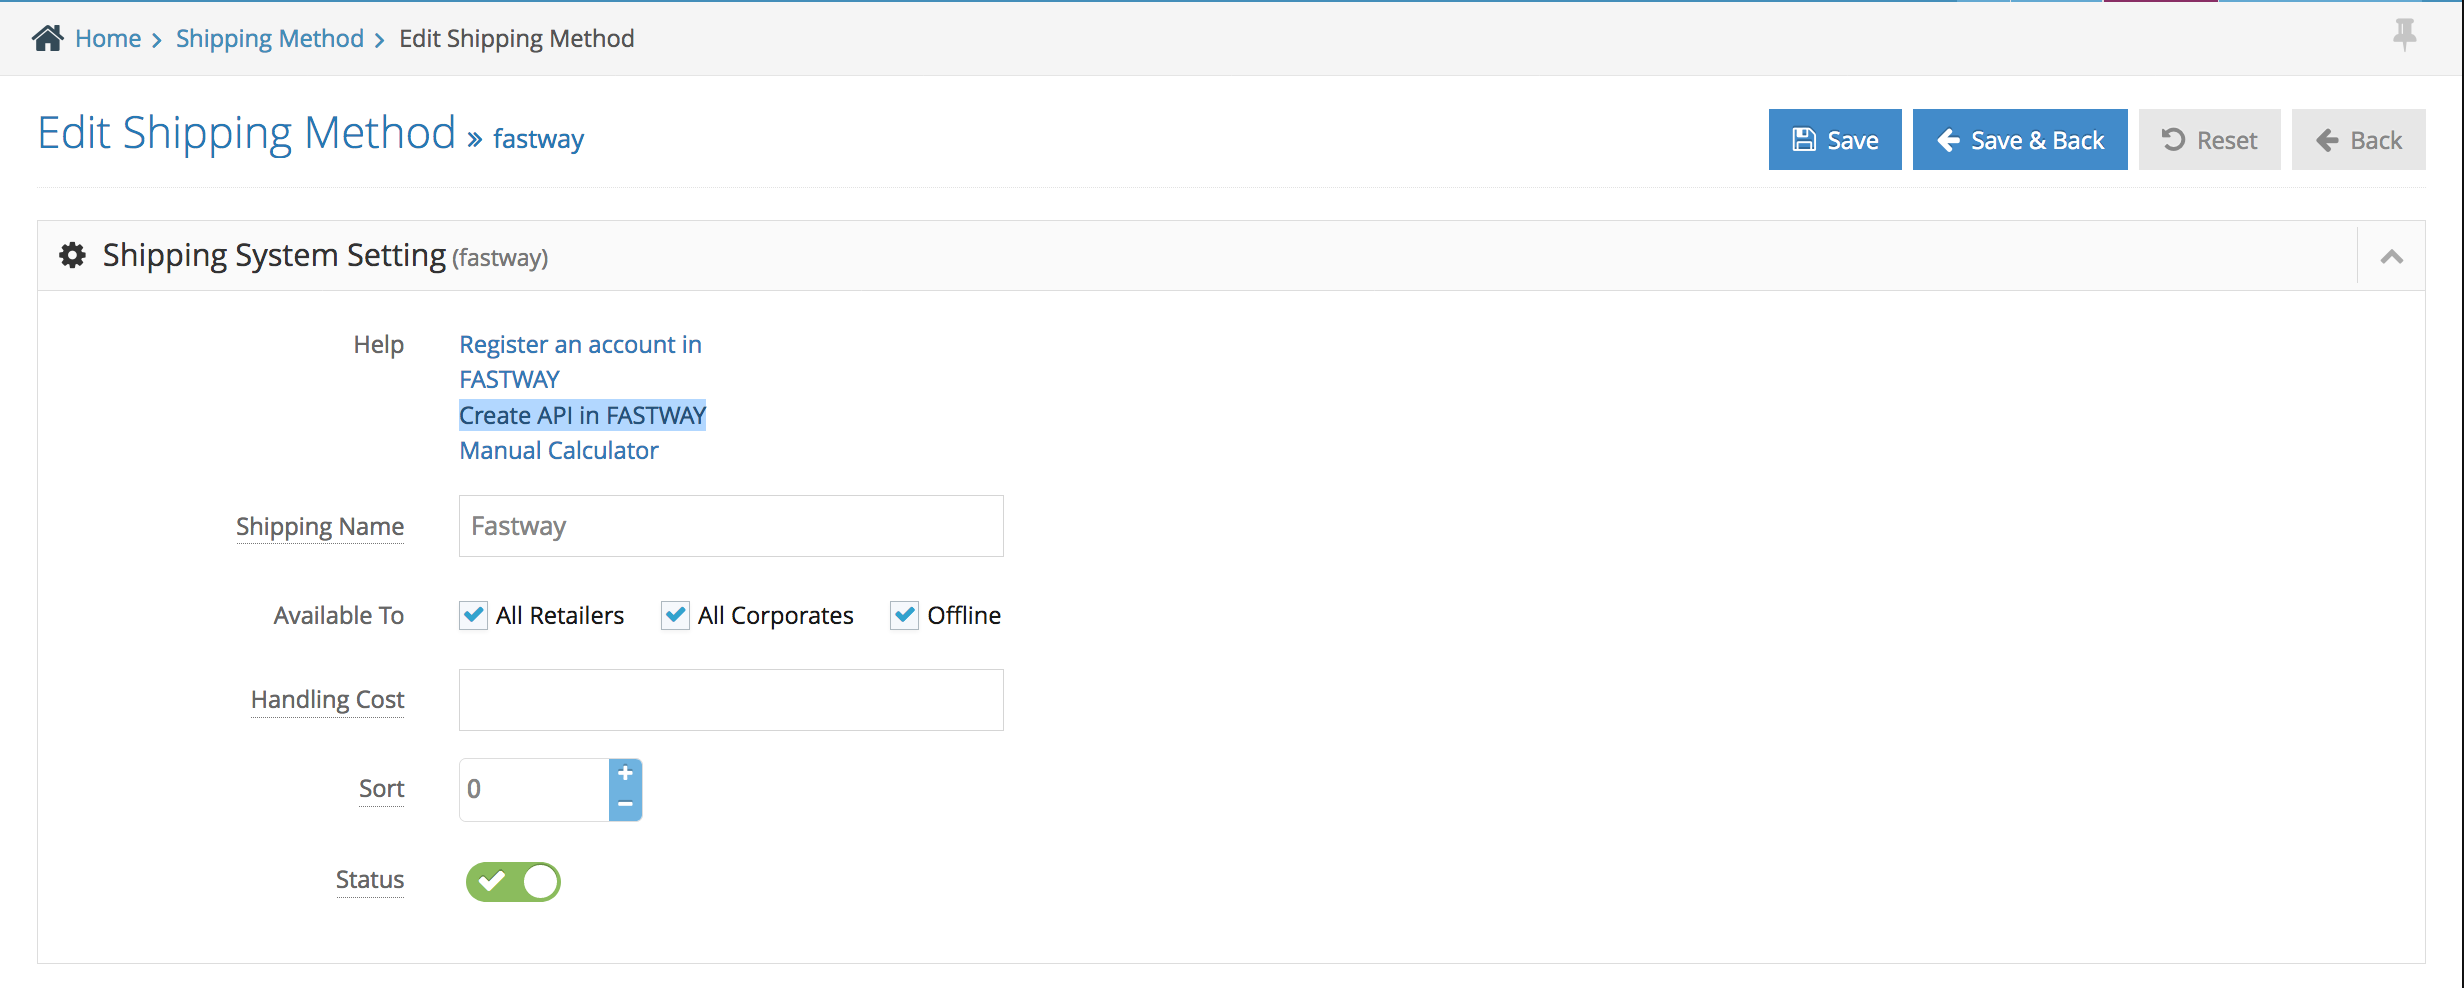
Step 3. Fill out the Fastway registration form
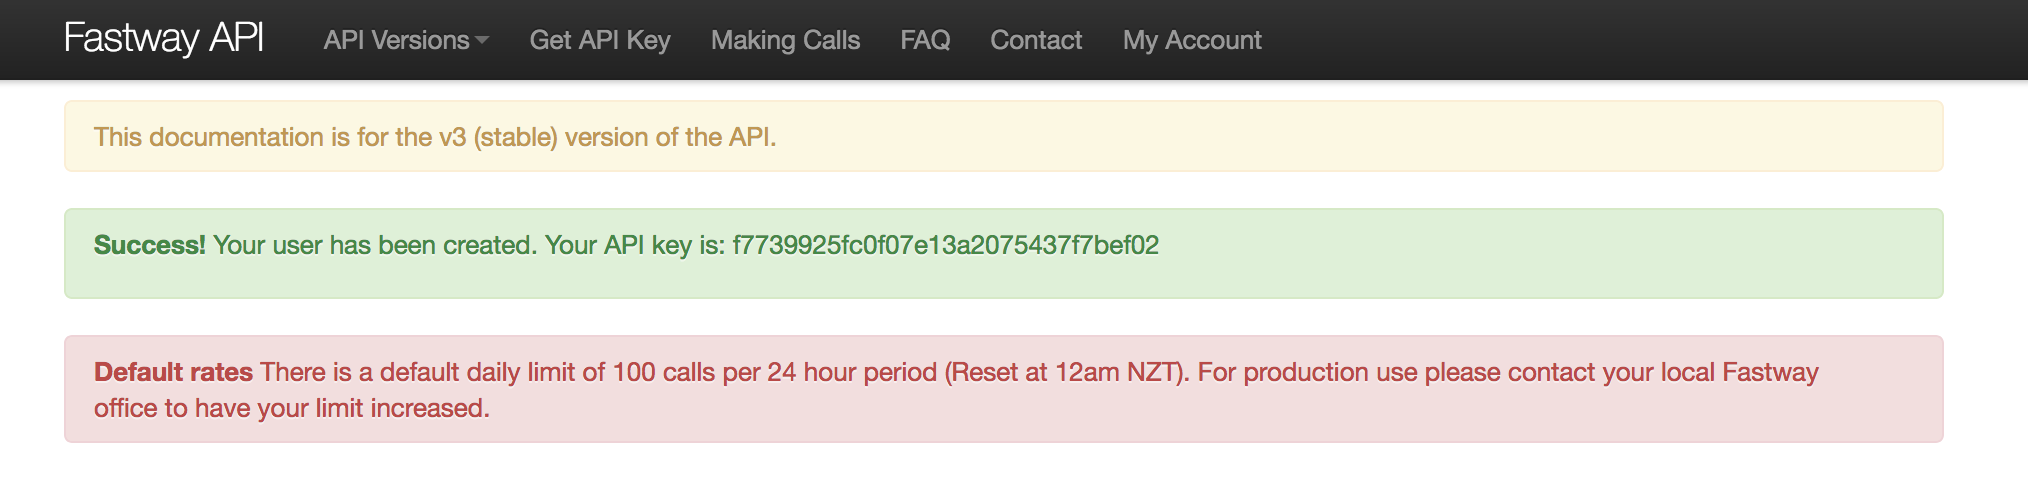
Step 4. Once you have submitted you will receive the API key at the top of the page, copy the API Key (example below)
Step 5. Back to the admin side Store Configuration > Shipping Method > Select Fastway > Action > Edit
Step 6. Paste the API key on the API key box
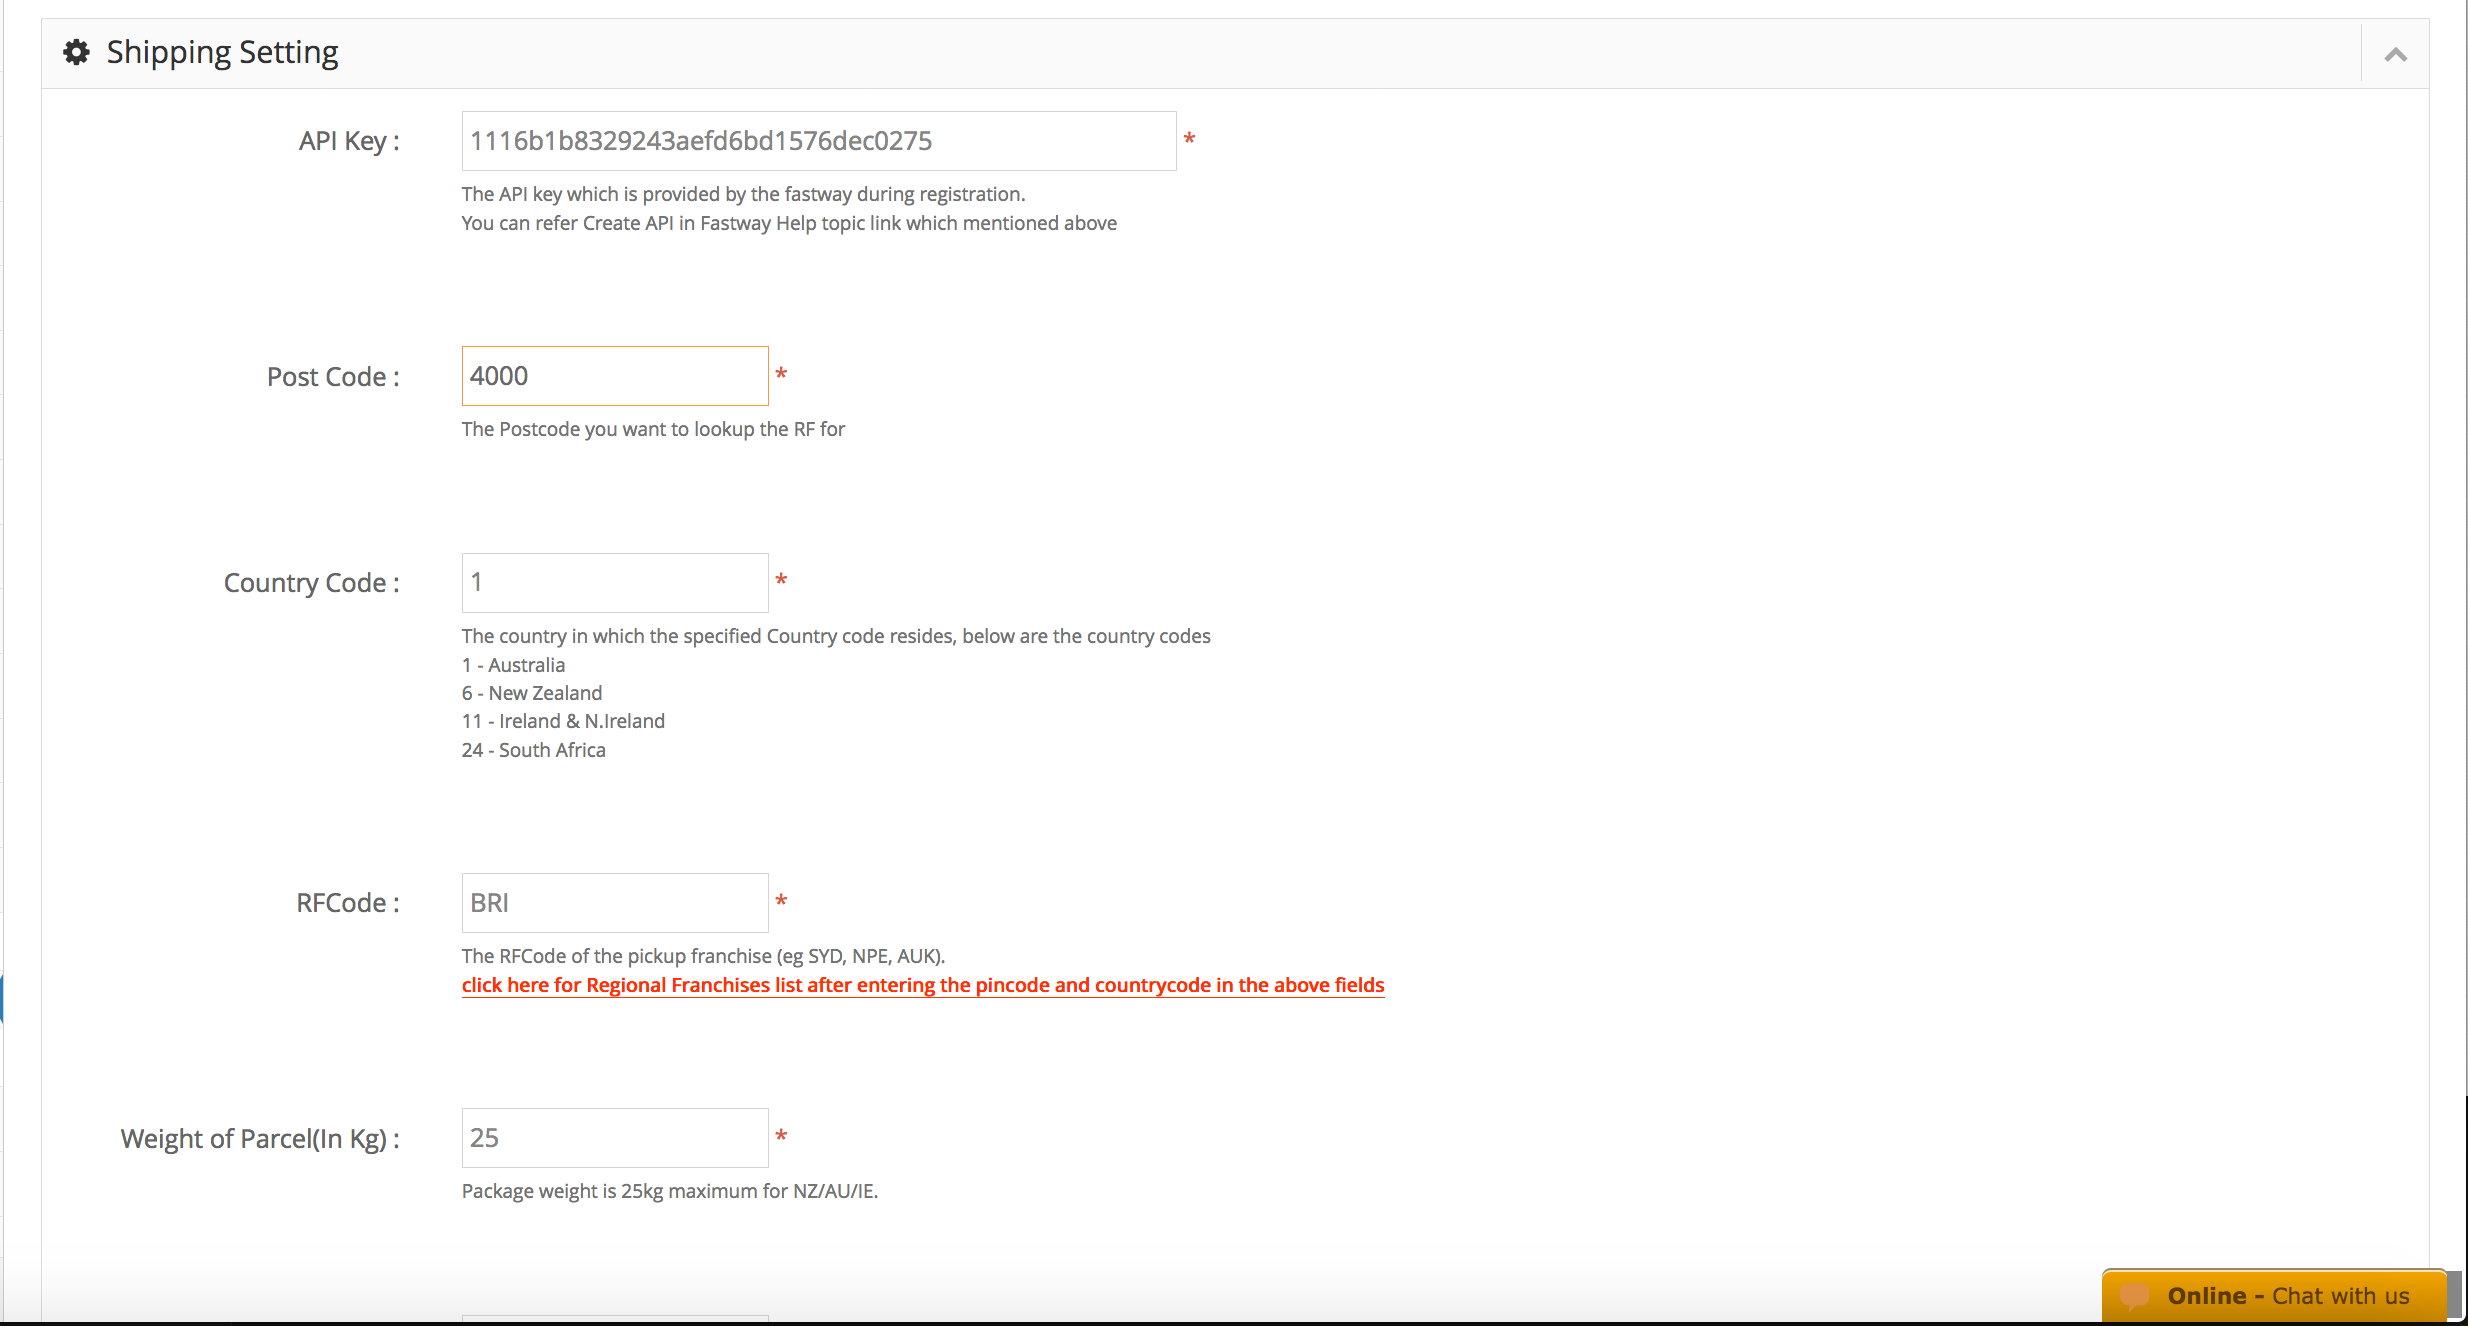
Insert your postcode (fastway will be based the distance calculation from this postcode to the customers postcode)
Country Code: 1 for Australia
RF Code: once you have put your postcode – click the red link to get your RF code
Weight in Parcel: the maximum weight fastway will use to measure the total weight.
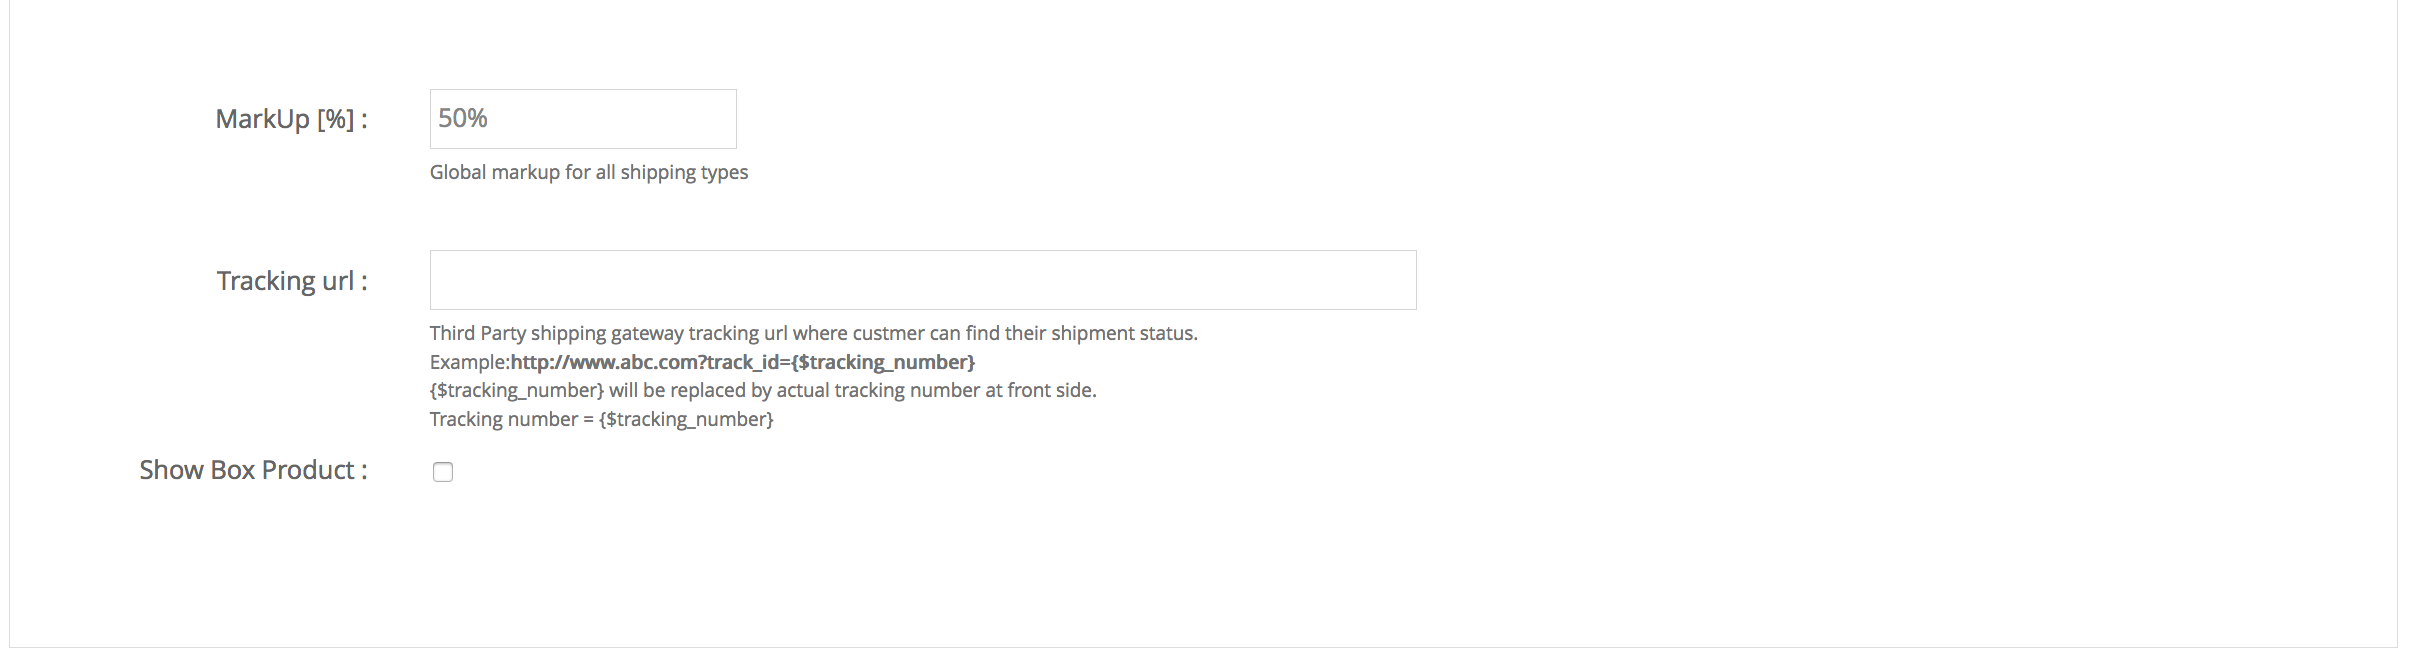
Set the Mark up Box: the perecentage will automatically marked up fastway charges – the marked up price will be the one your customers will see.
Tracking URL : set the parameters of fastway tracking URL – please refer to this training article >
Show Box Products: feature to enable the flat rate fastway shipping (please contact fastway for more information).
Step 7. Click Save to save your changes.
Step 8. Test it from your website.
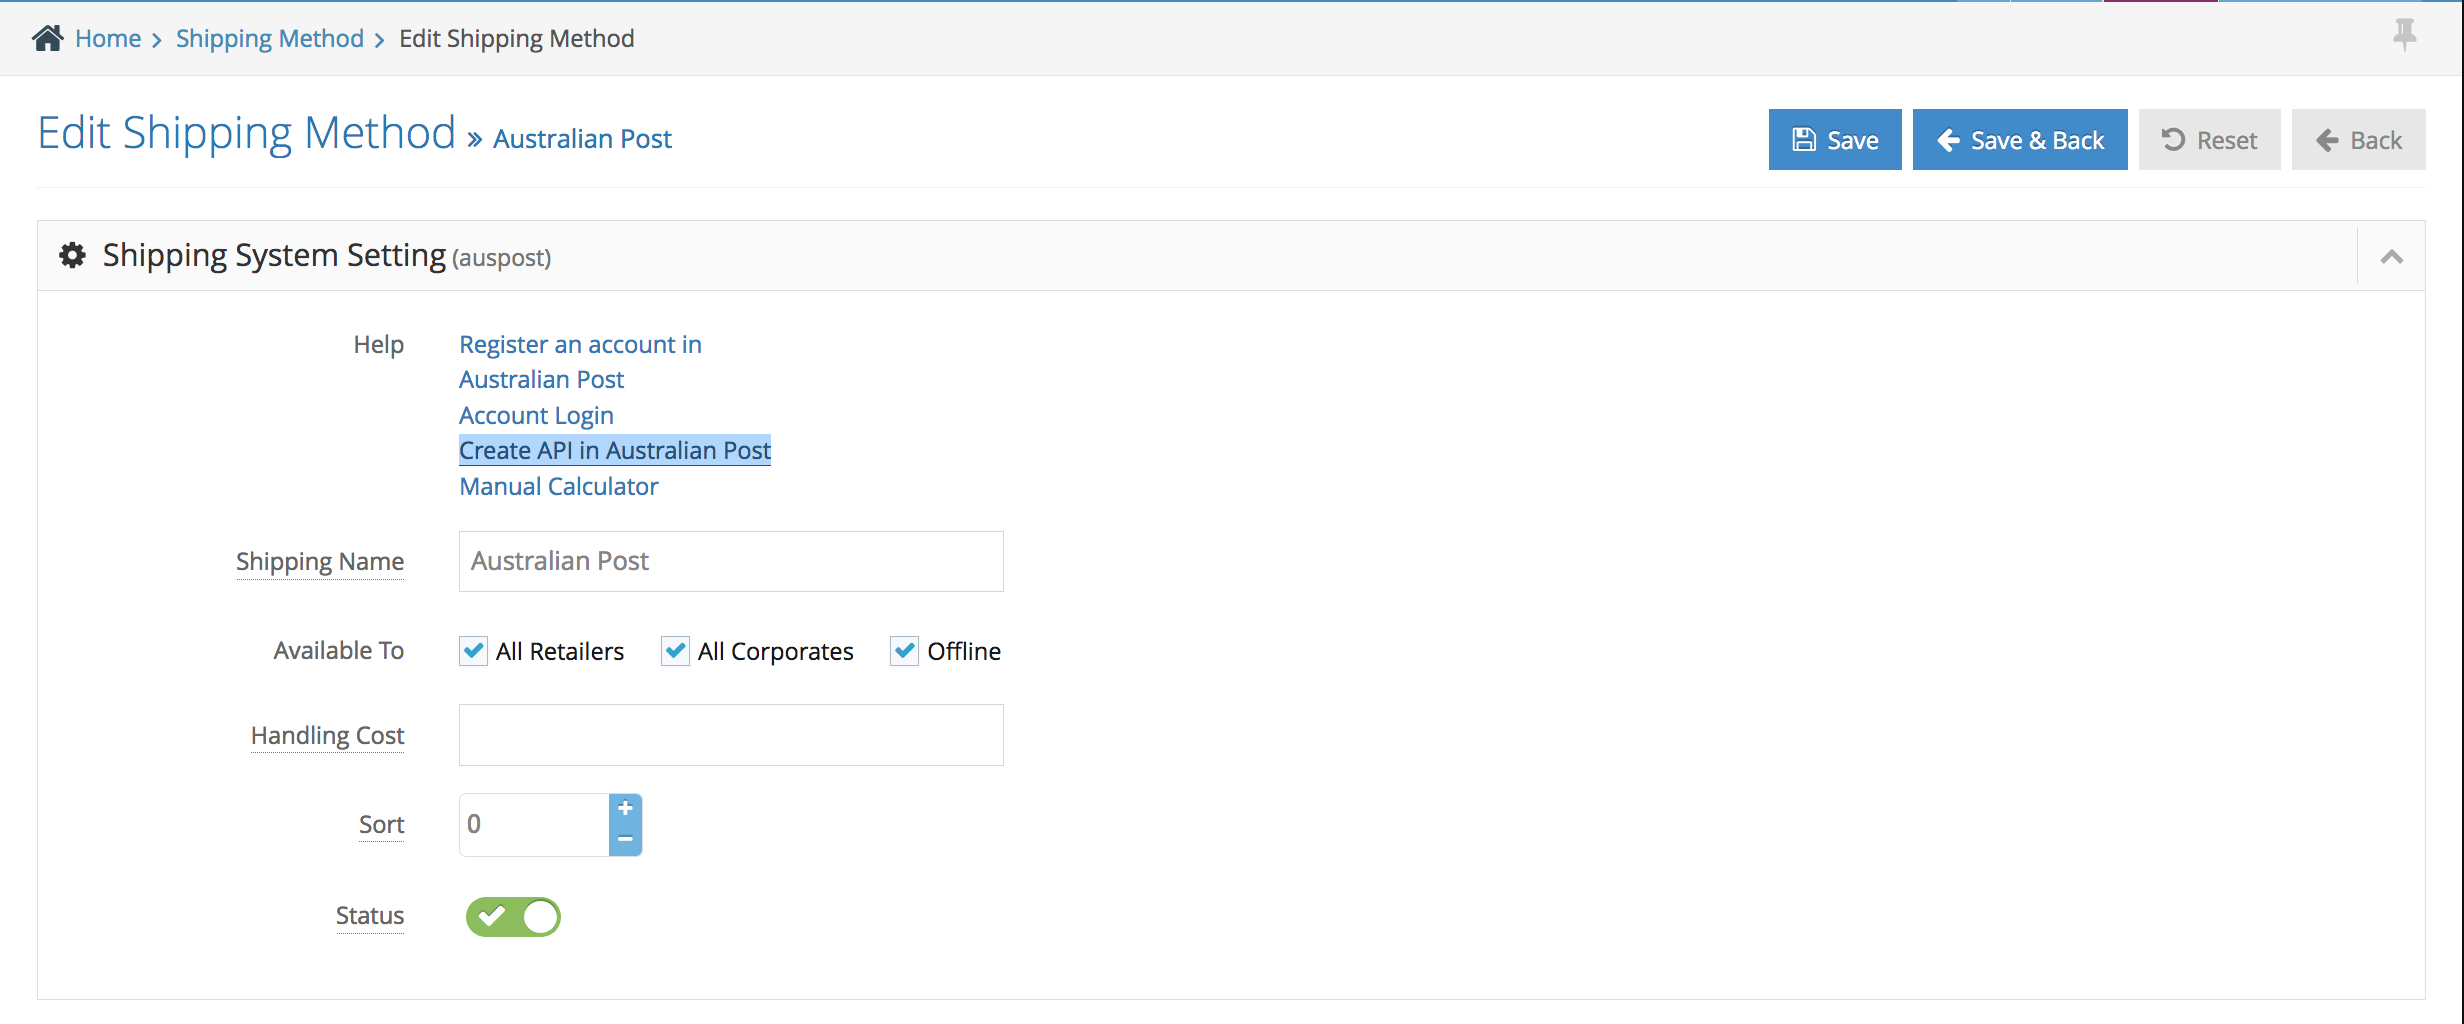
Step 1. Login to the Admin side and navigate to left-hand side navigation bar Store Configuration > Shipping Method > Select Australia Post > Action > Edit
Step 2. Select Create API in Australia Post
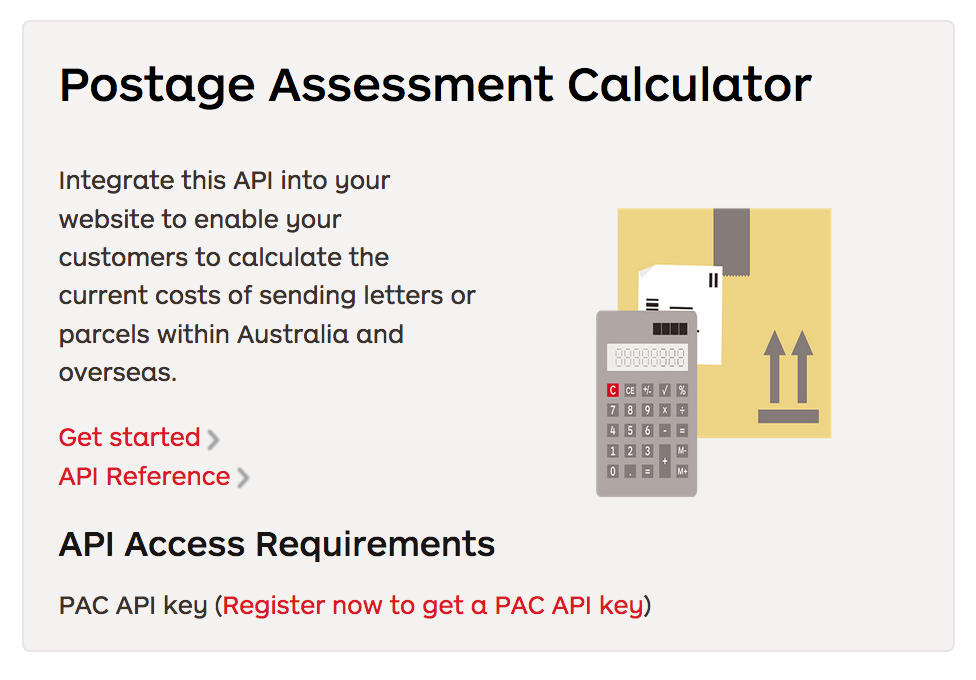
Step 3. Select the ‘Postage Assessment Calculator’ option > click ‘register now to get a PAC API Key’
Step 4. Fill out the form for Auspost API key registration
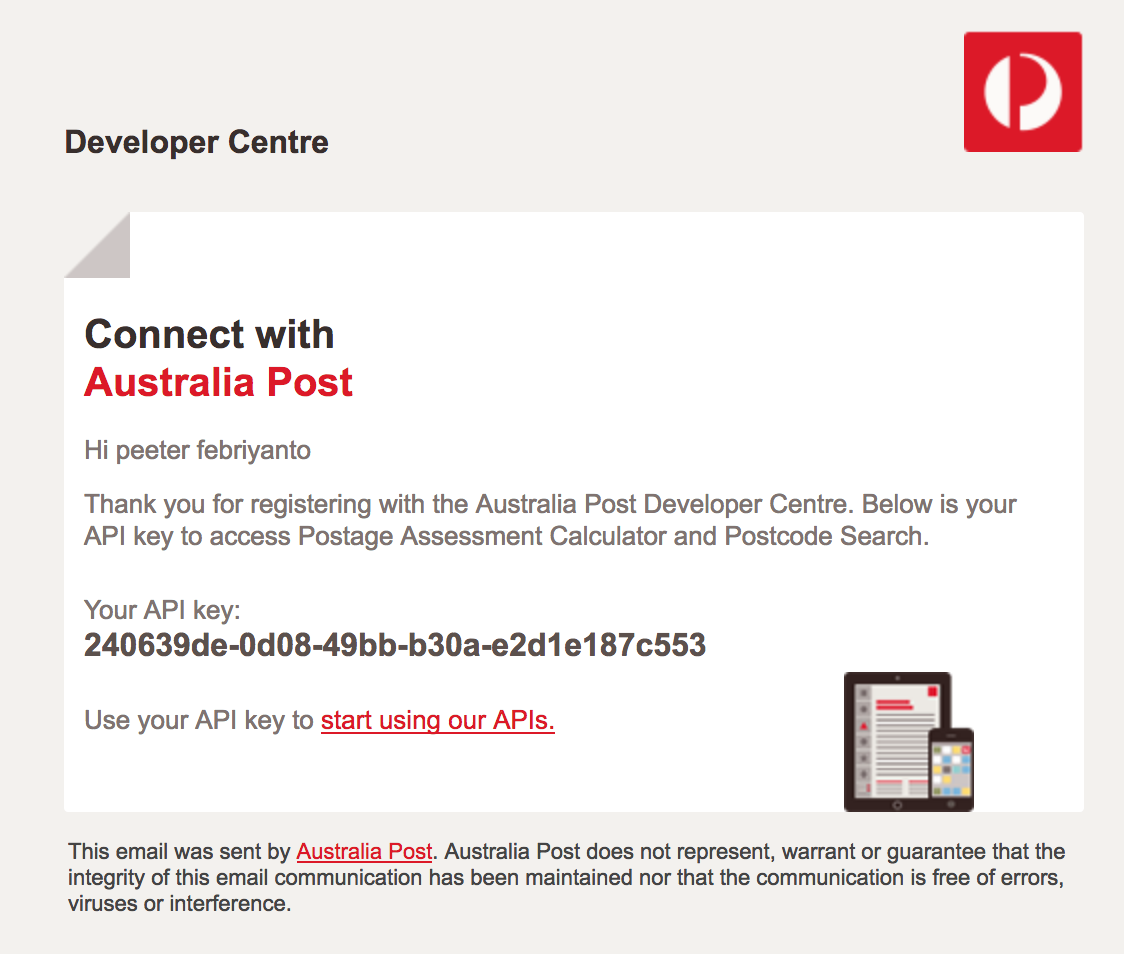
Step 5. Check your inbox > copy the API key from the email received – example below
Step 6. back to the admi side navigate to left-hand side navigation bar Store Configuration > Shipping Method > Select Australia Post > Action > Edit
Step 7. Paste the API key, set up the mark up, set your postcode (your company address postcode), parcel length, height, width, and weight.
note: the normal set up for the parcel length, width and height is 10x30x21 and weight is 22kg.
Step 8. Set the tracking URL parameter – please check this article >
Step 9. Click Save to save your changes
Step 10. Test it from your front end.
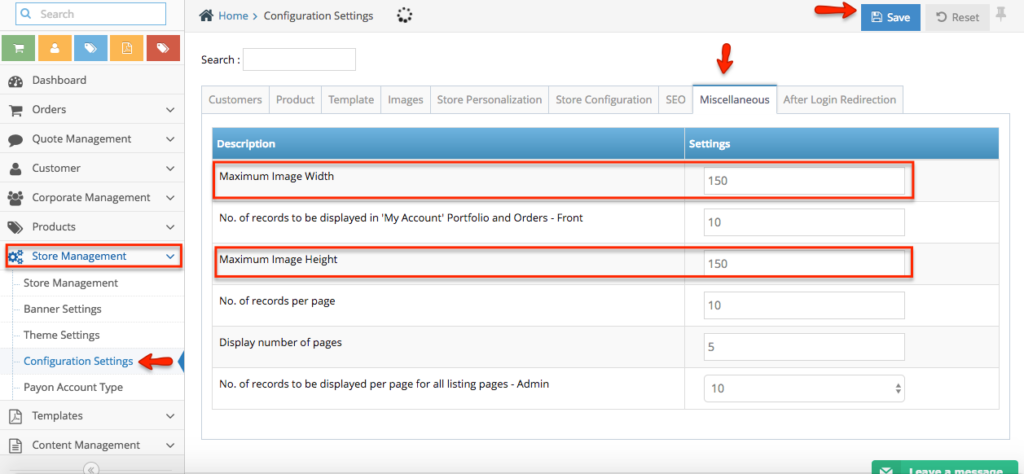
Step 1. From the home page, navigate to Store Management section, then click Configuration Settings.
Step 2. Go to Miscellaneous tab and look for Maximum Image Width, and Maximum Image Height. Update the value on the given boxes under Settings column.
Step 3. Click Save button once done.
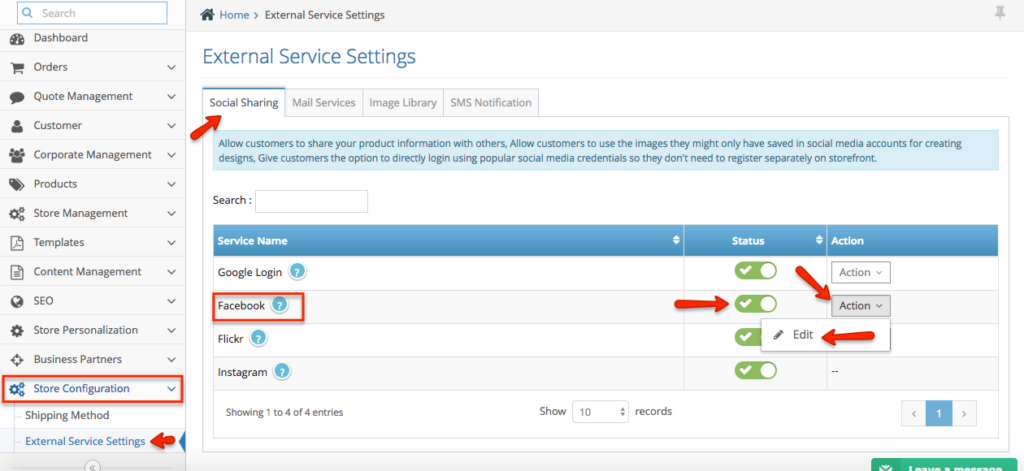
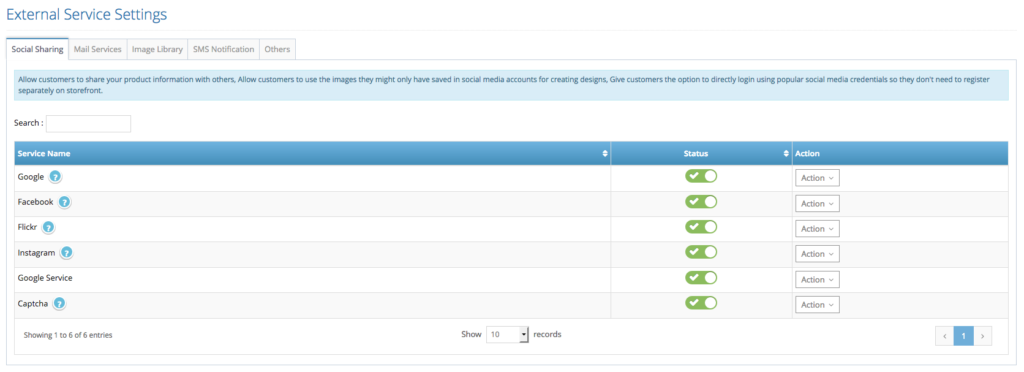
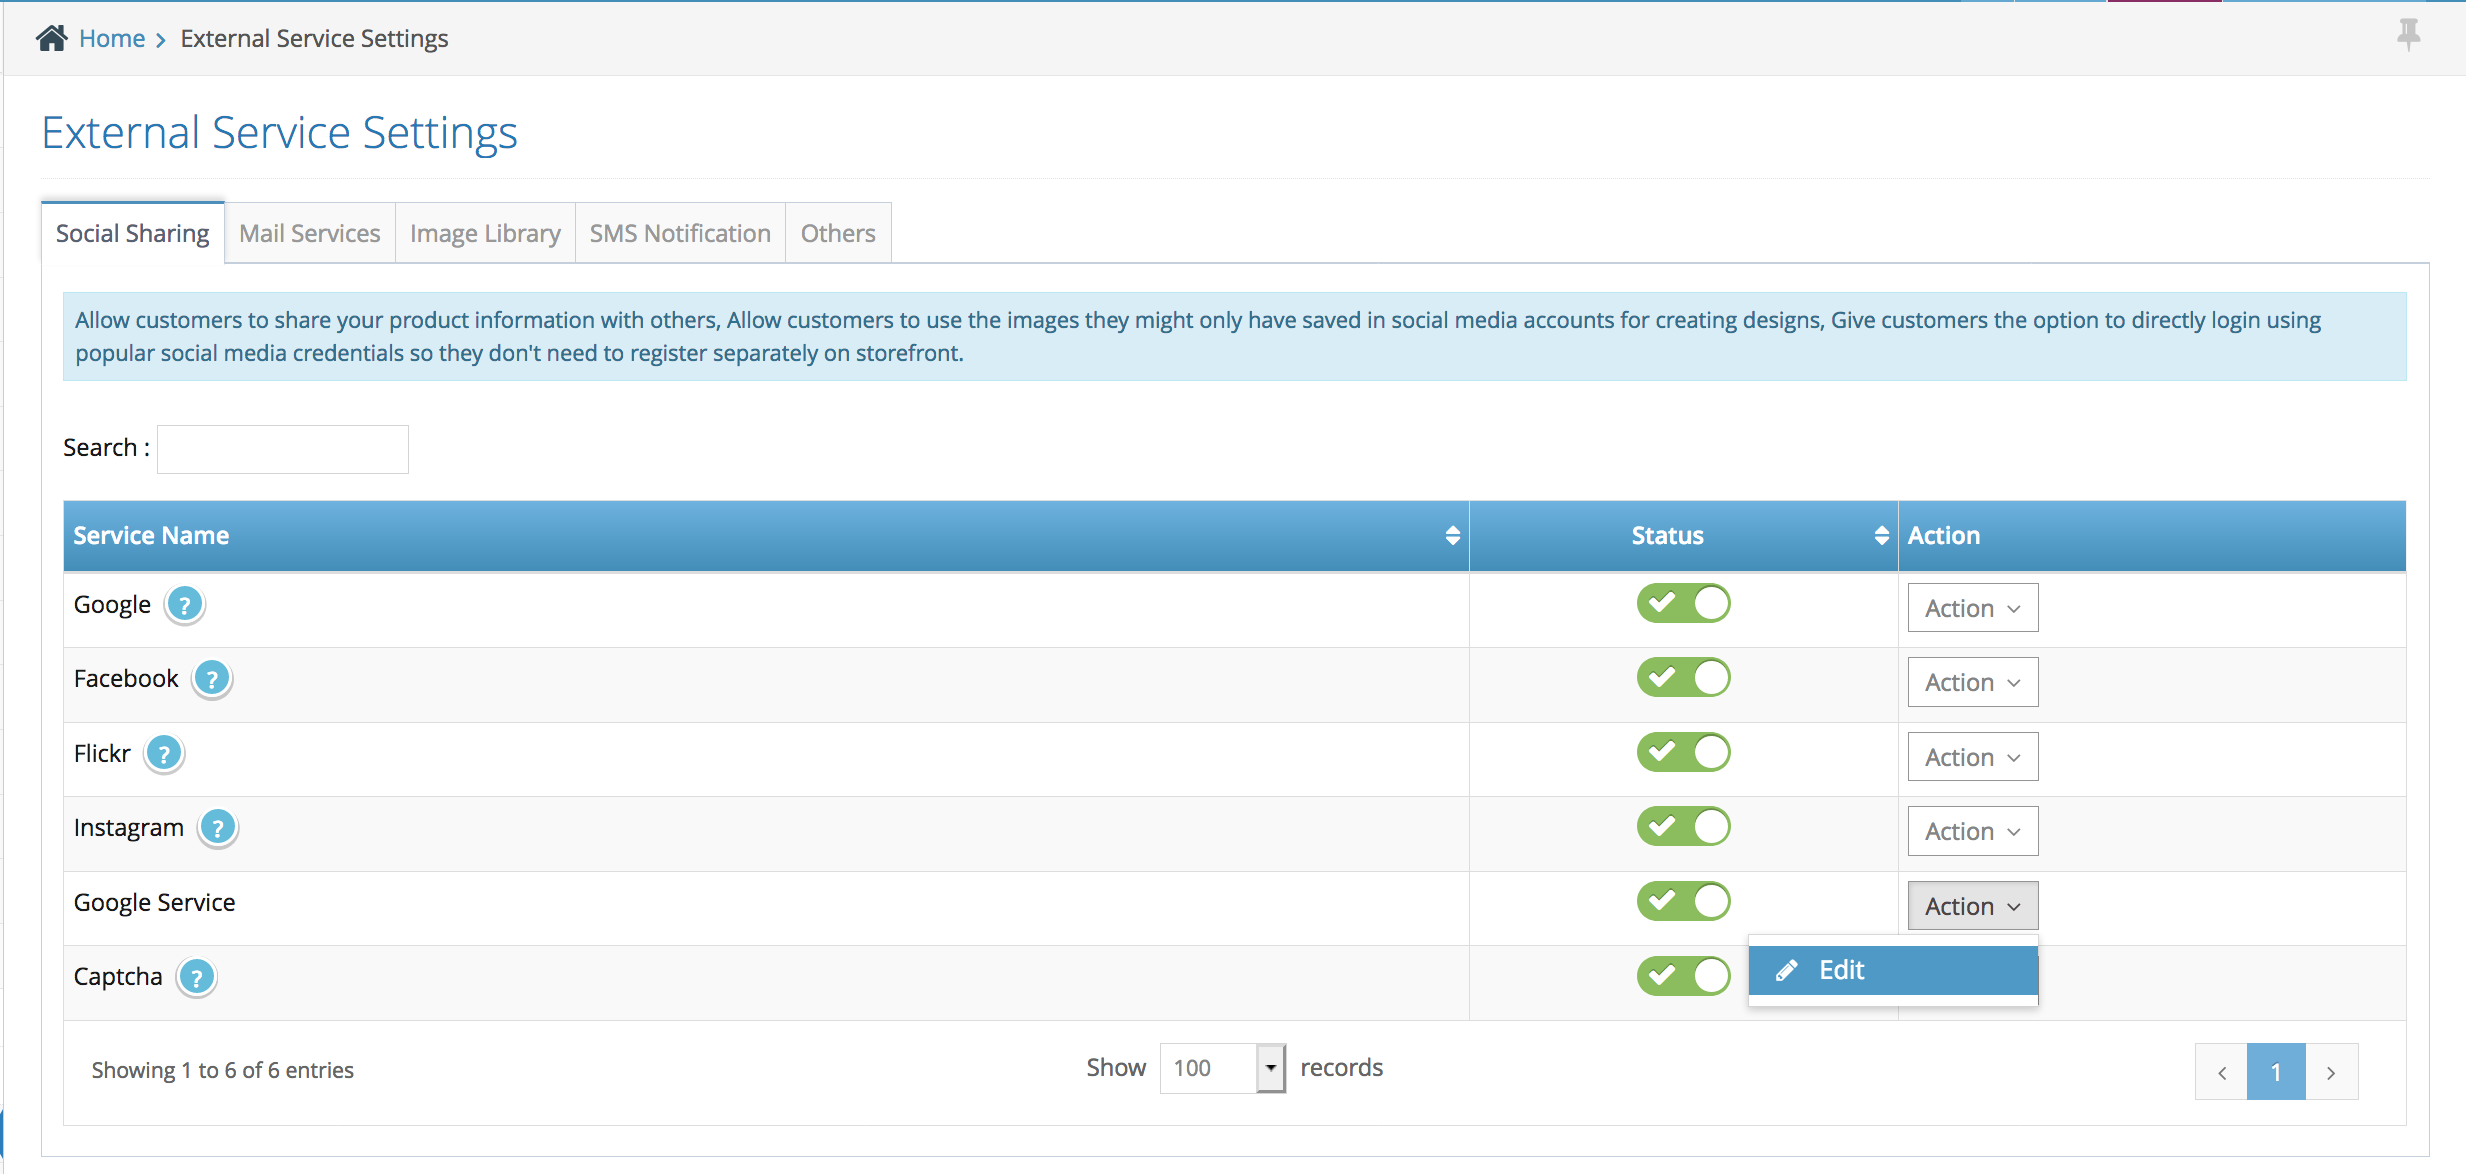
Step 1. From the home page, navigate to Store Configuration > External Service Settings.
Step 2. Under Social Sharing, look for Facebook. In this page, you can enable its status. Click Action button and Select Edit.
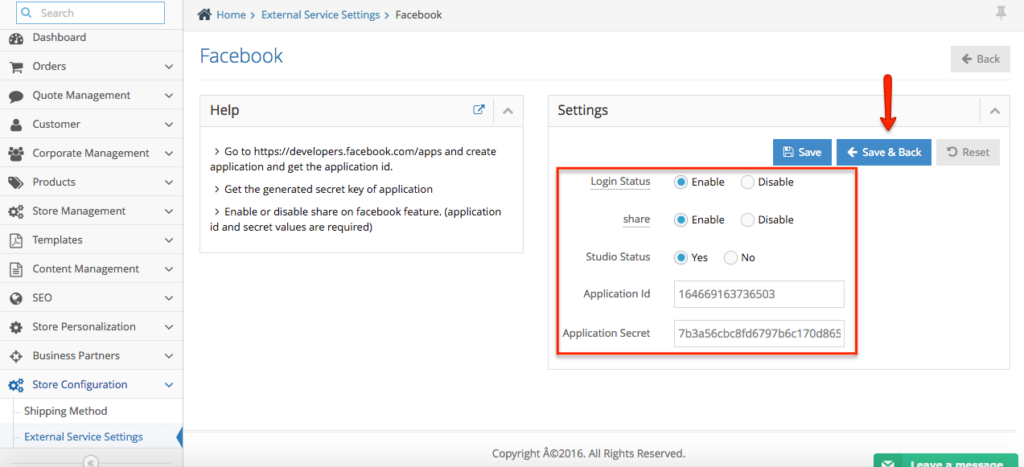
Step 3. Fill out the settings. Once done, click Save & Back button to apply changes.
Once you have completed the admin set up, please follow these steps below
1. Login to your Facebook Account with your Facebook credentials
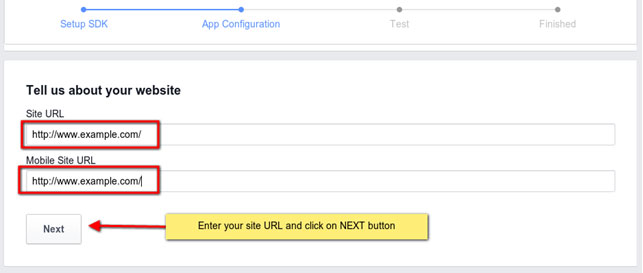
2. Go to this URL: https://developers.facebook.com/apps/ link Click on Add a new APP link form My apps menu.
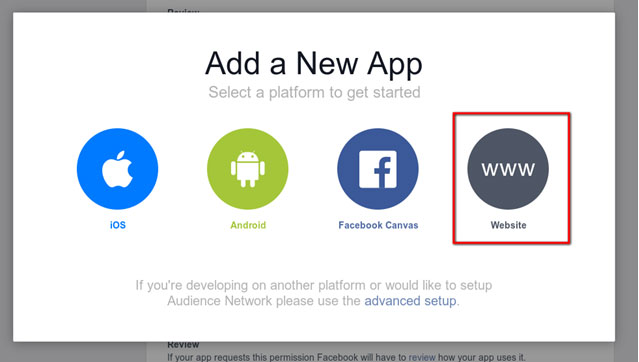
3. Select Website platform form list of platforms
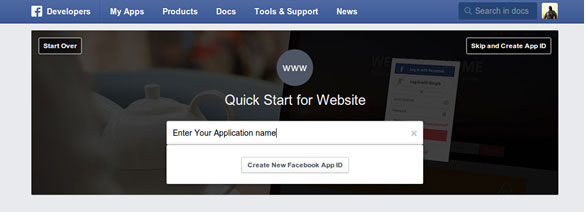
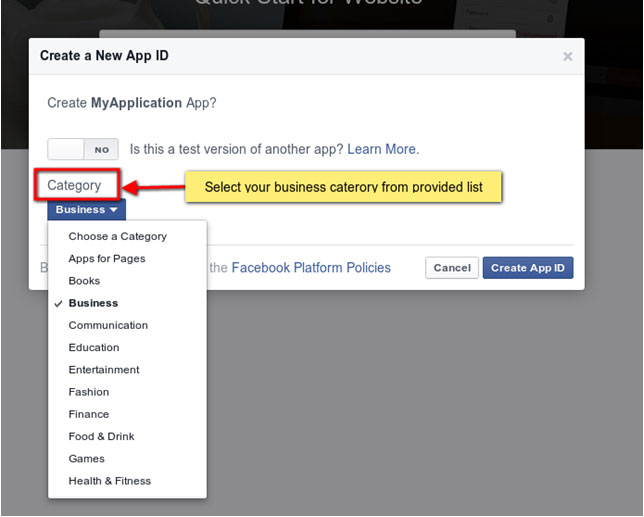
4. Enter your application name and Click on Create New Facebook App ID.
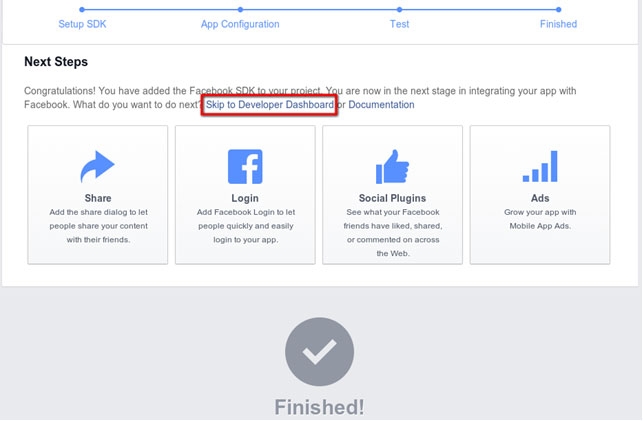
7. Scroll down till end of the page and then select Skip to Developer Dashboard link.
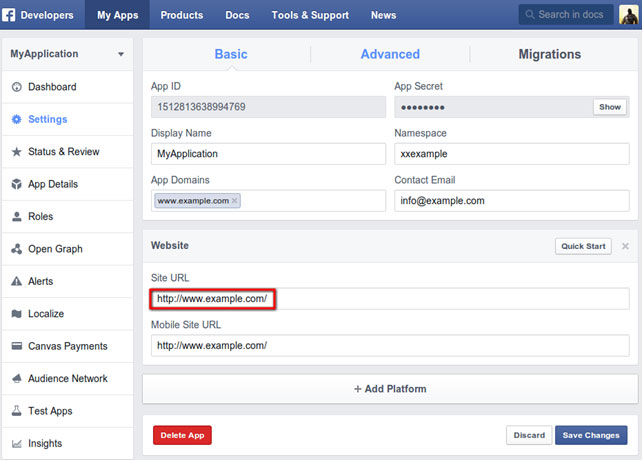
8. Now click on second tab Settings from left panel, Inset valid email address and inset domain name without http in app domains.
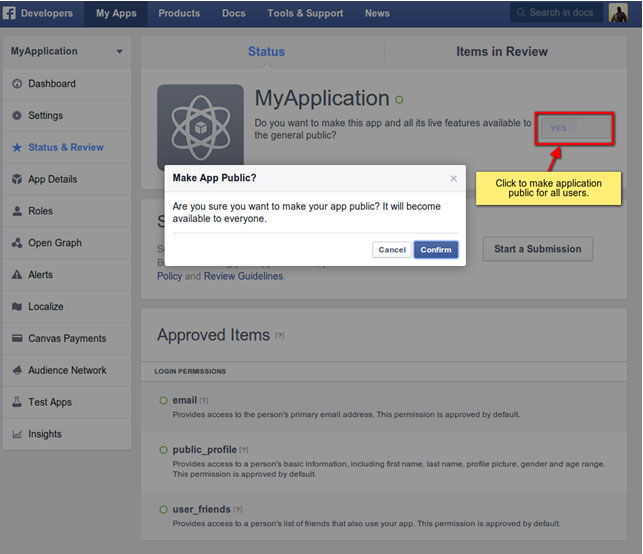
9. Now click on third tab status & review from left panel, Click on to make application public for all users and click on confirm for confirmation.
Note: Now at this stage facebook login functionality will start working if you enter application ID and Application Secret into your Admin’s third party Settings.
Configuration for Designer Studio
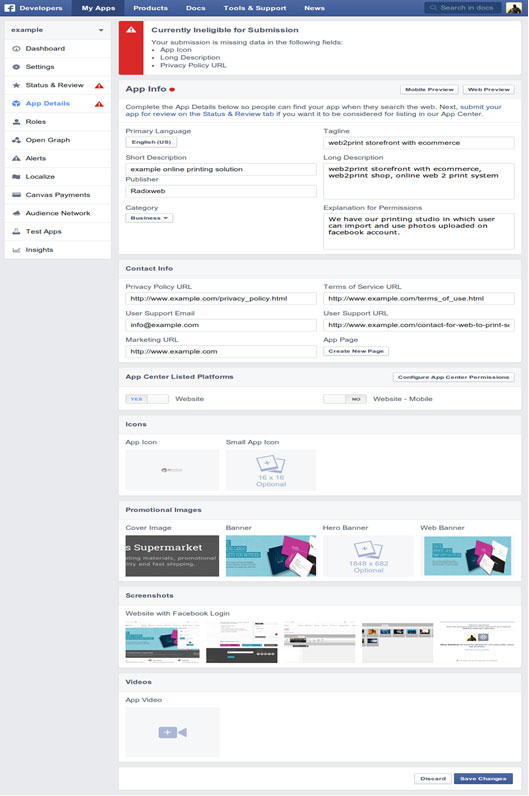
For import the user images/photos in designer studio from facebook, you need to submit your application for approval with user_photos permission access. Kindly follow the below steps.
1. Click on start a Submission button from Status & Review tab and select user_photos permission and click on add item.
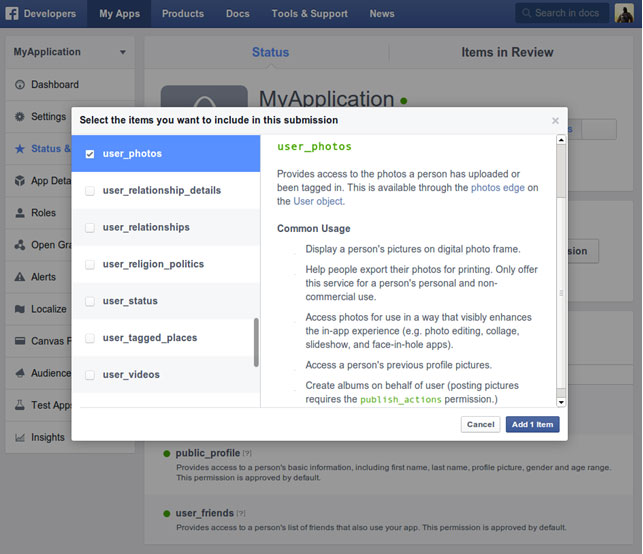
1) You can use below text for referee in putting notes. “We are providing online studio to make customize design for printing and we are providing the ability to import Facebook uploaded images into our studio and use that for designing”
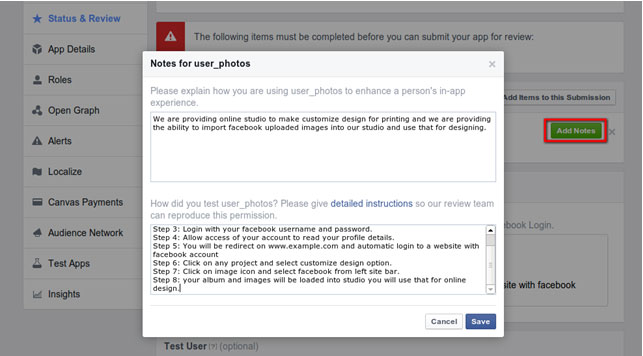
2) You can use below steps or write your own. Steps to check user_photos permission
Step:1 Visit website using www.example.com
Step 2: Click on Login & register link and click on Facebook button.
Step 3: Login with your Facebook username and password.
Step 4: Allow access of your account to read your profile details.
Step 5: You will be redirect on www.example.com and automatic login to a website with Facebook account
Step 6: Click on any project and select customize design option.
Step 7: Click on image icon and select Facebook from left side bar.
Your album and images will be loaded into studio you will use that for online design.
3. After pressing save button on notes popup you need to feel below details.
1) You can use below steps or write your own.
Step 1: Visit website using www.example.com
Step 2: Click on Login & register link and click on Facebook button.
Step 3: Login with your Facebook username and password.
Step 4: Allow access of your account to read your profile details.
Step 5: You will be redirect on www.example.com and automatic login to a website with Facebook account
Step 6: Click on any project and select customize design option.
Step 7: Click on image icon and select Facebook from left side bar.
2) Take your website screen shots for below pages and submit as per predefined dimension.
a. Login page.
b. Facebook login screen.
c. Allow rights use your information page.
d. Show your user name.
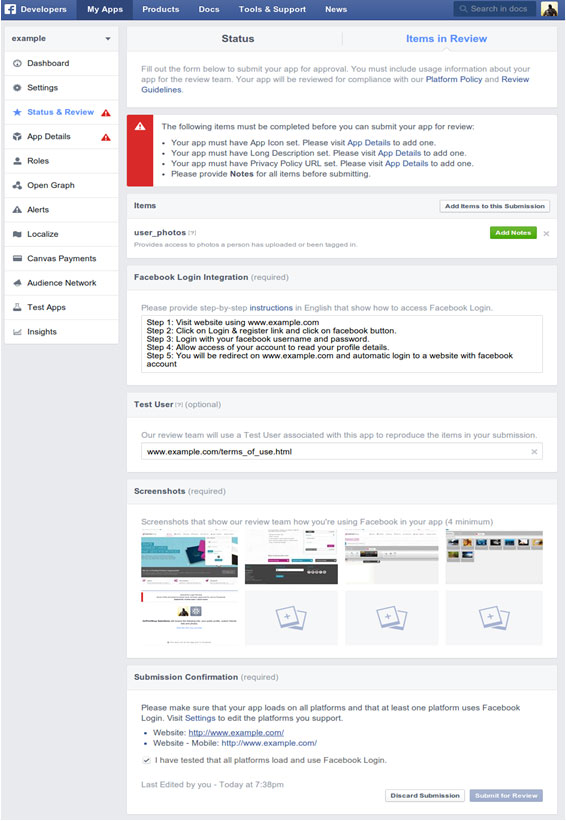
4. Click on notes button and input steps and information how Facebook photos will help user to create design for review.
5. Once get approve then Facebook Photo import facility should work in designer studio.
Step 1. Login to your admin > navigate to left had side navigation > Store Configuration > External Service Settings
Step 2. Under the ‘Social Sharing’ tab you will find ‘Flickr’ > click action > edit
Step 3. Inside the page you will see the instruction how to integrate it
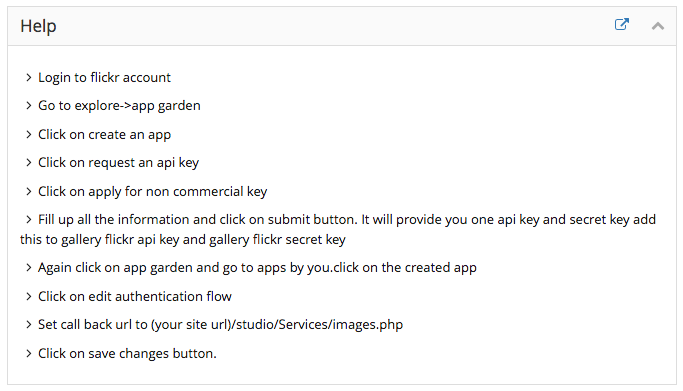
Step 4. Follow the step by step process and copy and paste both secret and site key on to the admin side
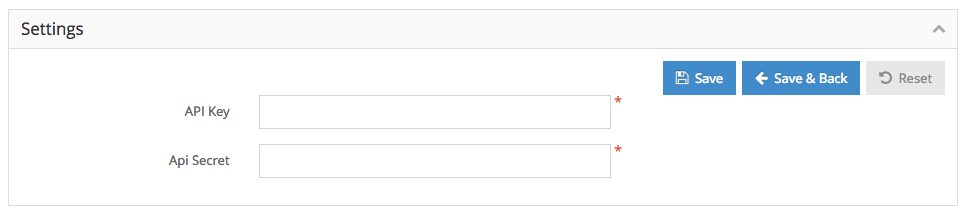
Step 5. Once completed > click Save and back.
note: please check it on the online editor by clicking the flickr icon under the upload image page inside the online editor.
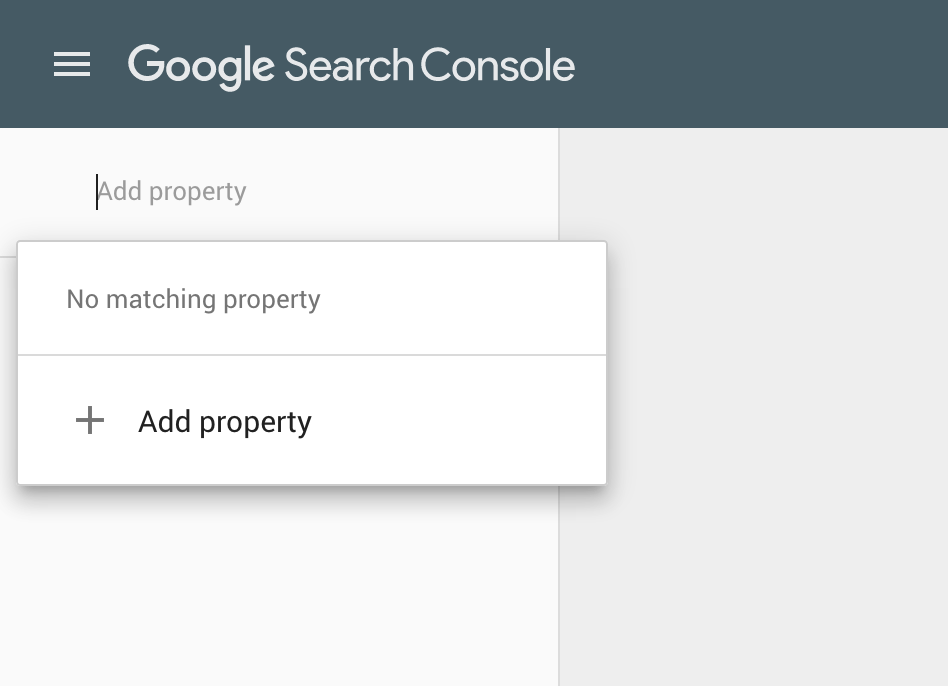
Step 1. Click this link to go to the Google Search Console – https://search.google.com/search-console/about
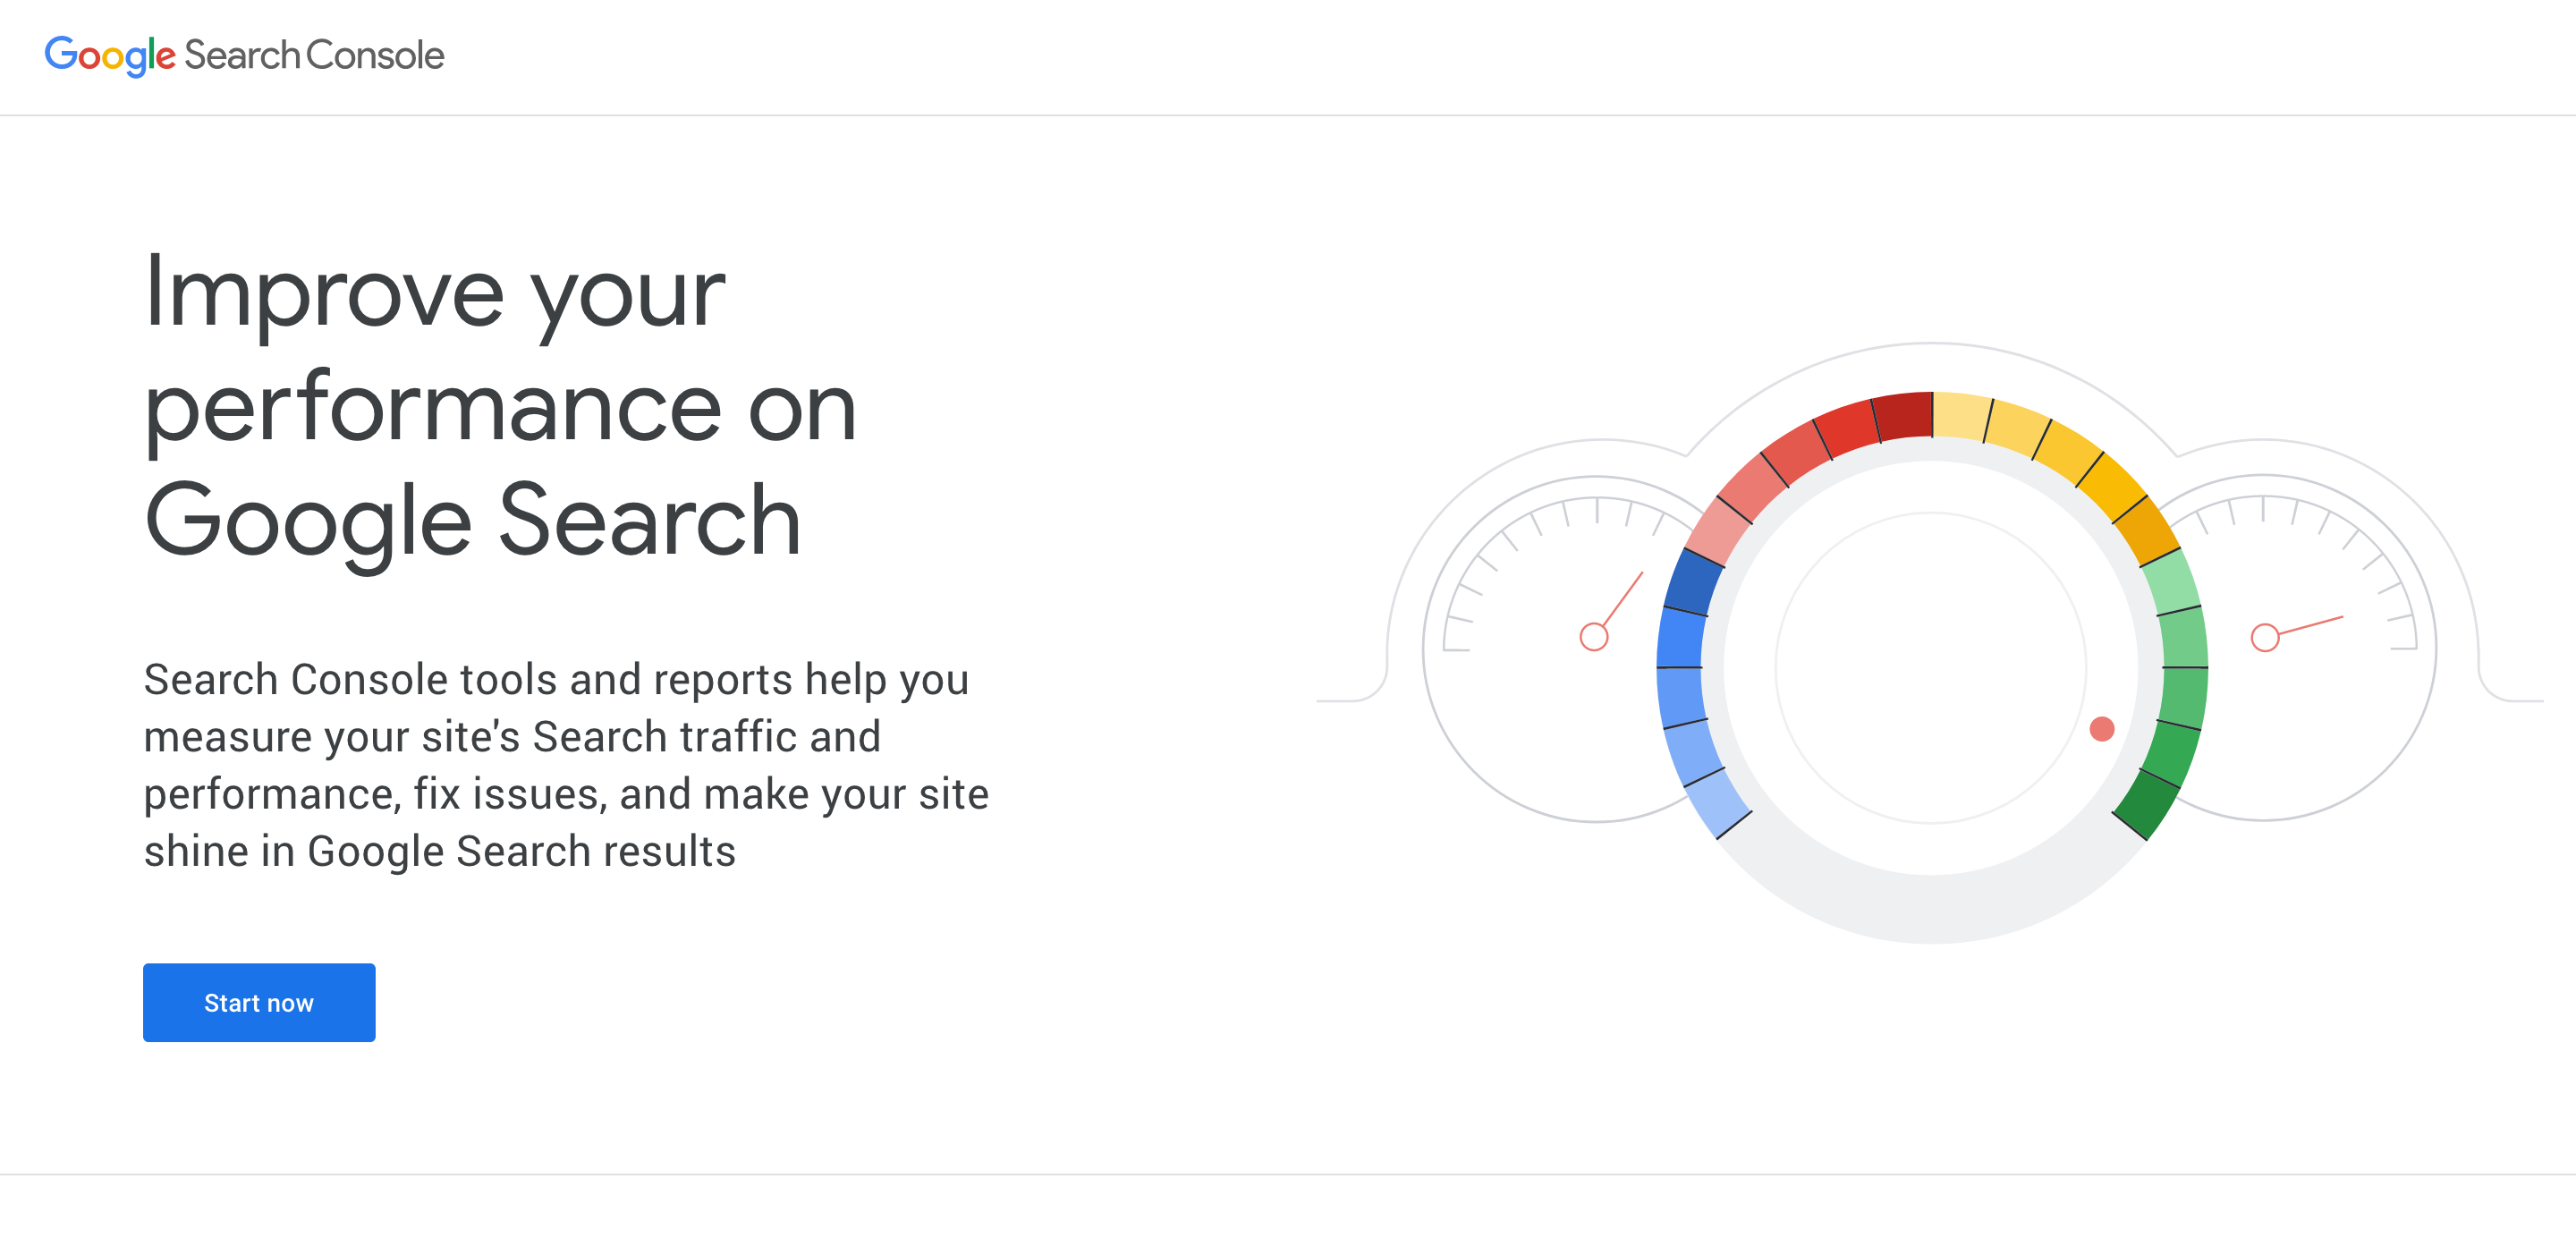
Step 2. Click Start Now to start registering your website – needs a google account.
Step 3. Add a property by clicking the top left button to add your property
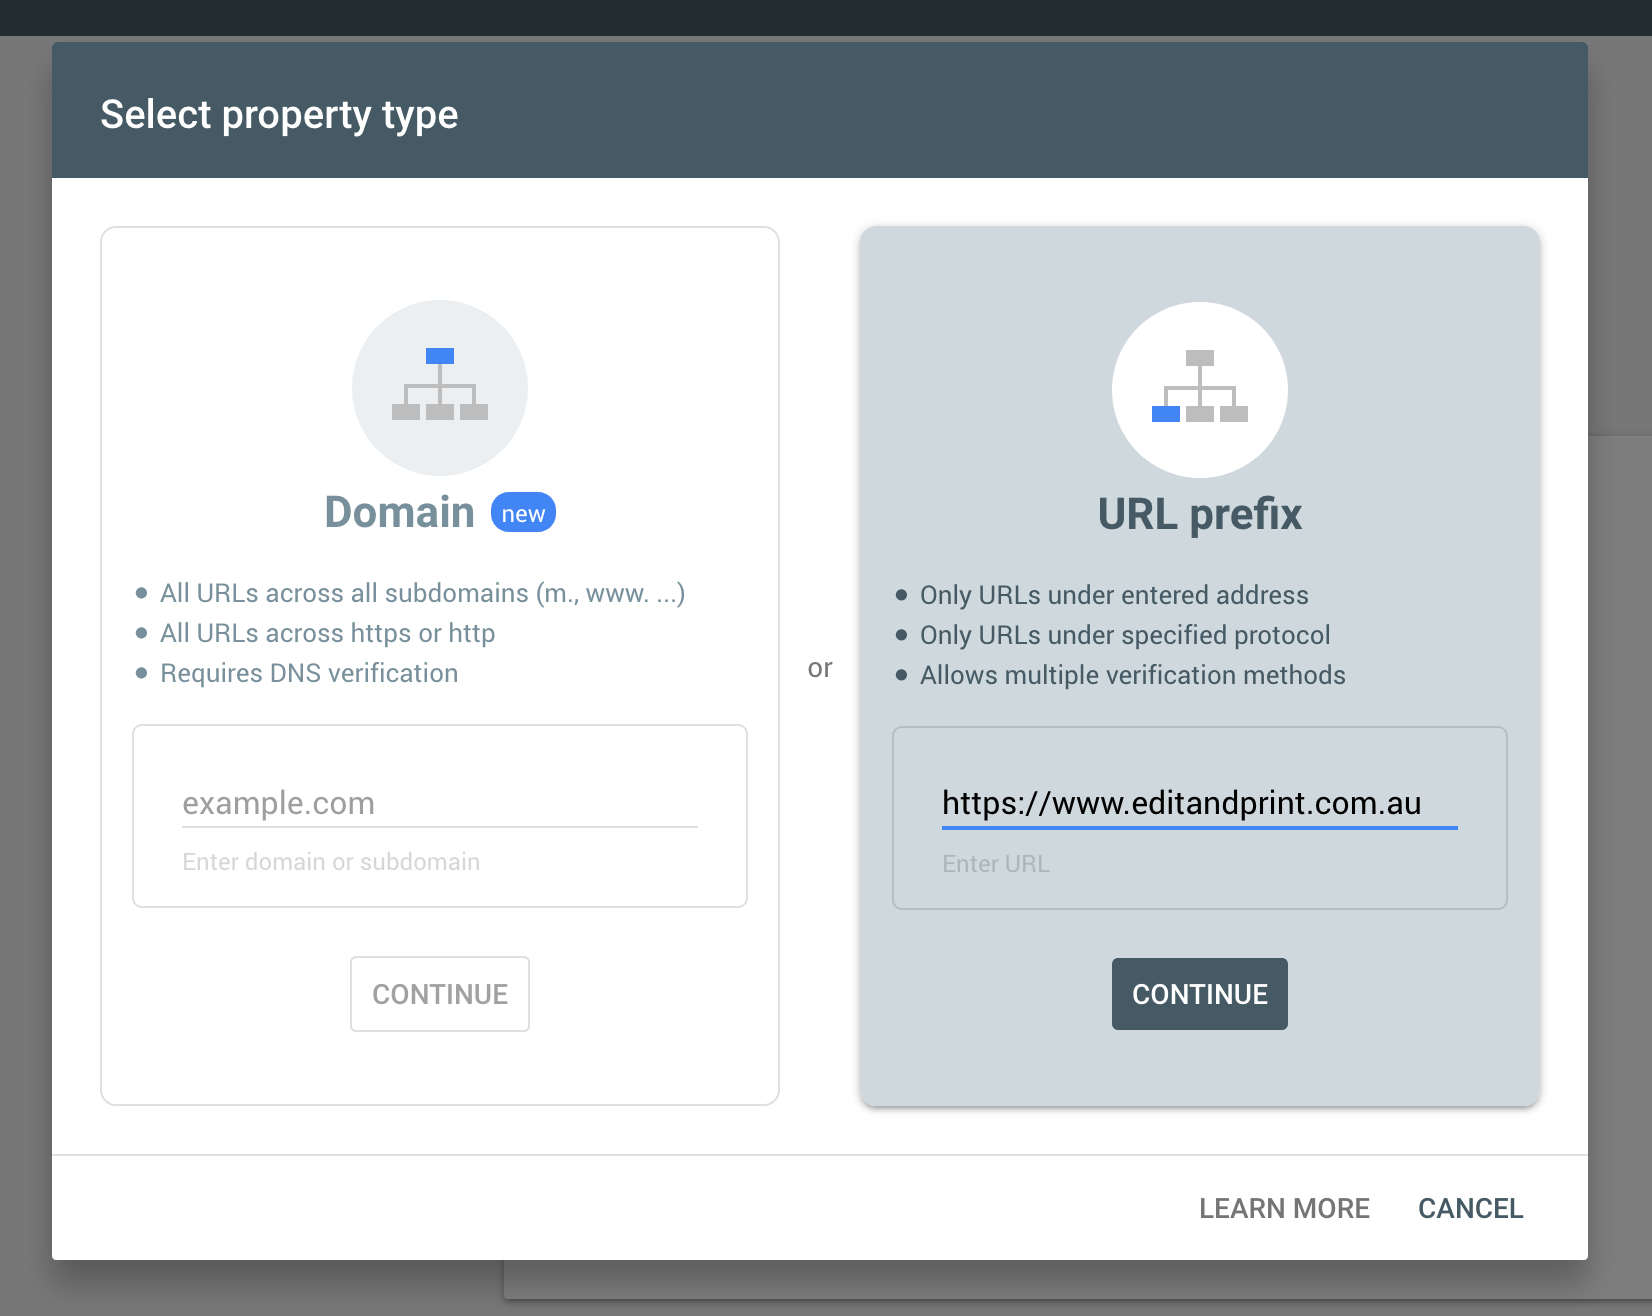
Step 4. Select ‘URL prefix’ option and input your website URL (we suggest to do this once your website is live and we have installed the full SSL certificate.
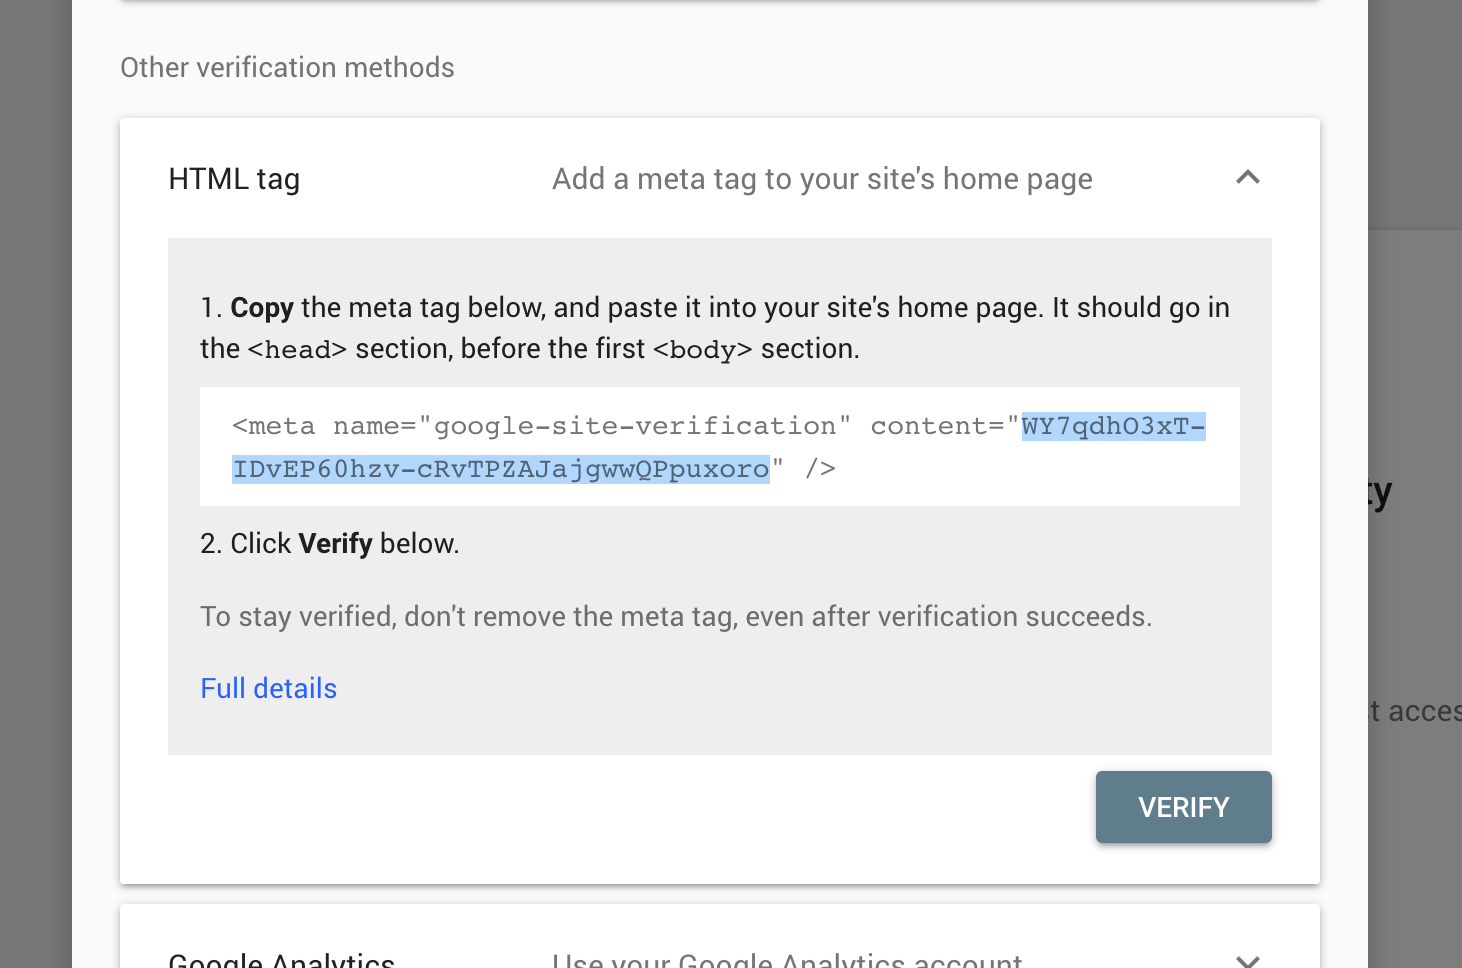
Step 5. Once continue, you will have options how to verify your website. Select HTML Tag
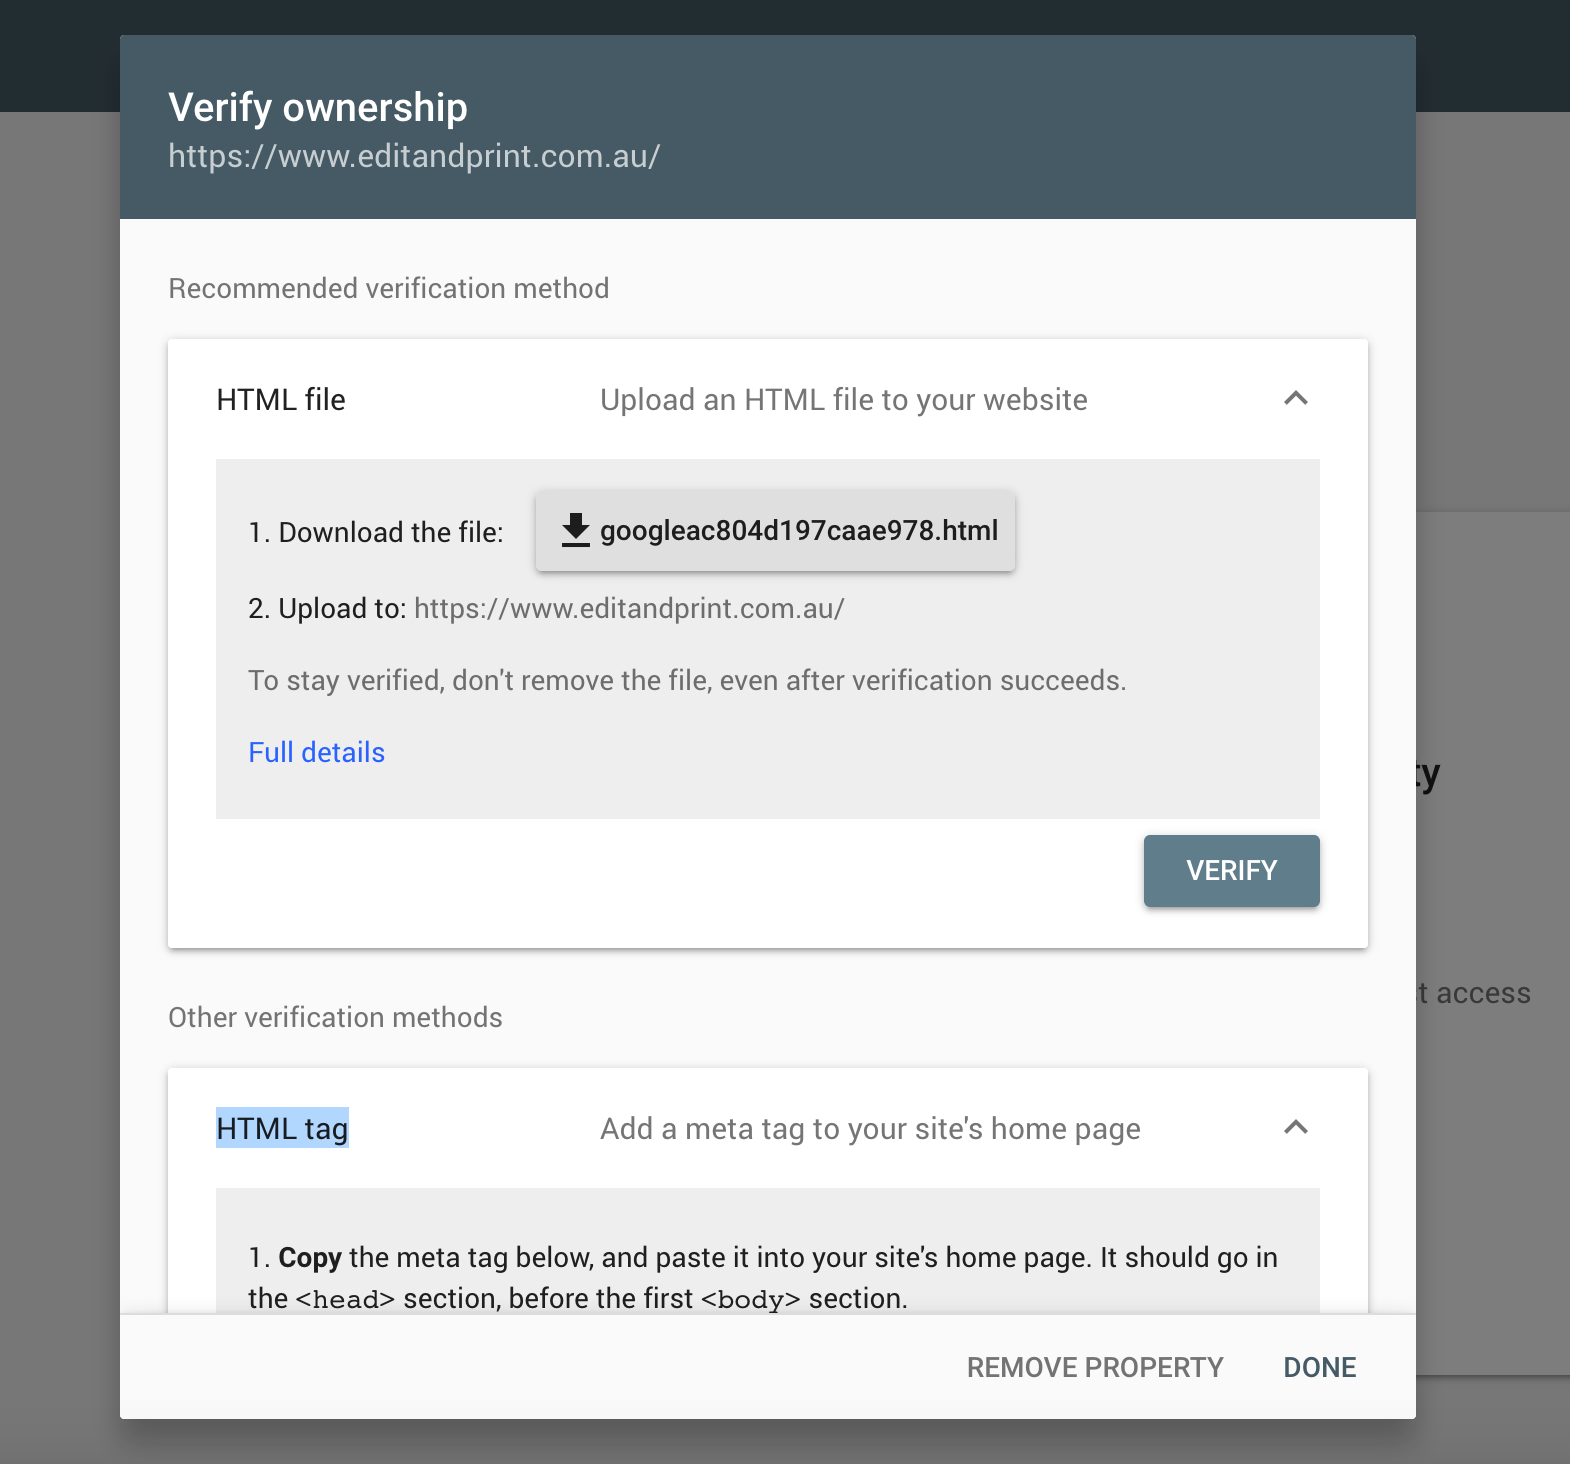
Step 6. Copy just the contents of the google-site-verification as per below
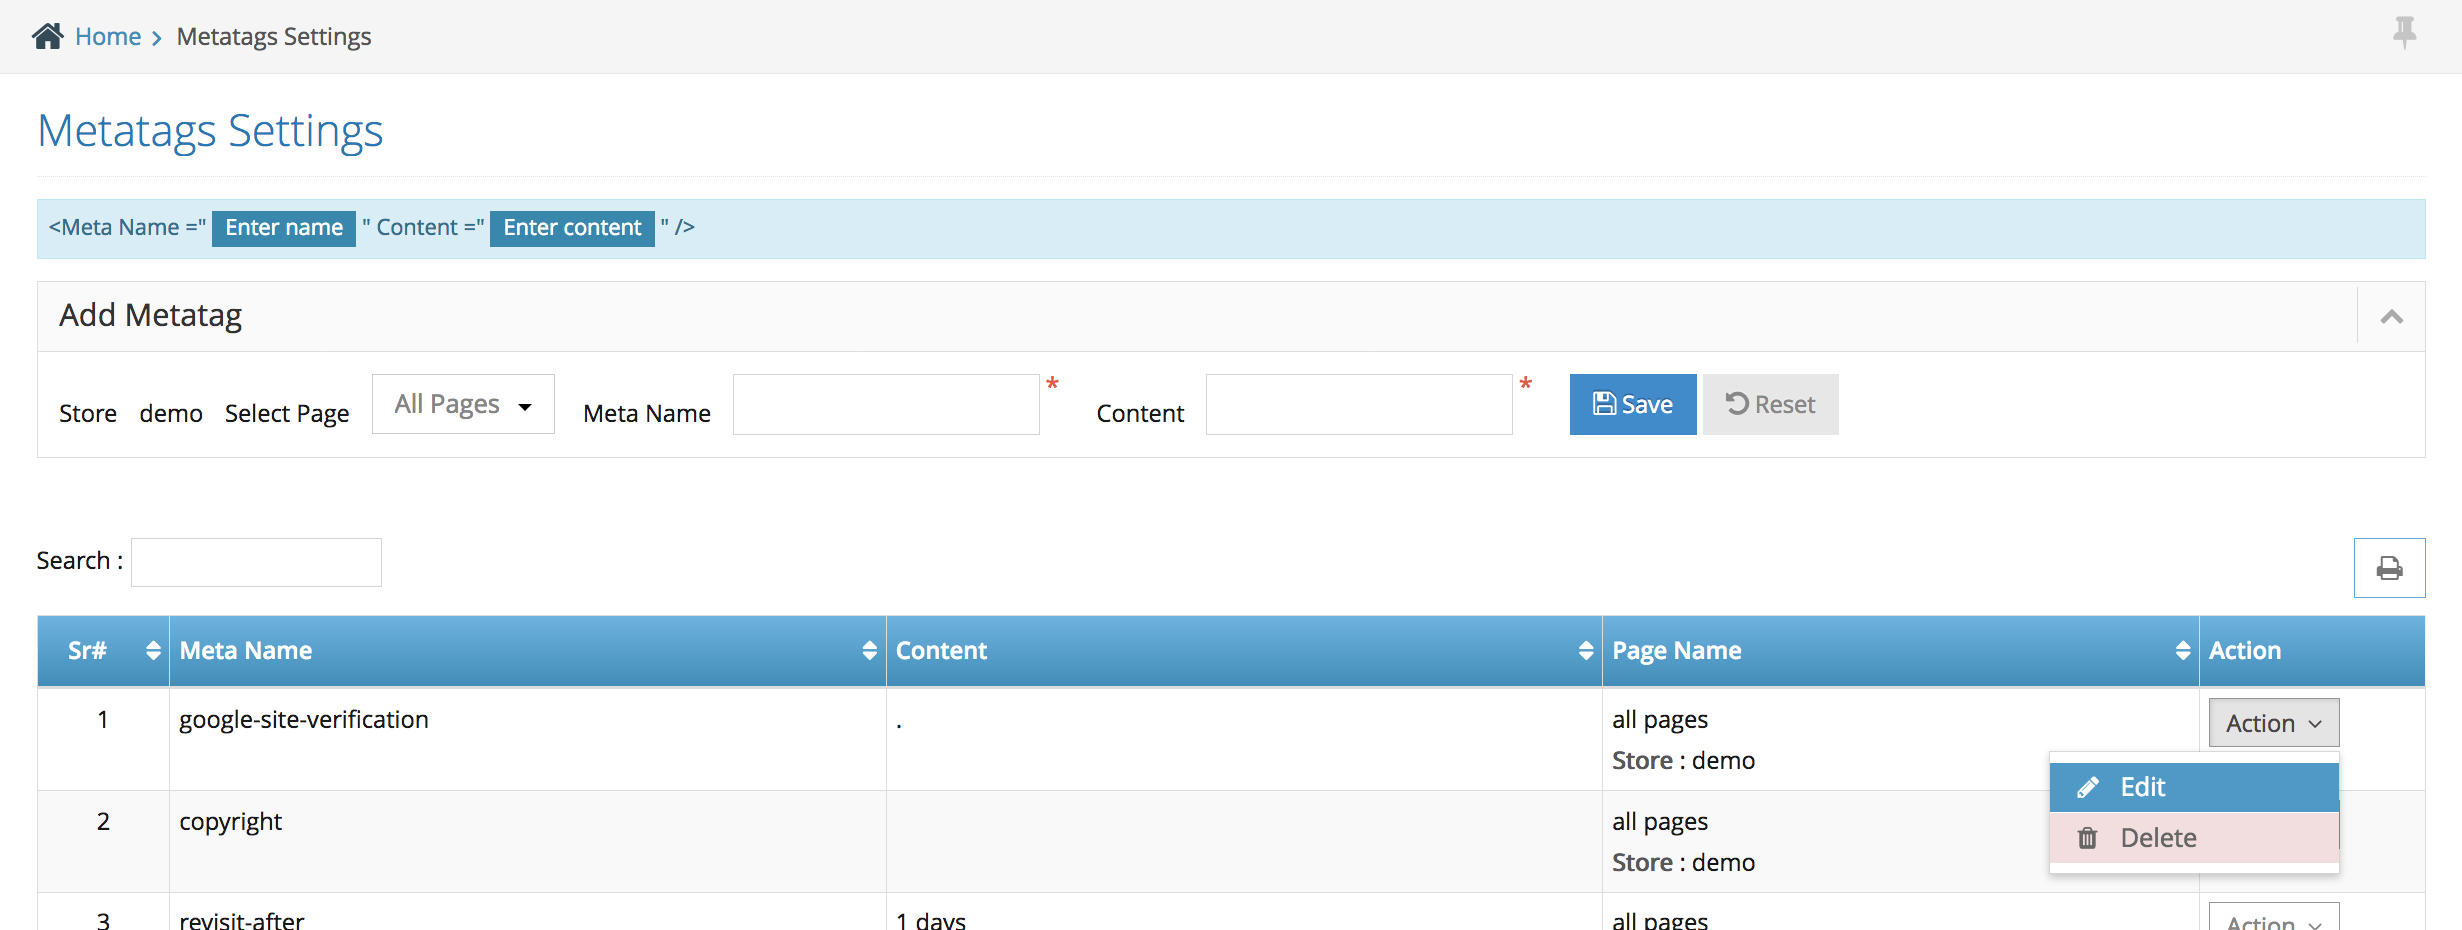
Step 7. Back to the admin side of your website > navigate to SEO > metatags settings
Step 8. Select the Google-Site-Verification > Action > Edit
Step 9. Paste the content you have copied from the Google Search Console on the box at the top as per below screenshot
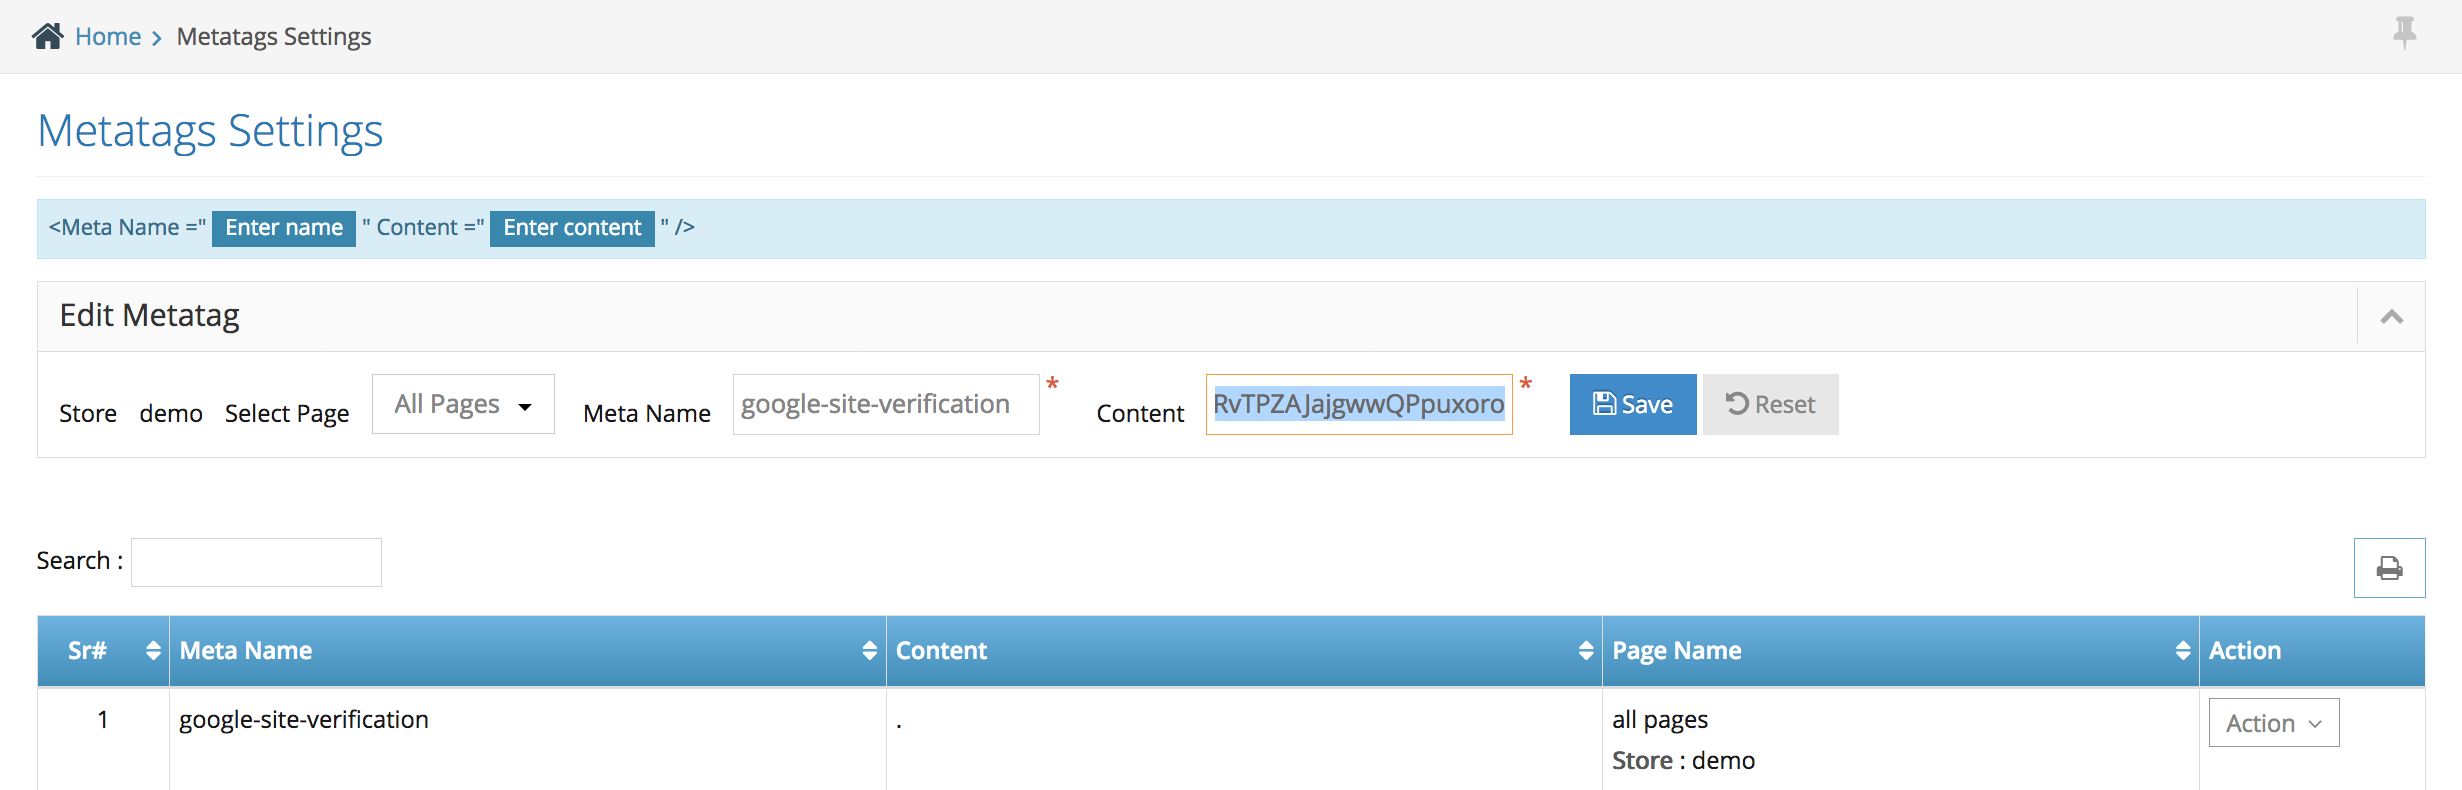
Step 10. Click Save to update the content.
Step 11. Back to the Google Search Console website and click ‘Verify’ to verify your website
Step 1. Go to Google Analytics website (requires google account) – link to google account https://analytics.google.com/analytics/web/
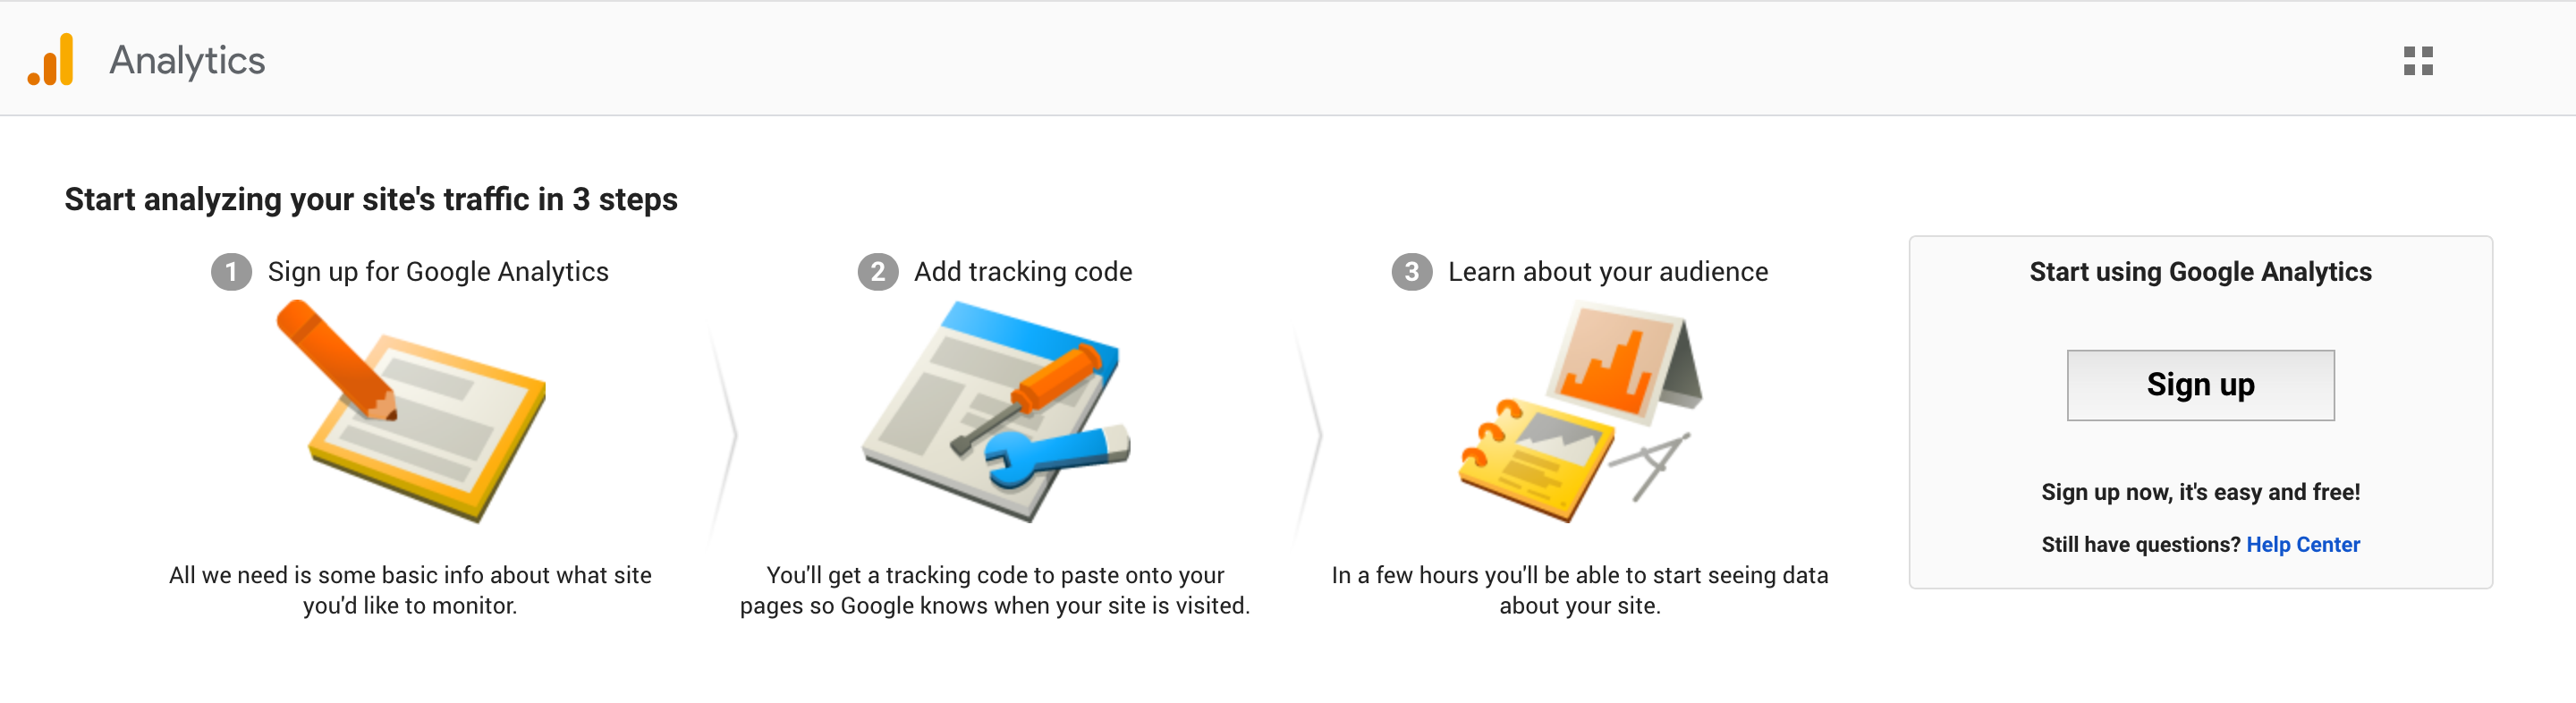
Step 2. Click Sign up if you have not registered yet & fill up all the information on the form

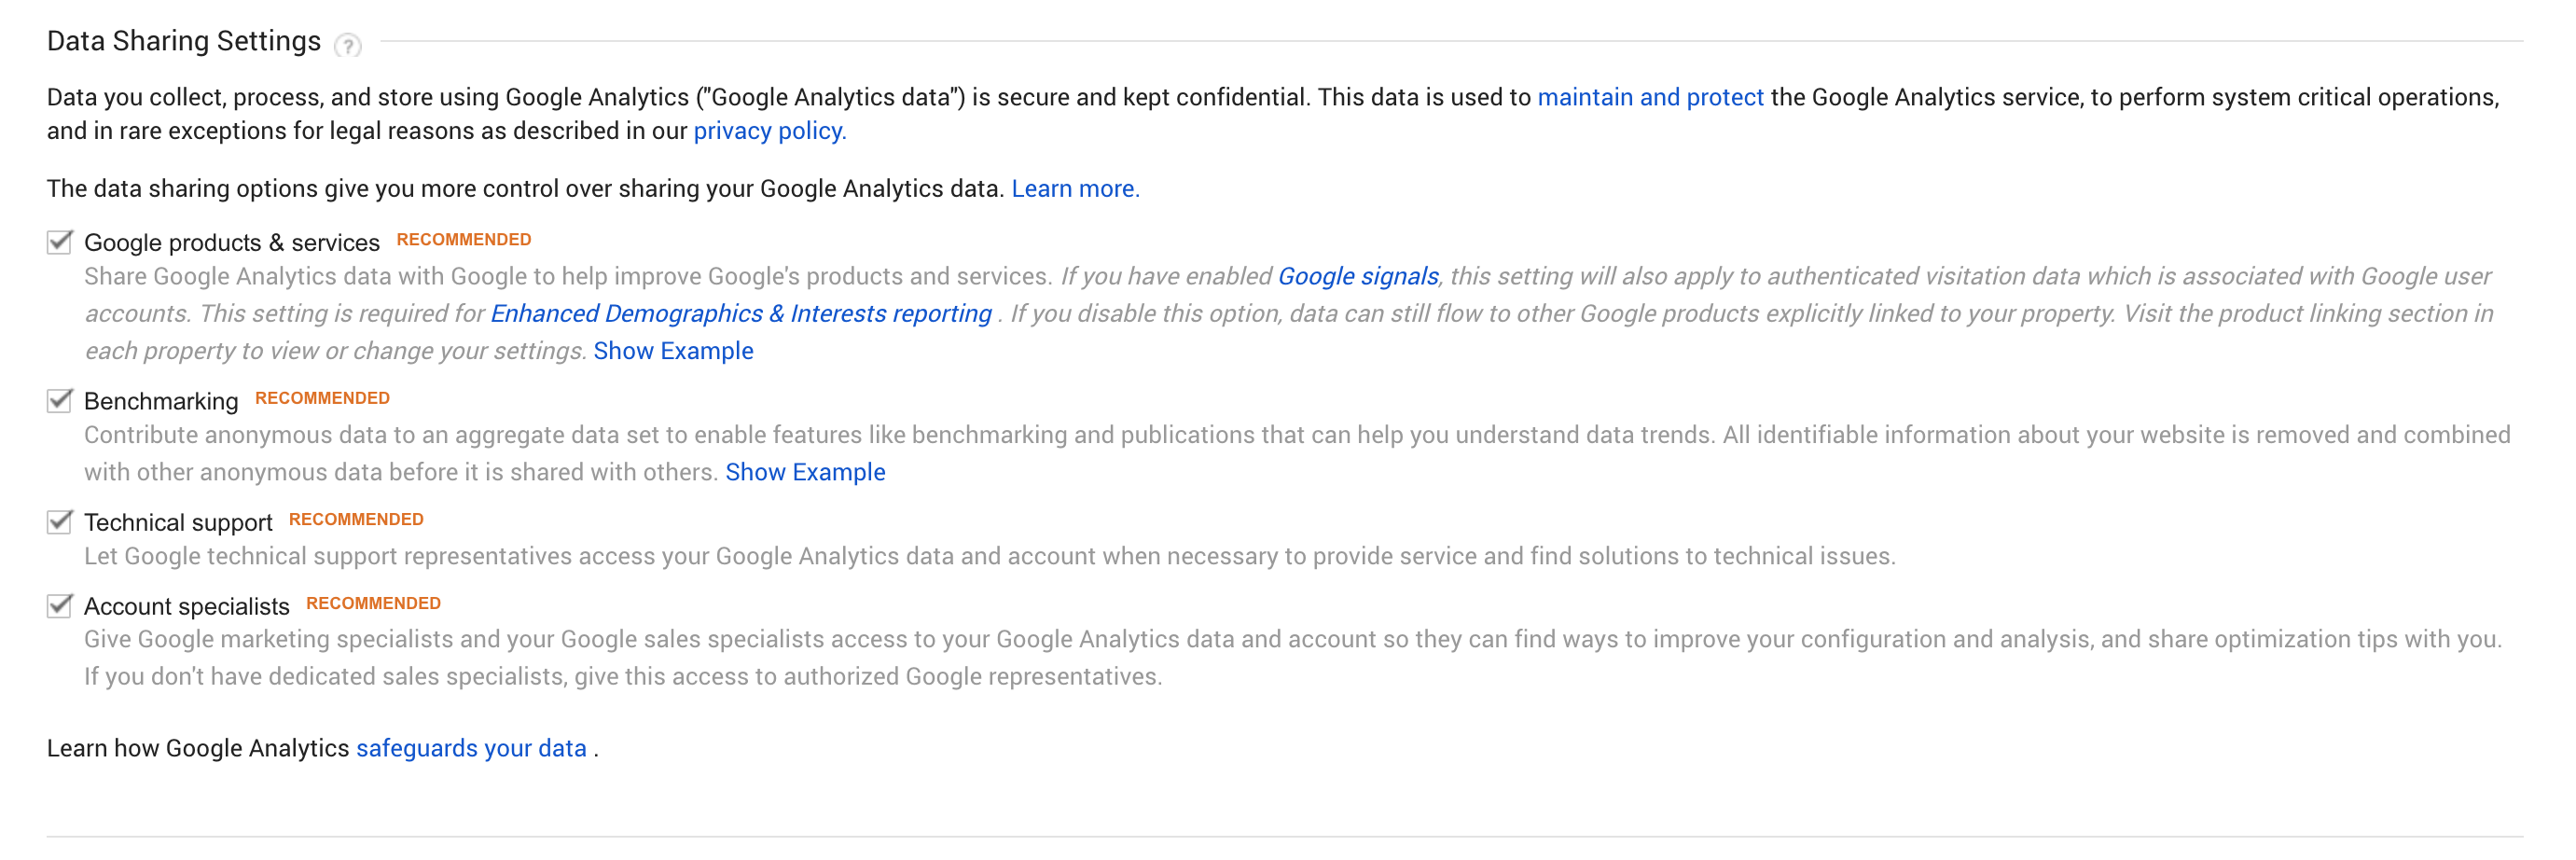
Important note: set the timezone to Australia Time Zone & Tick all the Data Sharing Settings
Once you have finished click the ‘Get Tracking ID’ > Agree Google Terms of Use.
Step 3. Copy the Google Site Tag – as per highlighted on the screenshot below

Step 4. Back to the admin side > navigate to the Store Configuration > External Service Settings > Google Service > Action > Edit
Step 5. Paste the code on to the Google Analytics Code Box – see screenshot below
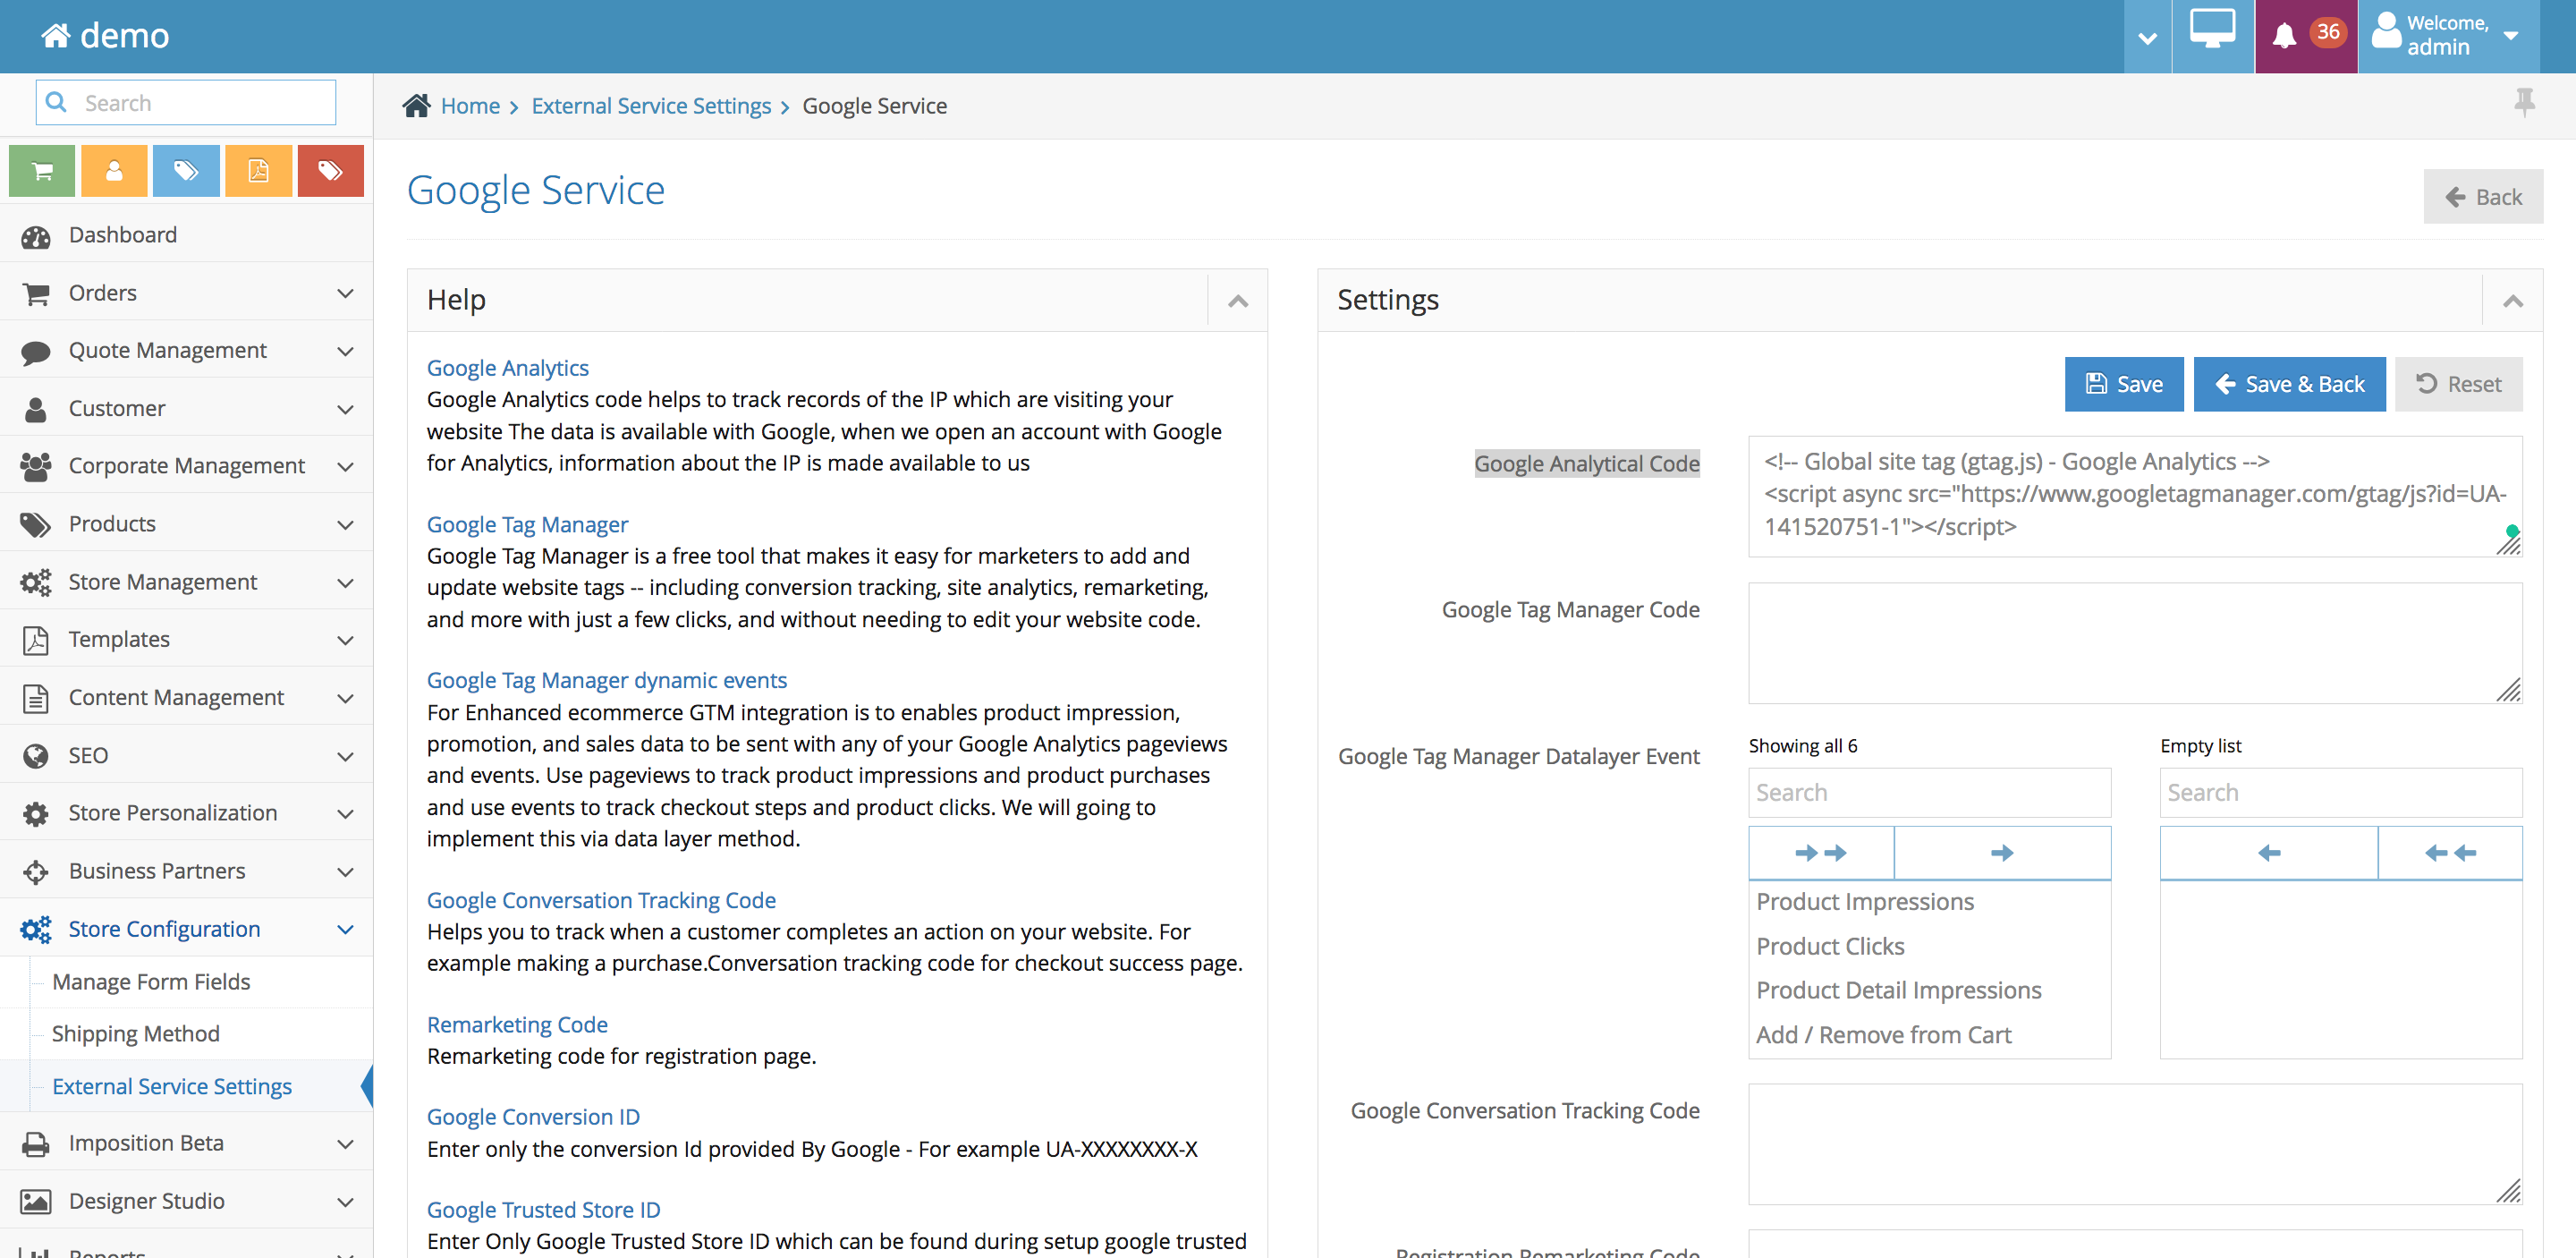
Step 6. Click Save to save your changes.
Step 1. Login to your admin and navigate to Store Configuration on the left hand side navigation bar
Step 2. Under the Store Configuration > select External Service Settings
Step 3. Select Captcha > Action > Edit
Step 4. Inside the page you’ll find the ‘ Steps to reconfigure the Google Recaptcha’
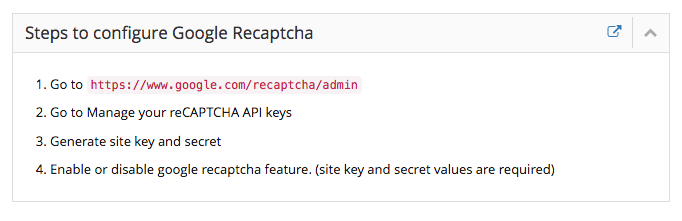
Step 5. Copy and paste the google red link to your new window.
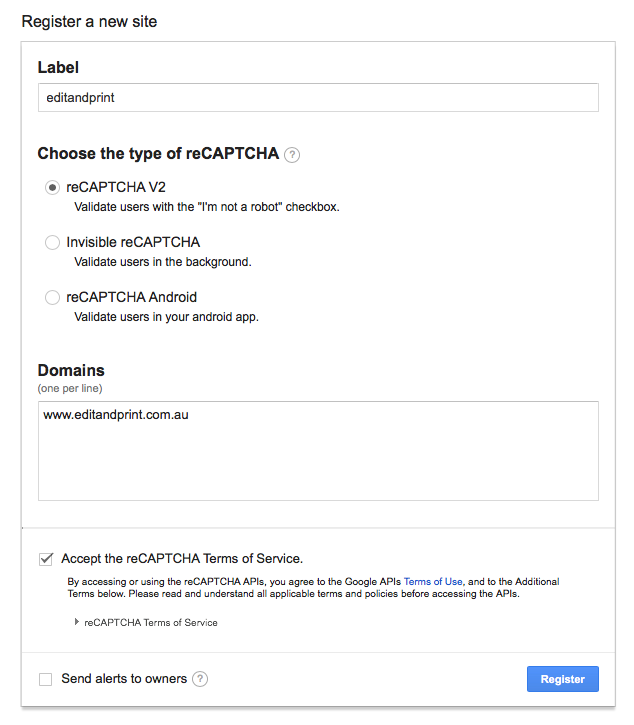
Step 6. You will see the form, fill out the label name (your site name), select the reCaptcha V2, insert your Domain Name, agree the terms and service > click register.
Step 7. Get both Secret and Site Key once you’ve registered.
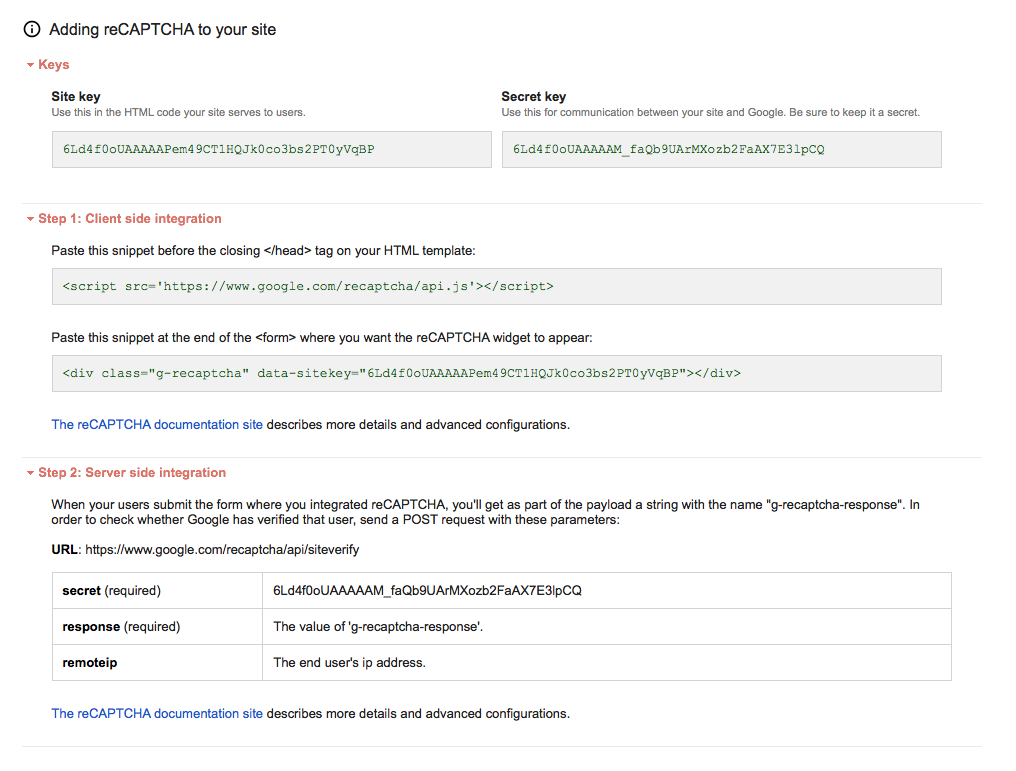
Step 8. Copy both Keys and paste it on to your admin side again (back to store configuration > external service settings > captcha > action > edit)
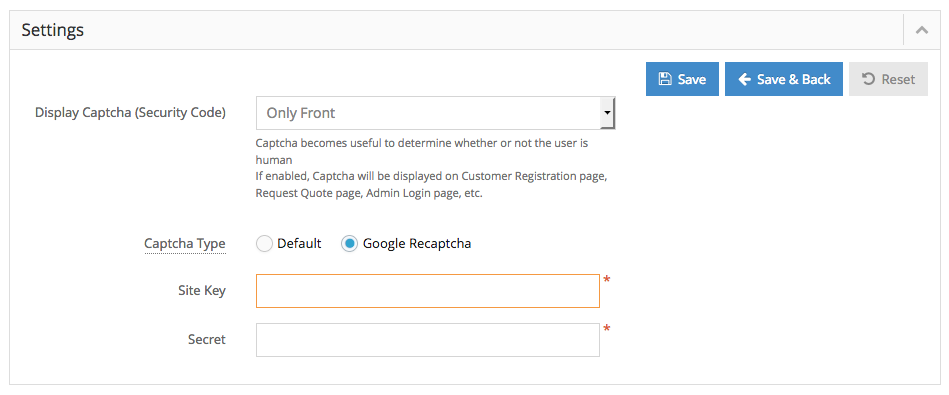
Step 9. Under the ‘Settings’ you will see:
1. Dispay Settings :
None: not displaying any captcha (not recommended)
Only Front: displaying the captcha on the front side only
Only Admin: displaying the captcha on the admin side only
Both: displaying the captcha both front and admin side (recommended)
2. Captcha Type:
Default: Use our common captcha
Google ReCaptcha: Use new improved Google Re-captcha V2
3. Site Key and Secret Key text box : this is the area where you can paste both secret and site key you’ve received from Google.
Step 10. Once you’ve finished click save & back and check it on your site.
Step 1. Login to your admin side and navigate to left hand side bar navigation > click Store Configuration > Manage Form Fields
Step 2. Click Add button on the top right hand side

Step 3. Fill out the form
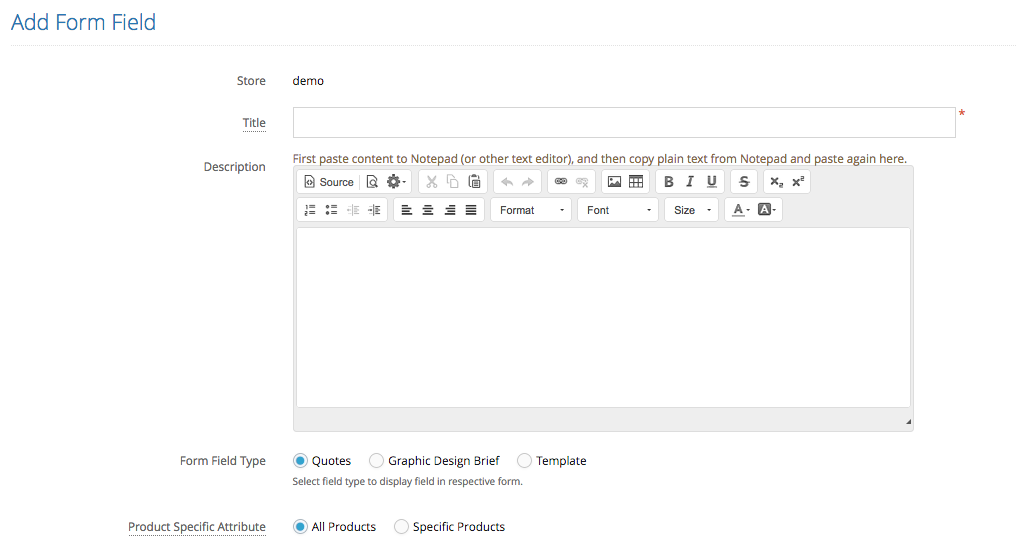
Title : this would be the questions?
Description : this will be the help description
Form Fields : choose Graphic Design Brief
Product Specific Attribute : you can choose whether this question will be apply to all products or specific products
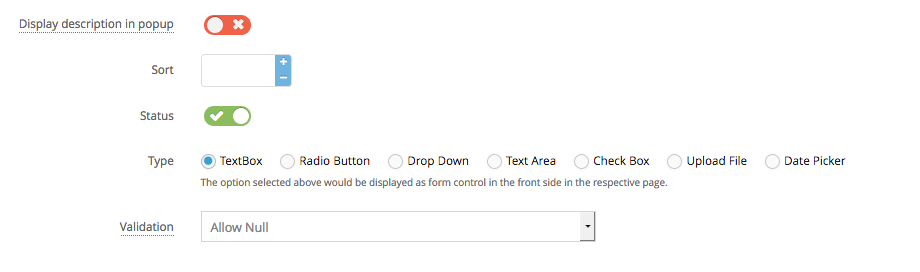
Display description in pop up : settings to set your help description as a pop up or always displaying
Sort : sort order of the question
Status : active / inactive
Type : choose the type of questions form
Validation : choose the validation of the questions whether it’s mandatory or not.
Step 4. Click Save to add the question/ save the changes .
note: you can add as many questions as you like
Step 1. Login to your admin side and navigate to left hand side bar navigation > click Store Configuration > Manage Form Fields
Step 2. Click Add button on the top right hand side
Step 3. Fill out the form
Title : this would be the questions?
Description : this will be the help description
Form Fields : choose Quotes
Product Specific Attribute : you can choose whether this question will be apply to all products or specific products
Display description in pop up : settings to set your help description as a pop up or always displaying
Sort : sort order of the question
Status : active / inactive
Type : choose the type of questions form (template)
Validation : choose the validation of the questions whether it’s mandatory or not.
Step 4. Click Save to add the question/ save the changes .
note: you can add as many questions as you like, if you create a template form – please see the link below how to assign / link the form questions to a template.
Step 1. Login to your admin side and navigate to left hand side bar navigation > click Store Management > Configuration Setttings
Step 2. On the search bar > search for breadcrumbs
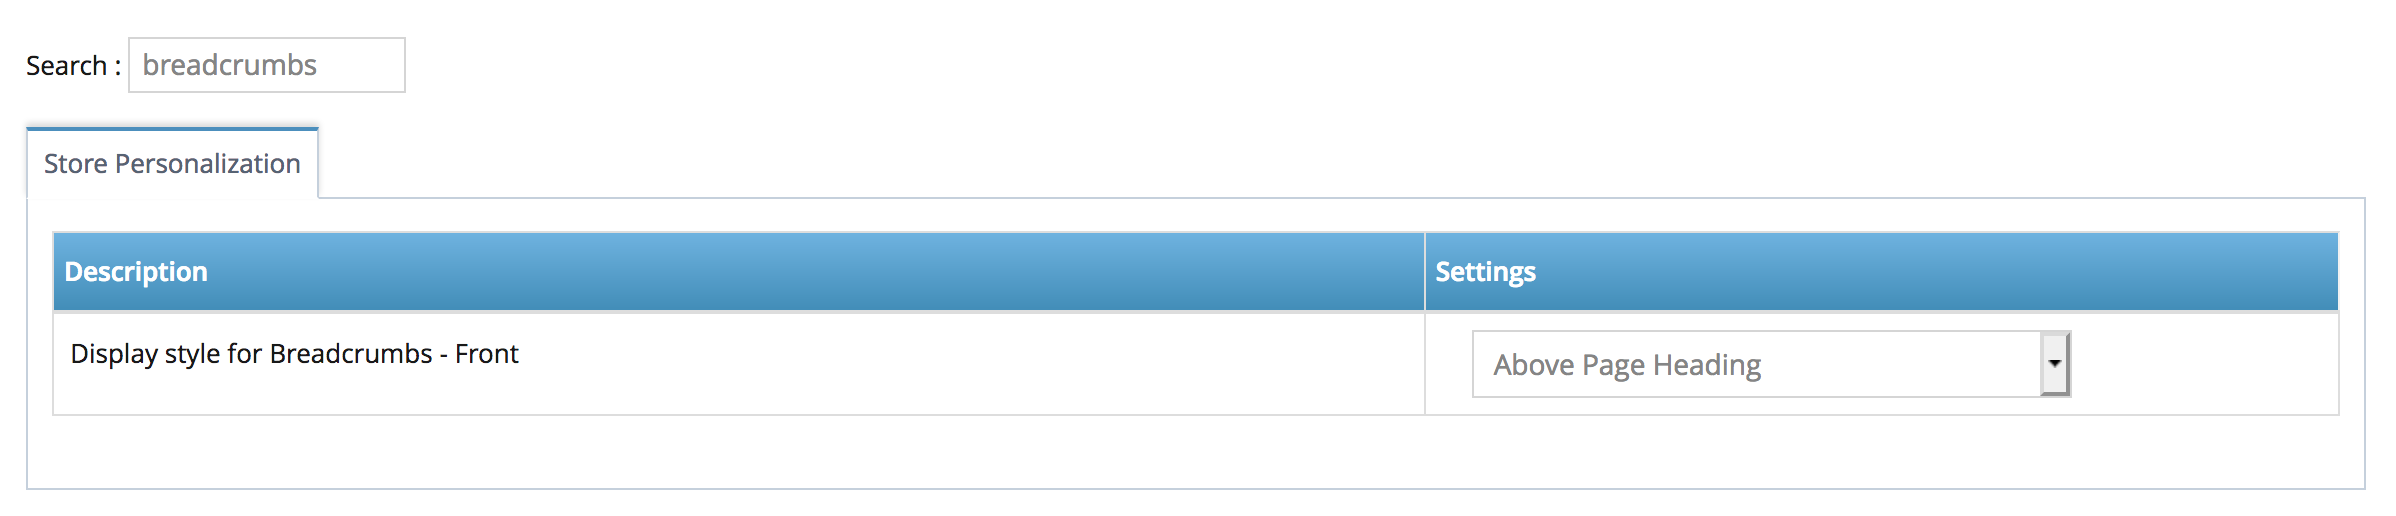 Step 3. We have settings you can choose from in the dropdown :
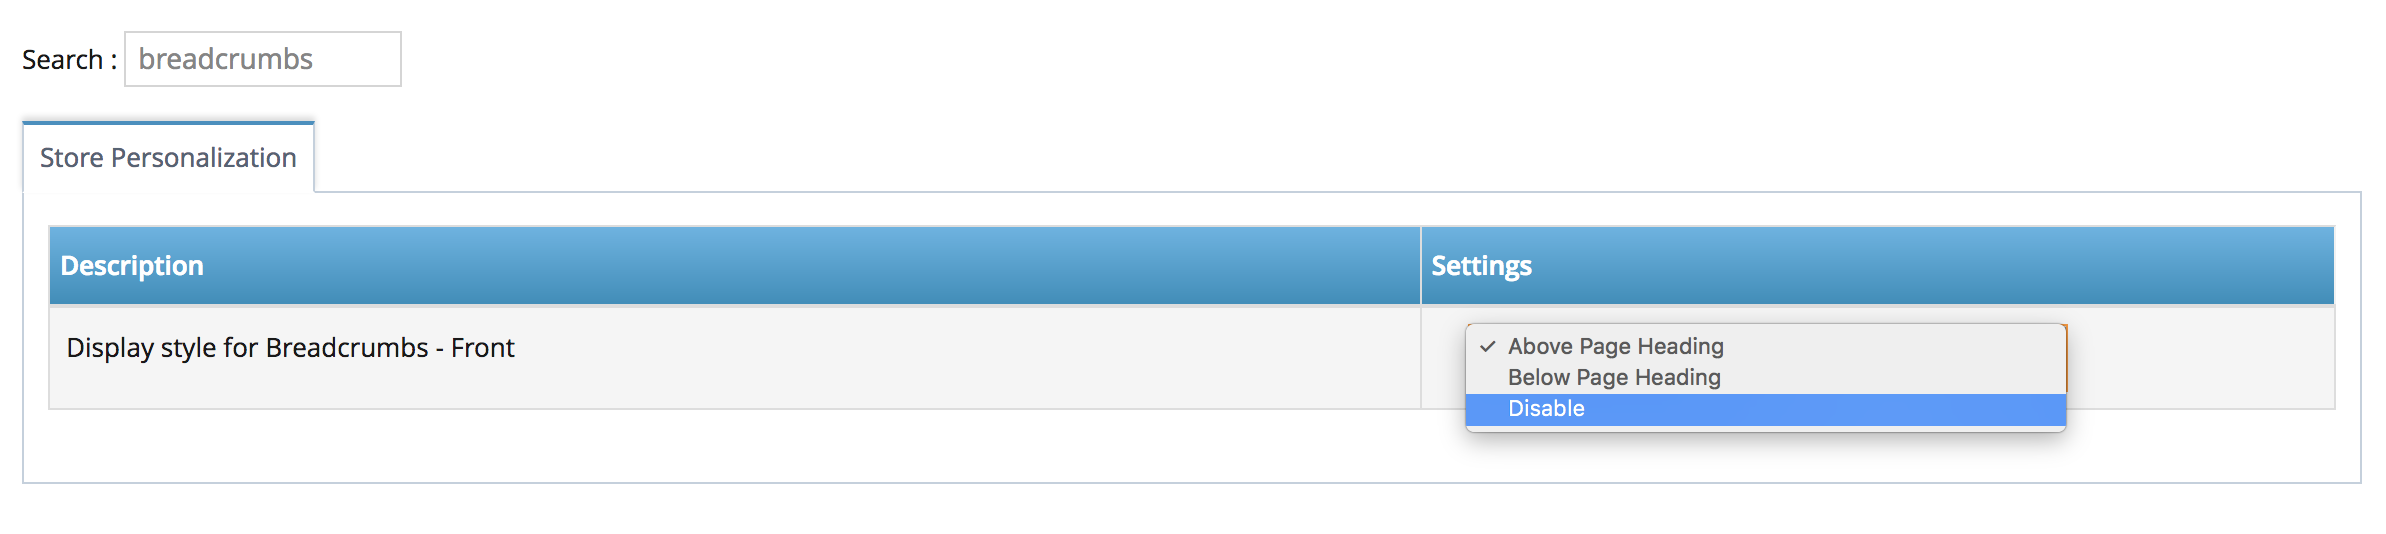 -. Breadcrumbs position above the page headings.
-. Breadcrumbs position below the page headings.
-. disable the website breadcrumbs
Step 4. Click Save to add the question/ save the changes .
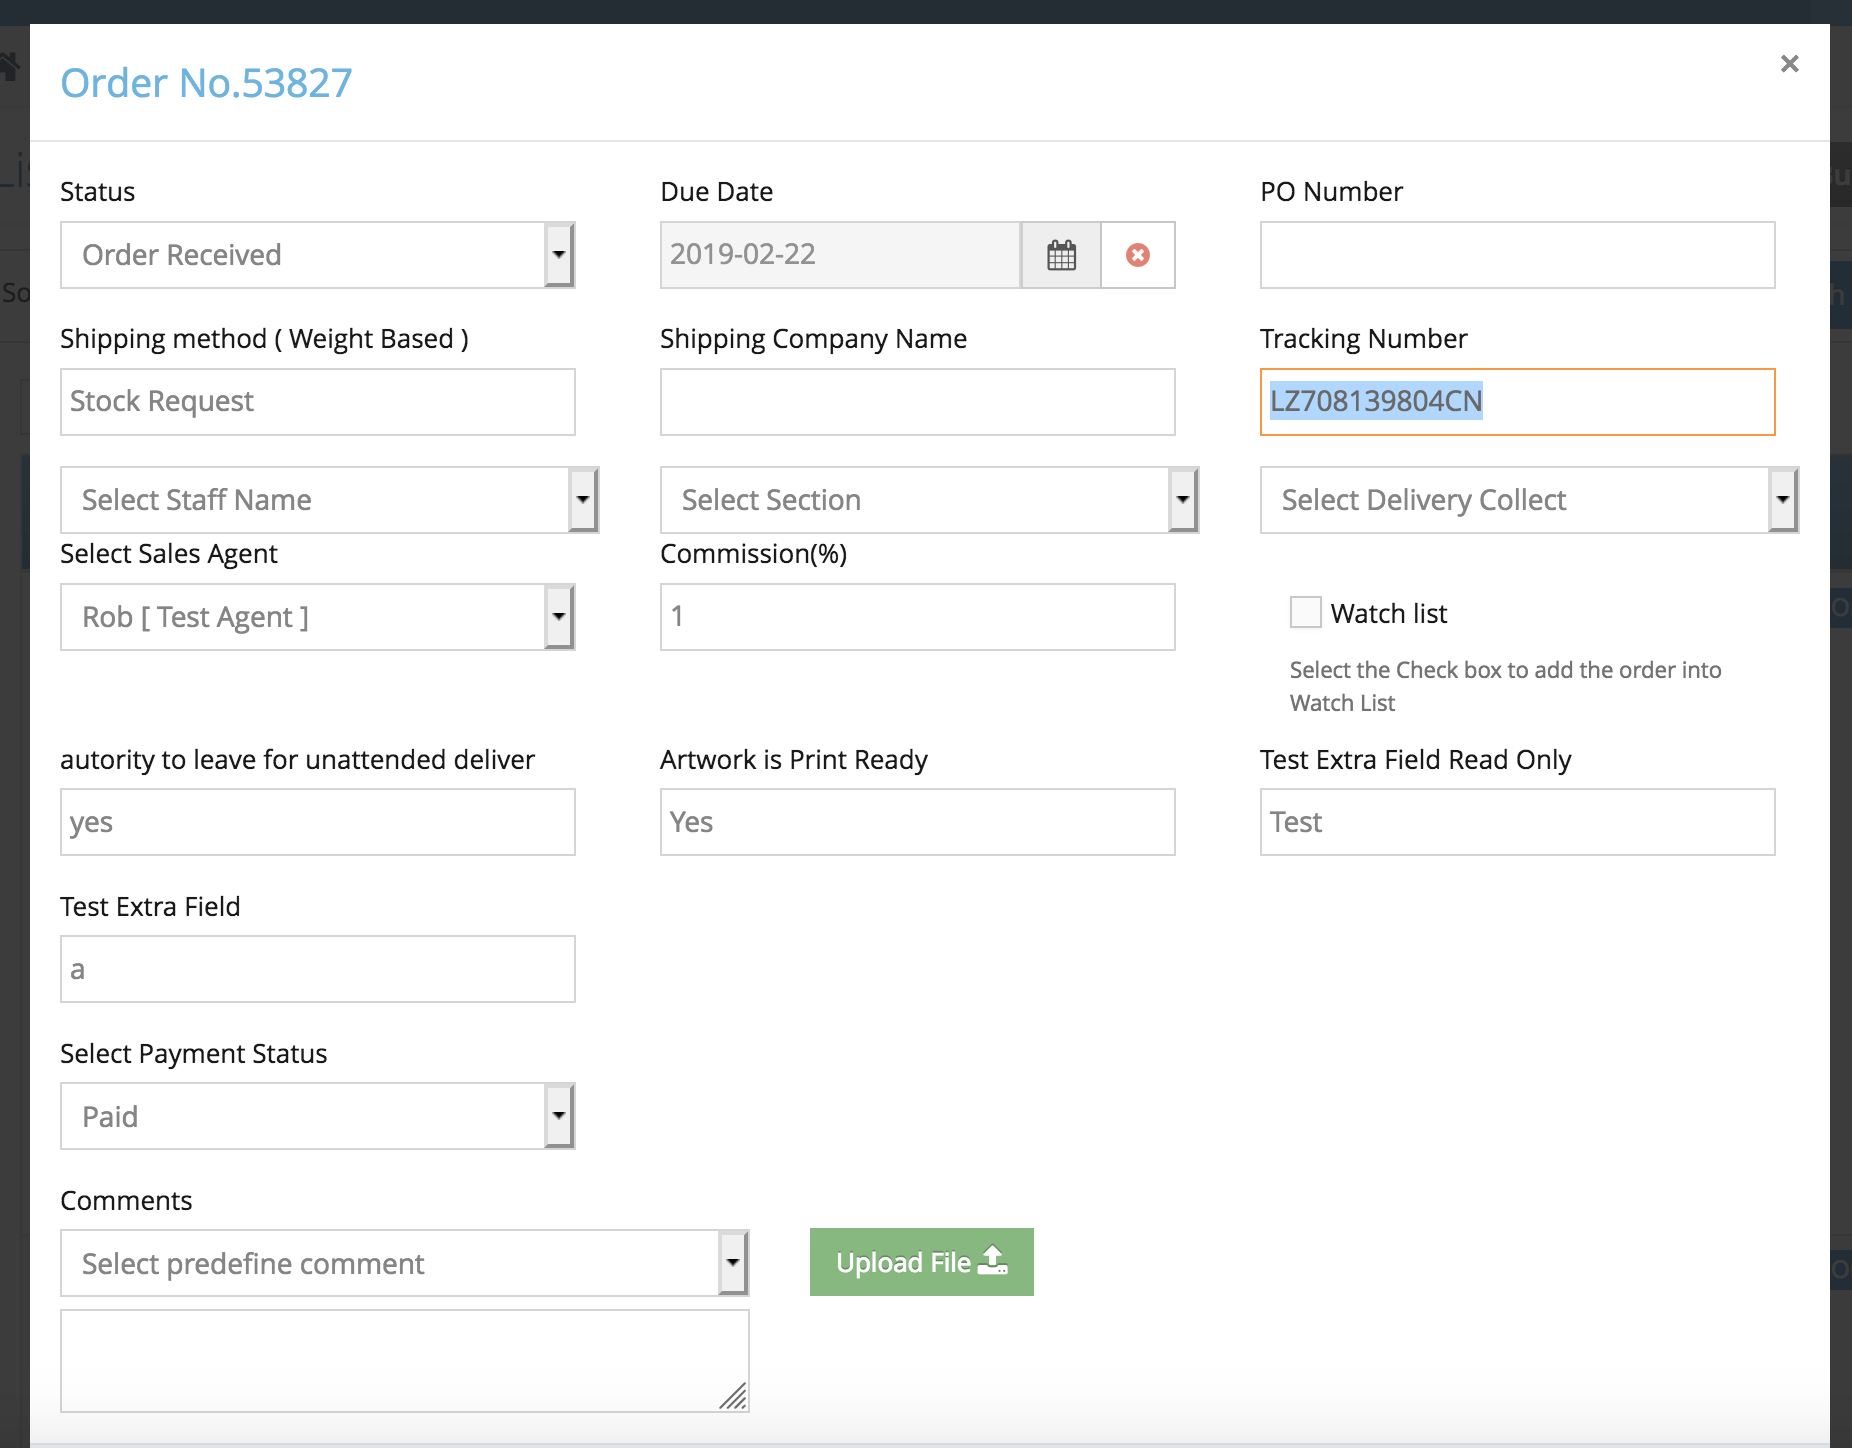
Step 1. Login to your admin side and navigate to left hand side bar navigation click Store Configuration > Shipping Method.
Step 2. Choose the courier (Fastway or Australian Post) click action > edit
Step 3. Scroll to the very bottom of the page and find ‘Tracking url’
for fastway you can put : https://www.fastway.com.au/tools/track/?l={$tracking_number}
for australian post you can put : https://auspost.com.au/mypost/track/#/details/{$tracking_number}
Step 4. Click Save to save your changes
note: when updating your order, you can put the tracking number as per usual.