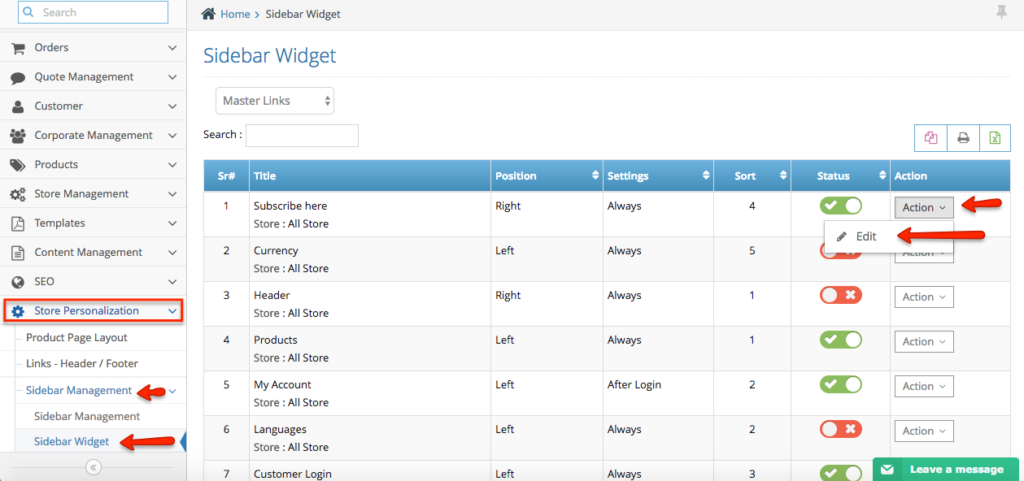
Step 1. From the home page, navigate to Store Personalization section >> Sidebar Management >> Sidebar Widget
Step 2. To edit a sidebar content, click the Action button next to it and select Edit.
Step 1. From the home page, navigate to Store Personalization section >> Sidebar Management >> Sidebar Widget
Step 2. To edit a sidebar content, click the Action button next to it and select Edit.
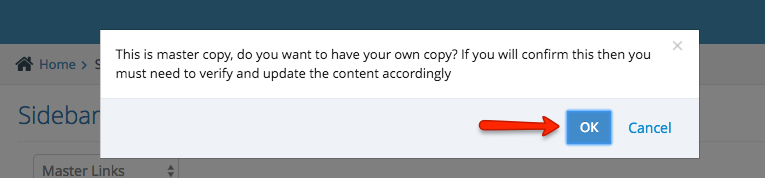
Step 3. You might get a popup window like this, just click Ok button.
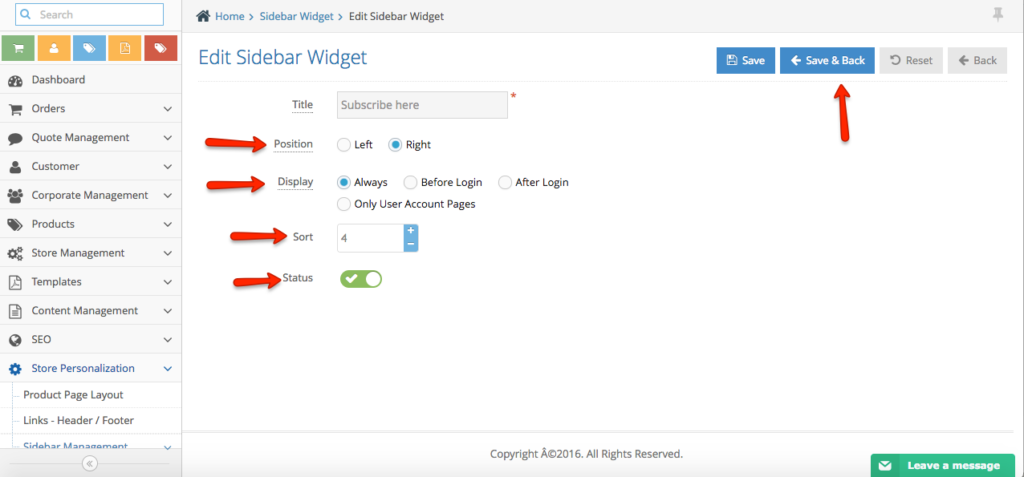
Step 4. Update your sidebar and once done, click Save & Back button.
Step 1. From the home page, navigate to Store Personalization section >> Sidebar Management >> Click Sidebar Management
In this page, you can manage whether to show left or right sidebar.
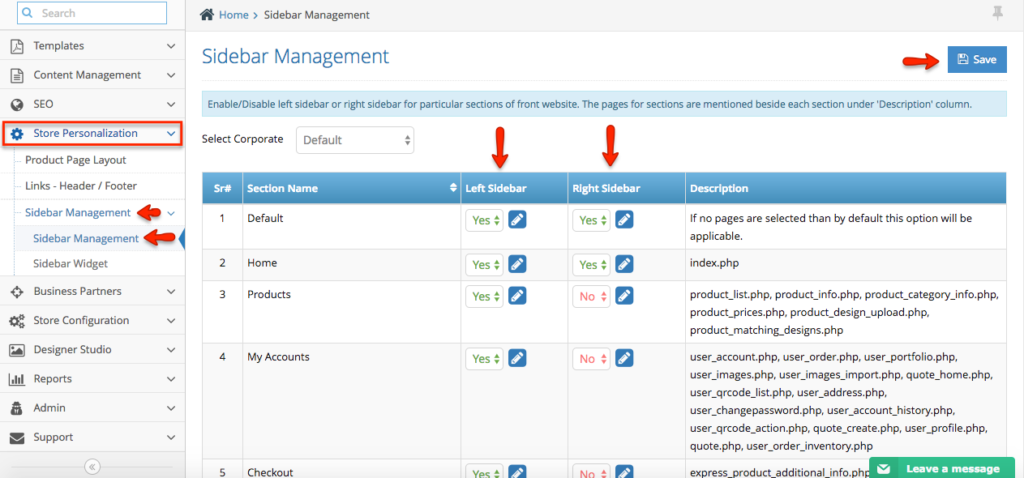
Step 2. To edit the sidebar:
Click Yes – If you wish to show the sidebar on your left or right pane of your store.
Click No – If you want to hide it.
Select Corporate – Default means you are making changes on your affiliate account. If you choose to make changes for any of your corporate accounts then select from the list.
Click the pencil icon – If you wish to choose what to show and hide on that specific sidebar.
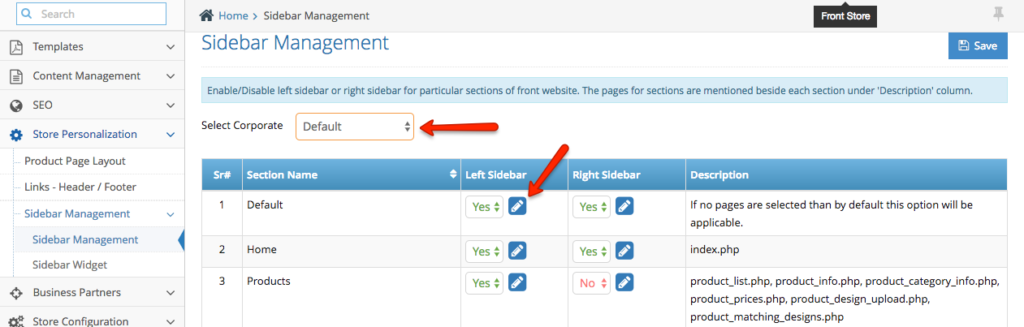
Step 3. Once you’re done making changes, click Save button.
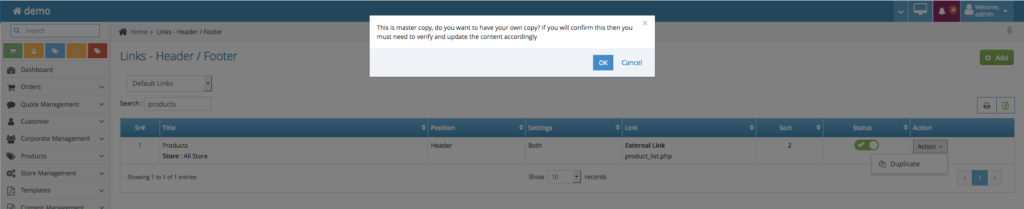
Step 1. Login to your website admin and navigate to left hand side navigation bar > Store Personalisation > Links Header / Footer
Step 2. Search your website links you would like to edit.

Step 3. Duplicate the master links and edit by clicking action > edit.
Step 4. Editing the links
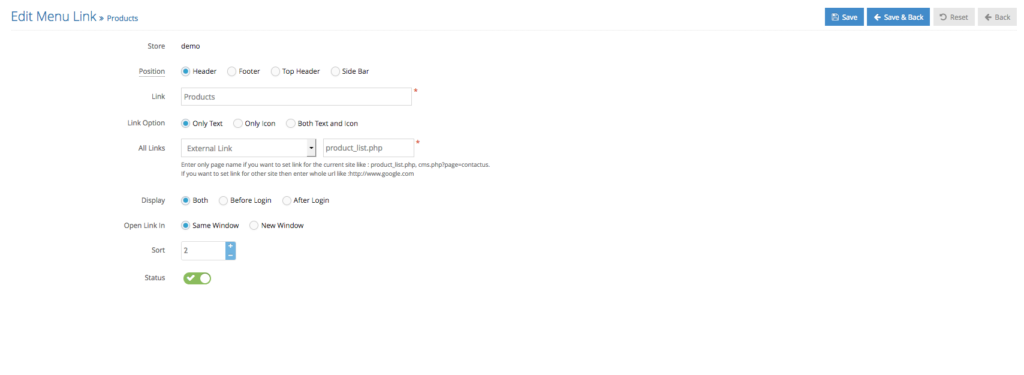
Position : you can set the position of the links (top header, header, footer, sidebar)
Link : set the title of your link
Link Option : set the link type whether a text link, an icon link or text with icon
All Links : set your links to a specific page, content, products or URL
Display : manage the display before, after login only or both.
Open Link In : manage the link to open on the same window or new window
Sort Order : sort order of the links
Status : manage link the status active / inactive
Step 5. Click save to save your changes.
Step 1. Login to your admin side and navigate to Store Personalisation section in the left hand side navigation toolbar > Sidebar Management > Product Page Layout.
Step 2. You can create a new product page layout or duplicate an existing one.
Step 3. Set a name for your new product page layout
Step 4. Layout Type – whether the layout you are about to create will be for web or mobile.
Step 5. Sidebar Display – whether you would like to follow the settings for default of the site (under the sidebar management) or no side bar.
Step 6. Select the product you would like to assign the product page layout to. This will allows you to set different page layout for specific products. Otherwise you don’t need to assign to any product and make this layout as a default in the main product page layout page.

Step 7. if you create it from scratch you can start building up your layout by selecting the block you would like to add to the canvas. Once you have clicked ‘add’ – the block you have selected will automatically landed on the canvas.
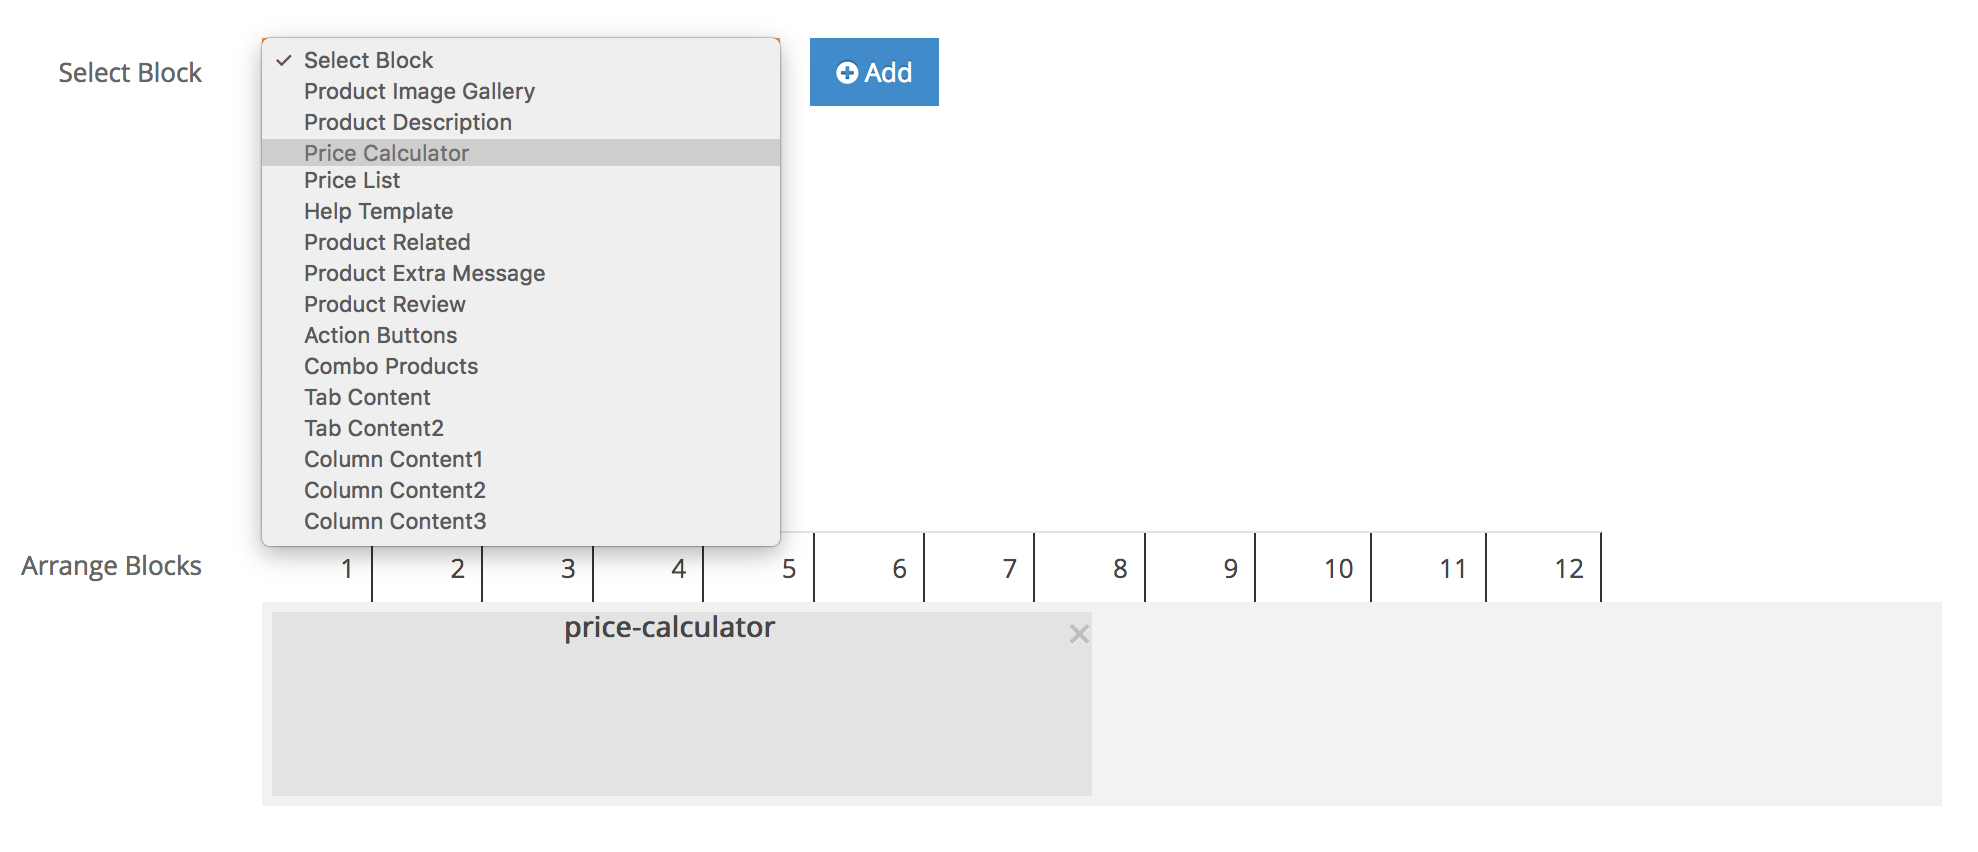
Tips : you can adjust the size of the block by dragging the bottom right of the block or you can move it around to the left and right or top to bottom (when you have mutliple blocks).
In the block section you also have options to have tabs or column.
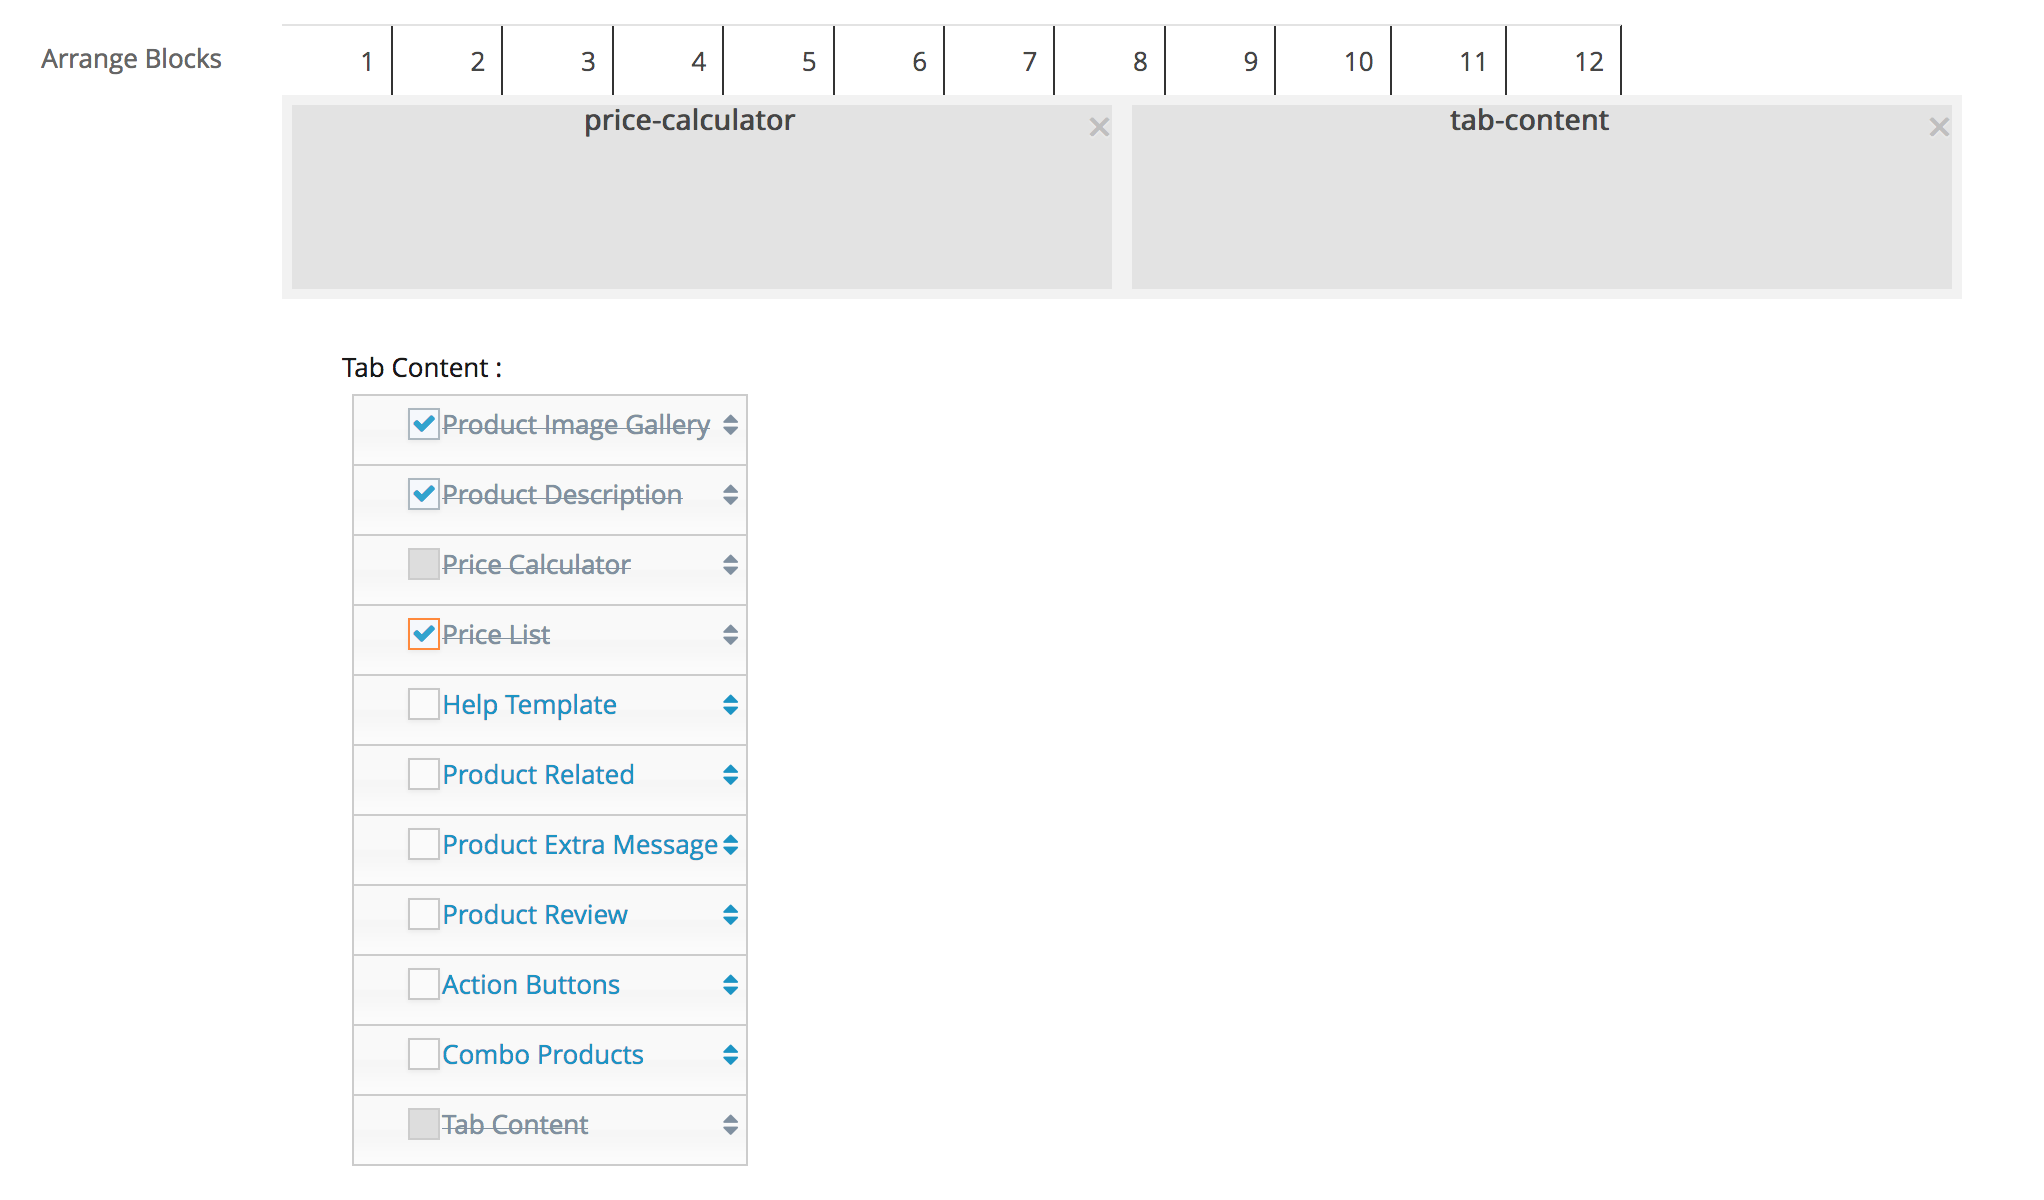
Tabs will allows you to create a mutliple tab as per below
how to manage the tabs? when you have added the tabs or column you will have the option to check which blocks are going to be part of the tabs or column as per below
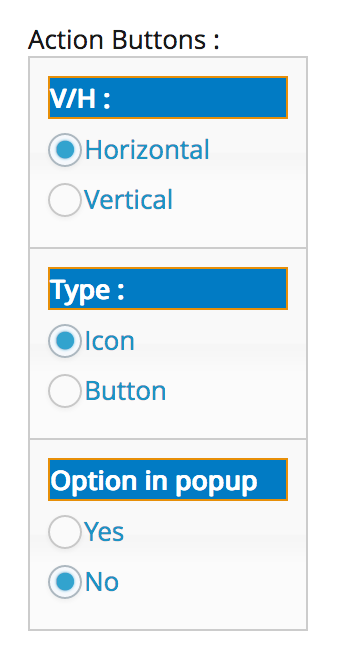
Apart from the tab and column, you also have the settings of how you want the action button to looks like in the front end side (i.e. the position whether will be horizontal or vertical, type, and the pop up option).
Once you have finished designing your new layout do not forget to click save.
Step 1. Login to your admin and navigate to your left hand side navigation > Store Personalisation
Step 2. Click Language Text References under the Store Personalisation
Step 3. Search the wording you would like to edit.
Tips: type the exact wording that is displaying on your website (example below)
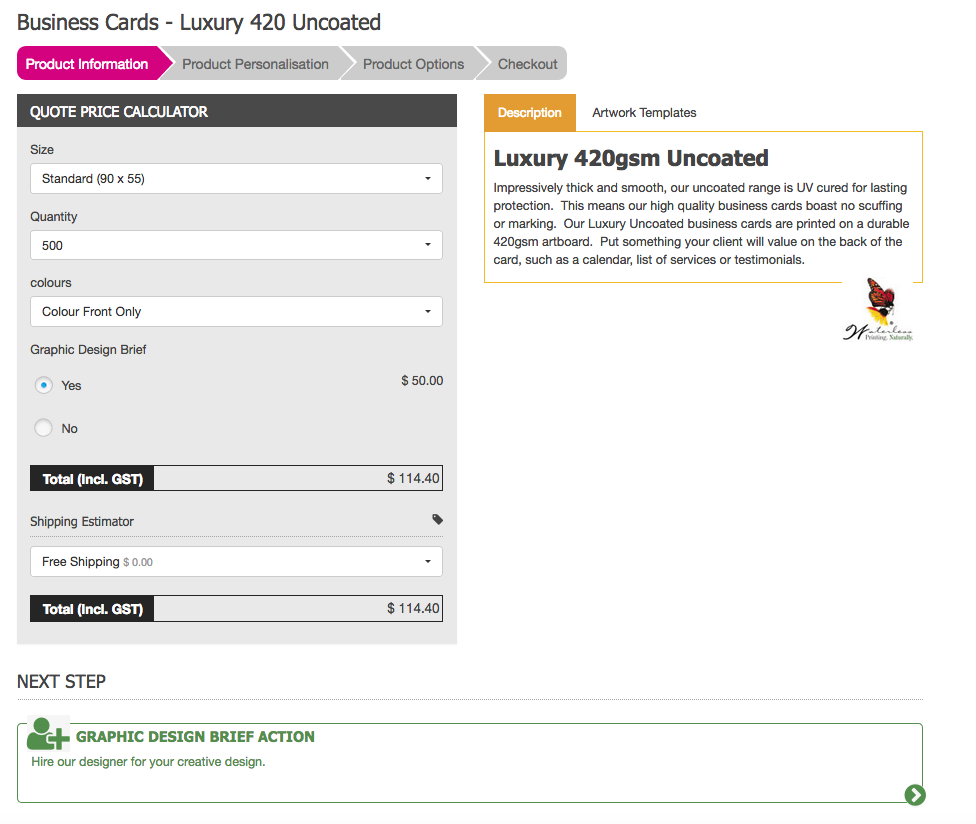
You would like to change the word Graphic Design Brief on the instant calculator or the word ‘Next Step’.
Type the exact word on the search box.
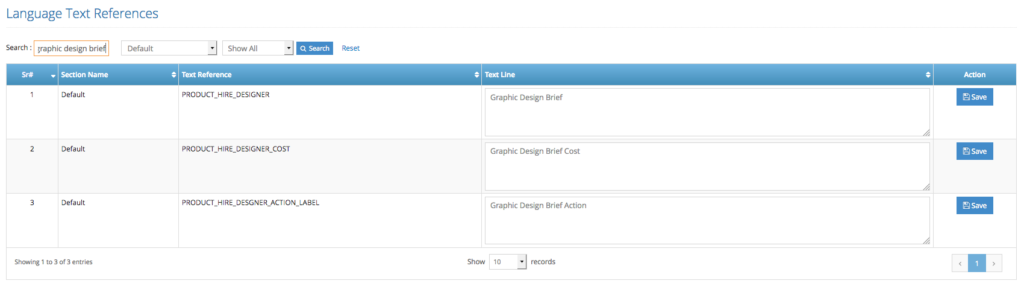
Step 4. Type the text you would like to replace it with on the ‘Text Line’ box
Step 5. Click Save to save your changes.
Step 1. Login to your admin and navigate to your left hand side navigation > Store Personalisation > Pop Up Promotional Content / Message (please see how to activate the configuration here)
Step 2. Click ‘Add’ to create a new one.
Step 3. Setting up the settings for the pop up message.
-. Available to : configuration to make it available to retailer or corporate or both
-. Display : configuration to display before or after login or both before and after.
-. Page to be displayed for : configuration to select on which page you would like the pop up promotional message to appear. (i.e. specific product page, website content page, homepage, registration page, etc..)
-. Promotion Pattern : select type of pop up promotion (top header, slider, toggle, or pop up)
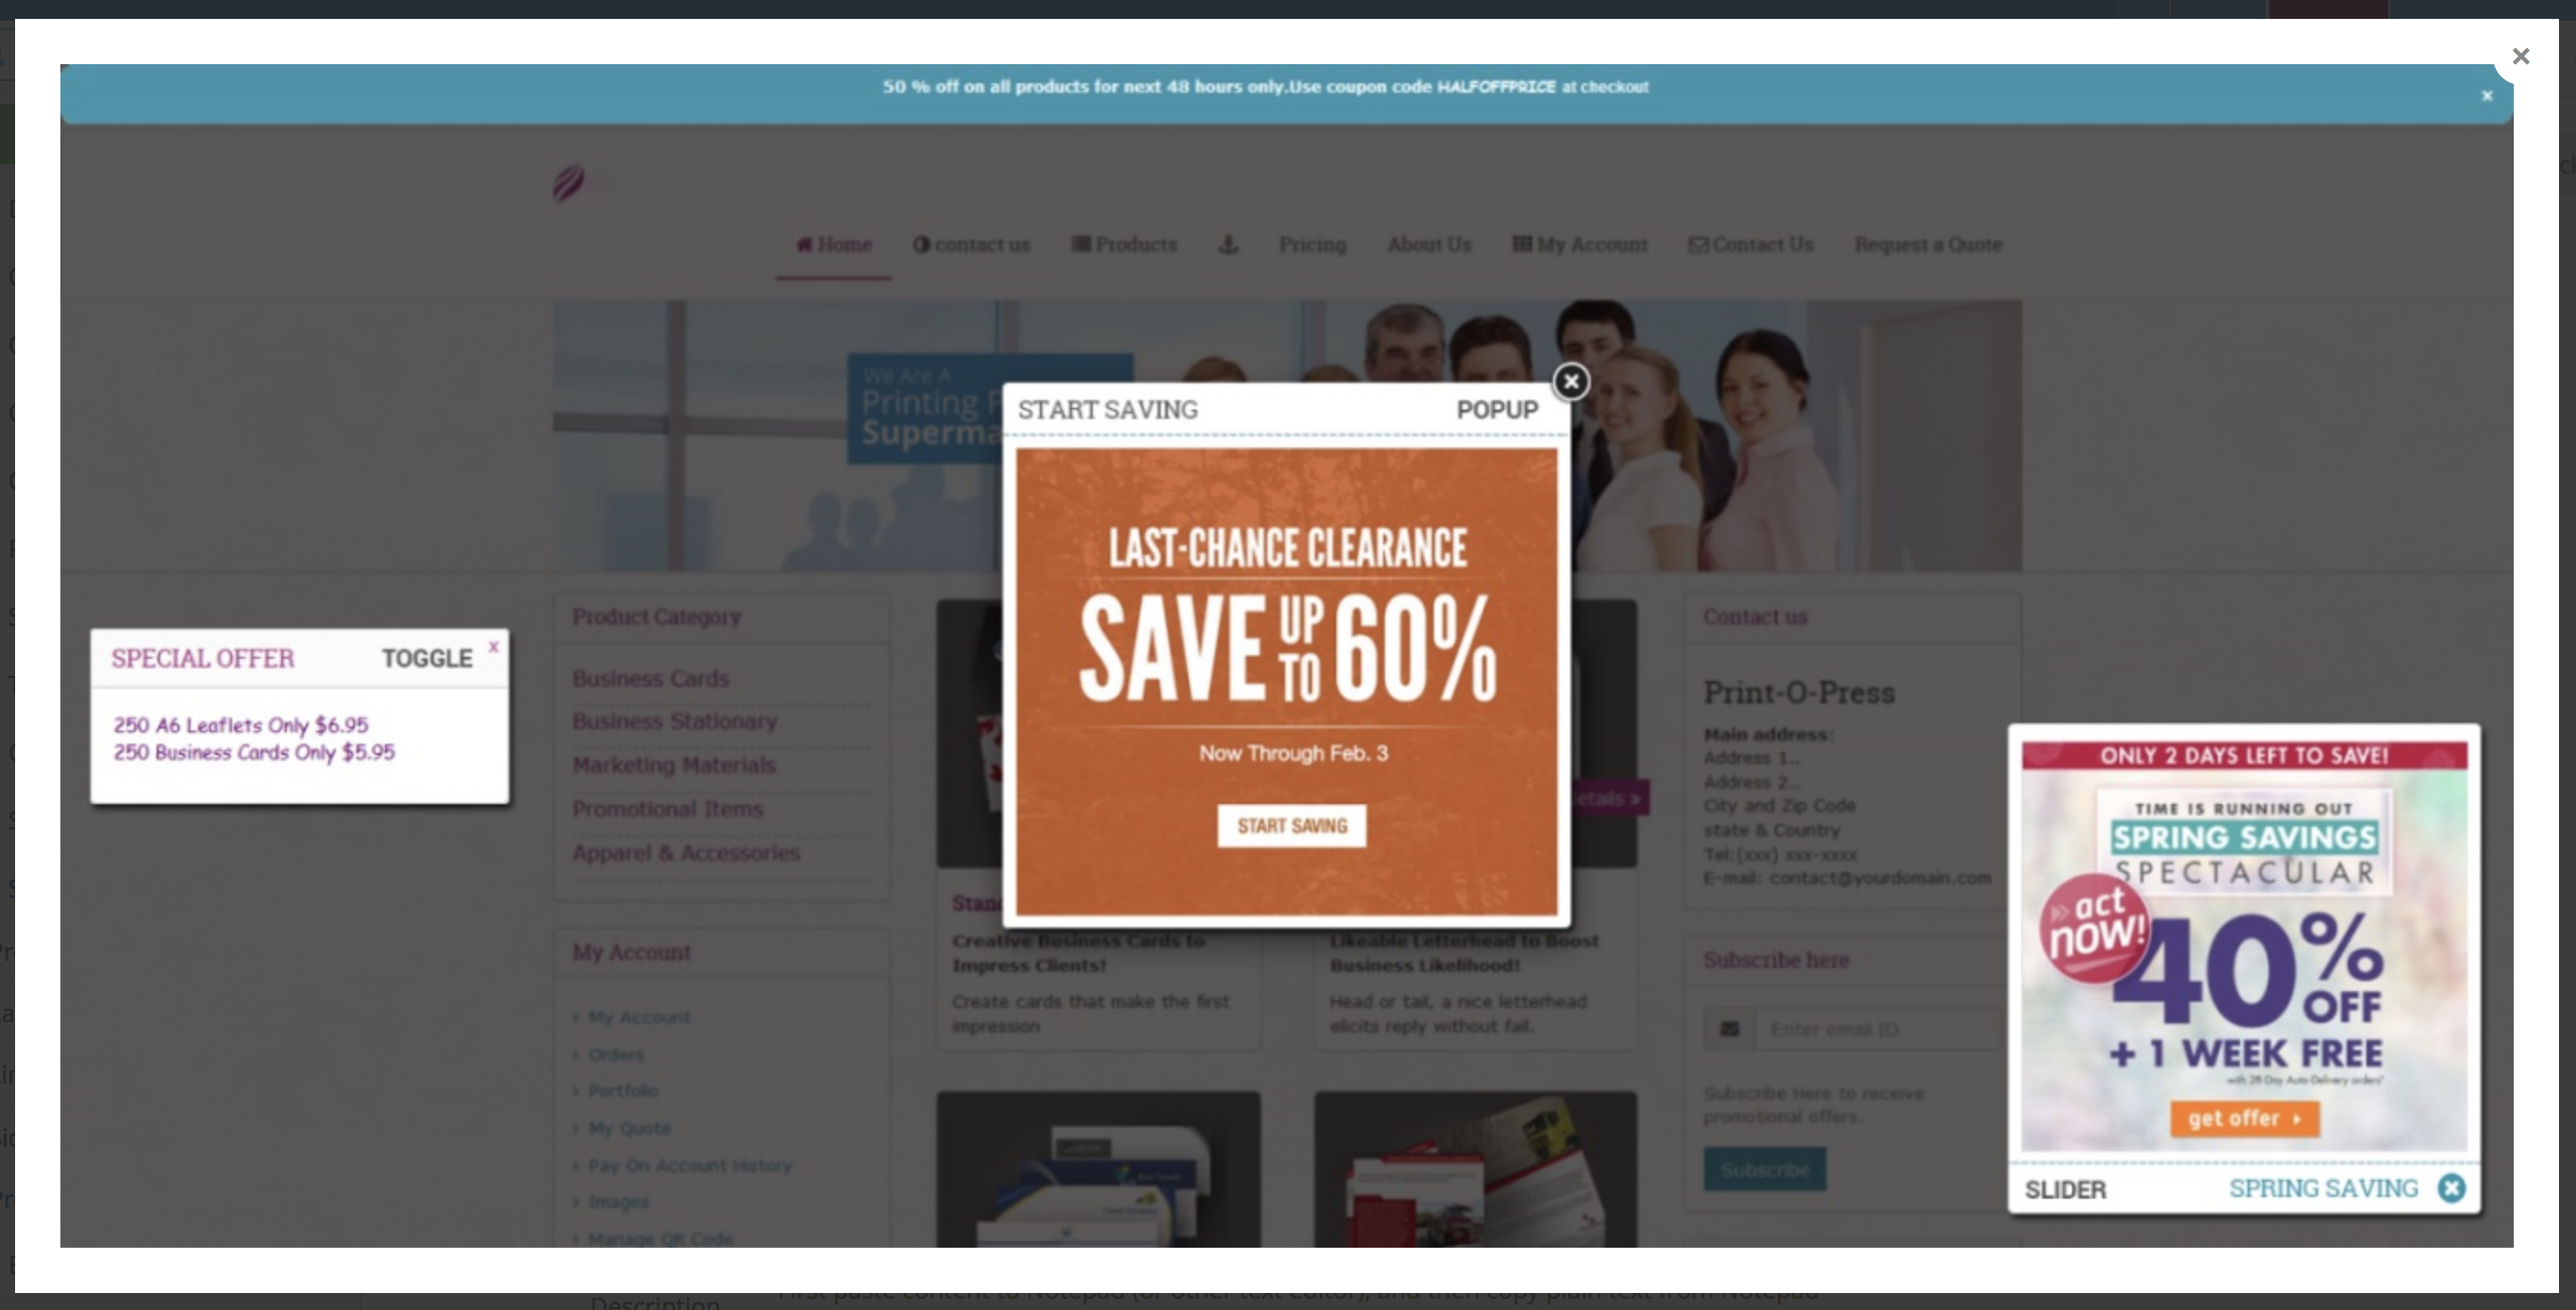
note : when the pop up type is selected you have to set the dimension of the pop up, if you select slider or toggle you need to set the position of the message on your website.
-. time (not available for slider type) : configuration to set the gap of time (in minute) after the customer close the promotional message.
-. delay time : configuration to set when (in second) the promotional message will appear.
-. Title : field to label your promotional message (for admin to be able to tell each promotional messages) – title will shows when pop up type been selected.
-. Description : text field where you can put the promotional message that will appear in the front end. You can also upload image, gif or embed a youtube video.
– Status : configuration to allow you to inactivate the pop up promotional message temporarily.
Step 4. Click Save to save your Promotional Message.
Note: you can not create multiple promotional message in the same page.