• Main Menu
    • Feature
    • Showcase
    • Plans
  • Demo
  • Full Suite of Features
  • Inclusions
  • Blog
  • About Us
  • FAQ
  • Contact Us
  • Terms and Conditions
Editandprint
  • Overview
  • Features
  • Showcase
  • Plans

Admin Dashboard

  • Admin Dashboard
  • Store Cache Setting
  • Admin Dashboard - Additional Setting
  • Admin Dashboard - Front Store and Admin Menu
  • Admin Dashboard - Search Textbox
  • Admin Dashboard - Favorite Links
  • Admin Dashboard - Recent Activities
  • Recent Orders Tab - How to get to your new orders details
  • Recent Customers Tab - How to get to your new customers details
  • Recent Quotes Tab - How to find a specific quote
  • Admin Dashboard - Job Board
  • Admin Dashboard - Sales Statistics
  • Admin Dashboard - Sales Orders
  • Admin Dashboard - Hot Selling 10 Products
  • Admin Dashboard - Store Statistic
  • Admin Dashboard - Recent Updates

Admin Dashboard

Admin Dashboard Overview

Introduction to the Admin Dashboard

From the home menu, you will have access to some widgets where you can view:

1) Recent orders, customers, quotes: manage your latest orders, users, and quotes submitted to your website.

2) Sales Statistics: Get an overview of your online sales (weekly, monthly, yearly).

3) Job Board: The area to manage your orders based on the order & job status.

4) Sales Orders: Overview of your website sales ( Monthly or Yearly ) in curve statistics.

5) Hot Selling products: Provides a graphical representation of the most products sold in your store

6) Store Statistics: Overview of your online platform such as total orders, customers, corporate, products, templates, agents, quotes, etc.

7) Recent Updates: News & updates details from EditandPrint


Store Cache Setting

Store Cache Setting

In computing terms, Cache is a storage layer provided by the system to store a subset of data, allowing for faster loading time the next time the web page is loaded. 


Note: Every time the slider is changed from No to Yes or vice-versa, the setting is saved automatically.

Admin Dashboard - Additional Setting

Admin Dashboard - Additional Setting

Located next to the Cache as Dropdown Arrow, the admin user can find an additional setting that acts as a support tool.


I. HTML Help


HTML Help is a code guide that admin users can use for creating a different effect on their store.


Each of the HTML elements is divided into Tabs as follows:

> Typography = Typography refers to the appearance of the text on the admin store page. The help will include guides to manipulate the text, creating listed/bulleted content, blockquotes, addresses, and descriptions.

> Tables = Tables allow the admin to create and arrange the information or data in rows and columns. The help will show the example and different kinds of tables that admins can create. 

> Components = Used to add content variations such as alert information, labels, page header, and media objects.

> Image = Image will allow the admin to create image shape and add effects to the image.

> Tabs, Dropdowns, & Collapse = Often called Togglable, are options that allow admin to show specific content in the form of tabs, dropdowns, or collapse to ensure that the page is not too cluttered with content/information and easier to read.

> Alerts, Popovers, & Tooltips = Alerts, Popovers & Tooltips are a collection of buttons or elements that the admin user can use to get customer attention when browsing or checking through the page.

Also, set up the position of the information when the customer is hovering or clicking the specific text. 

> Carousels = Carousels is a slideshow for cycling through a series of content, such as images, text, and banners.


II. Full-Screen Window


Full-Screen Window allows for a broader page without interruption of browsers’ menu and tabs. Admins can also press the F11 key to behave the same way to make it full screen.

Admin Dashboard - Front Store and Admin Menu

Admin Dashboard - Front Store and Admin Menu

The screen button in the screenshot below worked as a shortcut to the store home page in the new tab.
So you can check the changes that you are working on from the customer side.


Notifications

Notifications will alert admins of incoming events that need to be seen/resolved. The events will appear as a number beside the bell icon. 

Admin Menu

Admin menu allows admin to set up the Favourite Links, Change Password, and log out of the current session.

Please click “Here“to read our article about How to Setup Favourite Links

Admin Dashboard - Search Textbox

How to search specific sidebar option using search textbox

Located on the top left of the admin page, the Search Textbox is a feature that allows admins to navigate the necessary function on the admin’s sidebar menu without having to search and select the orderly selections from the admin menu one by one.


For example, if you are want to look for Settings, you can type ‘settings’ in the textbox, and the search result will show all the Settings-related keywords. Clicking on the results will direct you to the corresponding page.


With this feature, you can find the specific page easier and faster throughout the admin menu

Admin Dashboard - Favorite Links

How to set your favorite link into the website dashboard

Located under the Search Textbox for admin, the Favourite Links are shortcuts that will allow easier access to the allocated menu that is displayed. With a maximum number of 5 shortcuts, admins can go through the needed shortcuts without navigating one by one.


For example, the green icon indicates List Order (you can also hover your mouse to show the information about the link). Rather than selecting Orders > List Order, simply clicking the green icon link will redirect you to the List Order Page, which is faster and easier.

Affiliates can configure the order or target links personally by clicking on the Dropdown button next to the admin name > Setup Favourite Links.


On the Setup Favorite Links page, the affiliate can choose the link icon and page location on your admin website. If you want to revert the link to the default setup you can see the default link on Recommend Link column.


By changing the link to the one you like, the system will change the default icon related to your chosen links.
However, you are still able to change the hero icon if you like to.


When you are happy with the changes, You can update the changes by clicking the save button. However, to show the update on the admin dashboard, you need to clear your website’s cache by clicking the icon on the screenshot below.


The favorite link will get updated as per the screenshot attached.


Admin Dashboard - Recent Activities

Dashboard - Recent Activities

Recent Dashboard will allow affiliates to see the most recent activities categorized into Orders, Customers, and Quotes. Affiliates can also refresh the Recent Dashboard data manually by clicking the loop symbol.


This feature is useful as Affiliates can see the most recent orders, customers, and quotes. In addition, it will function as a shortcut depending on which data the admin would like into (Orders Tab for Order Number, Customers Tab for Customer Details, and Quotes Tab for Quotes Status).

However, do note that there is some case that even though some transactions may be over one or two years ago and will appear in the Recent Dashboard, so Recent Dashboard will not be affected by timelines.

Recent Dashboard – Orders:
On the Orders Tab, affiliates can check the five most recent orders that the customers have made. Affiliates can also click on the Order number to go to the view/update order page like a screenshot below


Recent Dashboard – Customers
On the Customers Tab, affiliates can see the most recent customer detail of the recently registered customer. Clicking on the clickable link on the Customer’s name will direct it to the Customer’s Detail.


Recent Dashboard – Quotes
Affiliates can see the most recent customer quote or admin (offline quote) on the Quotes tab. In addition, affiliates can see the quote details and redirect to the quote page by clicking the quote status.


You can also find a Textbox underneath the Recent Dashboard Table. Note that the text in the textbox will change depending on the Recent Dashboard Tabs. For example, if the Recent Order Tab is selected, the textbox will have a caption of Order No. If Recent Customer is selected, the textbox will have a caption of Customers, and Quotes Tab will have a caption of Quotes.


The benefit of using the textbox is affiliates can search for a specific order, customer, or quote without having to go through their respective pages. While in the Orders tab, using the textbox will allow affiliates to look at the order through both List Order and Archive Order without any restriction.

List Order is the page where the page shows all the recent and ongoing order that the admin and customer currently creates.

Archive Order is the page where all the orders have been moved to complete or closed by the admin. The benefit of the Archive Order is that affiliates can use data that can be accessed in the long term and used as backup data or records of order activities.

The View All Button (located on the bottom right of the Recent Dashboard) allows admins to act as a shortcut to show the respective tab.

Recent Orders Tab - How to get to your new orders details

how to get to the new order details via admin dashboard

Summary: You can get to your 5 latest orders quickly from your admin dashboard by following these steps below

Step 1. Login to your admin side > navigate to admin dashboard

Step 2. Right underneath the Dashboard title you will see the ‘Recent Orders’ tab > you can find your 5 newest orders on this tab (scroll down and click ‘view all’ in order to view all of the orders – if you have more than 5 new orders)


Step 3. Click the order number in order to get to the new order details.


Recent Customers Tab - How to get to your new customers details

How to find the details of the new customers via admin dashboard

Summary: The easiest way to get to your new customer’s details from your admin dashboard.

Step 1. Login to your admin side > navigate to the admin dashboard

Step 2. Right underneath the Dashboard title you will see the ‘Recent Customers’ tab > you can find your 5 newest Customers on this tab (scroll down and click ‘view all’ in order to view all of the orders – if you have more than 5 new orders)


Step 3. Click the customer’s name in order to get to the new customer details.


Recent Quotes Tab - How to find a specific quote

How to find a specific quote from the admin dashboard.

Summary: Two ways to find a specific quote you’re looking for from the admin dashboard.

One by clicking the Quote title as per the screenshot below.
The system will direct you to the specific quote page.

Two you can go the quote page by typing the specific quote number into the search text box.

Step 1. Login to your admin side > navigate to the admin dashboard

Step 2. Right underneath the Dashboard title, you will see the ‘Recent Quotes’ tab (next to the ‘Recent Customers’ tab) > Scroll down on the recent quotes box until you can see the ‘Search box’ for the quotes.


Step 3. Type the quotes number or the customer’s name and click enter to get the customer’s details.


Admin Dashboard - Job Board

How to search and sort order on Job Board

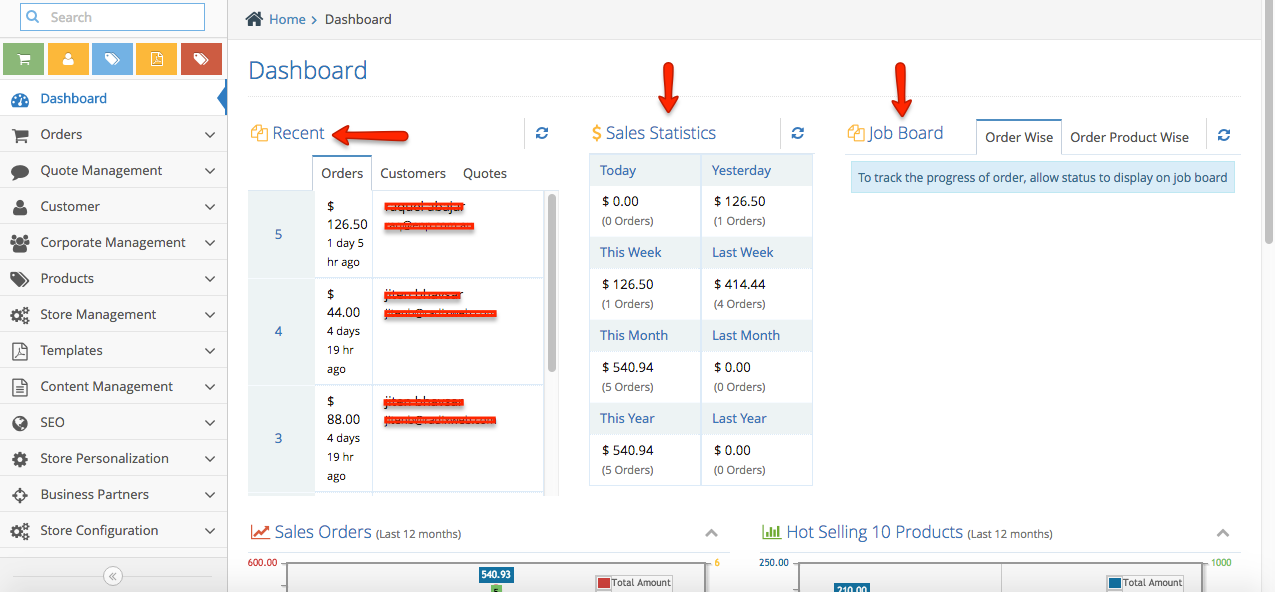
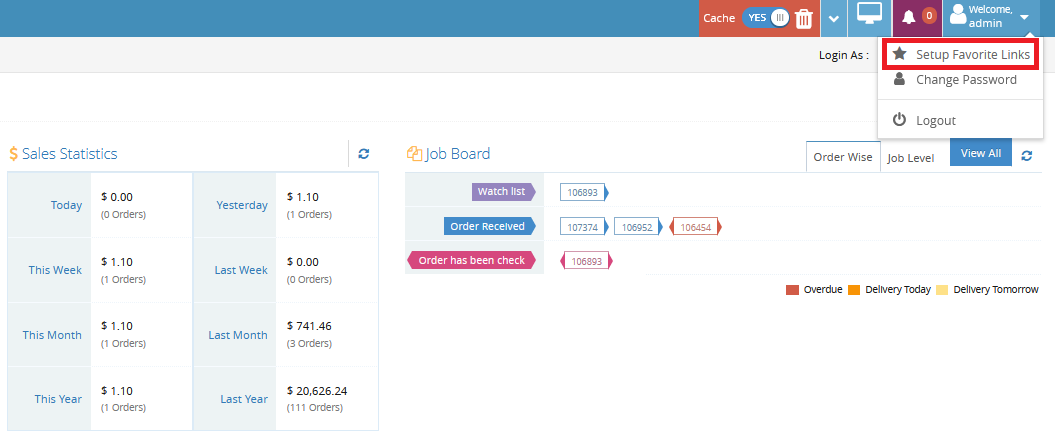
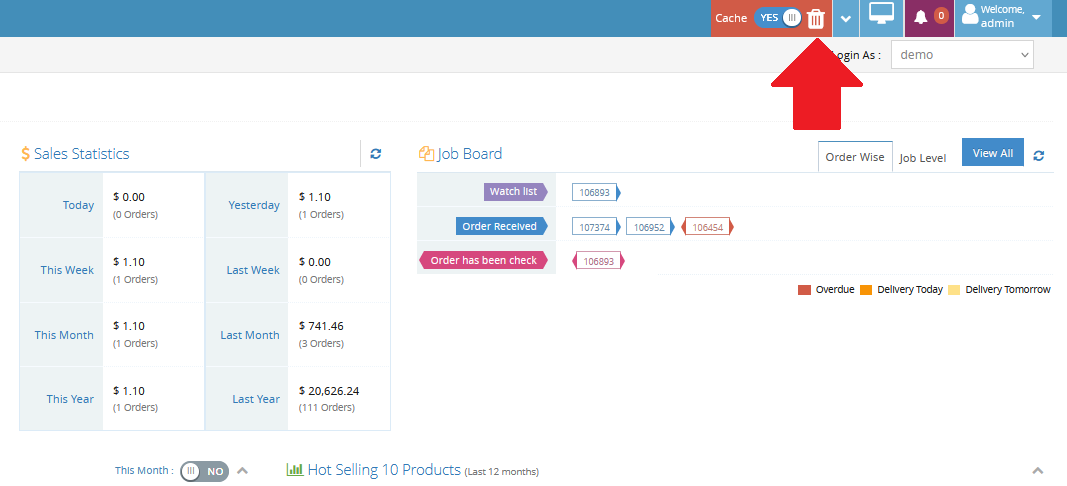
Job Board is the feature that allows the admin user to check order by status. The Job Board consists of two tabs:

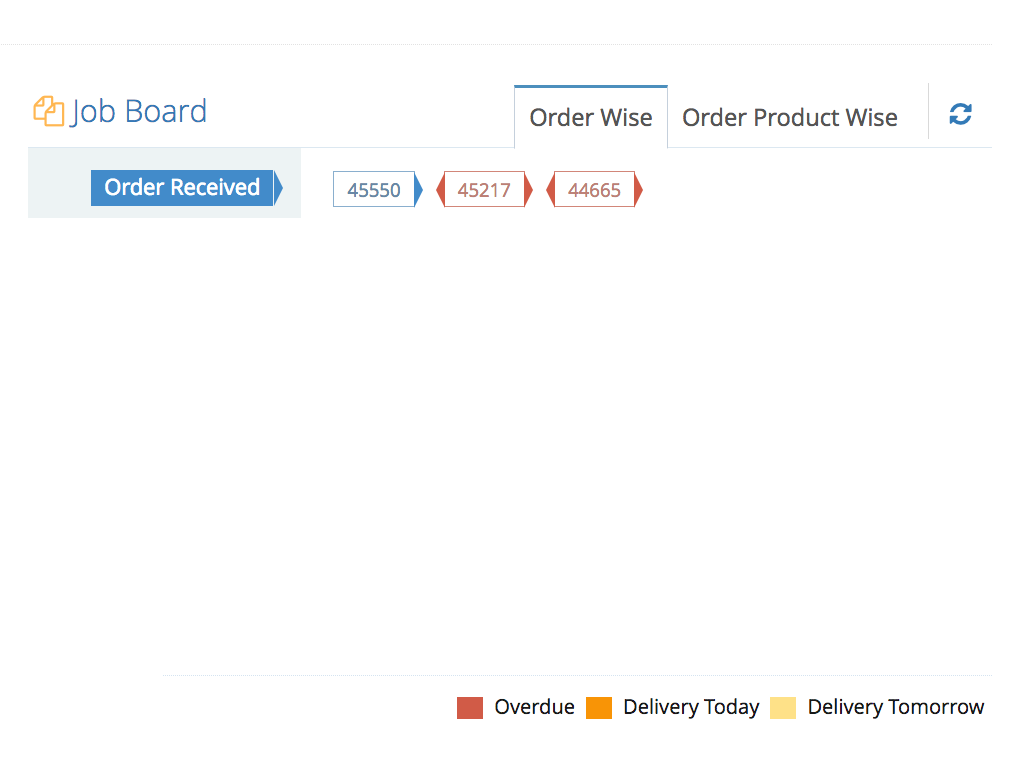
  • Order Wise: Indicating the Order Number and Current Order Status
  • Job Level: Indicating the status of the job


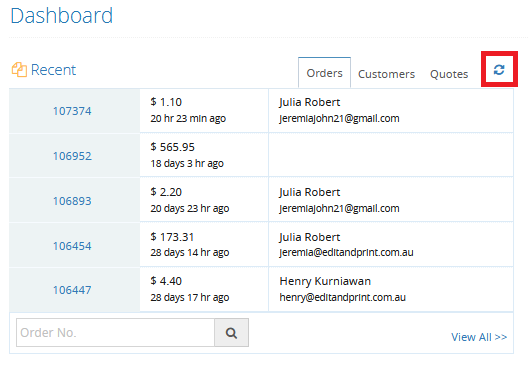
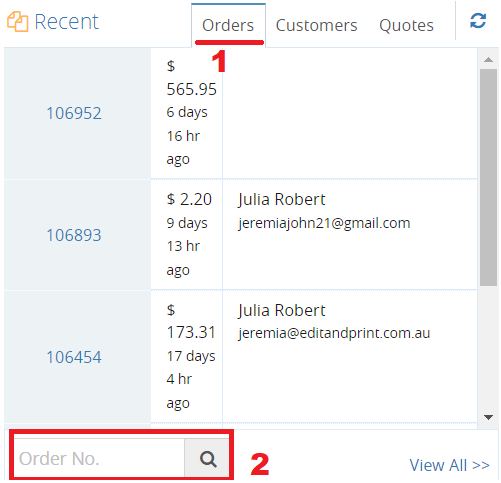
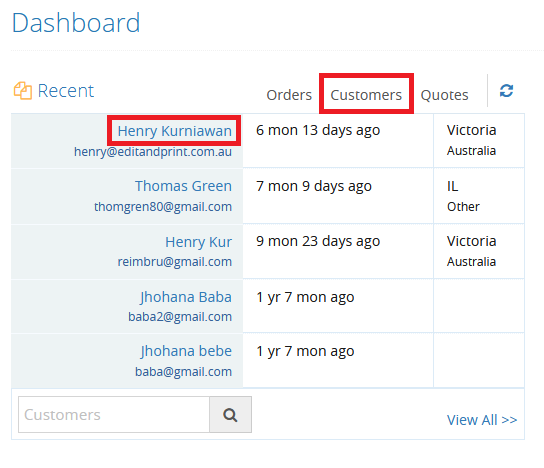
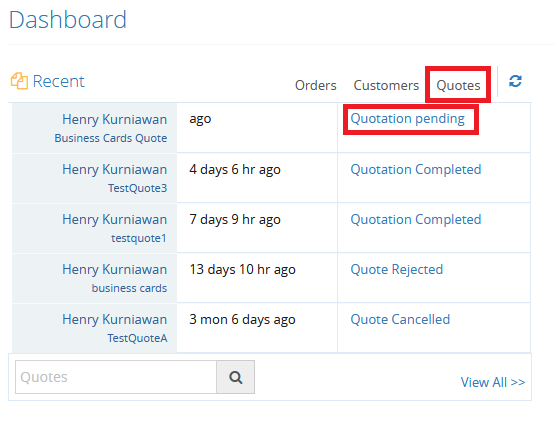
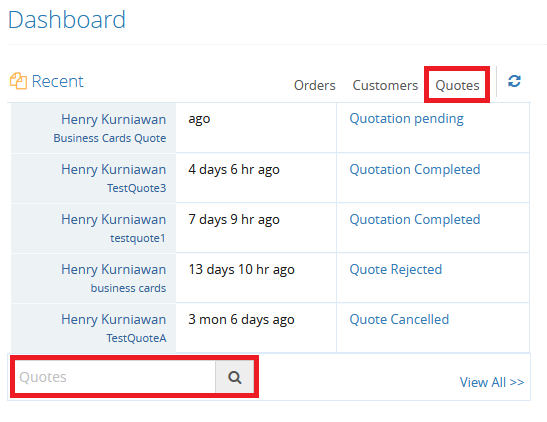
Unlike the “Recent Dashboard” area which only shows a maximum of 5 order entries, the Job Board can display a larger number of order status and job status in one table, making it easier to find the current order status of the order. 

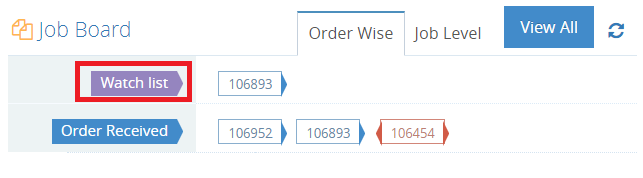
Admin can also keep track of the specific order by making it into a Watch List. The Watch List will make the order pinned in both Order Wise and Job Level, making it easy to keep track. 

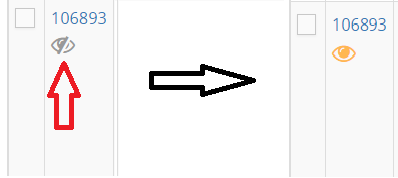
To enable the Watch List, navigate to Orders > List Orders and look for the specific order you would like. Under the order ID, there is an Eye icon. Click the icon to make the particular order on the Watch List.


As the Job Board only displays the order and job status, shop admins can easily find the specific order status they need rather than search it one by one.

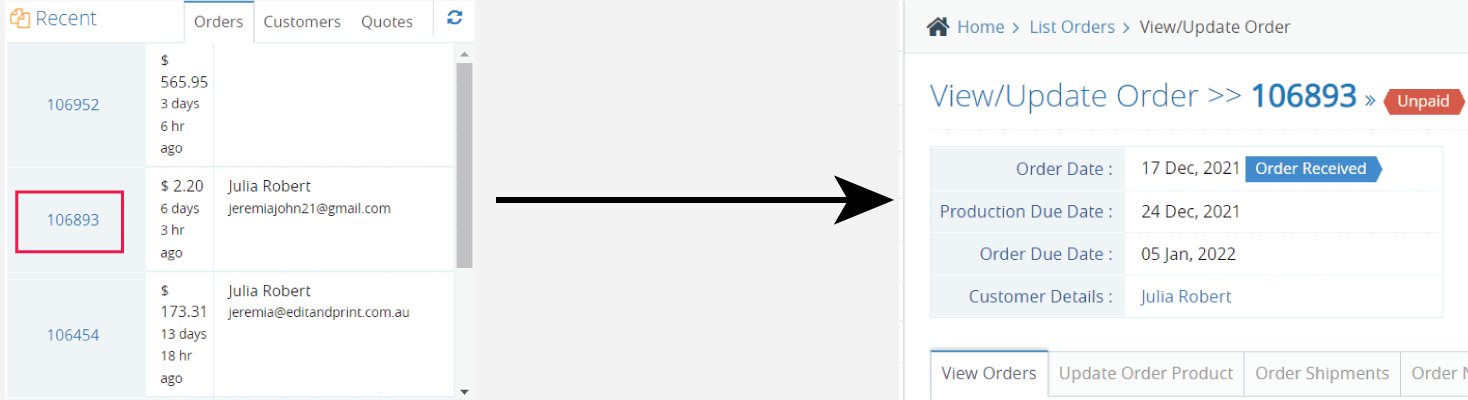
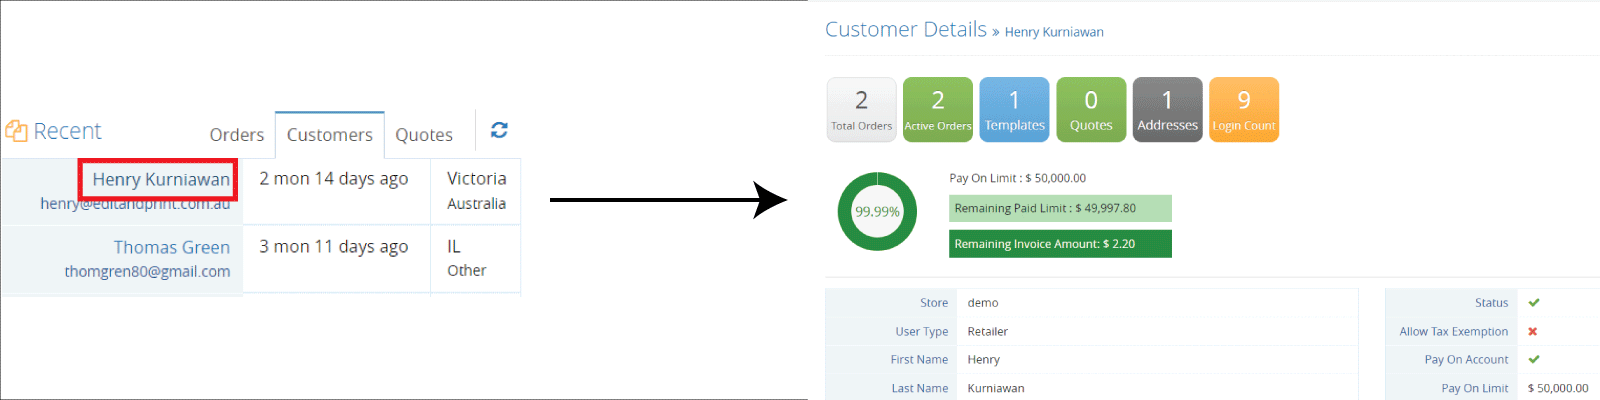
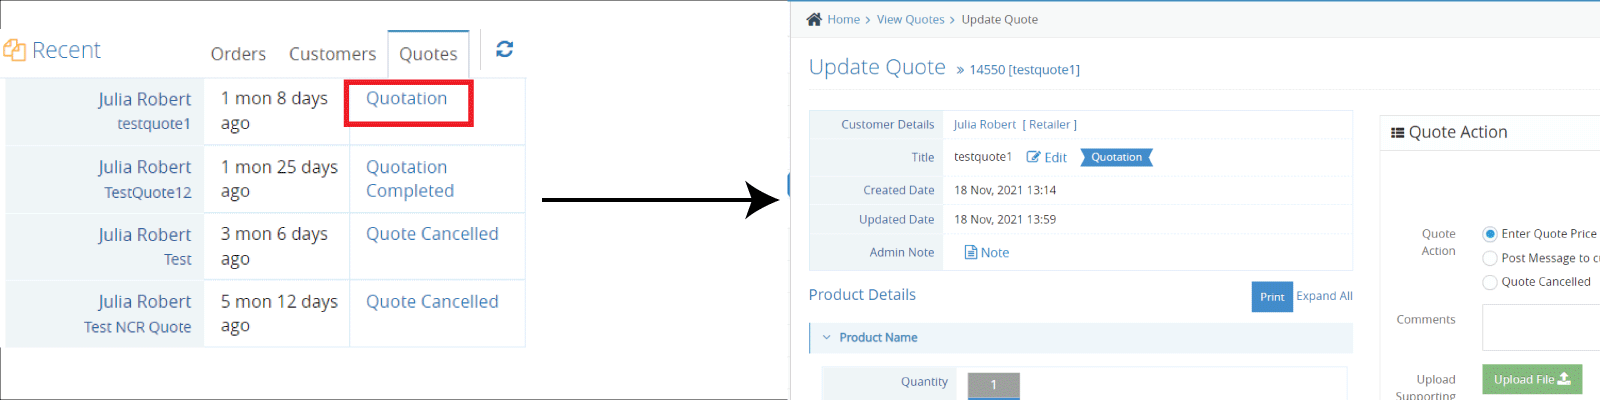
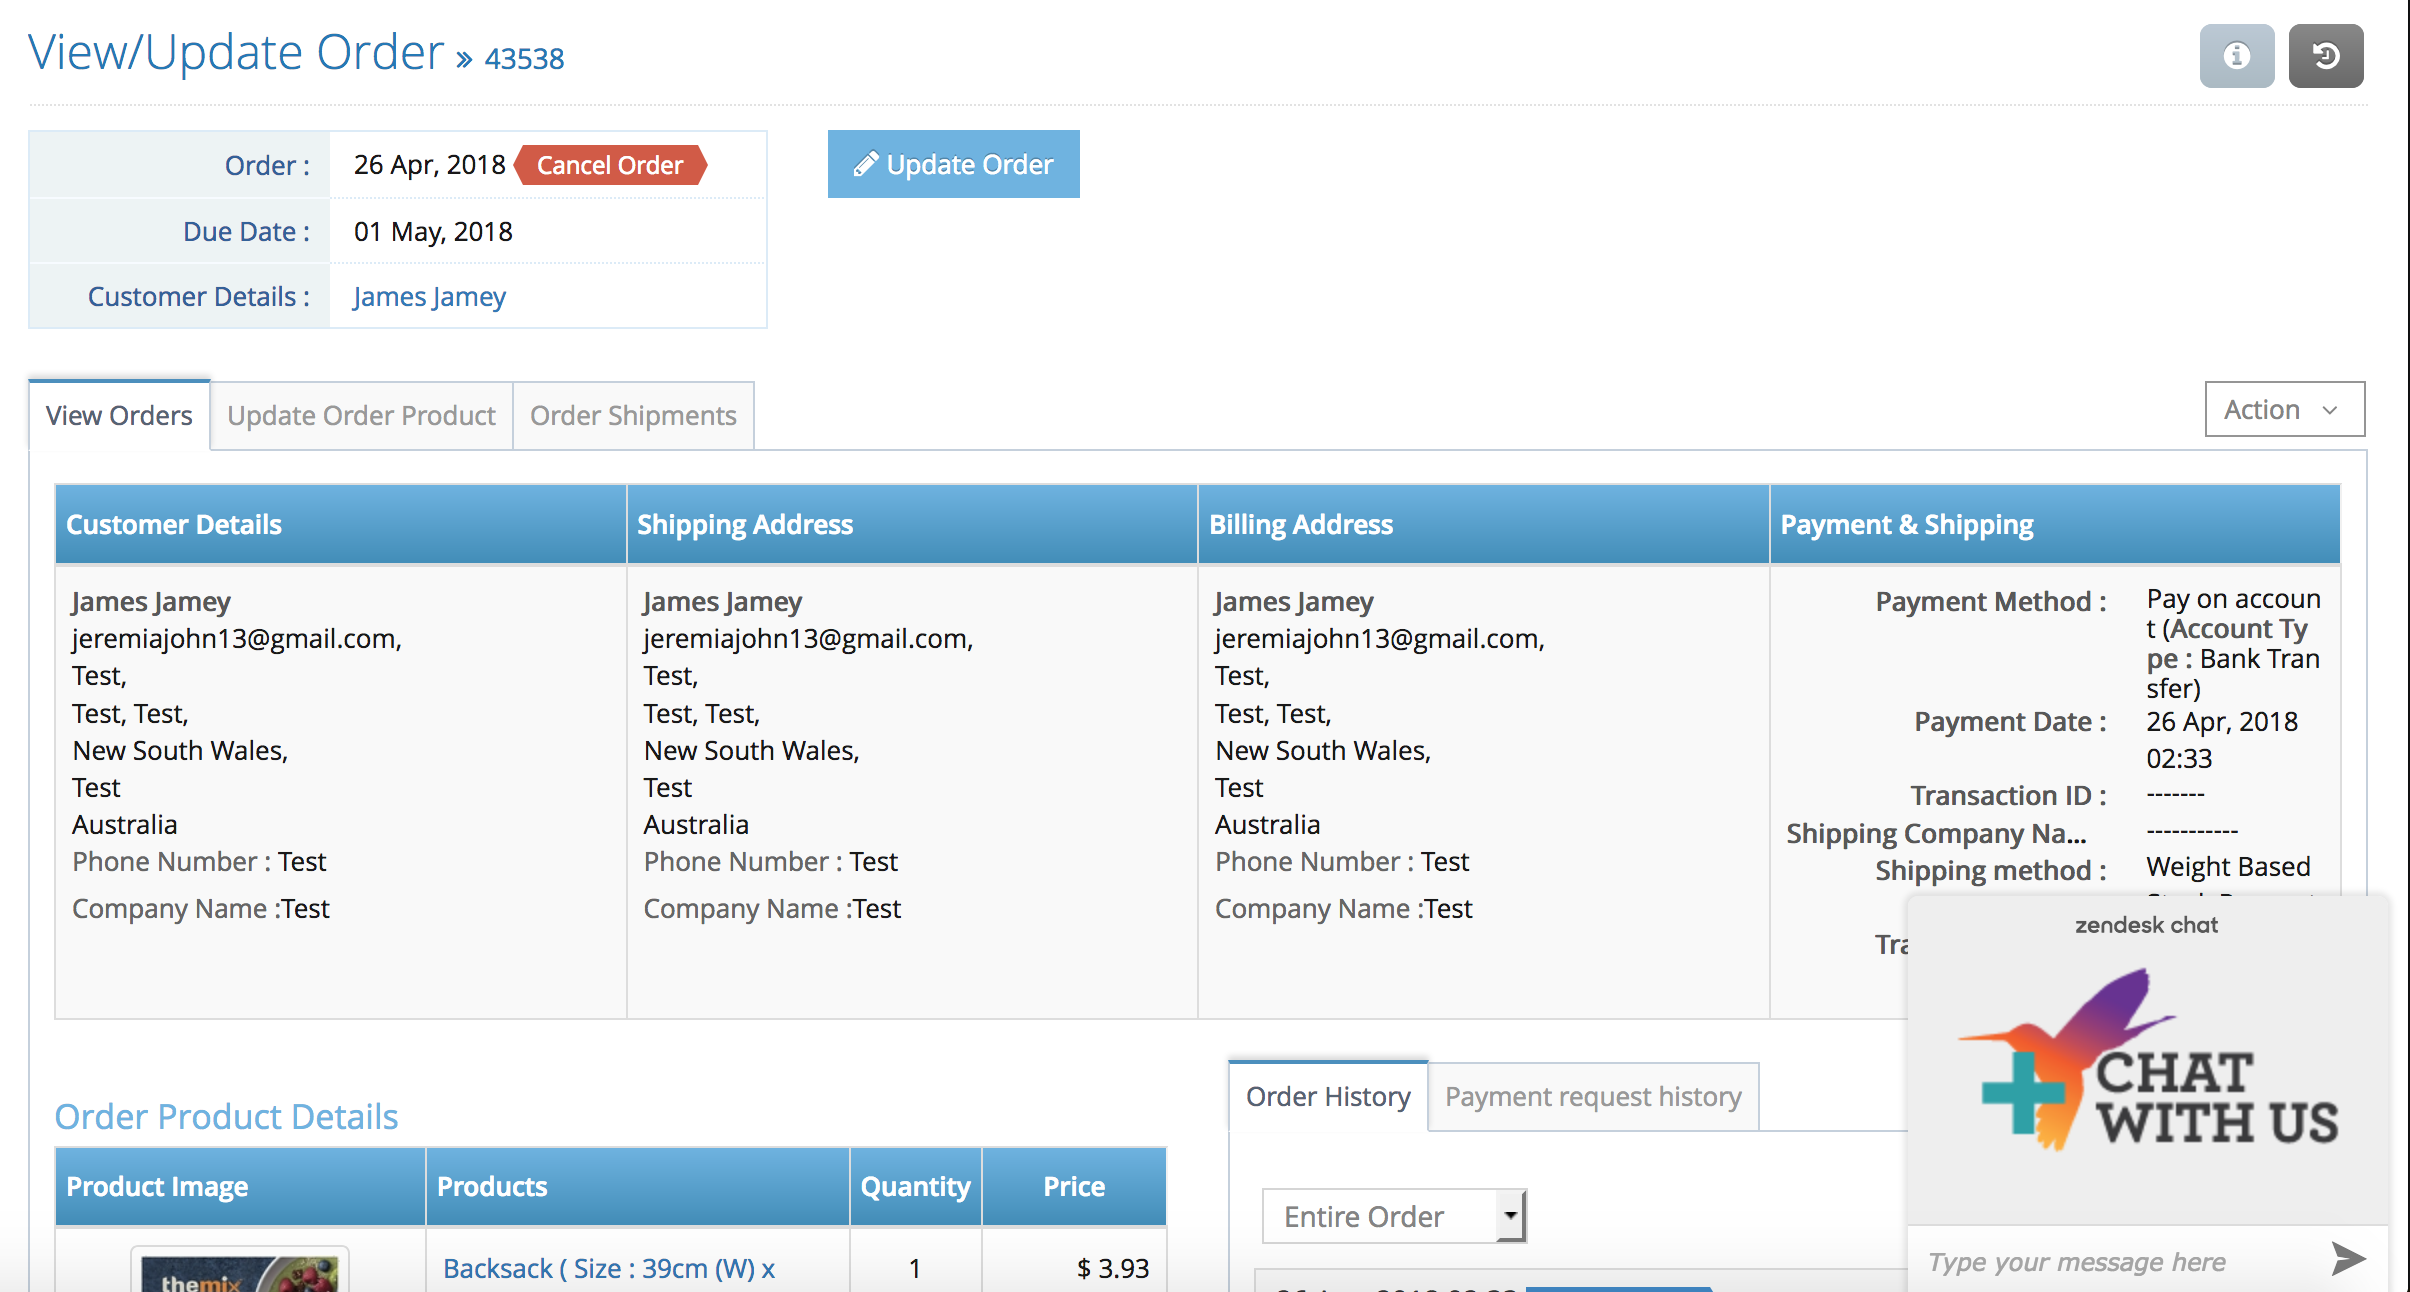
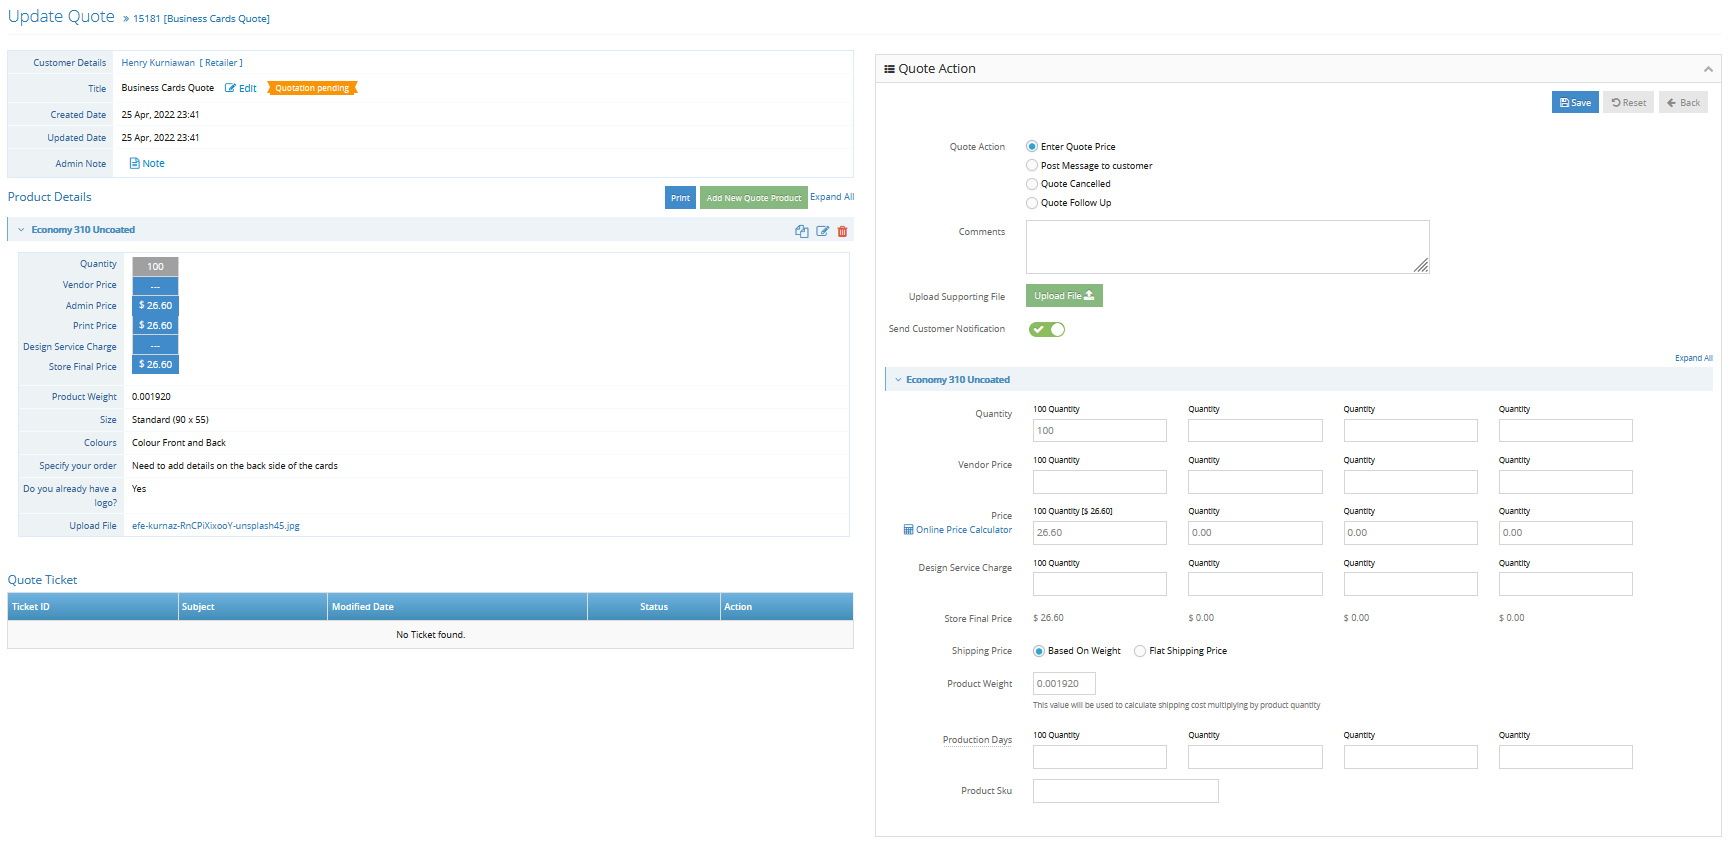
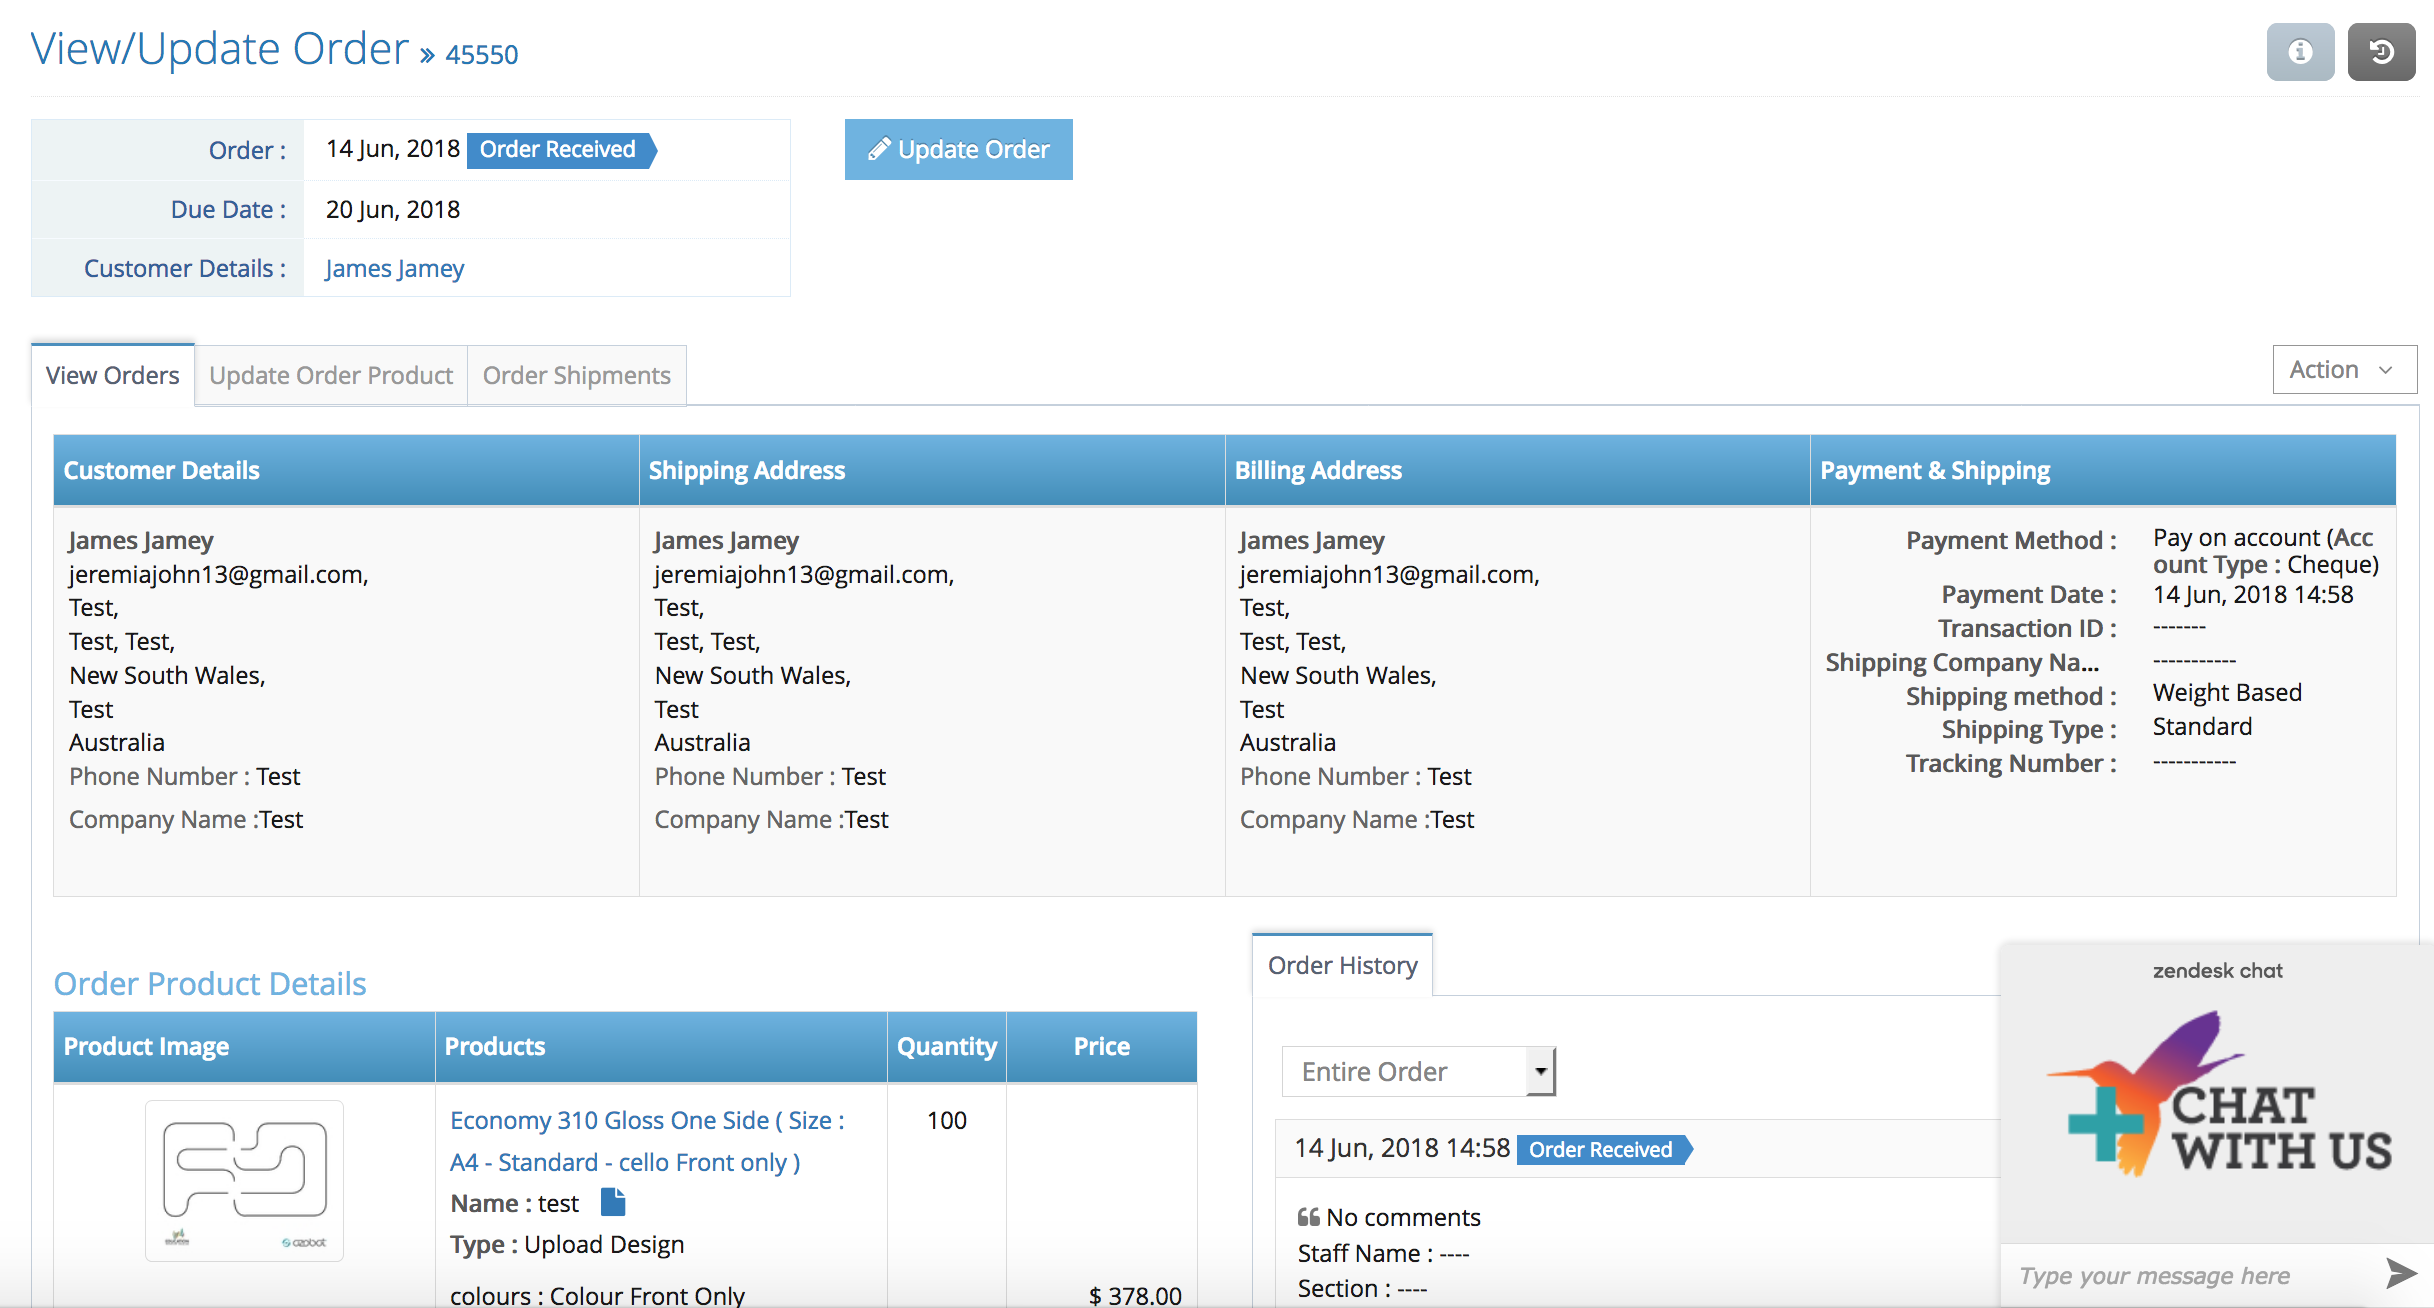
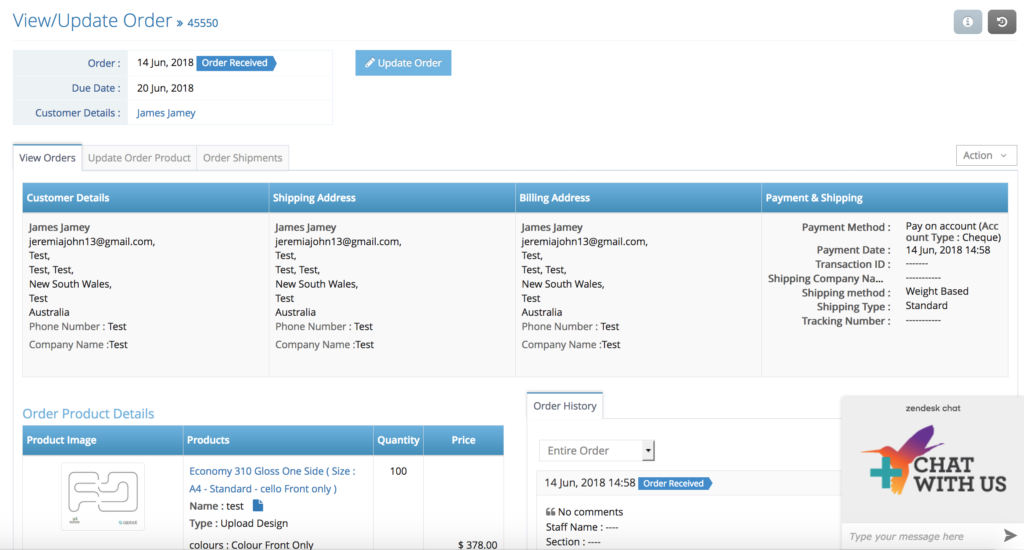
Admins can also click on the Order ID in the Order Wise/Job Level to get redirected to the specified Order Page. 


Please note that one order can consist of more jobs if customers order multiple products and artwork or different production days.

Despite the functionality, the Job Board can only display the order and job status for the last 30 days (1 month) period of time. Therefore, we introduced the View All Button located on the top right corner to compensate for the time period restriction. 

The “View All” Button will show and redirect the admin user to the new page that shows the order’s current status and job regardless of time as long as the order is not processed to archive order.


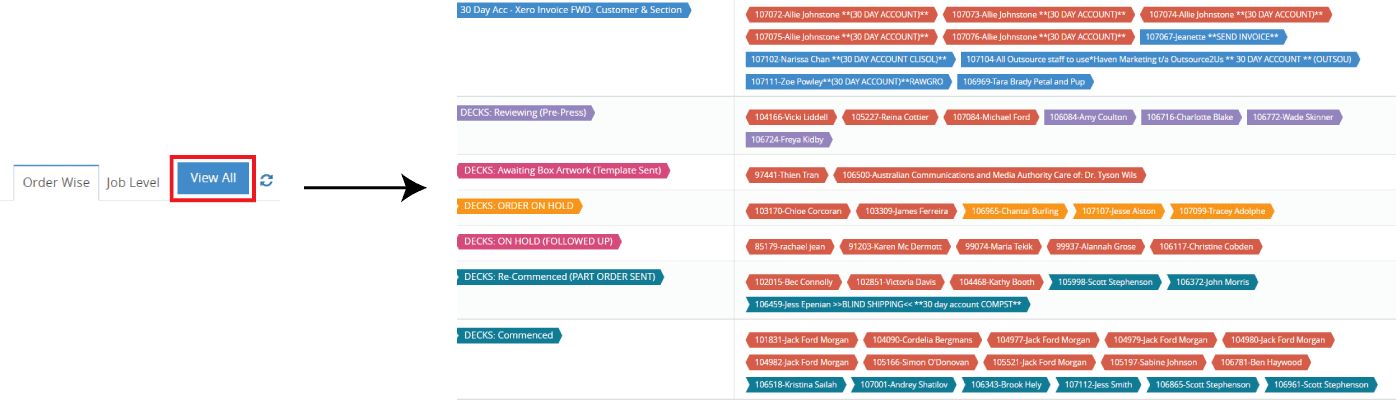
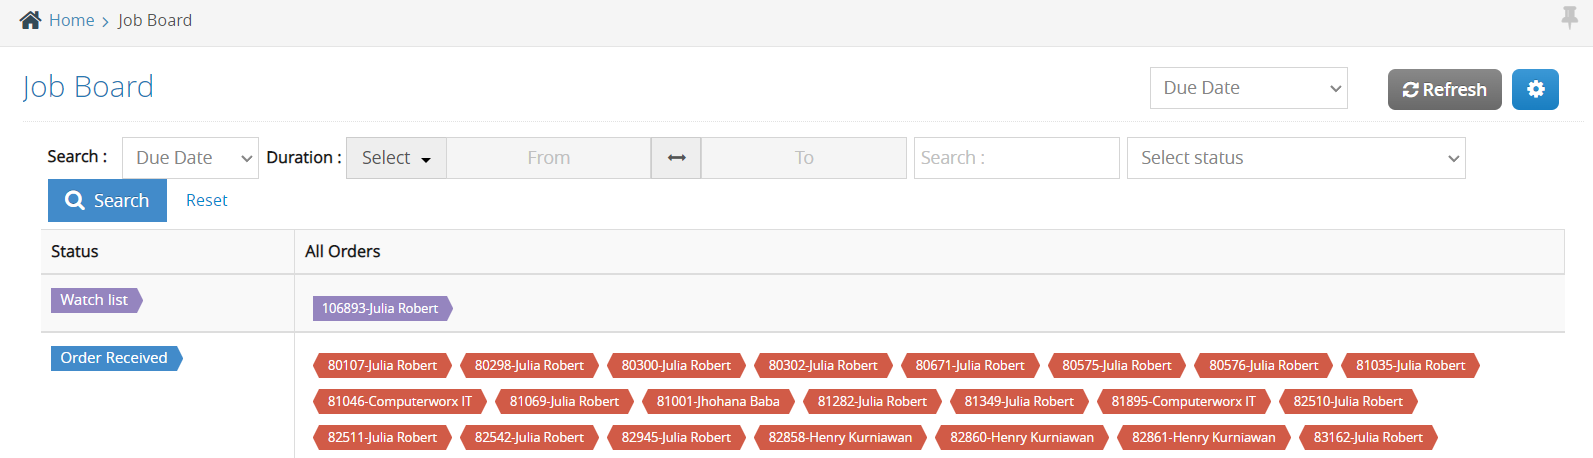
Note: we have color coded when the order is close to the due date by using 3 different colours:

Yellow: Delivery Tomorrow
Orange: Delivery Today
Red: Overdue


Affiliates can also filter the Job Board from View All as by list as follows:


1. Search Text Box:

a)Due Date – When the order is due

b)Order Date – When the order has started

2. Duration: Select the duration of the time period affiliate would like to display the date from and to. A dropdown selection button next to the Duration text will have a preset date depending on the time period. 

For example, Selecting This Week from the Select dropdown will automatically set the duration time for this week.


3. Search: Search for a specific name (Customer Name or Artwork Name) or Order Number to filter the Job Board

4. Select Status: Select the order to be displayed by status to filter the job according to the status selected

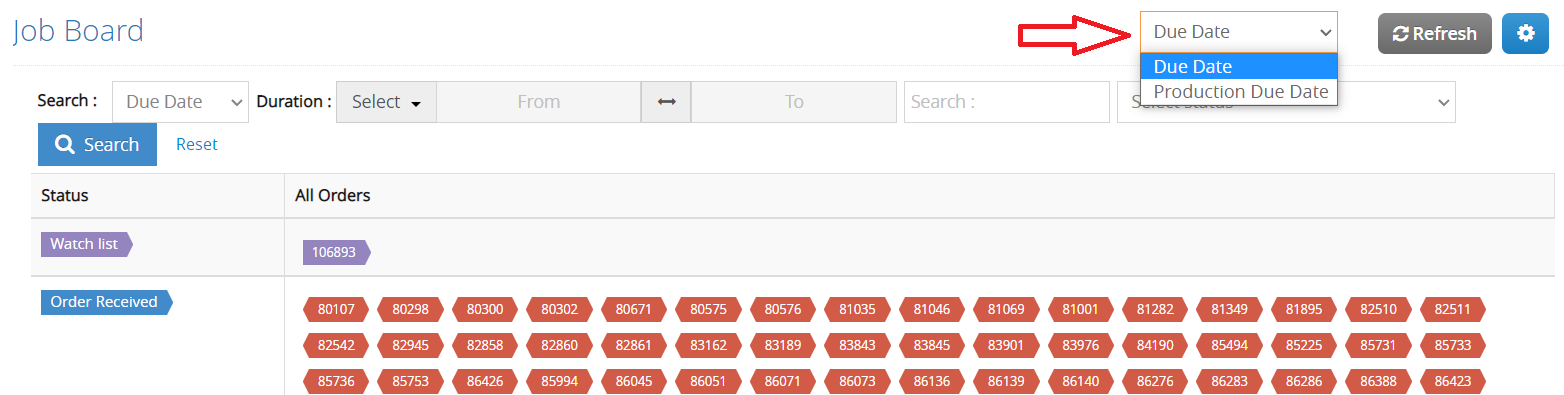
On the top right, you can set the Job board will view the Job Board by the Order Due Date or Production Due Date. 


Note:
The Job Board by Order Due Date or Production Due Date menu is only available when Job Board Preference has the Order Status selected. If the Order Product Status is selected, the menu will not be available.
For more information regarding the Job Board Preference, please check our article about Job Board Preference.

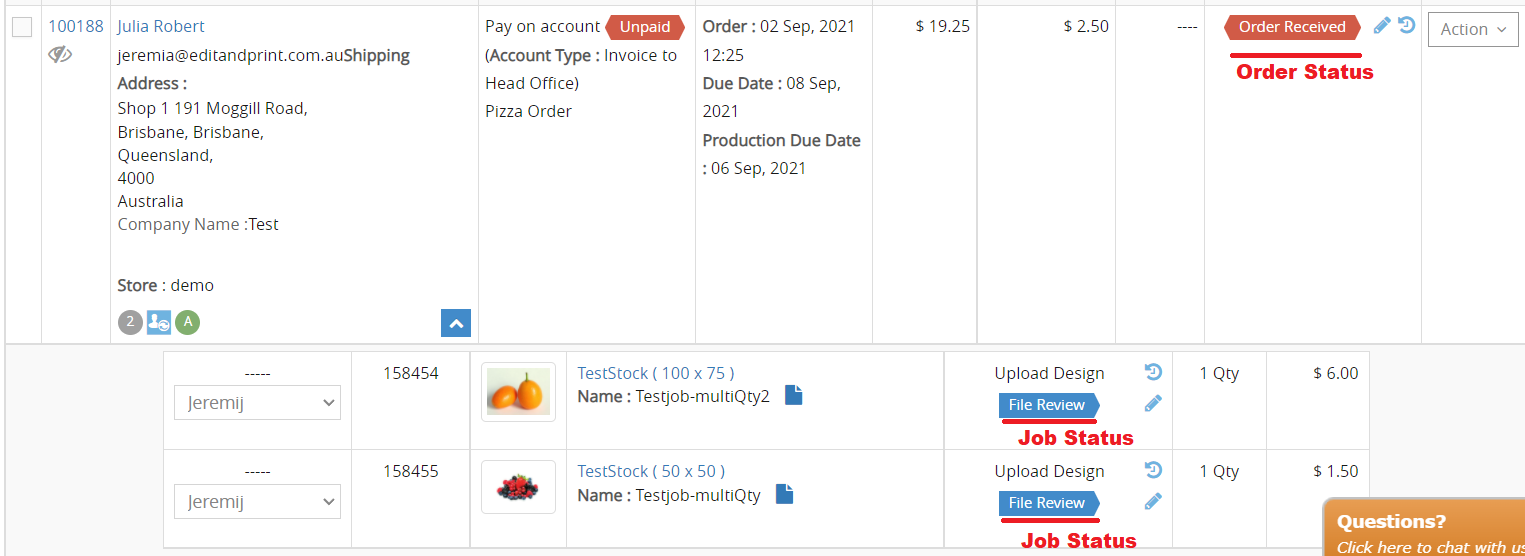
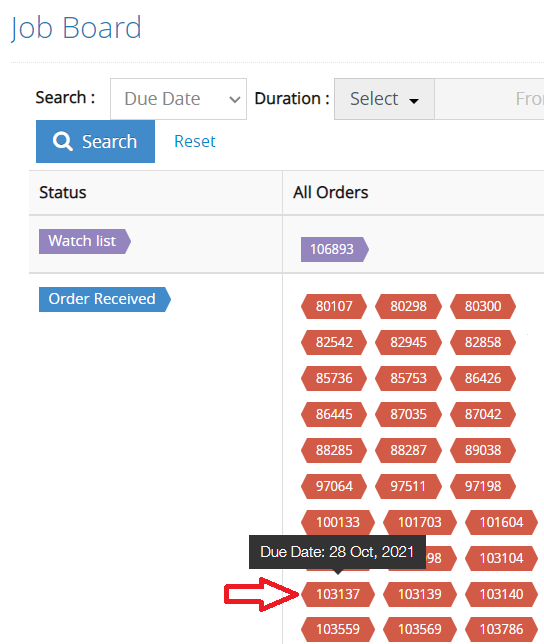
Due Date: Selecting the Due Date will sort the order based on the date that the order is ready to be delivered.
Hovering the mouse over the selected order will show the admin user when the date of the order should be complete or has been delivered.


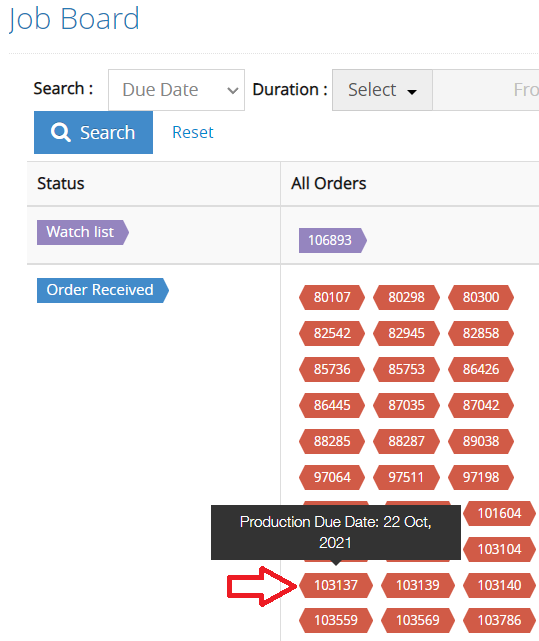
Production Due Date: Selecting the Production Due Date will sort the order based on the date the order has been printed and ready to be dispatched from the printer.+
Hovering the mouse over the selected order will show the date the order is ready to be dispatched. Please check the screenshot attached.


Affiliates can also refresh the data by clicking on the Refresh button next to the Due Date/Production Due Date selection. Next to the Refresh button is the Job Board Preference, marked with the gear icon.


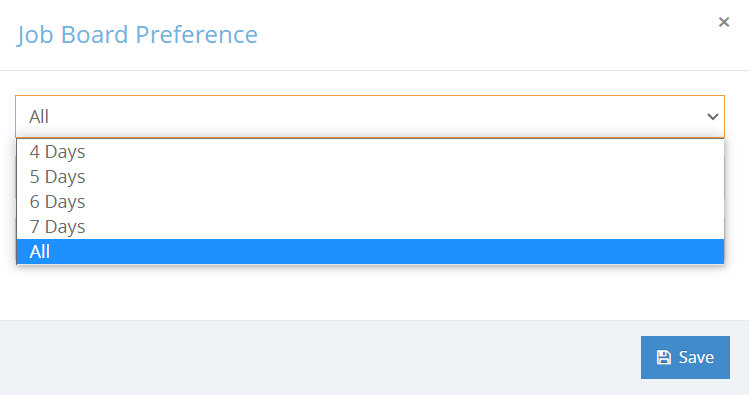
Job Board Preference allows you to filter the job based on the admin selected from 4 to 7 Days or view All-time followed by Order Status or Order Product Status and additional information such as Customer Name or Artwork Name or Product Name.


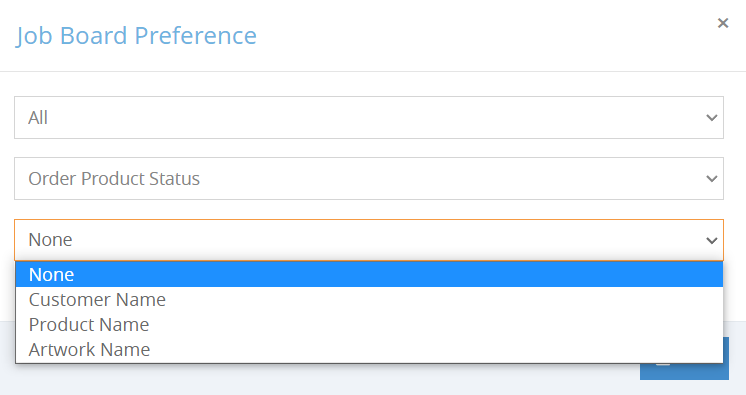
If the admin chooses Order Status. Admin can show the Customer Name in the Job Board by selecting additional information like the screenshot attached.


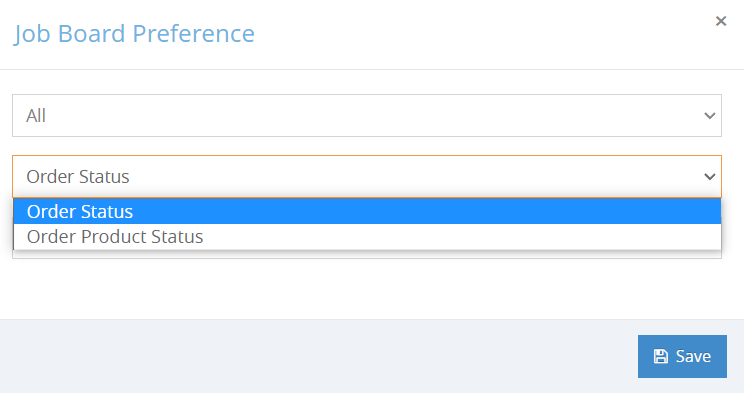
For Order Product Status, the admin can choose Additional information such as Customer Name, Product Name, or Artwork Name for the order displayed in the Job Board.


Job Board with Customer Name


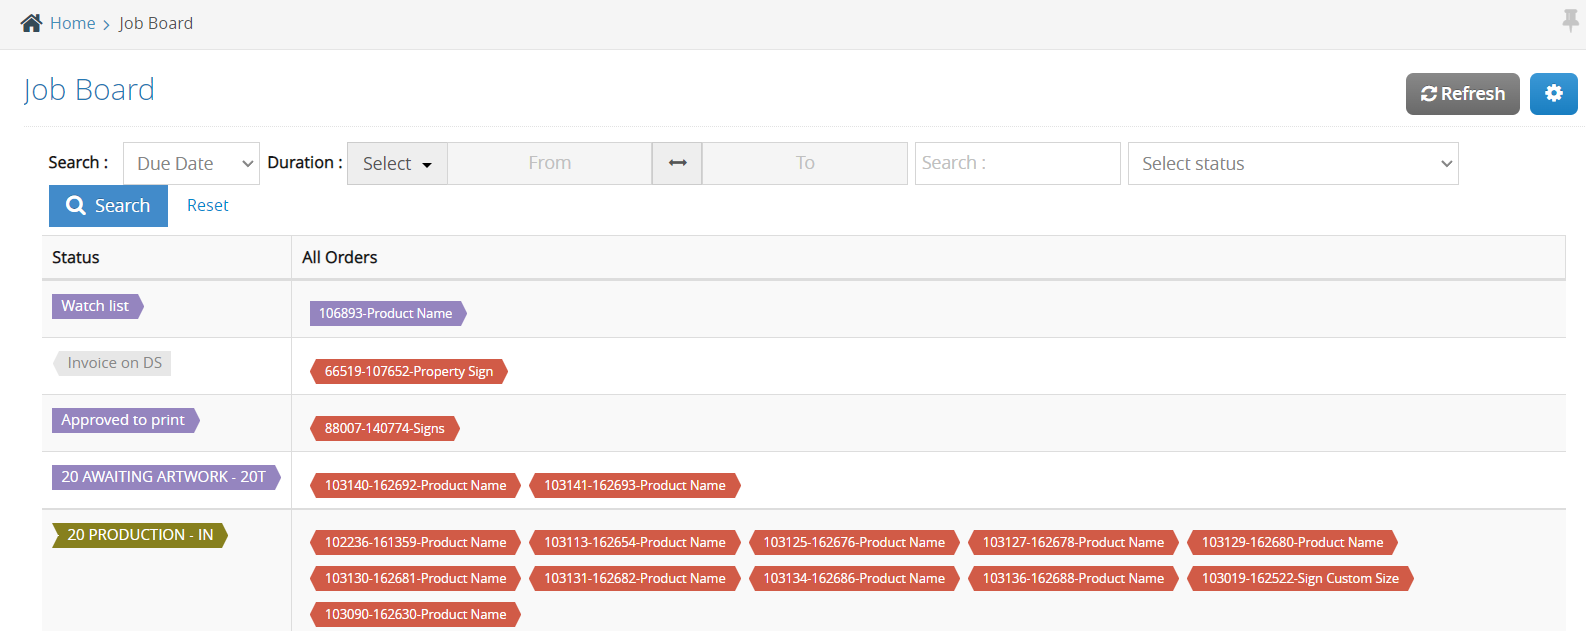
Job Board with Product Name


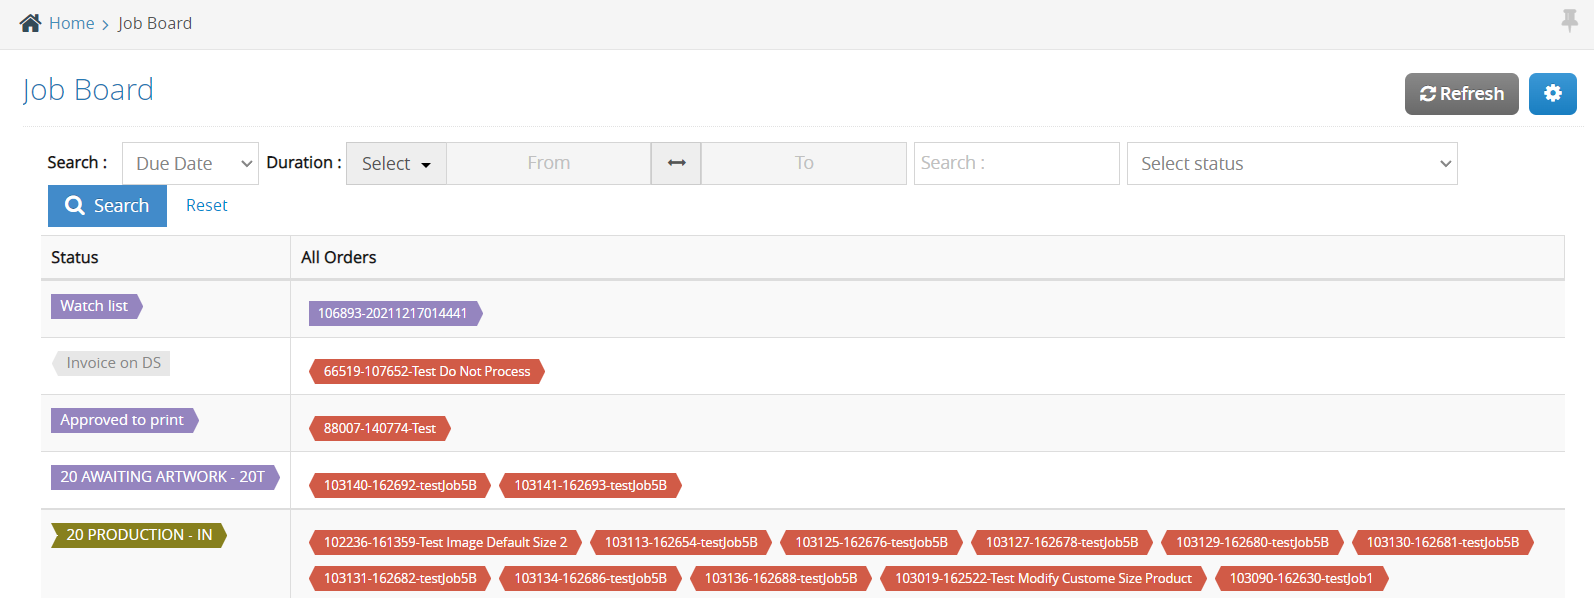
Job Board with Artwork Name

Admin Dashboard - Sales Statistics

Dashboard - Sales Statistics

Sales Statistics are a table consisting of multiple blocks that show the statistics of accumulated sales and the number of orders based on a specific period.


If the admin or customer makes a new offline order in a different browser tab while the admin has opened the dashboard, The sales statistic will not be updated. However, admins can refresh the statistic data manually by clicking on the loop button located top right corner of the table to update the details.

Admins can also hover their mouse to show the date range of the statistics.


Affiliates can also click on the category as a shortcut to Reports based on the affiliate’s period. For example, clicking This Month will bring affiliates to the in-depth report during the clicked period, as shown below. The report will also show the number of orders shown from the Sales Statistics.


Admin Dashboard - Sales Orders

Dashboard - Sales Orders

Sales Orders are a graphical illustration that shows the total amount of sales and the total order that happens in your store.

The sales order graph illustrated with two colored lines. The Red line indicates the total amount, and the Yellow line indicates the number of orders.


By default, the graph will show the total number of orders and how many orders over a yearly period.

Affiliates can also switch the graph to show the current month by clicking on the This Month slider button on the chart’s top right.


Admin Dashboard - Hot Selling 10 Products

Dashboard - Hot Selling 10 Products

Hot Selling 10 Products are graphical indications that show which ten products the particular store have sold the most yearly.

Each of the products displayed has three colored graphs.
– The blue-colored graph indicates the total amount of accumulated sales.
– The green-colored graph indicates the total amount of product quantity that has been sold
– The brown-colored graph indicates how many orders have been created with the particular product.

Affiliate can also hover the mouse over the graph to show the exact sales or quantity, or orders for that particular product.

Admin Dashboard - Store Statistic

Easiest way to check your store statistics

Store Statistics are numerical statistics that show particular variables that the store has.

Each variable can be clicked as a shortcut to redirect admin to their respective pages.

For example, clicking the Paid Orders will redirect to the List Orders, and clicking the Customers icon will redirect to the Website Customers.

Admin Dashboard - Recent Updates

Dashboard - Recent Updates

The “Recent Update” located on the bottom right of the store admin page will provide affiliate admins with the newest information that EditandPrint gives, such as tutorial links and new features for the system.

Other Training Module :

Order Management
Templates
Designer Studio
Quote Management
Content Management
Reports
Customers
SEO
Support
Corporates
Store Personalisation
Products
Business Partners
Store Management
Store Configuration

If you can't find what you want please let us know

Contact Us

We're currently offline. Send us an email and we'll get back to you, asap.

Send Message

Main Links

  • Demo
  • Feature Index
  • Our Plans
  • About Us
  • Terms and Conditions

Contact Info

  • 0414 586 892
  • peeter@editandprint.com.au

Fresh from blog

  • Online Editor Help Message Update
  • Content Structure
  • EditandPrint V.7 – Phase 2
  • Gearing up for Online Promotion
  • Personalised Job Board

Find Out More