• Main Menu
    • Feature
    • Showcase
    • Plans
  • Demo
  • Full Suite of Features
  • Inclusions
  • Blog
  • About Us
  • FAQ
  • Contact Us
  • Terms and Conditions
Editandprint
  • Overview
  • Features
  • Showcase
  • Plans

Orders

  • Admin Dashboard
  • Recent Orders Tab - How to find specific order
  • Recent Orders Tab - How to get to your new orders details
  • Recent Customers Tab - How to find a specific customer account
  • Recent Customers Tab - How to get to your new customers details
  • Recent Quotes Tab - How to find a specific quote
  • Recent Quotes Tab - How to get to your new website quotes
  • Manage Orders through Job Boards
  • List Orders
  • List Orders Bulk Action
  • List Order - Order Details
  • LIst Order - Payment Request
  • Introduction to Your Order Management System (Order and Job Status)
  • Modify Orders Artwork
  • Modify Customers Details
  • Modify Orders Specification
  • Ordering Process (IBS product - Customer Upload)
  • Ordering Process (IBS product - Websites template)
  • Ordering Process (IBS product - Graphic Design)
  • Ordering Process (Non-IBS product)
  • Edit / View the Order (IBS & Non-IBS product)
  • Process Non-IBS order (Essential Plan)
  • Process Non-IBS order - Assign Job (Premium Plan)
  • What is Archive Order
  • Coupon Creation
  • Discount Creation
  • Multiple Coupon Creation
  • Customer Group wise Discount/Coupon
  • Reward Points
  • Iprocess Order
  • How to create Your Own Order Status
  • Order Status Management
  • How to add payment request
  • Order Management - Job Board Page
  • Reward Points Expiry Date
  • Customer Download Press Ready
  • Pay on Account Payment Status

Admin Dashboard

Admin Dashboard Overview

Introduction to the Admin Dashboard

From the home menu, you will have access to some widgets where you can view:

1) Recent orders, customers, quotes : manage your latest orders, users and quote submitted on to your system.

2) Sales Statistics : Get the overview of your online sales (weekly, monthly, yearly).

3) Job Board : Easiest way to manage your orders based on the order & job status.

4) Sales Orders : Overview your sales in 12 calendar months

5) Hot Selling products : Provides a graphical representation of the most wanted products sold on your store

6) Store Statistics : Overview of your online platform

7) Recent Updates: New & updates from EditandPrint

overview1


overview2

Recent Orders Tab - How to find specific order

The best & fastest way to find a specific order

Summary: Sometimes you are looking for a specific order whether it’s on list orders page (still under process) or it has been completed on the archive orders page. The process below will be able to take you to the specific order regardless.

Step 1. Login to your admin side > navigate to admin dashboard

Step 2. Right underneath the Dashboard title you will see the ‘Recent Orders’ tab > Scroll down on the recent orders box until you can see the ‘Search box’ for the order number.

Step 3. Type the order number and click enter to get to the orders

Recent Orders Tab - How to get to your new orders details

how to get to the new order details via admin dashboard

Summary: You can get to your 5 latest orders quickly from your admin dashboard by following these steps below

Step 1. Login to your admin side > navigate to admin dashboard

Step 2. Right underneath the Dashboard title you will see the ‘Recent Orders’ tab > you can find your 5 newest orders on this tab (scroll down and click ‘view all’ in order to view all of the orders – if you have more than 5 new orders)

Step 3. Click the order number in order to get to the new order details.

Recent Customers Tab - How to find a specific customer account

how to find specific customers account via admin dashboard

Summary: You can search or find a specific customers account by using the recent customers tabs, please find the step by step process below

Step 1. Login to your admin side > navigate to admin dashboard

Step 2. Right underneath the Dashboard title you will see the ‘Recent Customers’ tab (next to the ‘Recent Orders’) > Scroll down on the recent customers box until you can see the ‘Search box’ for the customer.

Step 3. Type the customers email or name and click enter to get to the customers details.

Recent Customers Tab - How to get to your new customers details

how to find the details of the new customers via admin dashboard

Summary: The easiest way to get to your new customers details from your admin dashboard.

Step 1. Login to your admin side > navigate to admin dashboard

Step 2. Right underneath the Dashboard title you will see the ‘Recent Customers’ tab > you can find your 5 newest Customers on this tab (scroll down and click ‘view all’ in order to view all of the orders – if you have more than 5 new orders)

Step 3. Click the customers name (in blue colour) in order to get to the new customer details.

Recent Quotes Tab - How to find a specific quote

How to find a specific quote from the admin dashboard.

Summary: One way to find a specific quote you’re looking for from the admin dashboard.

Step 1. Login to your admin side > navigate to admin dashboard

Step 2. Right underneath the Dashboard title you will see the ‘Recent Quotes’ tab (next to the ‘Recent Customers’ tab) > Scroll down on the recent quotes box until you can see the ‘Search box’ for the quotes.


Step 3. Type the quotes number or the customers name and click enter to get to the customers details.

Tips: if you know the quote number you can type it on the search box and it will takes you directly to the quote details, otherwise it will takes you to the quote page.

Recent Quotes Tab - How to get to your new website quotes

How to get to the new quote details via admin dashboard

Summary: One way to find a specific quote you’re looking for from the admin dashboard.

Step 1. Login to your admin side > navigate to admin dashboard

Step 2. Right underneath the Dashboard title you will see the ‘Recent Quotes’ tab (next to the ‘Recent Customers’ tab) > you will see the latest 5 quotes submitted on your site

Step 3. Click the name (blue colour link) in order to get to the customers quote details page

Manage Orders through Job Boards

How to manage your online jobs easily through the job boards based on orders & jobs statuses.

Summary: The most efficient way to manage your online orders based on the order and the job status, knowing whether there are orders that needs to be actioned or not.

Step 1. Login to your admin side > navigate to admin dashboard

Step 2. On the right side you will see ‘Job Board’ where you can see 2 tabs – Order Status Tab & Job Status Tab.

Each tabs showing you the statuses that has been set up to be displayed on the job board. This way you can see the orders when it needed to be checked. Example : File Review (job status) – you will be able to see all of the jobs under file review when you have an order with that status on the job board.

Step 3. Click the order number in order to see the order in detail

Note: we have colour coded when the order is close to the due date by using 3 different colour :

Yellow: Delivery Tomorrow
Orange: Delivery Today
Red: Overdue

List Orders

List Orders

List Order

You can access List Order from Order >List Order
List order is a page where you can see all of the orders received, It has all of the information you need.
Order ID, Order Details, Date received and the due date, Total Amount, Store Commision, Staff Name, Status and Action tools.


Each order have a tiny icons which represent information about the order and the customer

Each icon have their own meaning, here is what they stands for,

You can also search for a specific order using the advance filter, you can do this by expanding the search fields.
It would then expanded the filters function

List Orders Bulk Action

List Orders Bulk Action

List Orders Bulk Action

In the List Orders page you can do actions related to orders that you got, such as Download Orders, Download Invoices, Archive Orders and Download Shipping Labels.

To do this you can click the action drop down button after selecting the order you want to process. Now, you can do this for a single specific order or you can also do this for a multiple orders.
For a single order just click the check box on the left of the order. For multiple orders, you need to check all the check boxes of the orders you want to process (see image below).

After that click the Action drop down and choose the action you need.

The action pretty much does what it’s labeled with
1. Download Order
This action will download the selected order’s image files and job ticket and put it in a Zip file.
2. Download Invoice
This action will download the selected order’s invoice in PDF.
3. Archive Order
This action will make the selected order goes into the archive section.
4. Download Shipping Label
This action will download the selected order’s shipping label.

You can also print the whole List order page or export it into an Excel sheet. You can do this using these 2 button (see image below)

The print button will show only the orders on the screen so you can print it out without the other menus on the page. While the Excel sheet button will export the whole orders into an Excel file that will be downloaded to you.
Remember, while using the printer and Excel button. It will print and shows all orders that you got.

List Order - Order Details

List Orders - Order Details

List Order – Order Details

In the list order page you can see the details of the orders you get, here are the details.

  1. Order Details.
    This area shows you the details of the customer for that order. Such as Name, Email, Company name, store name, and the order description icons.
  2. Payment and Shipping.
    This area shows what kind of payment the customer uses for this order.
  3. Date.
    This area shows the date that order was received and it’s due date.
  4. Total Amount.
    This area shows the total $ amount of the order.
  5. Store Commission.
    This area shows the amount of money the store make as a commission.
  6. Staff Name.
    This area shows the name of the sales agent for that order.
  7. Status.
    This area shows the status of the order. You can also click the “Pencil” to Update the order and Job status.
  8. Action
    This dropdown menu contains actions that can be performed for that order.
  9. Description Icon
    This icons shows the order details in icons.
  10. Expand Button to show Order’s Job
    This button will expand the Order details and shows the order’s jobs.


When the expand button is clicked, the display of the order details will shows the order’s Jobs. Each order and have multiple jobs to do.

                          1. Job Number
                          2. Product Name
                          3. Job Status
                          4. Job Quantity

You can also Update the status of an order or jobs by clicking the “Pencil” icon located right next to the order or Job status.

LIst Order - Payment Request

Payment Request

List Order – Payment Request

Using this interface admin can raise payment request for payment of unpaid orders and customer can pay from storefront using available online payment methods.

To reach the “Payment Request” page you can go to Order> List Order > Payment Request

The interface is pretty straightforward.

On the top of the page you can search the Order number of which you want to request a payment for.

Fill the amount of money (including Tax) that is required to paid by the customer, and fill in the remarks field with a message regarding the payment request.

There’s also the “Auto Credit Pay-On” switch. You can enable it to use the auto credit feature of their pay-on account balance. After you’ve filled all the necessary fields, you can continue by clicking save.

The customer will get an email regarding your request.

They can login into their account to do the payment using the available payment method.

After the request has been sent, it will appear on the lower part of the page in the “Raised Request” tab. In here, it displays the information about order number, the customer, date when the payment was requested, amount of money requested, remarks, and the action drop down menu.

The action drop down menu enables you to:

  1. Mark as Cancel :This will cancel the request and put the request into the “Canceled Request” tab.
  2. Modify Request :You will be presented with the same form when you first make the request. But this time it will only modify the request already made.
  3. Mark as Paid :If the customer already paid outside the regular method provided, this will marked the request as paid.
  4. Send Reminder :This menu will send a reminder email to the customer to do the payment requested.
  5. Delete :This will Delete the request

When the request has been paid by the customer, it will go to the “Completed Request” tab, and when the customer reject or the admin canceled the request it will go to the “Canceled Request” tab.

Introduction to Your Order Management System (Order and Job Status)

Introduction to Your Order Management System (Order & Job Status)

Introduction to Your Order Management System (Order & Job Status).

To get to the order details go to List Orders>Find your target Order > click Action > View/Update the order.

You can View / Update the order’s status and details on this page.

At the top you can see the order number (A) , the date the order received and the current status (B) the due date (C) , Sent to print (Yes/No) (D), Update Order button (E).

The Edit and Print ordering system comes with default statuses , however you can add your own order status & job statuses for your products. An email is sent to your customer every time you update the status of the order.

  1. Status (Default Statuses)
    You can change the status of the order from the drop down menu. Default statuses available– Awaiting Artwork Approval
    – Pending
    – File Review
    – Awaiting Artwork
    – Artwork Approved
    – Order Received
    – In Print Production
    – Finishing Job
    – Cancel Order
    – Order Complete
    – Ready to pickup
    Store Admin Status (Customize/ Create the status text relevant to your business)
  2. Due Date
    You can update the order due date
  3. PO number
    You can add or change the PO number for the order.
  4. Shipping Method (Weight based)
    The shipping method used for this order
  5. Shipping Company Name
    You can input in the shipping company name here.
  6. Tracking Number
    You can also input in the shipping tracking number
  7. Select Staff Name
    log the person who is updating / changing the information for this order.
  8. Select Section
    You can categorise the order by type. The choices are :
    – Small Format
    – Traditional
    -Offset
    -Design
    -Sales Order
    -Solvent

This aids the reporting functionality and analytics.

  1. Select Delivery Collect
    Select pickup or delivery options, If product is set on collect. Choices are:
    -Local
    – City
    -Courier
    -Collect PWR
    -Post

NOTE : This is for record keeping purposes only and does not produce shipping docs.

       10. Comments
          Any information relevant to the order can be communicated to the admin, the customer or both – an email will be sent if the notification box is ticked

        11. Upload filesThis is not designed for artwork proofing. It is to upload files relevant to the comments. However, there may be exceptions for your workflow. We do recommend you use the online proofing function

On the View Order Tab you can see Customer Details (F), Shipping address (G), Billing address (H), Payment and shipping info (I).

By scrolling down you can see Order Product Details (J), Order History (K)

Order Product Details.

You can see the Order’s Thumbnail Image, Product specifications , Quantity and the total price for the order.

Remember an order can consist of multiple jobs. For example, on the order number in the diagram (Order# 36605) it has 2 jobs (see Order Product Details).

(L) The Action drop down menu allows you to:

    • Assign Job to Printer
    • Modify the Order – including changing customer’s artwork and the order specifications after the order has been made.
    • Download Invoice
    • Download File – to download customer’s artwork & job ticket
    • Download Shipping Label – download a delivery slip.
    • Download Job Ticket
    • Archive – manually move the order to the archive.

(M) Order History

Order history gives you the history of any changes for the order (see Update Order Button). You can see Comments, Staff name, Section, Delivery Collect, Time Difference between your newest update to the last one.

(N) Each update or change is marked with a time stamp and the current order status at the time. The icon on right hand side indicates whether the Printer and the Customer have been notified of the changes or the update. (Black means ‘NO’ and Green means ‘YES’)


There is one other tab on the view / update order page – it is called UPDATE ORDER PRODUCT (O)

Inside this tab you can see the job for this order, and also the details of each job, Within each job you can view the following:

  • Product Image
    Thumbnail of the job
  • Products
    Products specifications
  • Status
    displays your current job status and also the next possible status (for IBS it will automatically update when you sent it to IBS, but for non-IBS you will need to manually update.).
  • Comment
    record any changes to a specific job within an order, choose whether to advise admin only, or both admin and customer – with the notification button.
    Email example

  • Proof Section
    This is not designed for artwork proofing. It is to upload files relevant to the comments. However, there may be exceptions for your workflow. We do recommend you use the online proofing function.

Modify Orders Artwork

How to modify customers artwork online

Summary: Sometimes you’re facing an incorrect artwork that was uploaded by your customer. Please follow the step by step process below how to modify your customers incorrect artwork to the correct one before you are sending it to the printer.

Step 1. From the home page, navigate to Orders section >> List Orders >> List Orders.

Step 2. Look for the order you wish to update. Click Action button and select View/Update Order.

modifyorder1


Step 3. Scroll down to Order Product Details. Click Action and select Modify Order.

Step 4. Click Upload Design Proof in order to upload the correct artwork

Step 5. Once you have clicked the ‘Upload Design Proof’ you will see the pop up window (below)

Step 6. Click ‘Upload Design’ button on the front side (if you have multiple pages, you don’t need to worry to separate the artwork as the system will automatically separate the front and back).

Step 7. After the artwork has been fully uploaded (you will see the thumbnail of the artwork), you will have an option to ‘ask for approval’ for the customer to approve the artwork first before it sent to the printer. You also have an option to put a comments on the order to update the customers and option whether to notify the customers or not.

Note: if you tick the ‘ask for approval’ it will automatically make the job status to ‘awaiting proof’ for customers to approve the order first by logging in to their account.

Step 8. Click Save to continue with the changes.

Step 9. Back to the order details to review the changes (the status of the jobs and also you can see the new artwork thumbnail has been updated to the new artwork you’ve uploaded)

Modify Customers Details

Modify Customers Details

Step 1. From the home page, navigate to Orders section >> List Orders >> List Orders.

Step 2. Look for the order you wish to update. Click Action button and select View/Update Order.

modifyorder1


Step 3. In the View Orders tab, you can see the customers details.

modifyorder7


Note: Customers can update their Customer Details by logging into their account. To change the shipping address, click Change Address button next to it. Enter the new shipping information and hit Save button once done. You can do the same for the Billing information.

Modify Orders Specification

Modify Orders Specification

Step 1. From the home page, navigate to Orders section >> List Orders >> List Orders.

Step 2. Look for the order you wish to update. Click Action button and select View/Update Order.

modifyorder1


Step 3. Scroll down to Order Product Details. Click Action and select Modify Order.

modifyorder2


Step 4. In the Products column, you can enter additional option and it’s price. You can also change the quantity and the main price. Once you’re done, scroll down and enter your comments on the Comments field. And finally click Save & Back button to apply the changes and to go back to the main order page.

modifyorder5


modifyorder6


Note: This option is only available for Pay On account, and for non-IBS products.

Ordering Process (IBS product - Customer Upload)

Edit / View the Order (IBS product - Customer Upload)

Step 1. From the home page, navigate to Orders section > List Orders > List Orders

Step 2. Look for the order with IBS product. Click Action and select View/Update Order to see the order details.

Step 3. In the View orders tab you can see the details of the order (customers, shipping & billing, artwork, prices, and order history)

Step 4. For Customers Upload order the default order status will be ‘Order Received’ and the job status will be ‘File Review’ ( you can see the job status under the Update Order Product tab). Before updating the status you will need to download the artwork first by click action > download file.

note:
With IBS order you don’t have the control of the order status as it’s linked to IBS’s status and will be updated automatically by IBS.

File Review status means that the order is now sitting in your admin side and has not been sent to the IBS yet as you will need to review the artwork that has been uploaded by the customers for its press ready.

Step 5. Once the file has been reviewed, click the Update Order Product tab, and you will have the option to update the job status. set the status to Proof Approved in order to send the order to IBS . Click Save button to apply the changes.

Status Info:
Proof Approved – you have checked the artwork and it’s press ready and you want to send it to IBS for print.
Awaiting Artwork – if your customers artwork is not press ready, you can change put some comments on the comment box and change the status to awaiting artwork.
Cancel Order – if you want to cancel the job

Ordering Process (IBS product - Websites template)

Edit / View the Order (IBS product - Websites template)

This is an automated process as the artwork created online using the online editor will be converted to a press ready artwork. The default status of the order will be under ‘Order Received’ and the job status of  the job will be under ‘Proof Approved’ which will triggers the job straight to IBS without you having to review the file.

note:
With IBS order you don’t have the control of the both order & job status as it’s linked to IBS’s status and will be updated automatically by IBS.

The process of the order status will be as per below :
Order Received – when the customer placed the order > Order Completed – when IBS dispatched the order

The process of the job status will be as per below :
Proof Approved – when the customer placed the order > Print Production – when IBS received the file and flight checked the job > Job Shipped – when IBS already dispatched the job > Order Completed – when the whole job has been completed.

Ordering Process (IBS product - Graphic Design)

Manage Customers Graphic Design Order

When your customer placed an order via a graphic design request, there will be a step by step proofing process that needs to be done before the order sent to the printer.

The key point of graphic design request order is to understand what your customers want, and the best way to understand it is by creating a design brief.

Learn how to create design brief here >

Once the customers placed the order, it will land on your admin side under the ‘Order Product Status: Awaiting Proof’ – which means the customer is waiting for design proof.

Step 1 – review your customer design brief

-. Login to your admin side > search for the order > click action > view/edit order > click the ‘Graphic Design Brief’ button under the ‘Order Product Details section – in order to see the customer’s design brief.

Step 2. Asking for more information to the customer

-. if you need more information from your customers in relation to the design brief – simply go to the ‘Update Order Product’ tab and write your questions on the ‘comments’ box > click save once you have completed.

Step 3. Upload your Design Proof:

-. Once you have enough information from your customers about the design, the next step is working on the design and upload it for your customer’s approval.

-. Go to the admin side > Find the order > Click Action > Modify Order > Click Upload Design Proof Button

-. Upload the PDF’s (if you have merged the PDF front and back in 1 PDF, you just need to upload it on the front side and the system will automatically populate the backside)

-. Tick the ‘ask for approval’ button to ask customers approval before sending the order to the printer.

Note: if you do not tick the ‘ask for approval’ the order will be sent to the printer automatically (for Admin Products Order)

note: tick the visual proof to let the customers use the proofing editor online (screenshot below)

Step 4. Review the Customers Comments / Feedback & Upload the Final Artwork:

-. In a case the customers rejected the artwork, they will have to put a comment in order for you to be able to fix it before sending it to the printer.

-. Go to the product details page (Admin > Order > Find the Order > Action > View/Edit Order > Click the User Proof Comments)

-. Find out the customers comments to understand the changes required.

-. Once the artwork has been revised as per customers comments, you need to go back to the modify orders page again to re-upload the proof (see step 3)

-. The order will automatically be sent to the printer when the customers approved the proof.

Ordering Process (Non-IBS product)

Manage Non-Admin Product

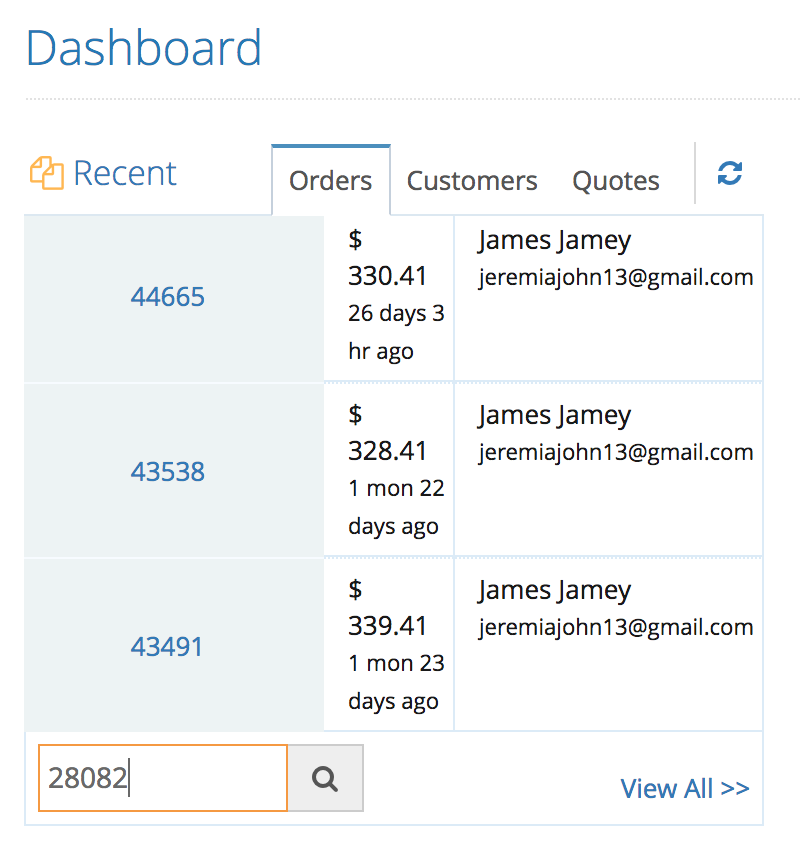
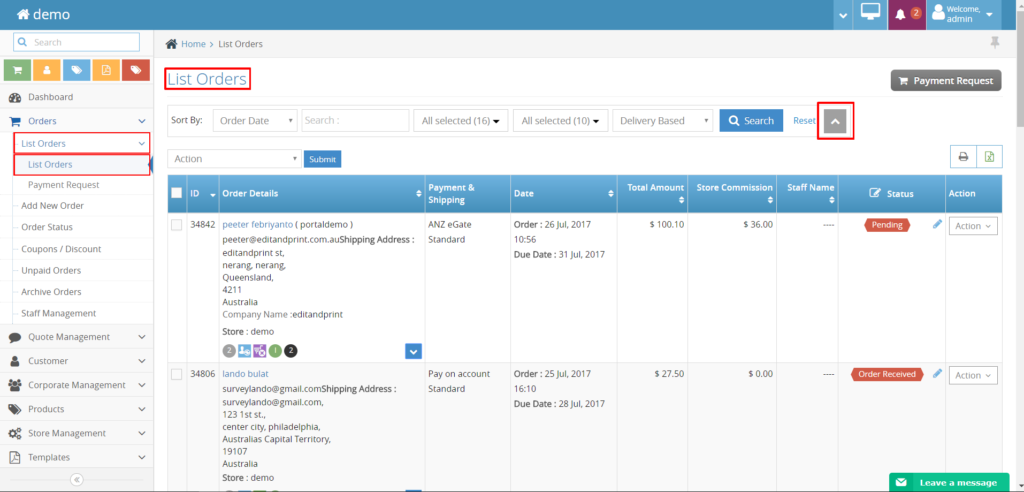
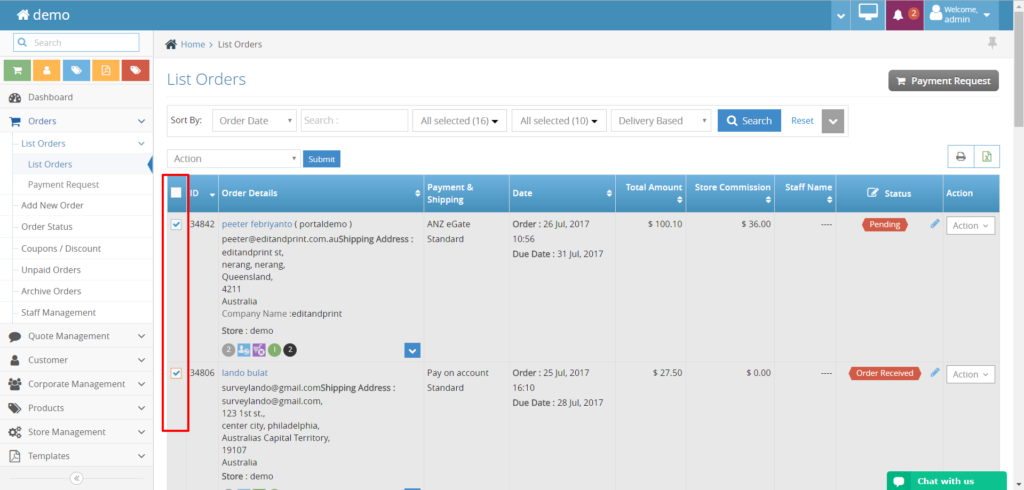
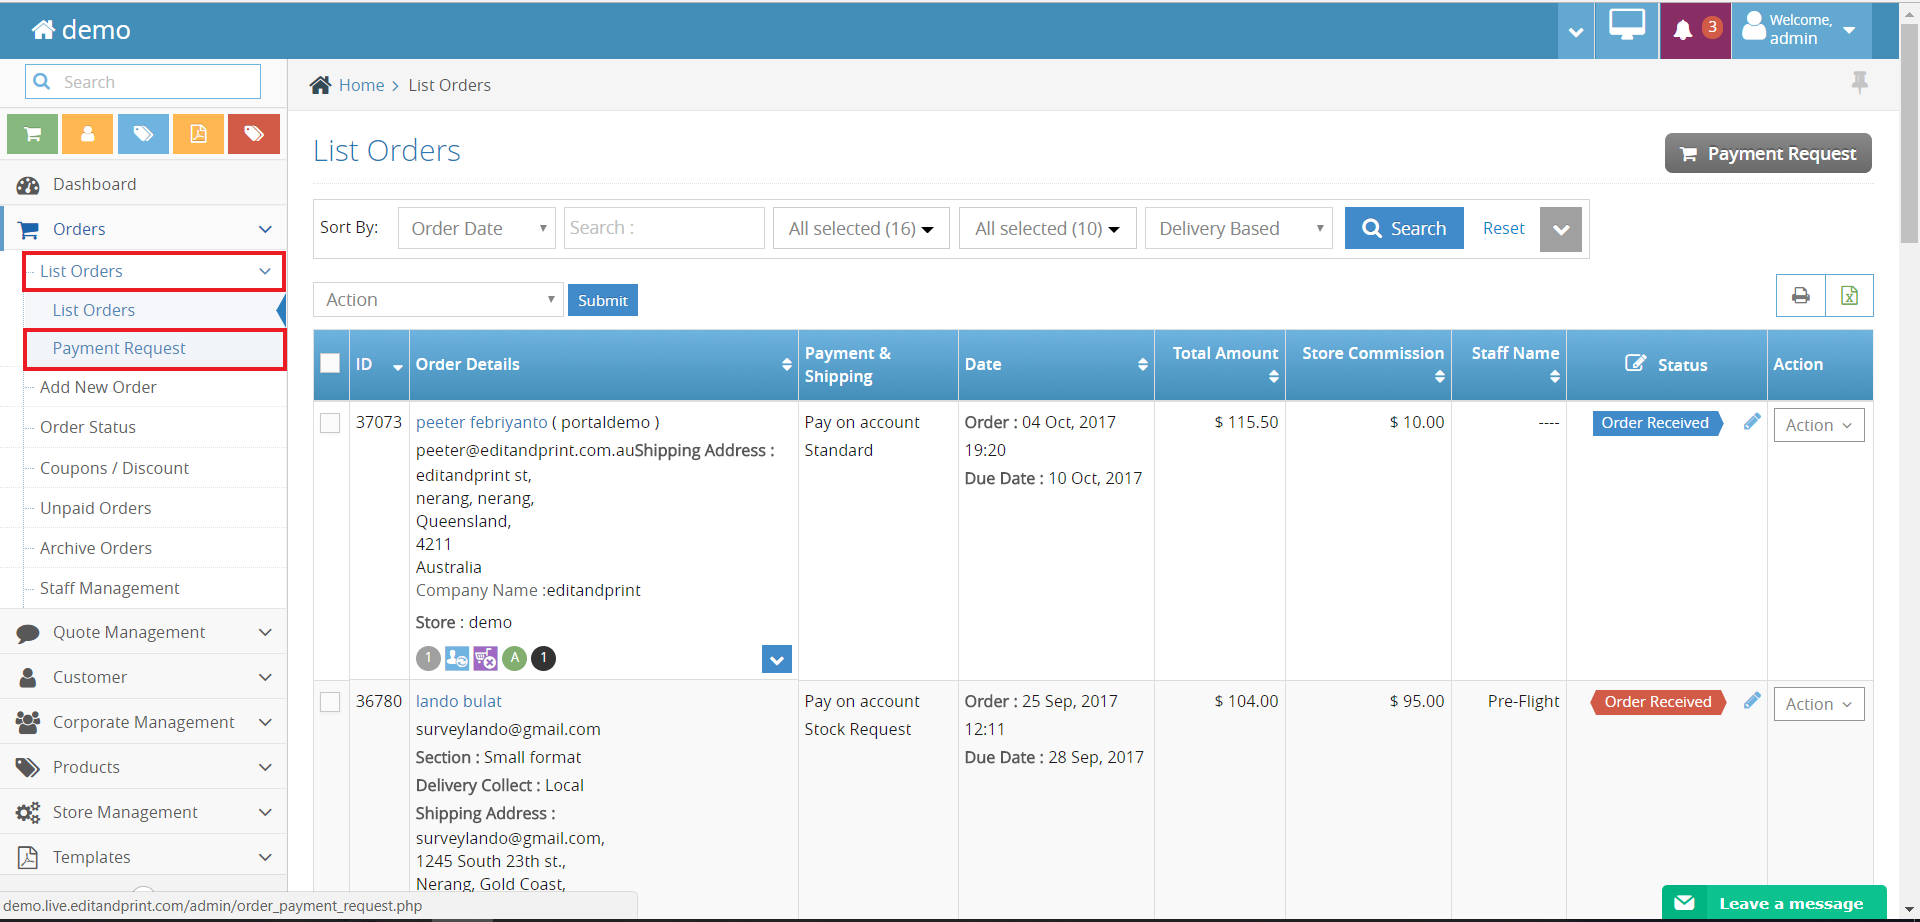
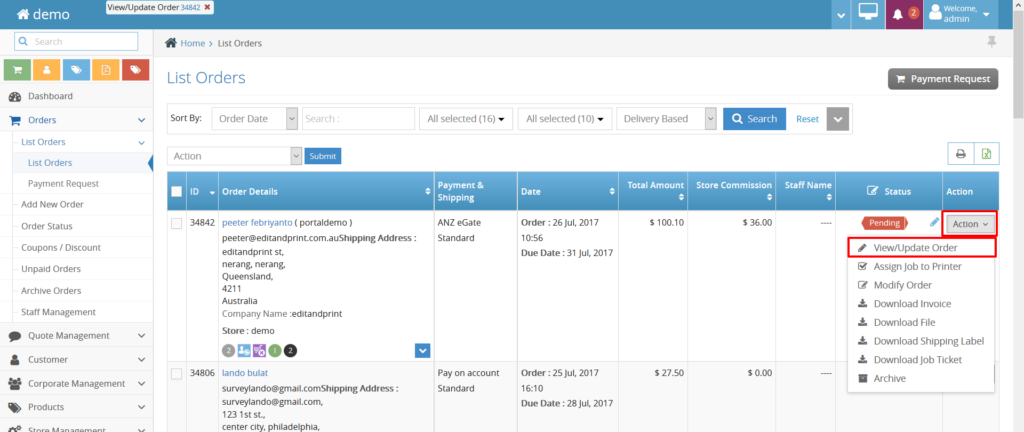
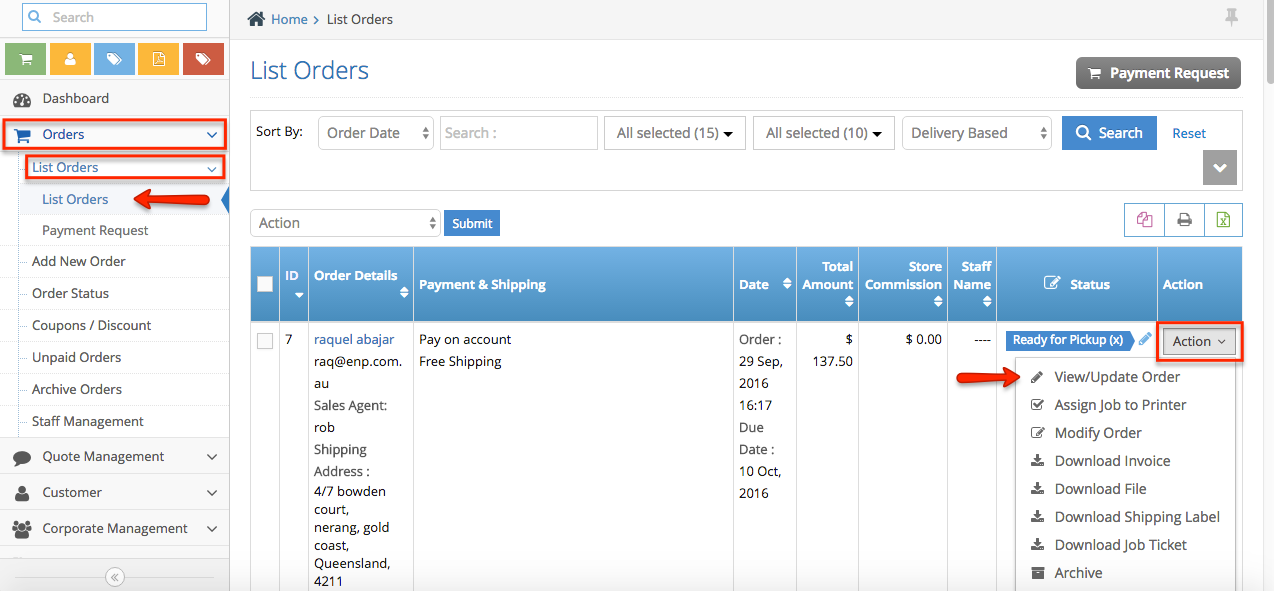
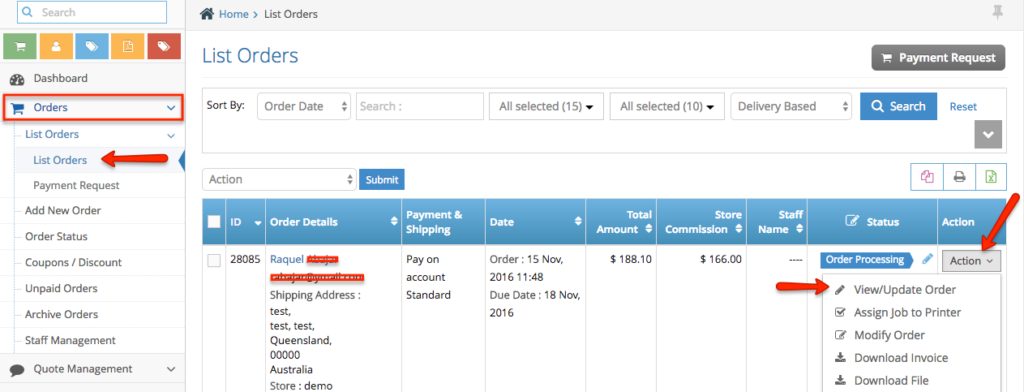
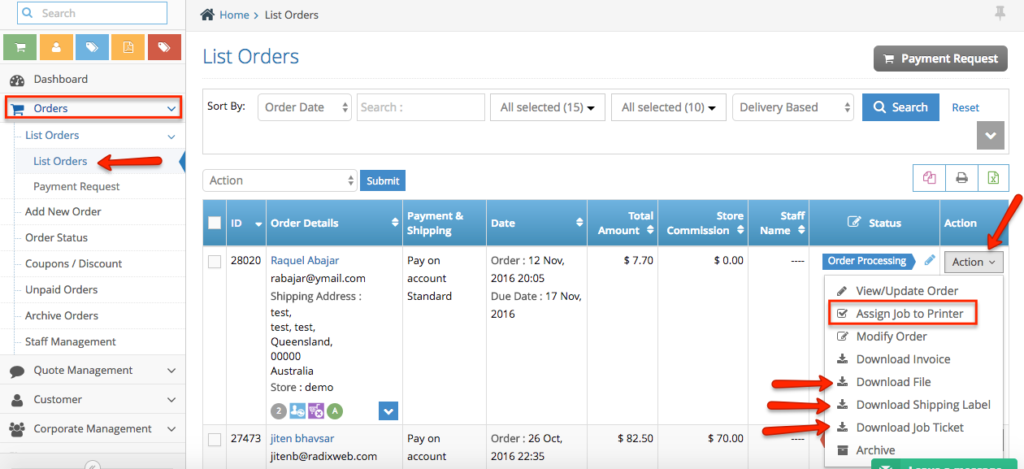
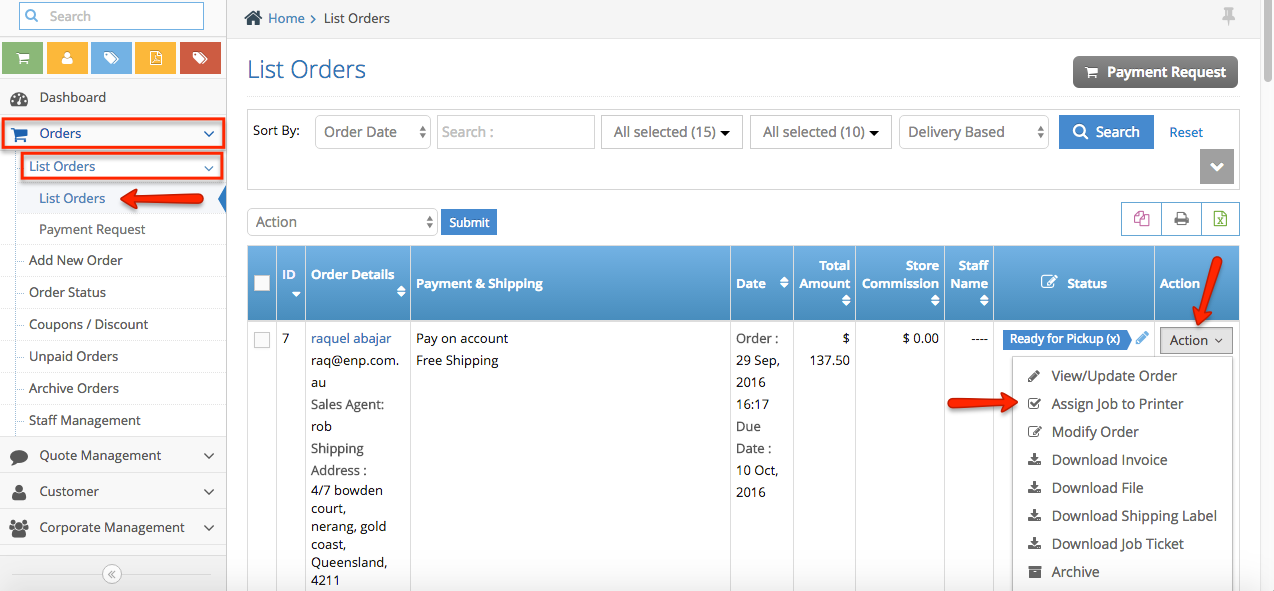
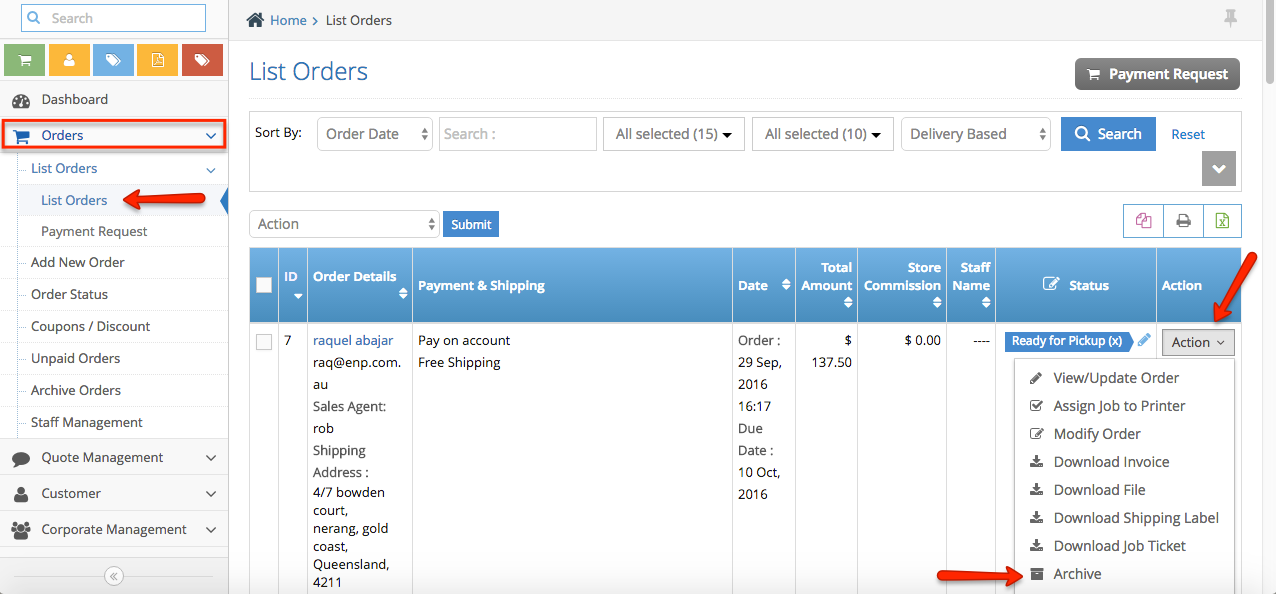
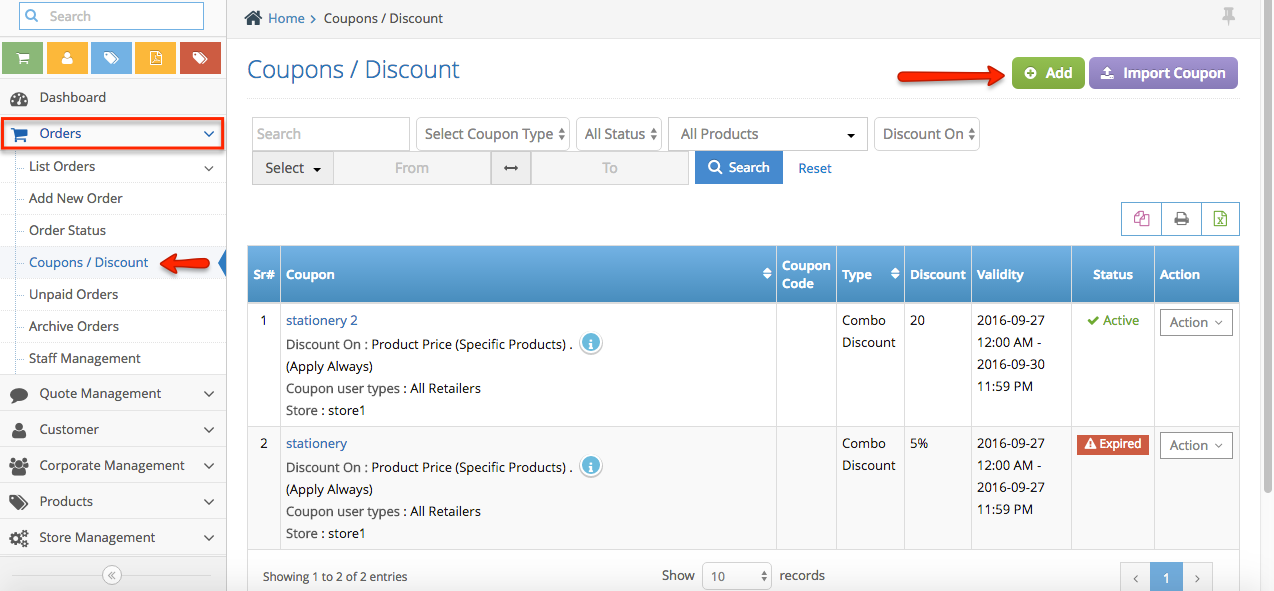
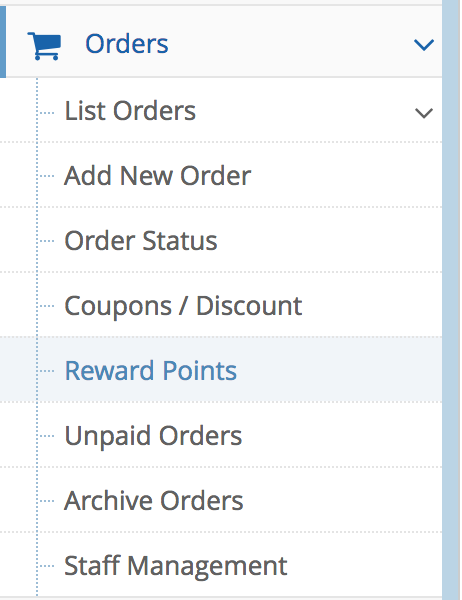
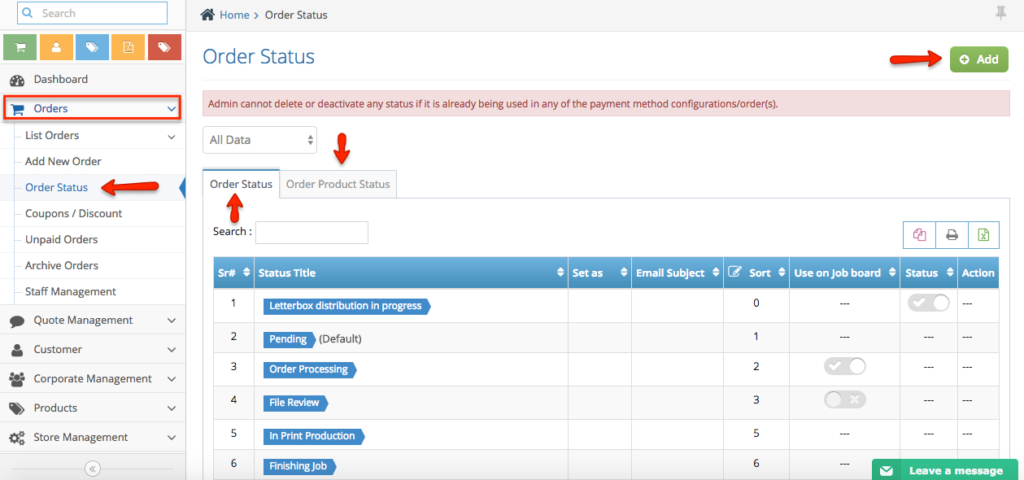
Step 1. Login to your Admin side, navigate to Orders section from the left hand side navigation bar > Select List Orders


Note: Non-Admin Product Order will have ‘A’ icon on the Order Details column.

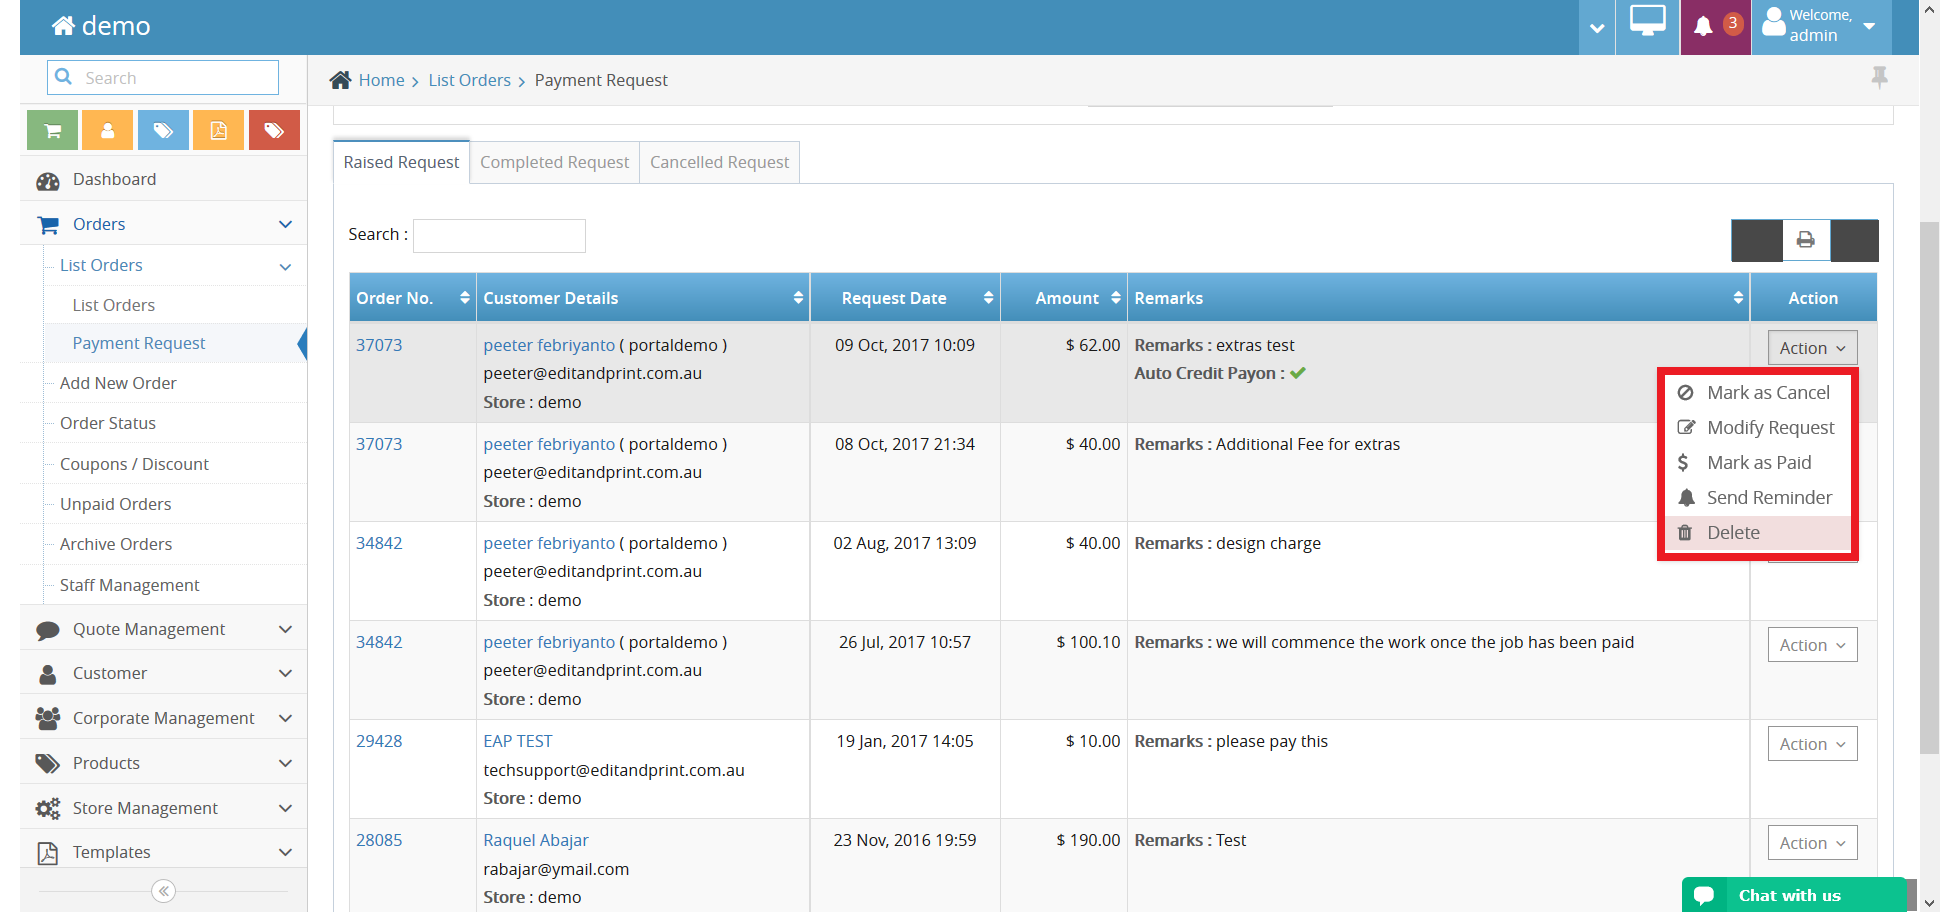
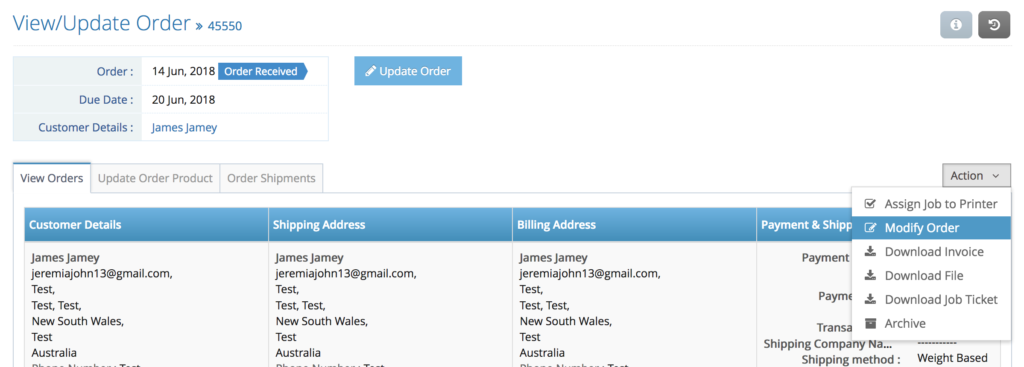
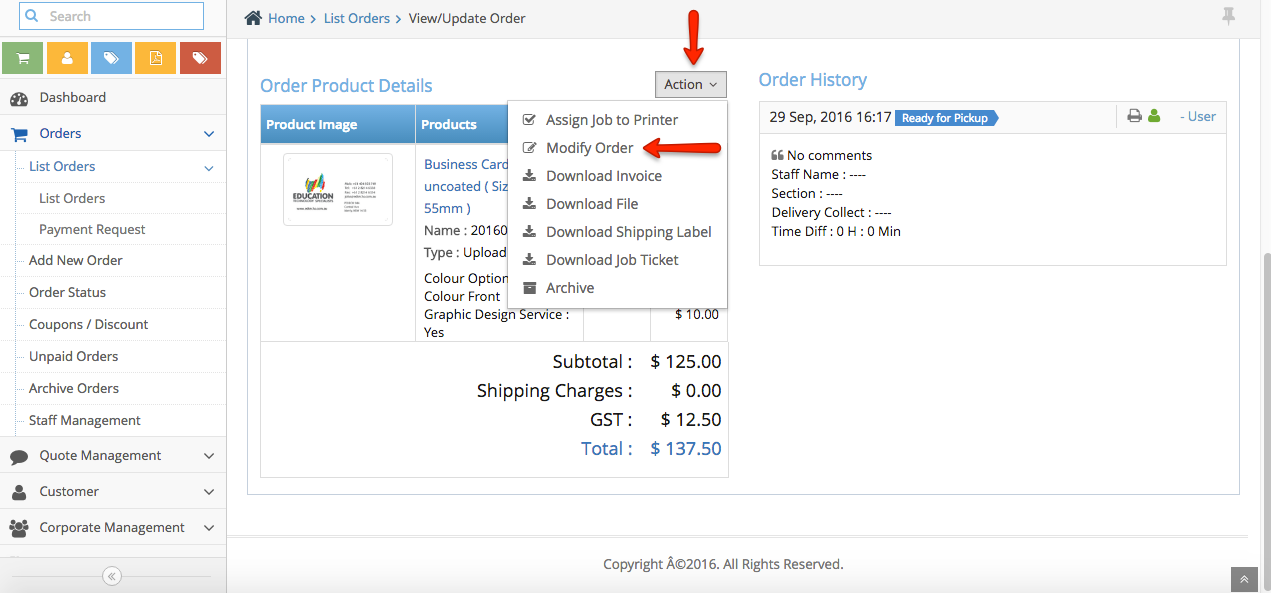
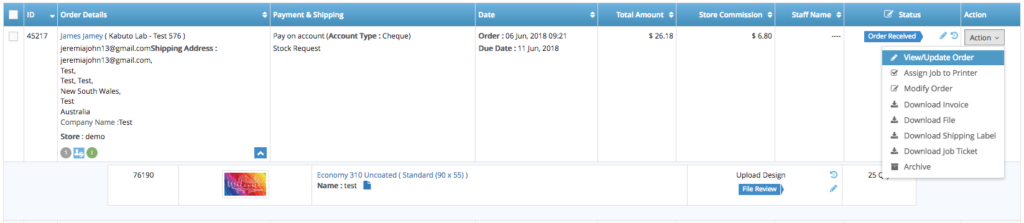
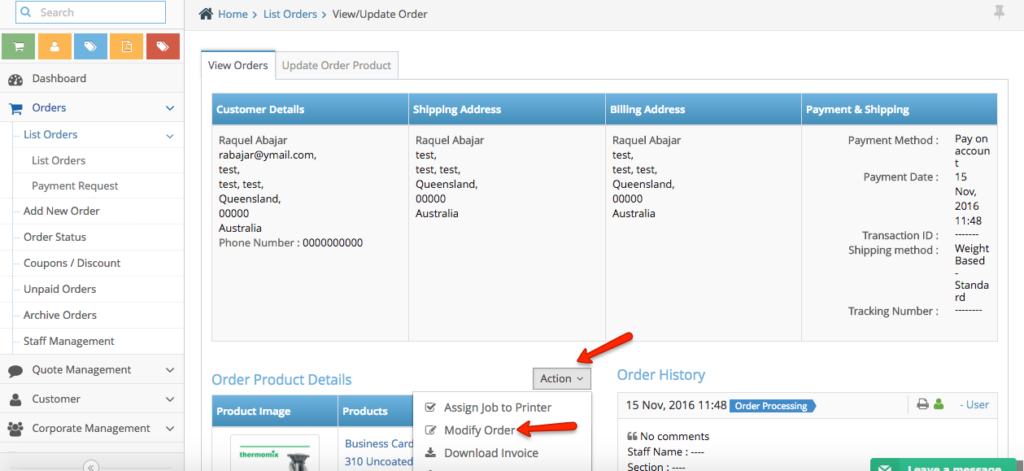
Step 2. Select the order > Click Action > View/Edit Order to process the order.

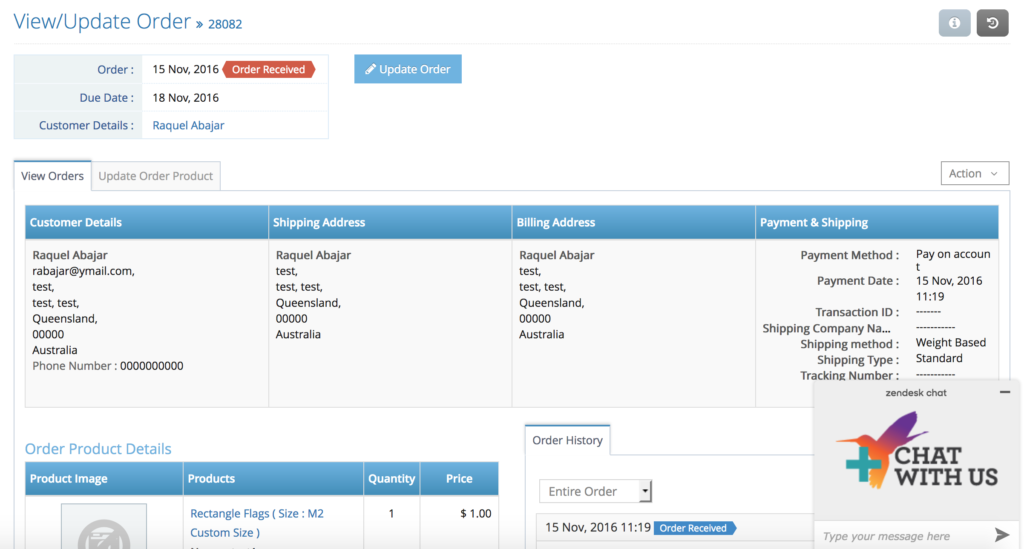
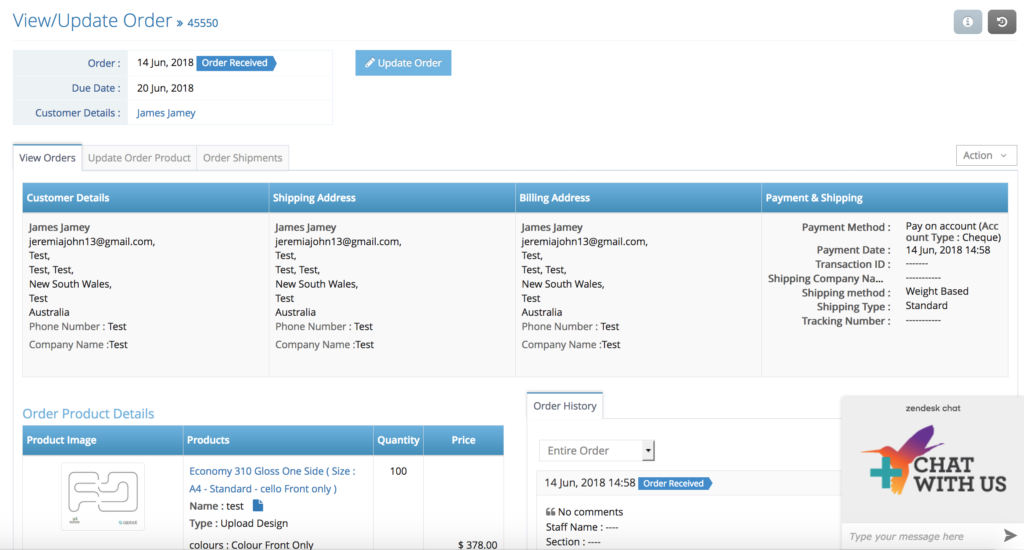
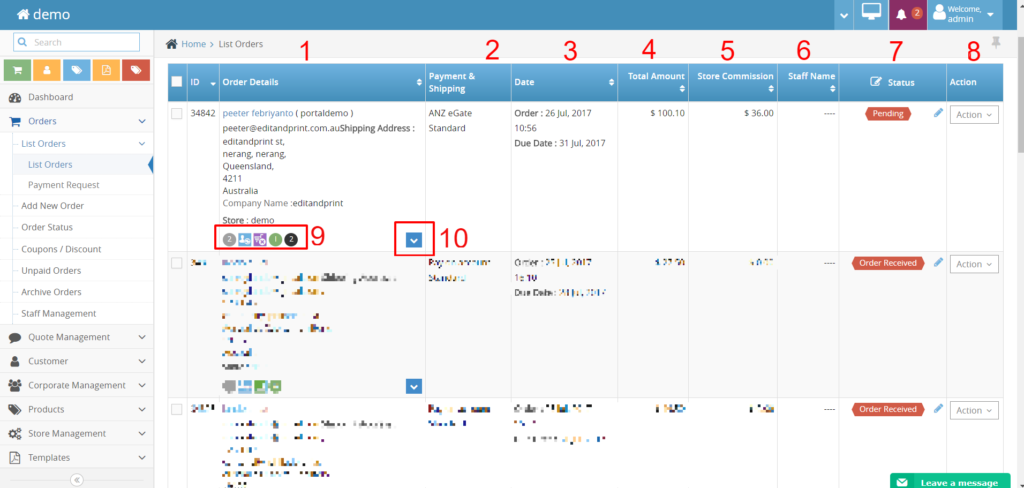
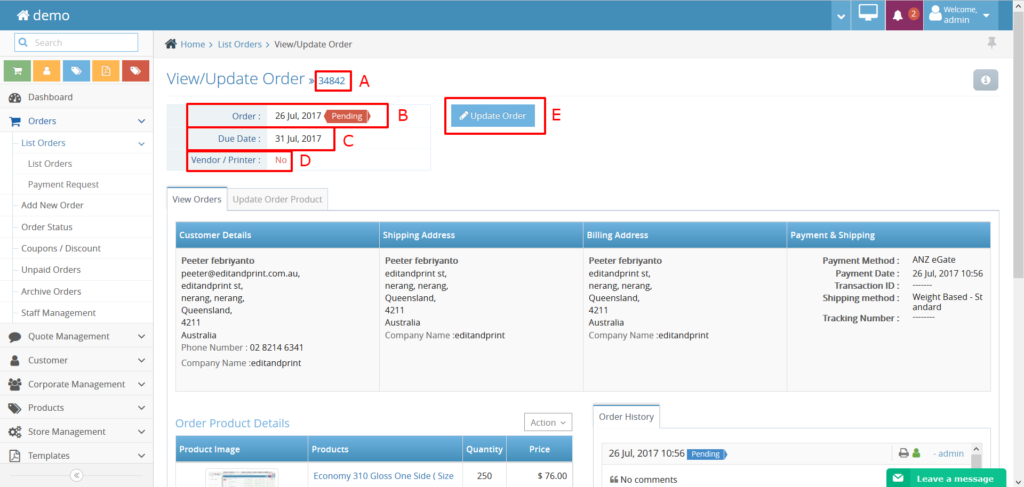
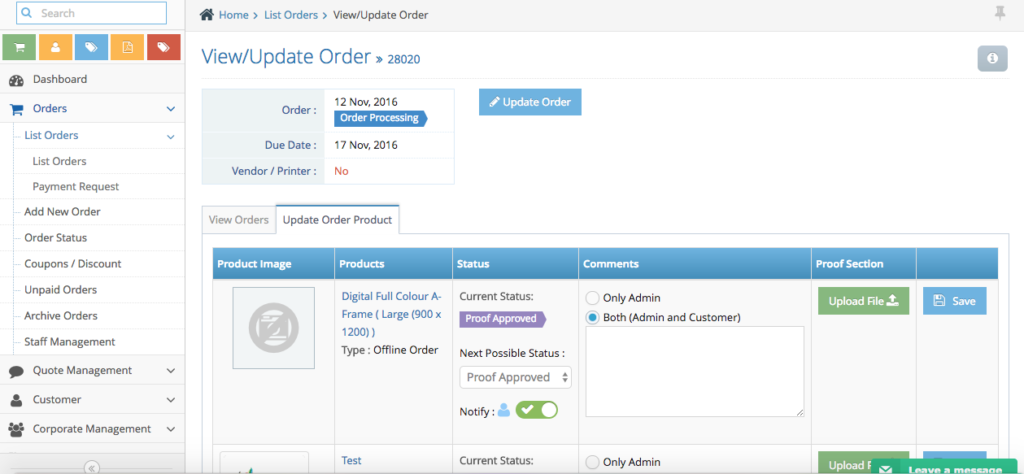
Step 3. In the View/Edit Orders page, you will see all of the information below:

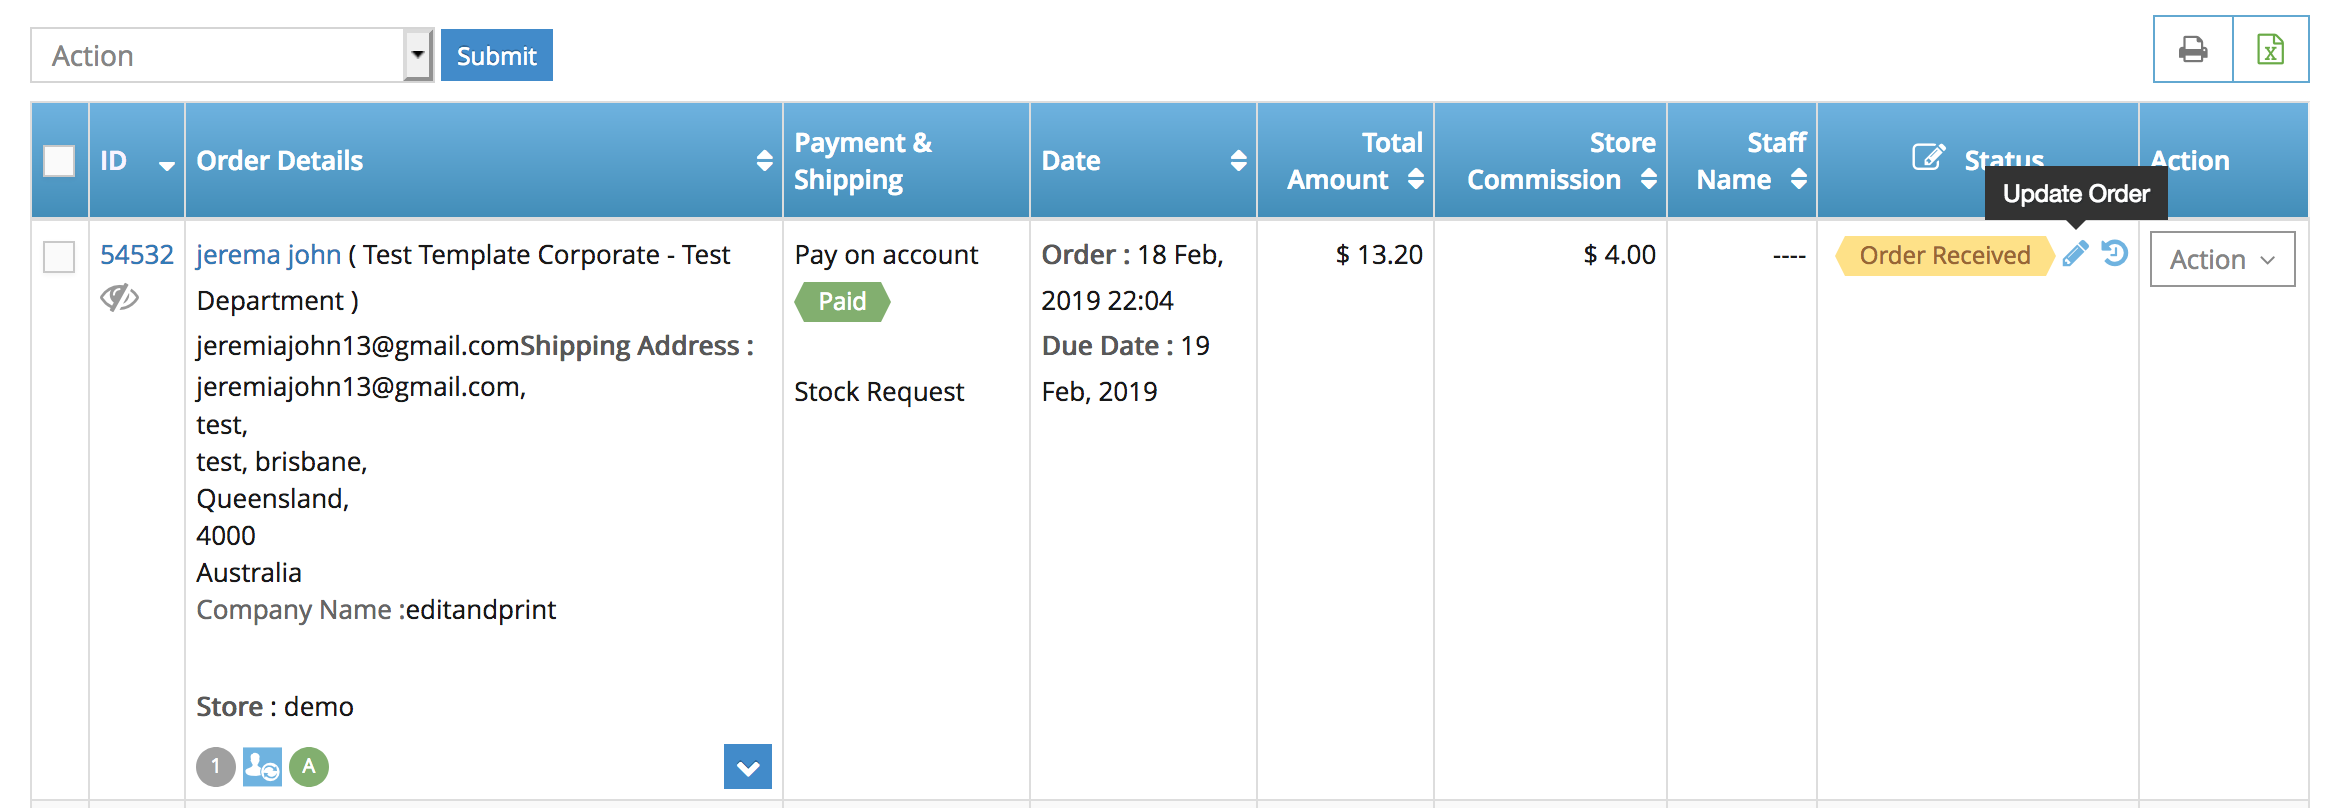
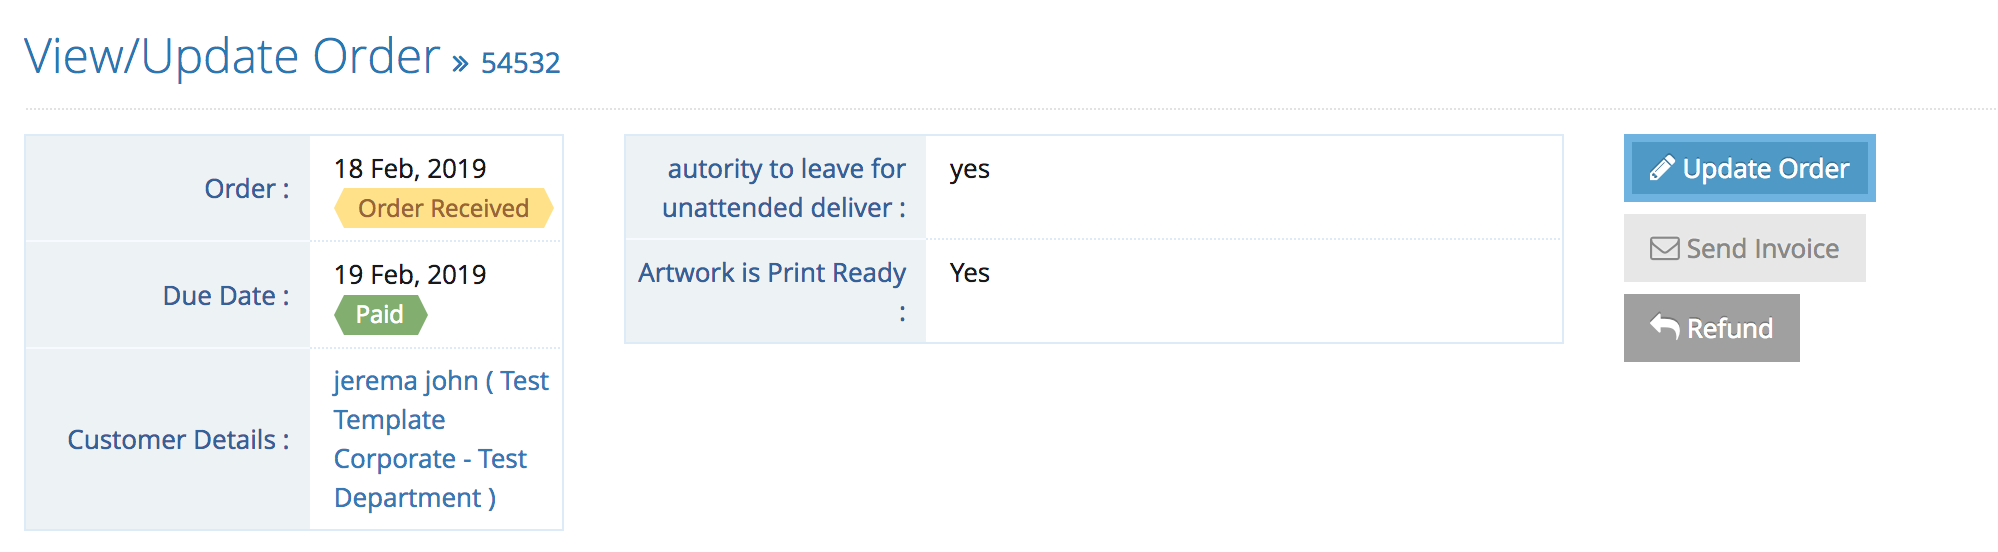
Orders Date & Extra information:

Located at the very top of the page you can see when the order was placed, order due date, and customer name (click it for an action shortcut), right next to it you will also see the extra information (from the customers extra field), at the very end is the action button for update the order status, sending invoice and refund process.

Underneath it, we have a selection of tabs (view orders, update order products, order shipments, and order notes – please see below for more explanation).
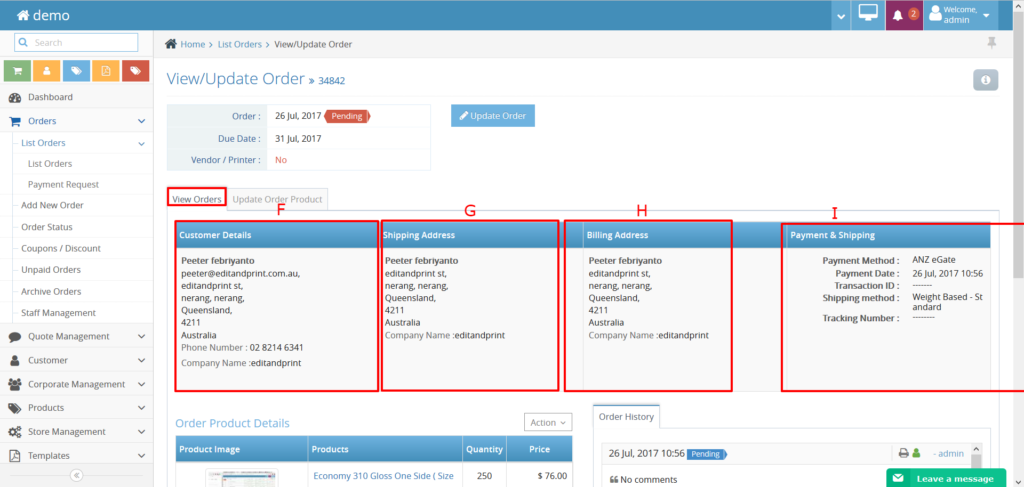
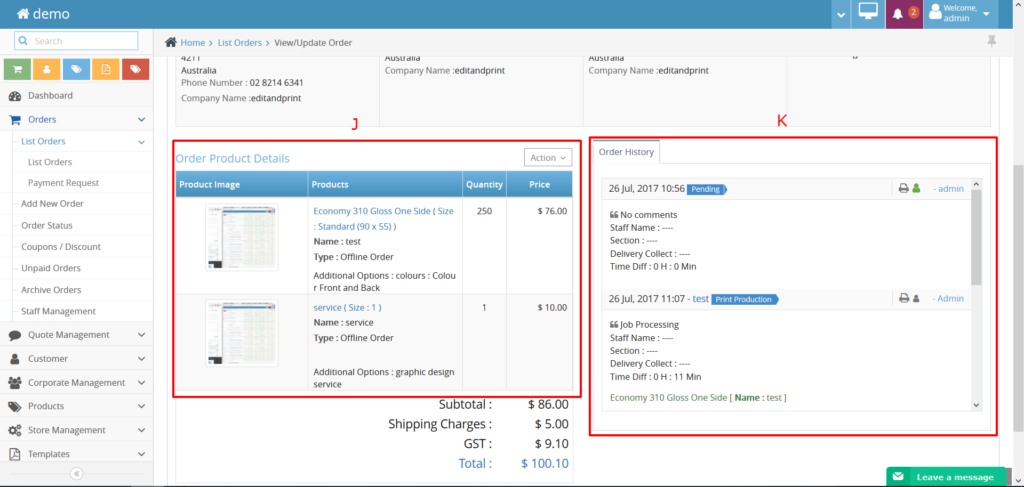
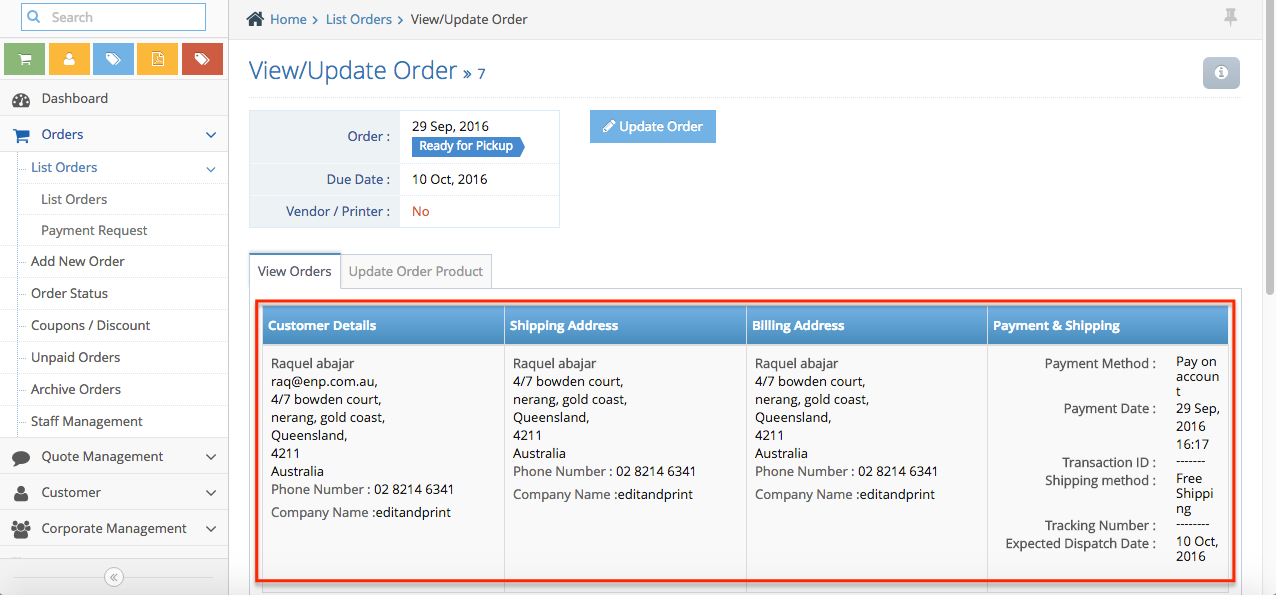
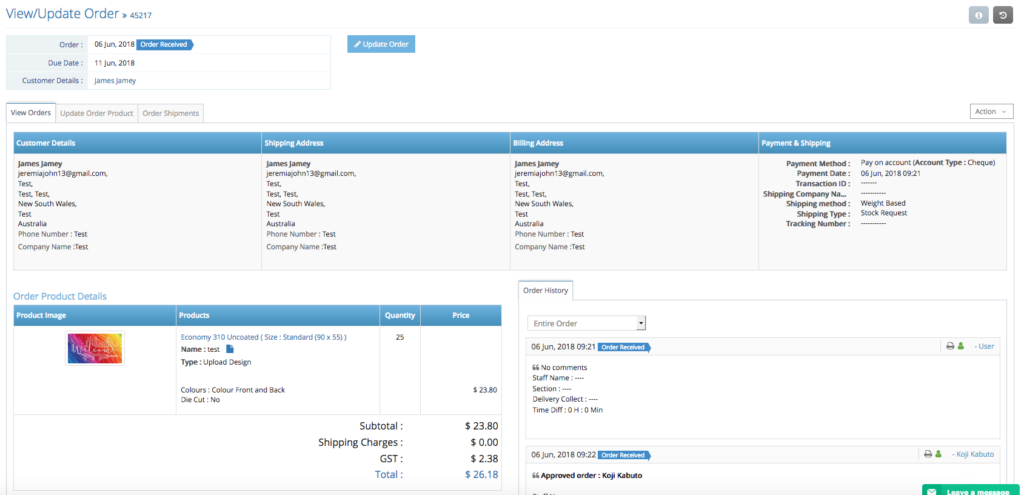
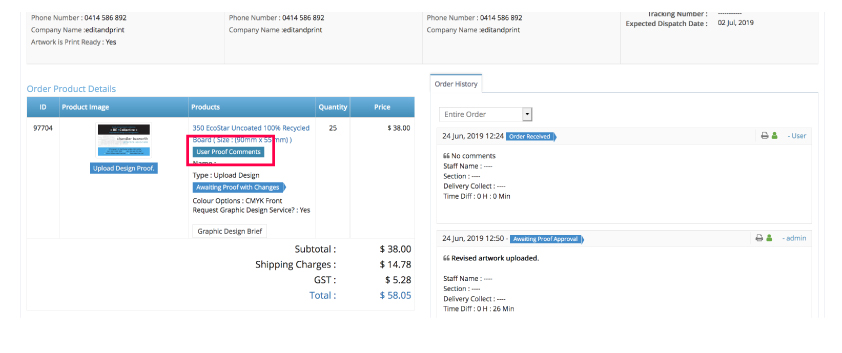
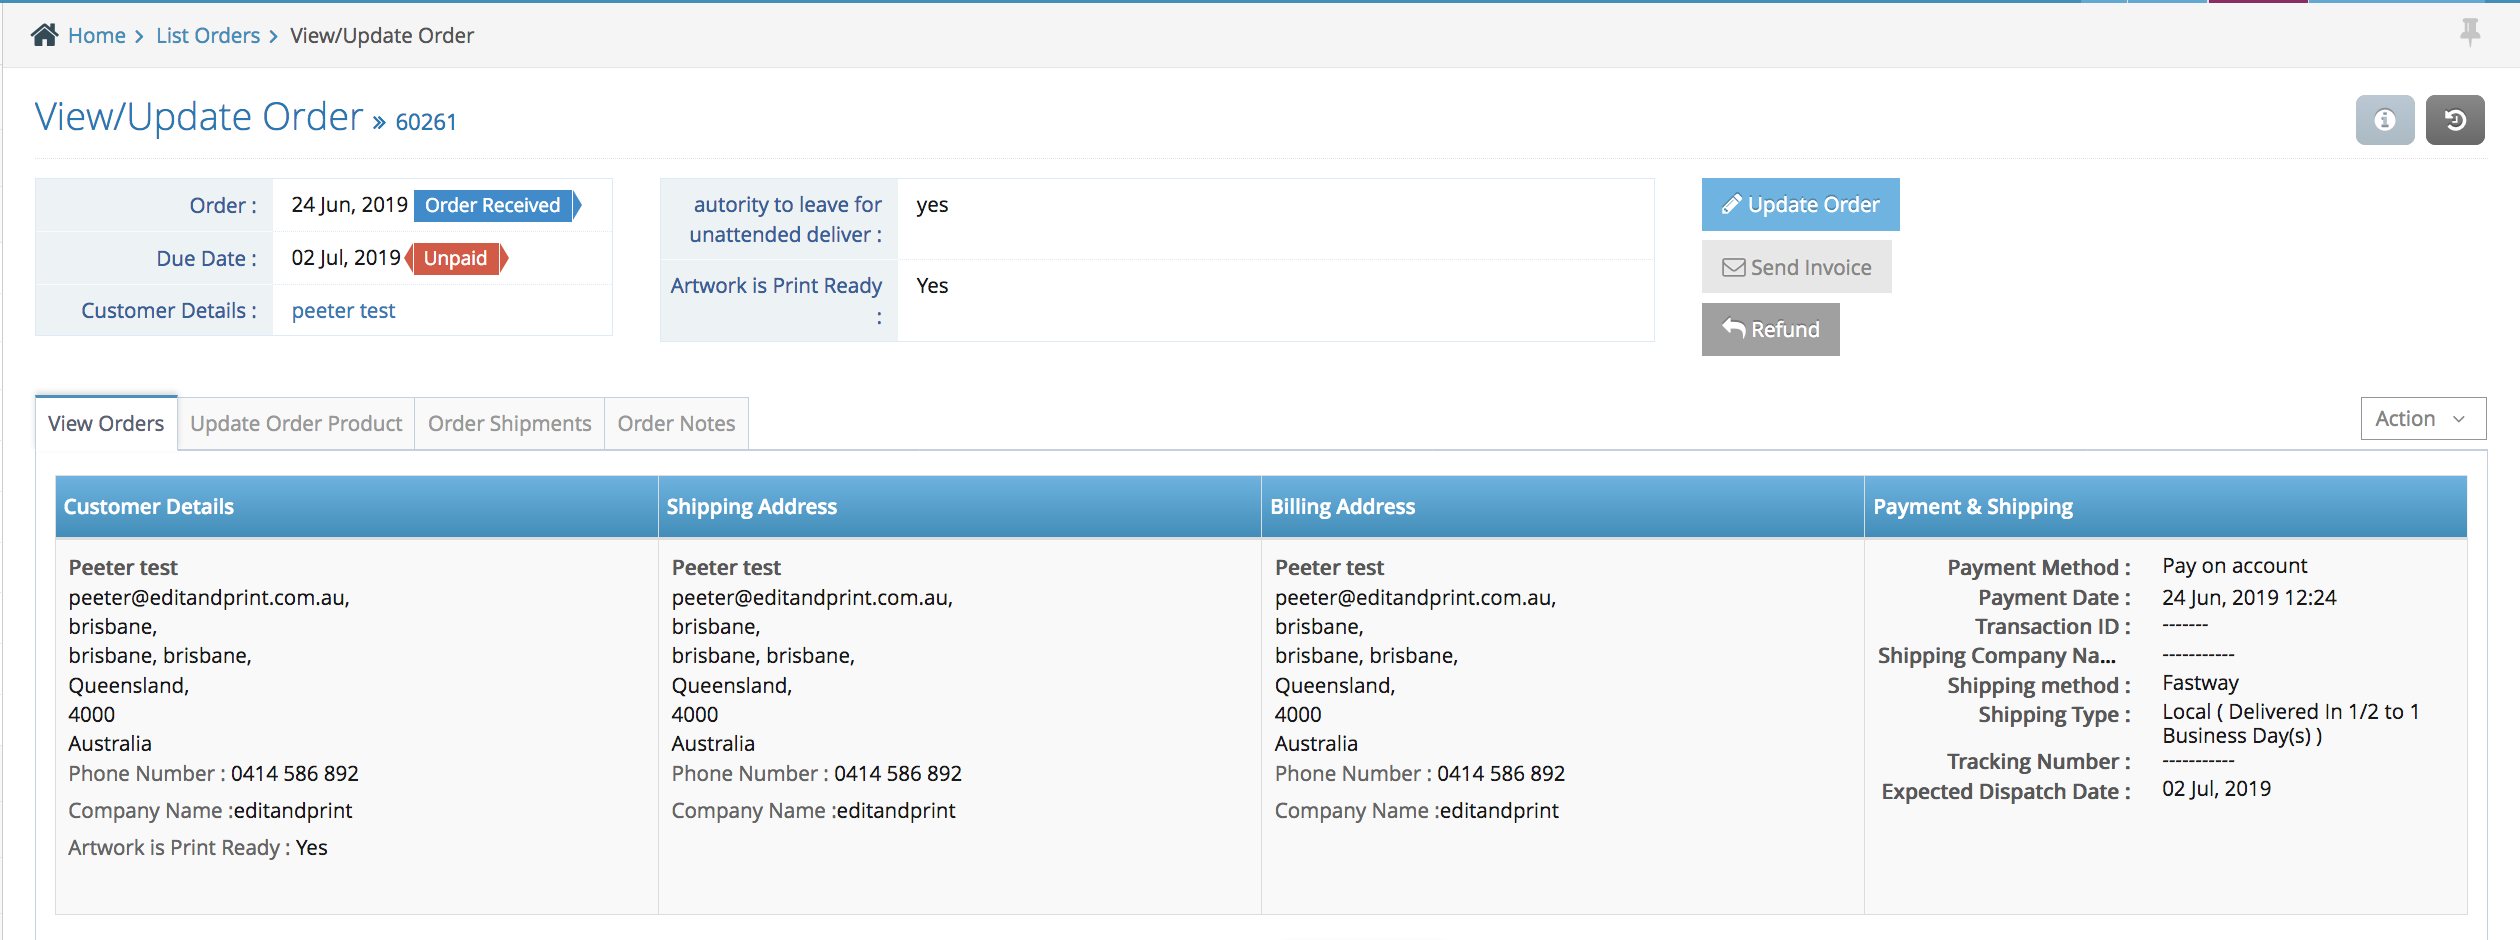
View Orders Tab:
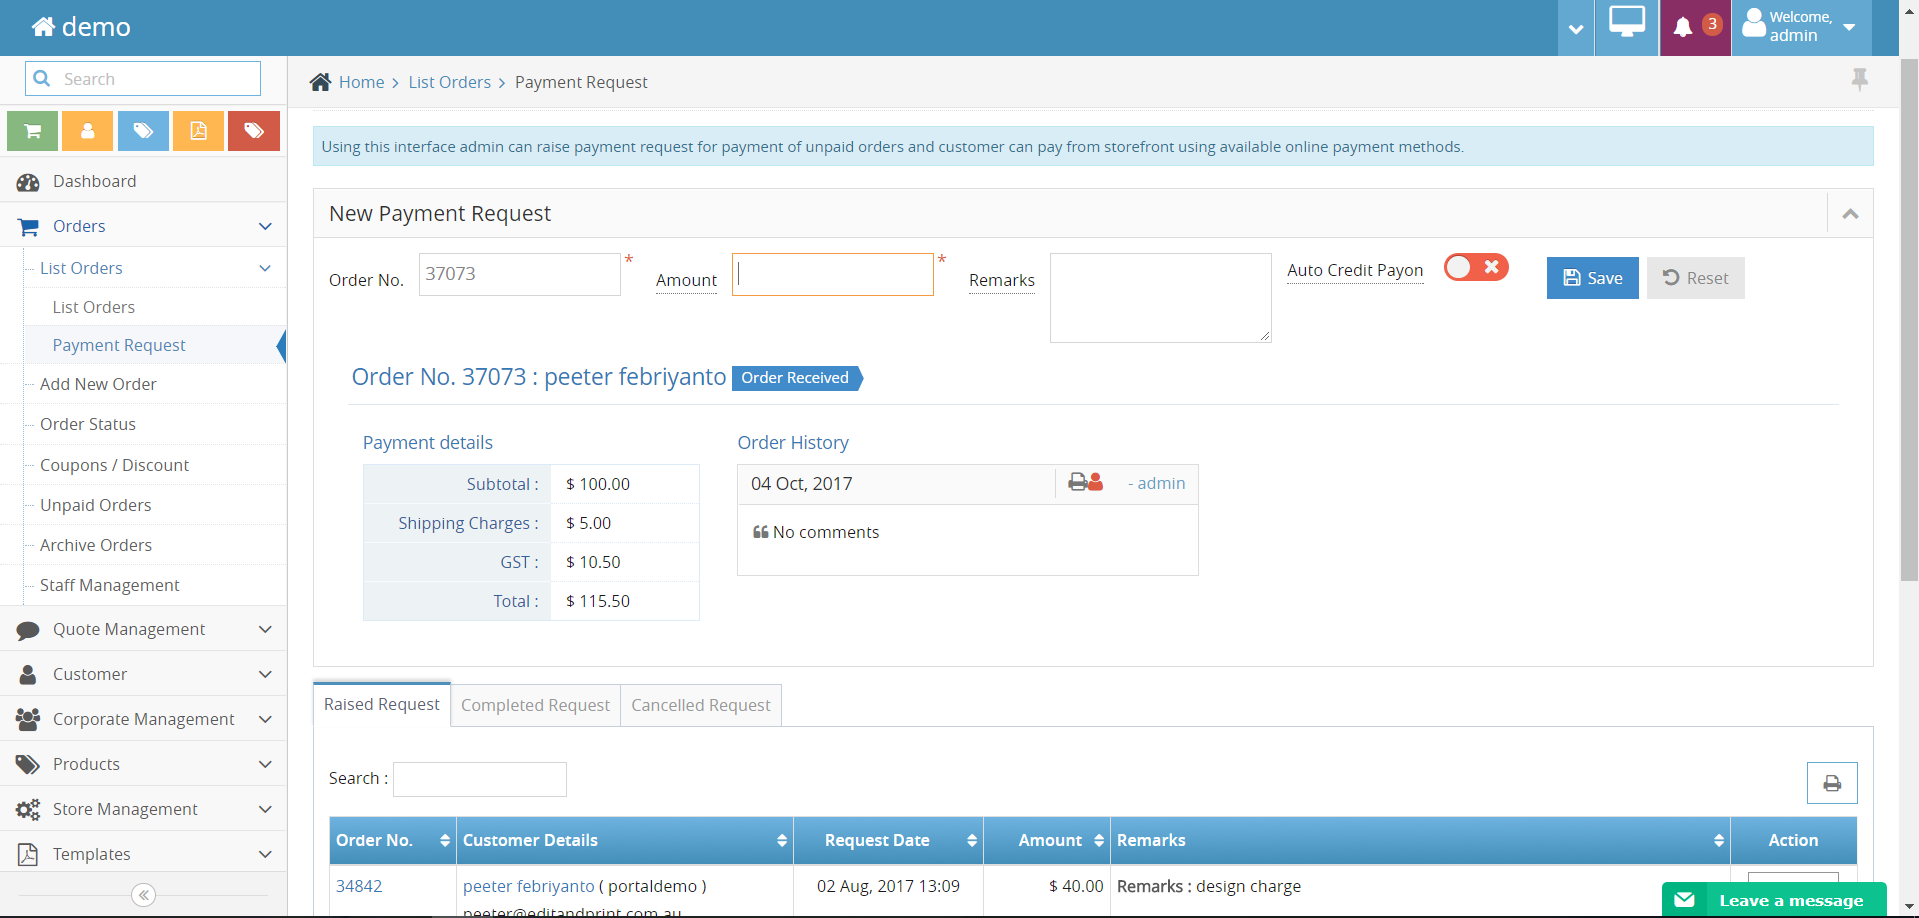
shows you all the details about the customer order  such as the customer details, shipping & billing, payment details, products & pricing and also the order history (located on the right side) – see example below

important details – on this page you can see the breakdown of the pricing and also the order history when the order was updated. You can also see the type of order (whether its a upload artwork order, custom design order or a quote order).

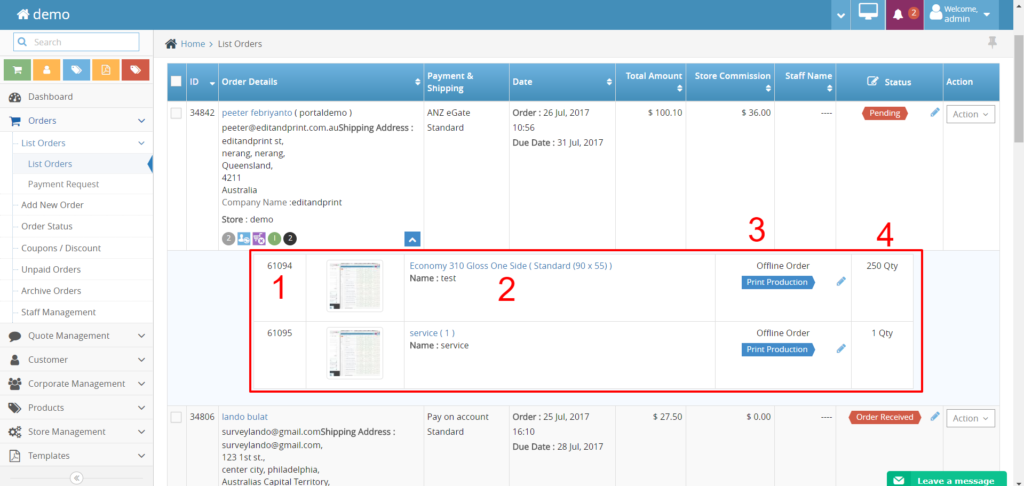
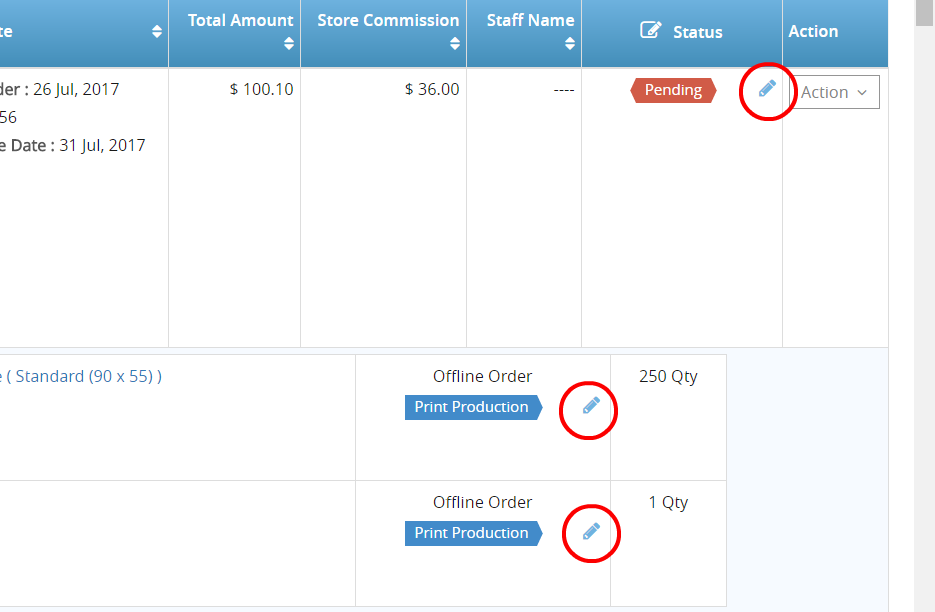
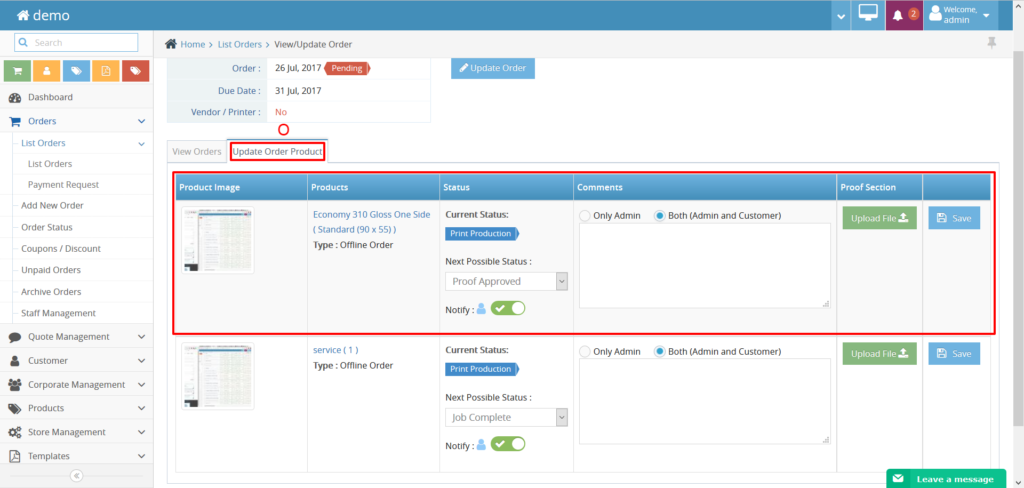
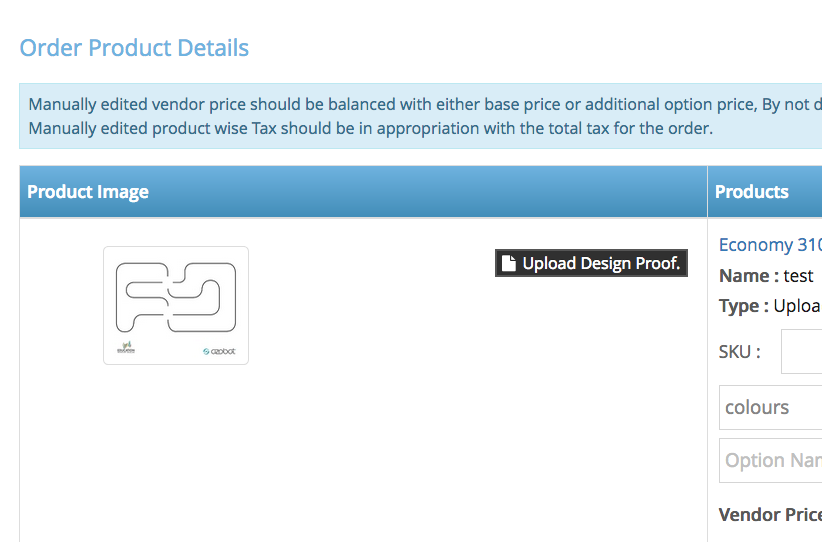
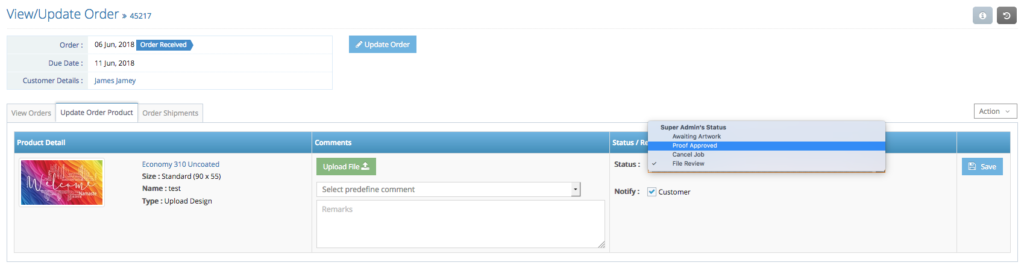
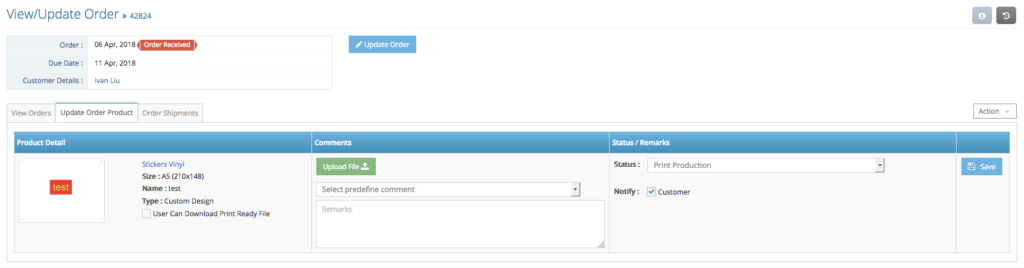
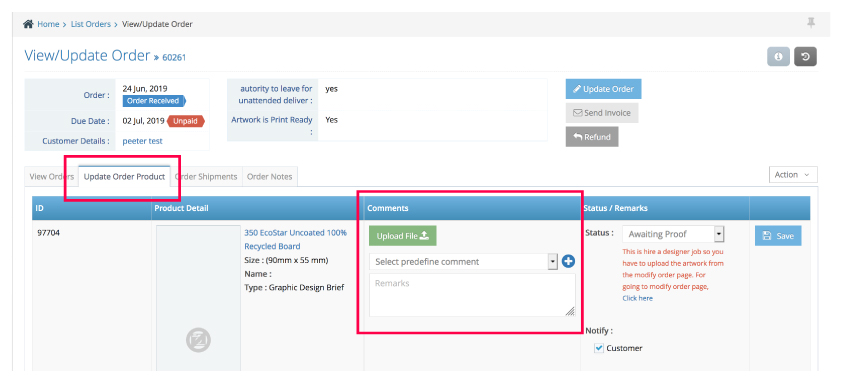
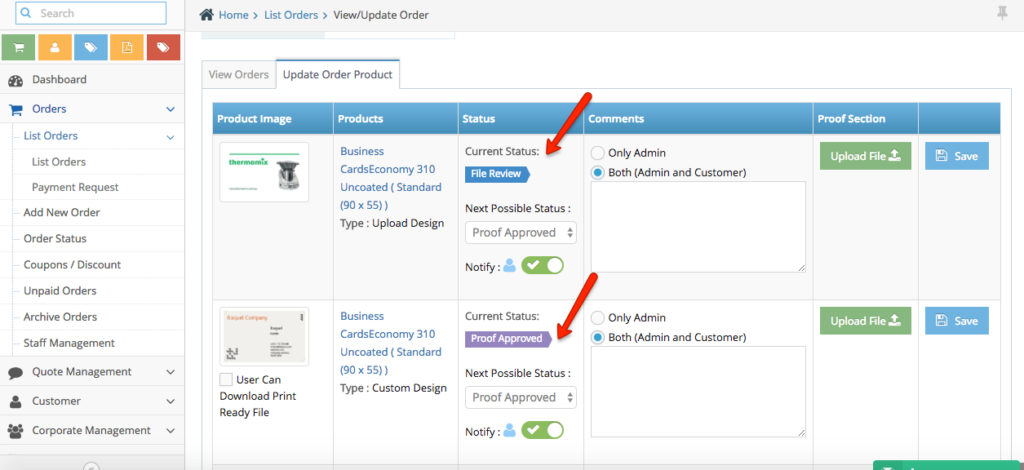
Update Order Products:
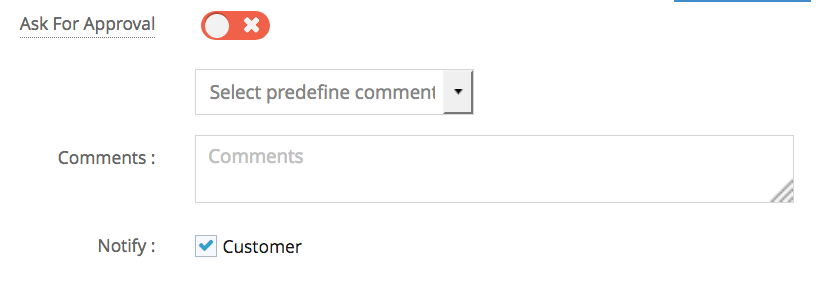
shows you more details of your online jobs under the order – this page allows you to be able to manage the status on job level to have a more accurate status update for your customer, you can also write a comments if you wanting to ask questions or communicating with the customer.
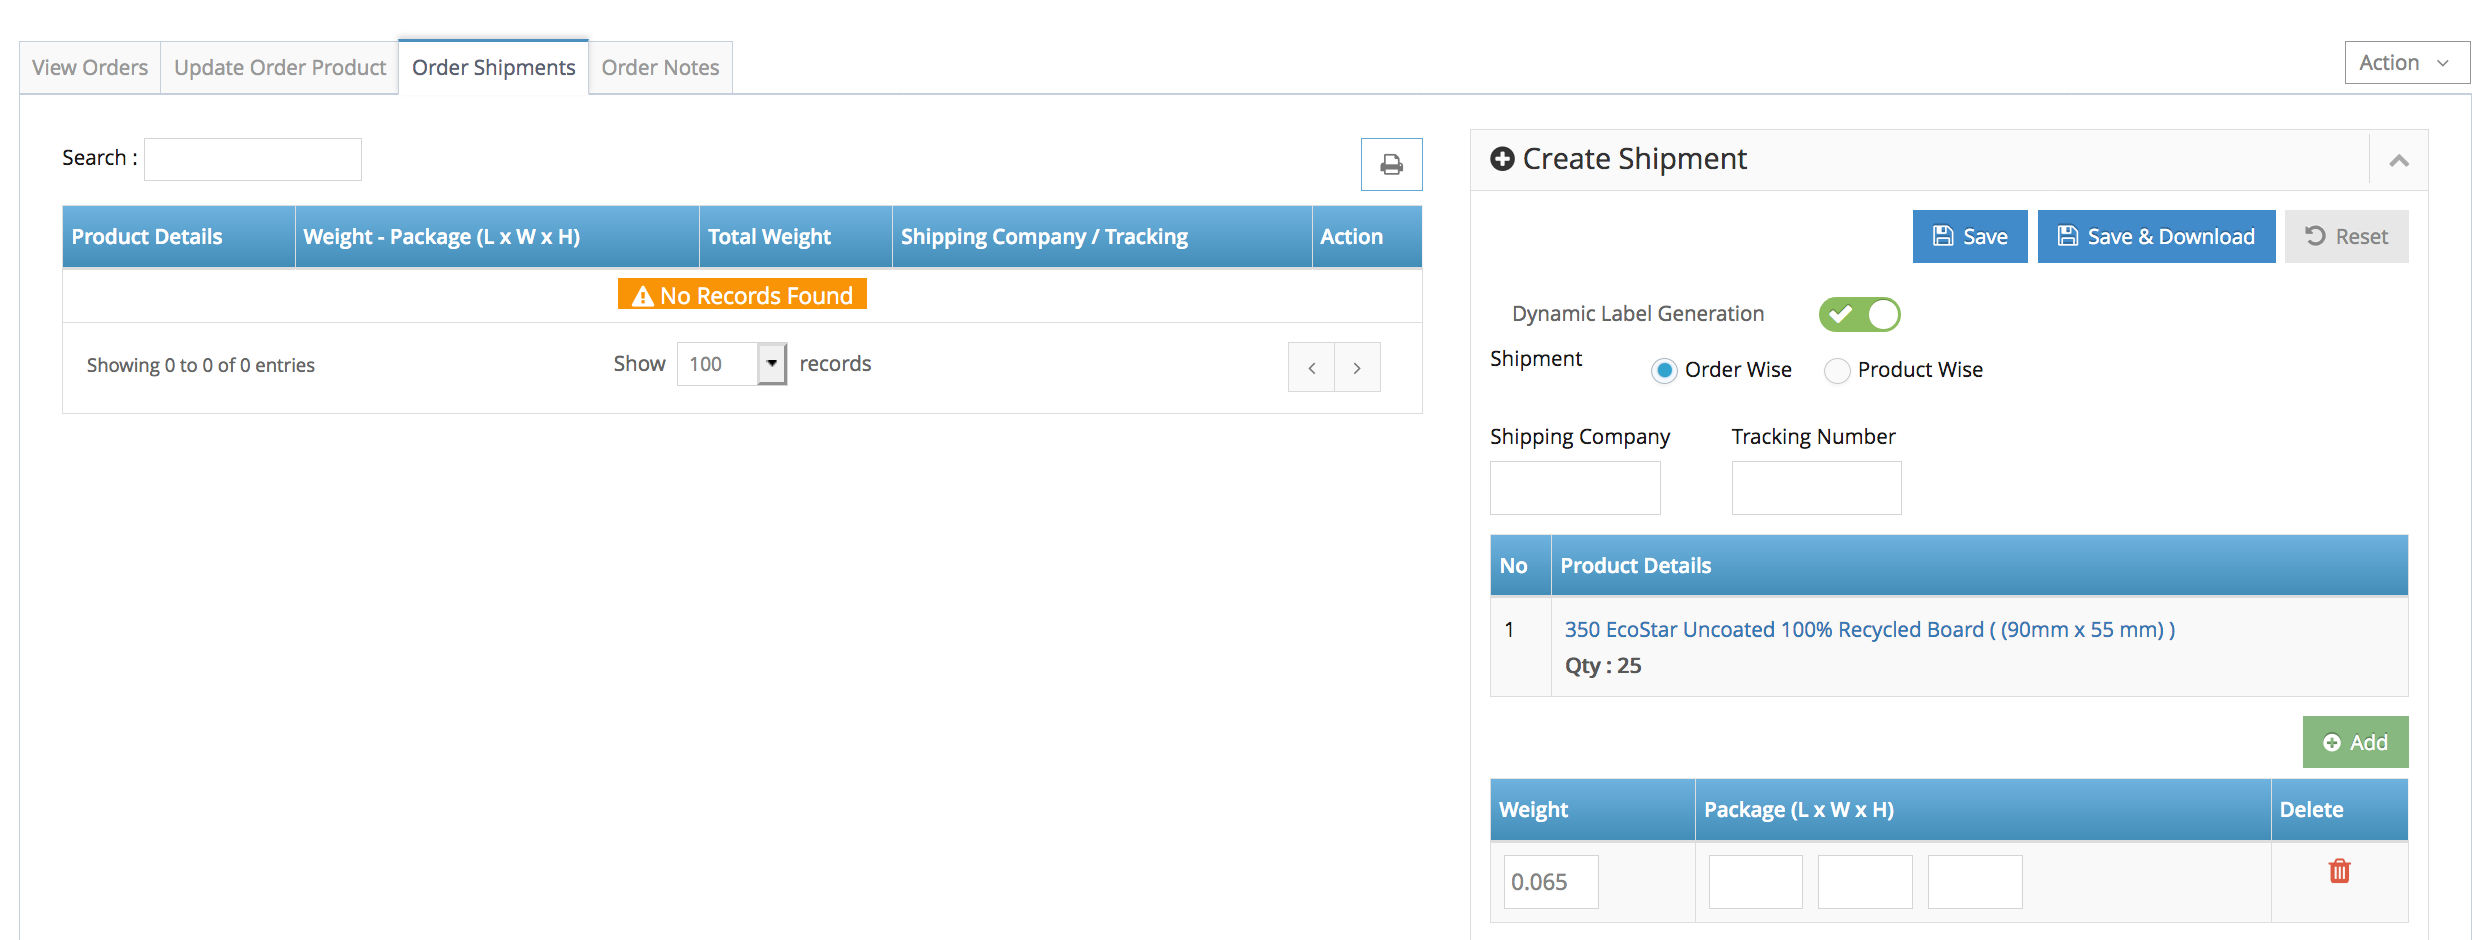
Order Shipment Tab:
shows you all the configuration related to the order shipment where you can generate a shipment label for your order.
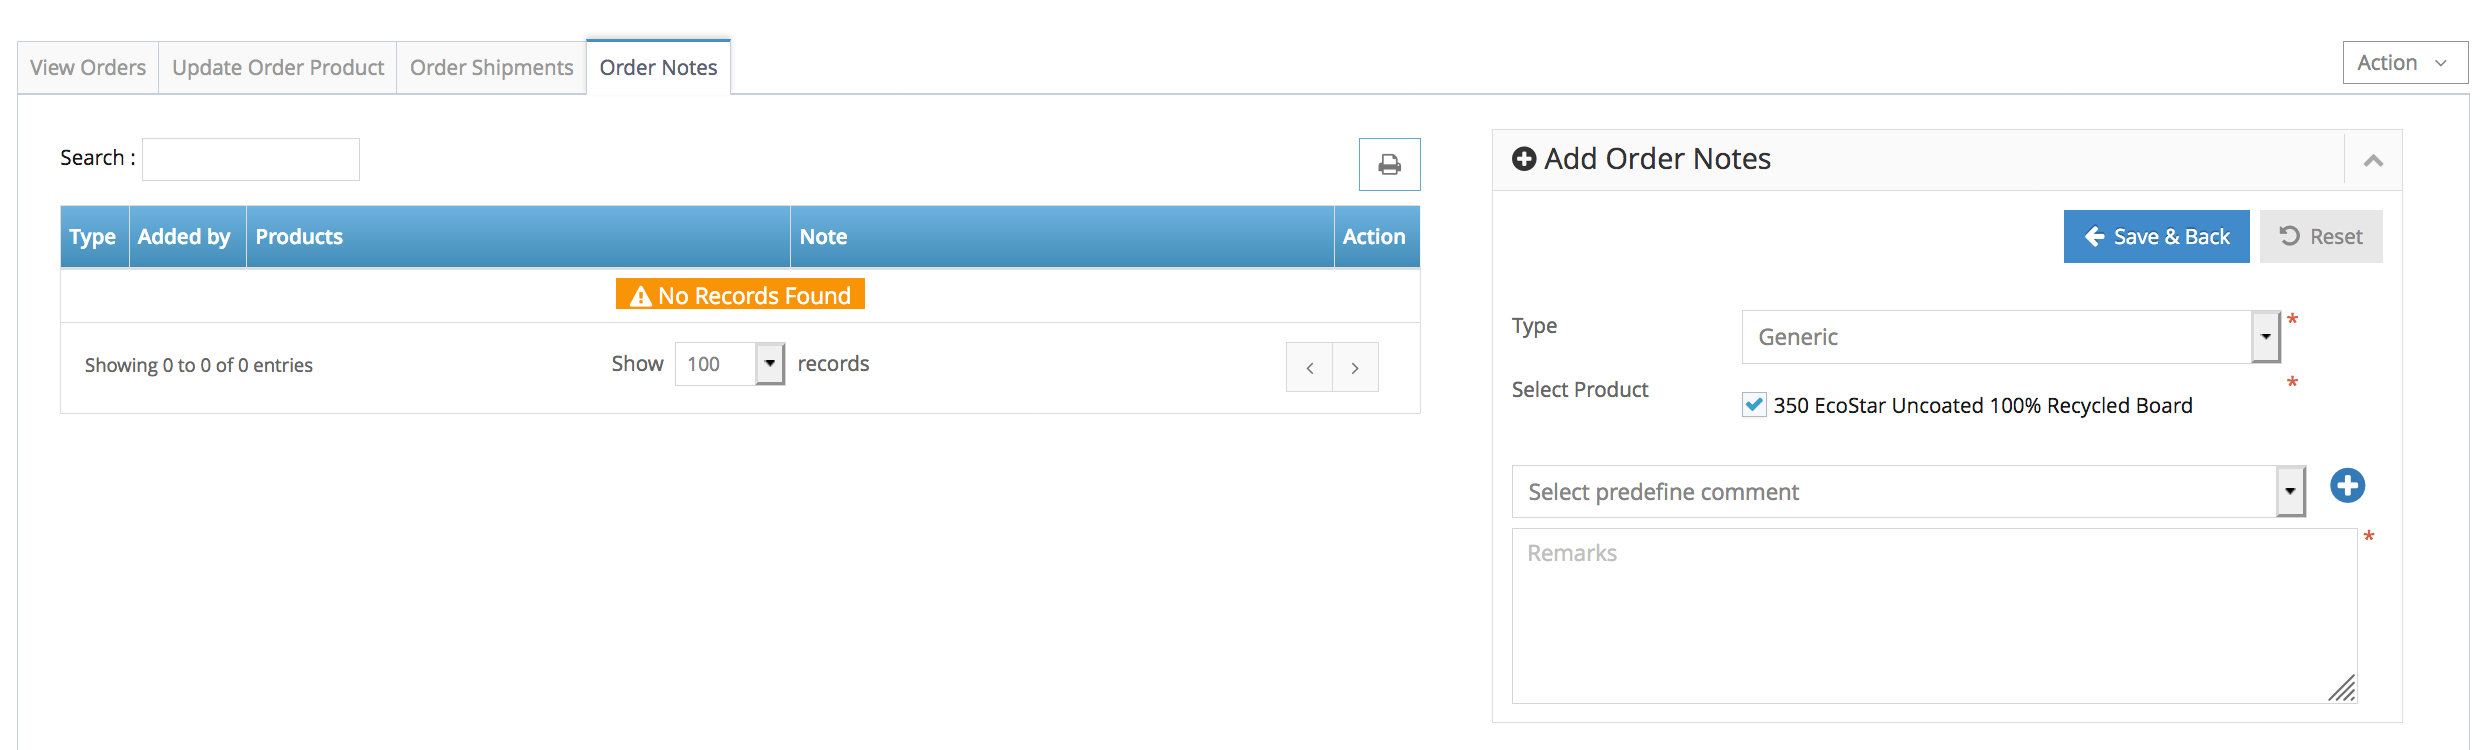
Order Notes:
shows you the interface to manage your internal or external notes related to the order.

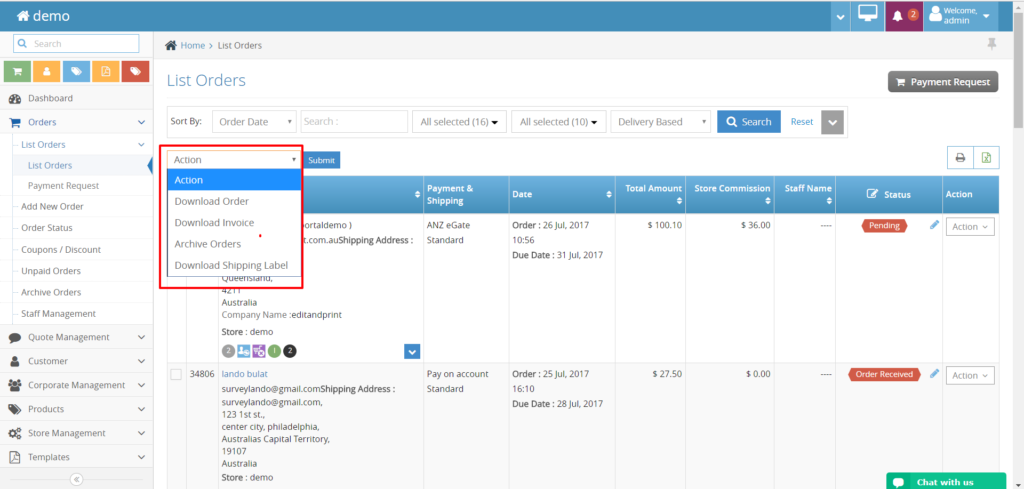
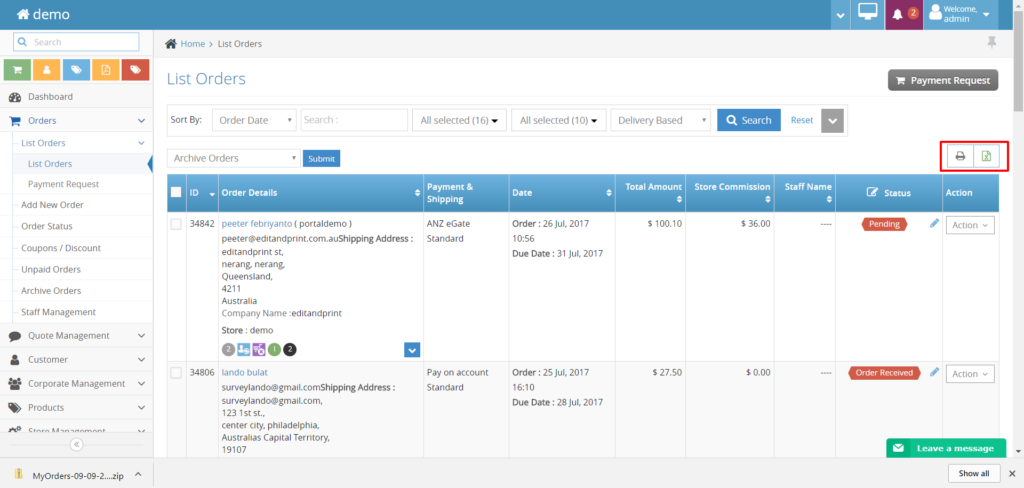
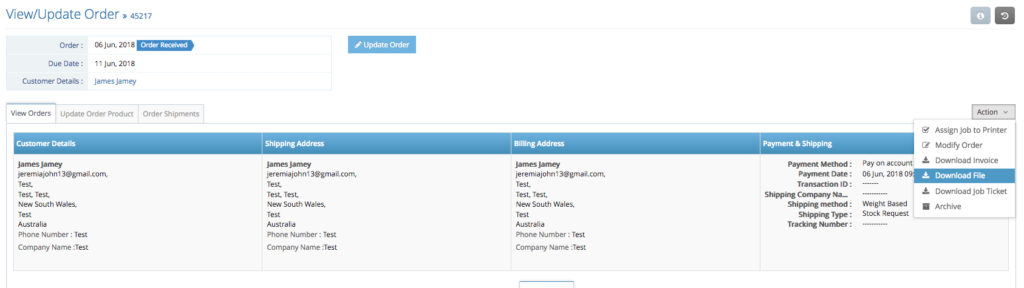
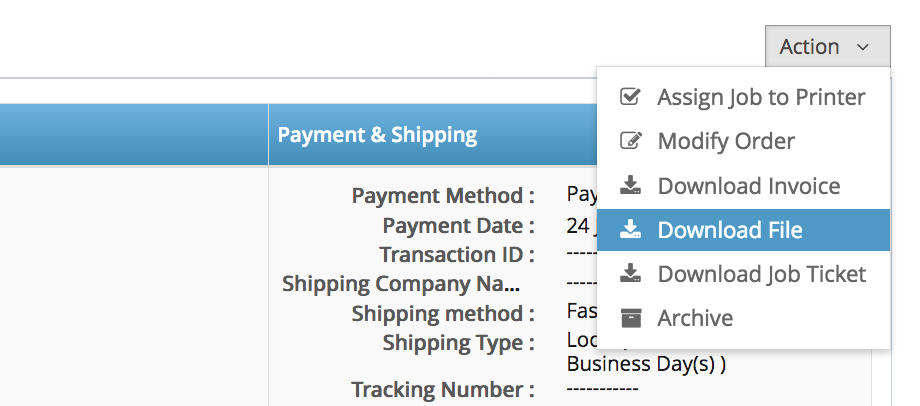
Step 4. regardless the type of the order, first you will need to review by downloading the file (downloading the file will also include the job ticket with the order details). Click Action > Download File

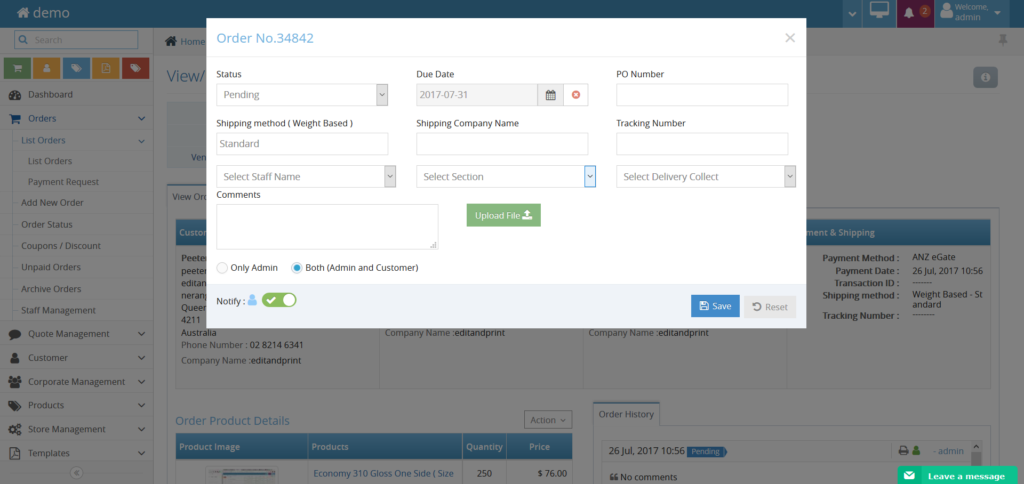
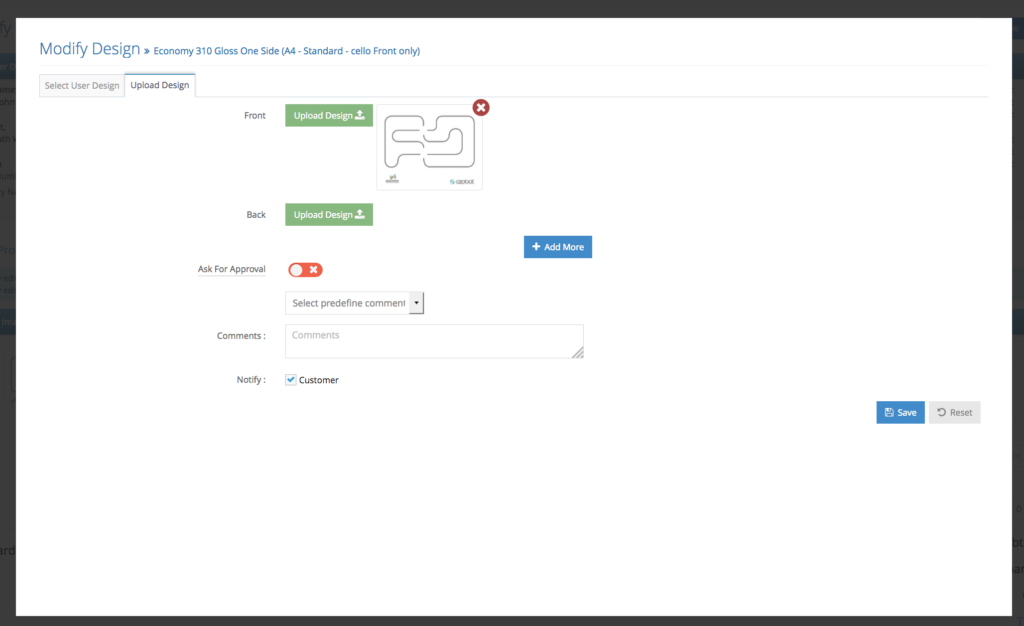
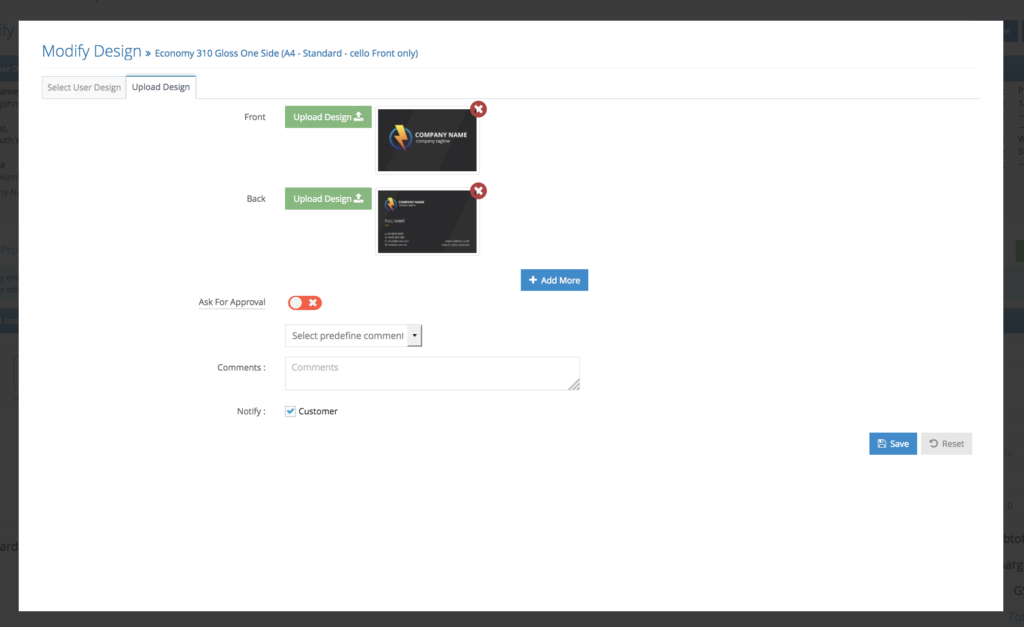
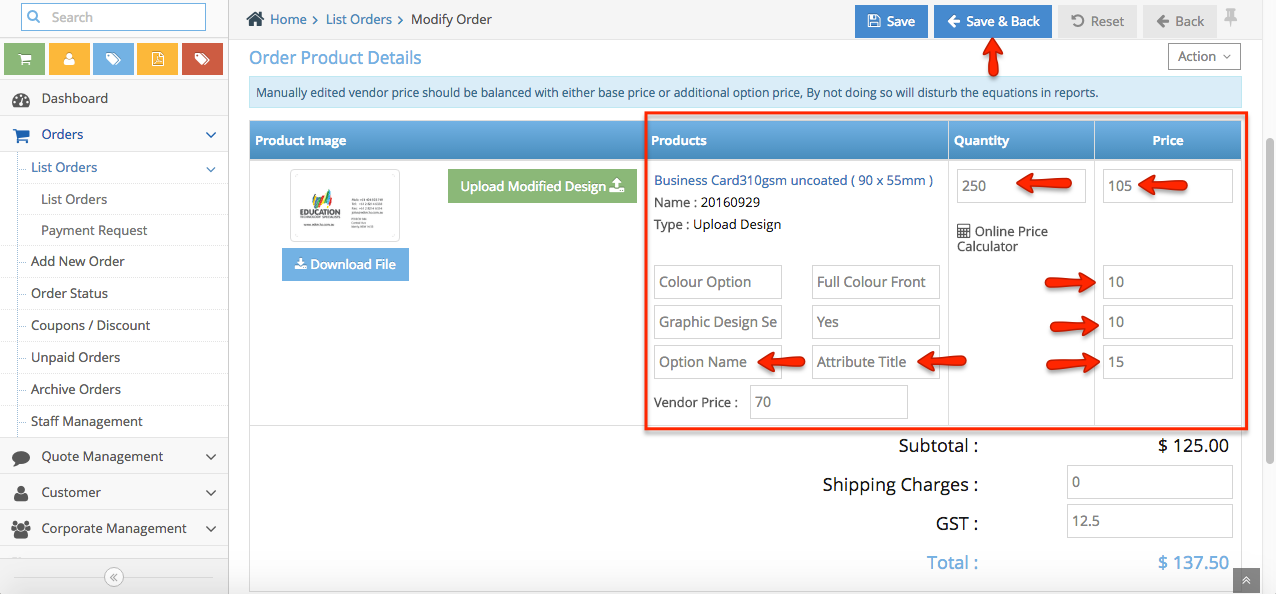
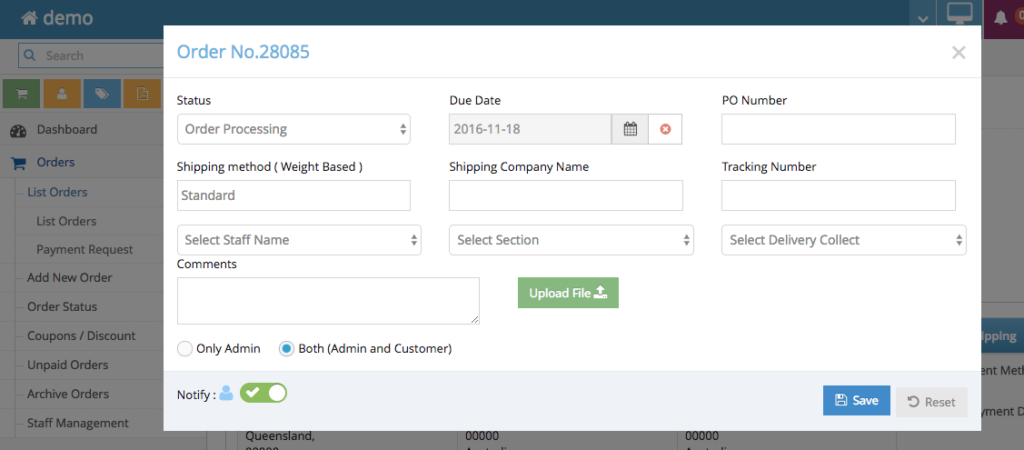
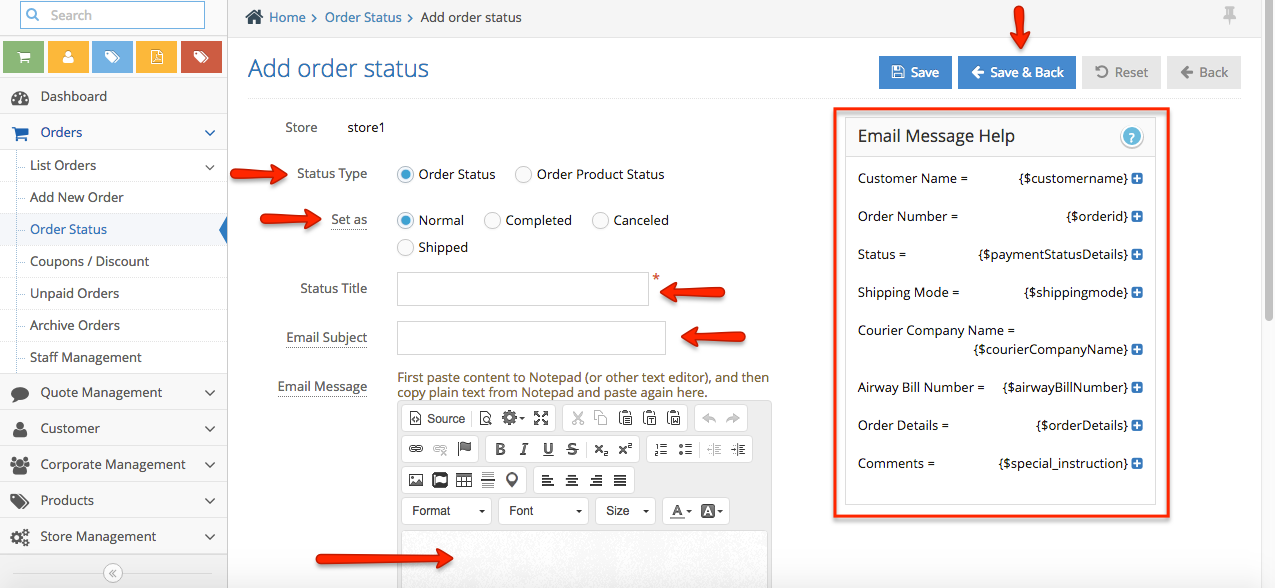
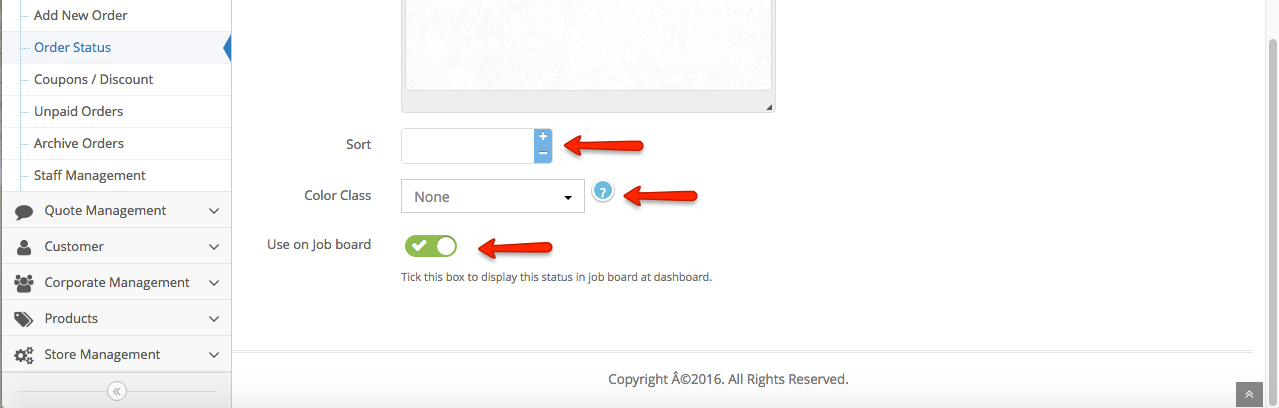
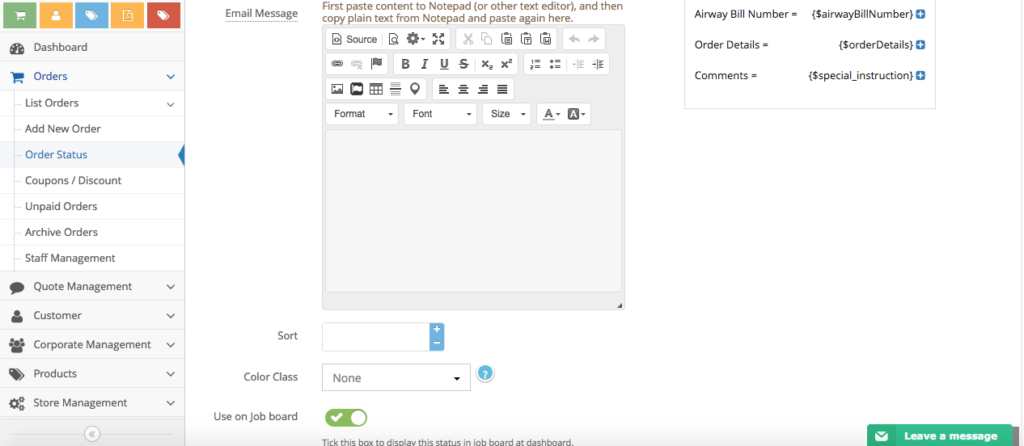
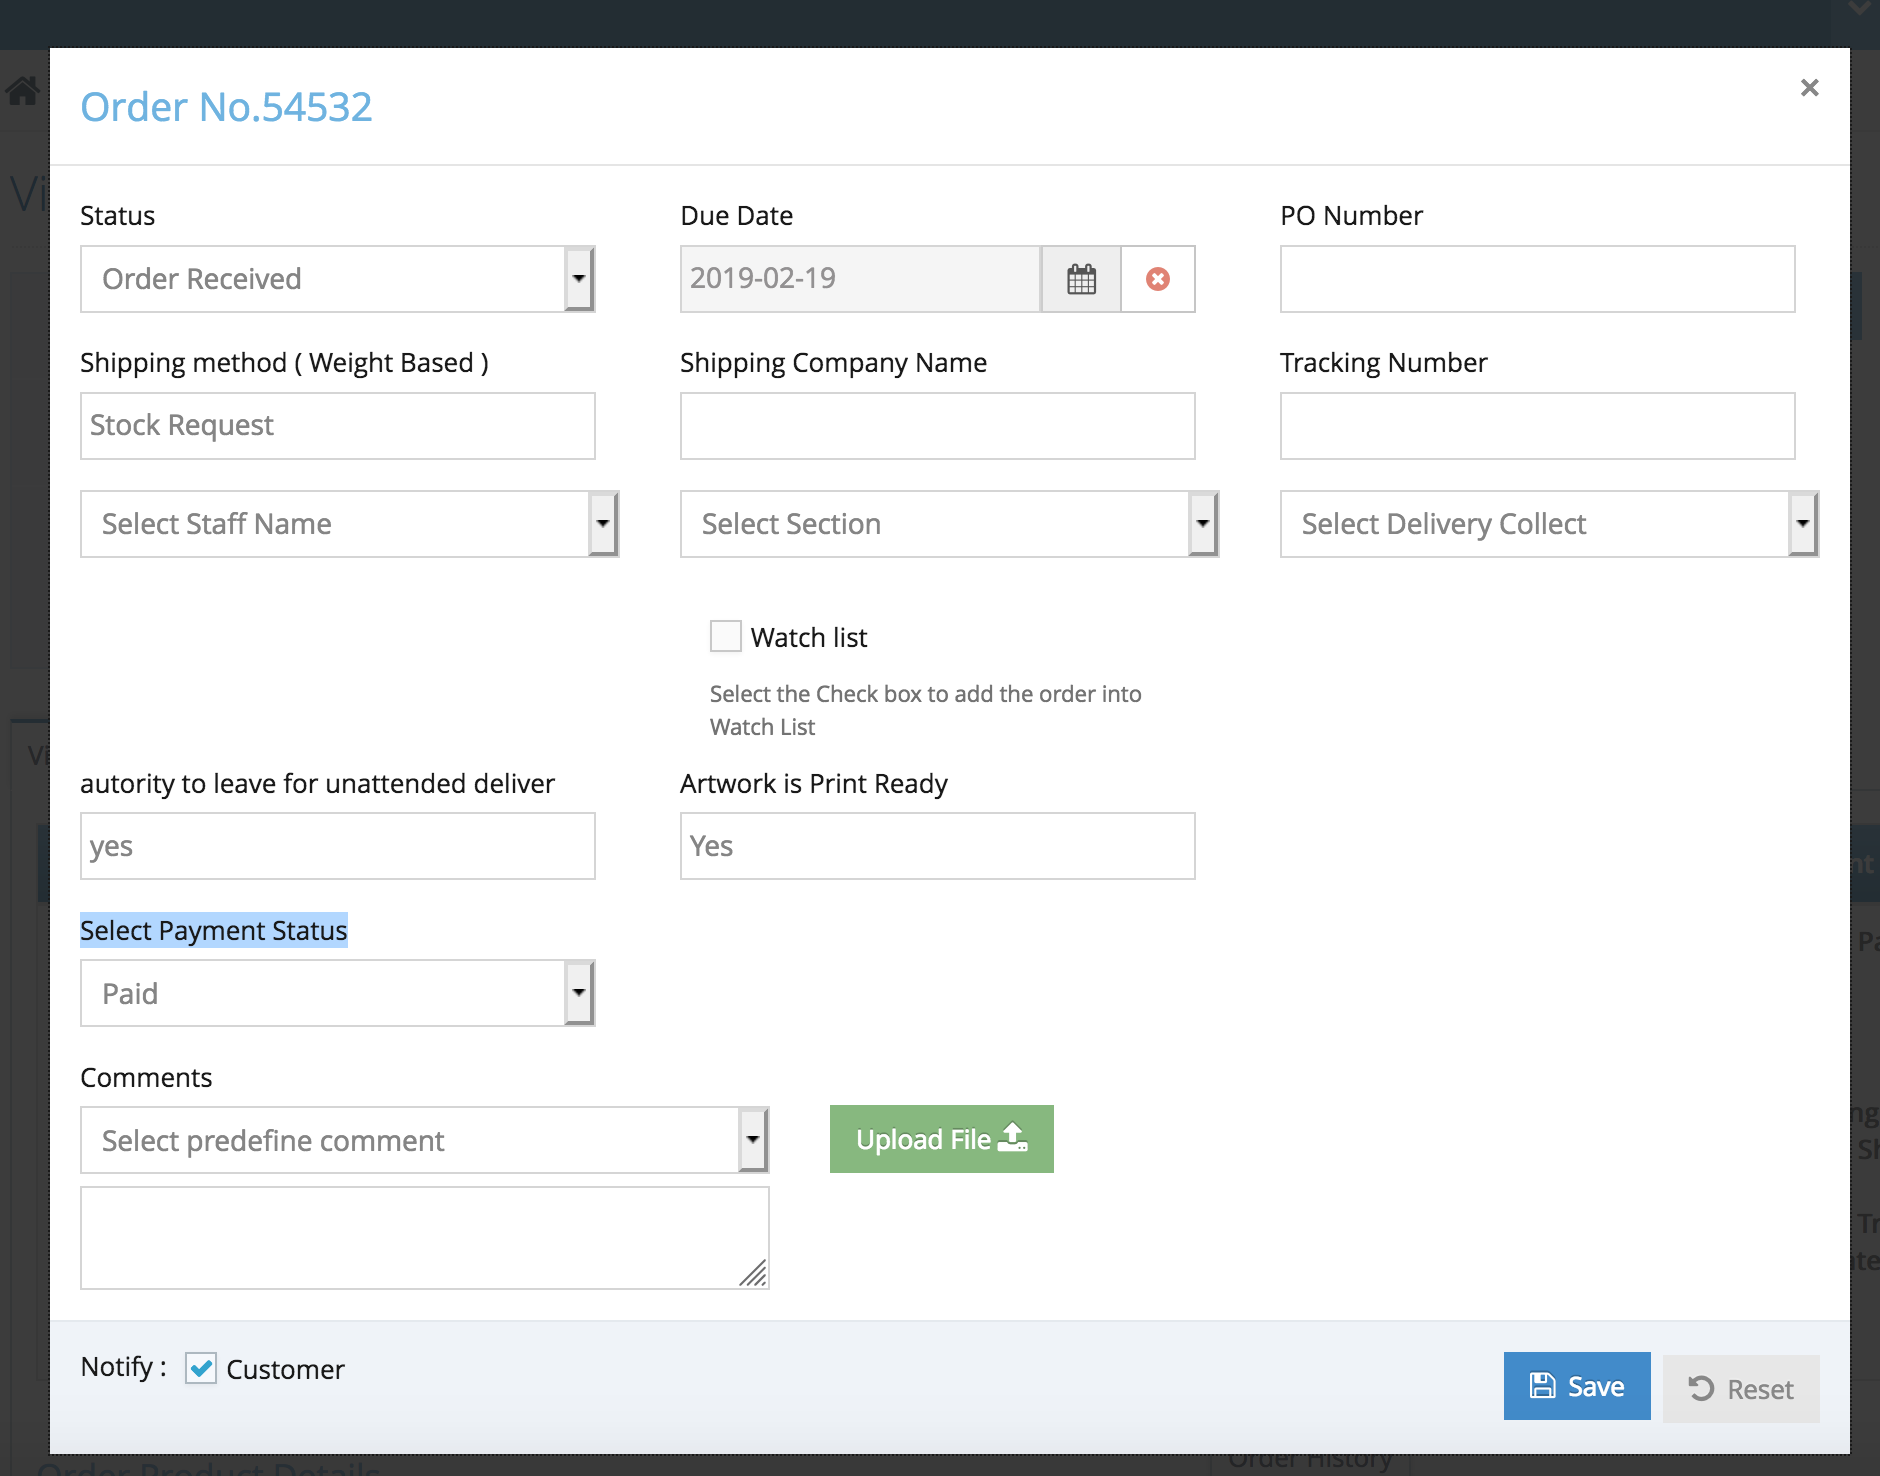
Step 5. Updating the Order & Order Product Status.

Click Save button to apply the changes.

Note: as this is non-IBS products, you will have the responsibility to update both of the order and job status manually from your side in order to update your customers with their order.

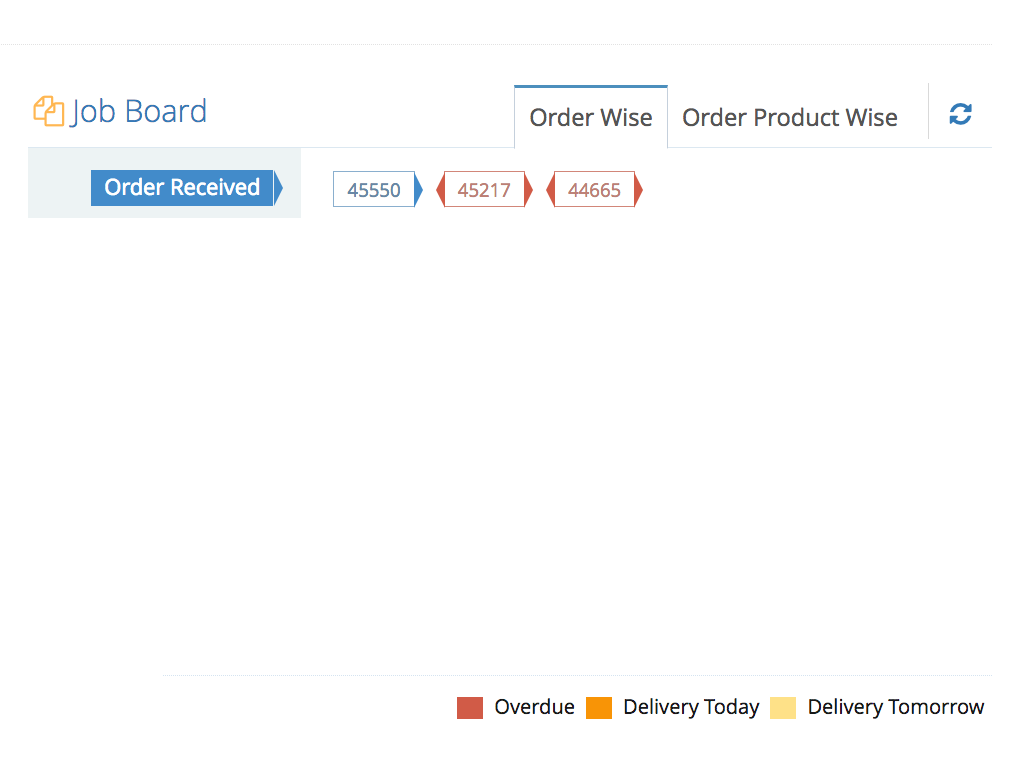
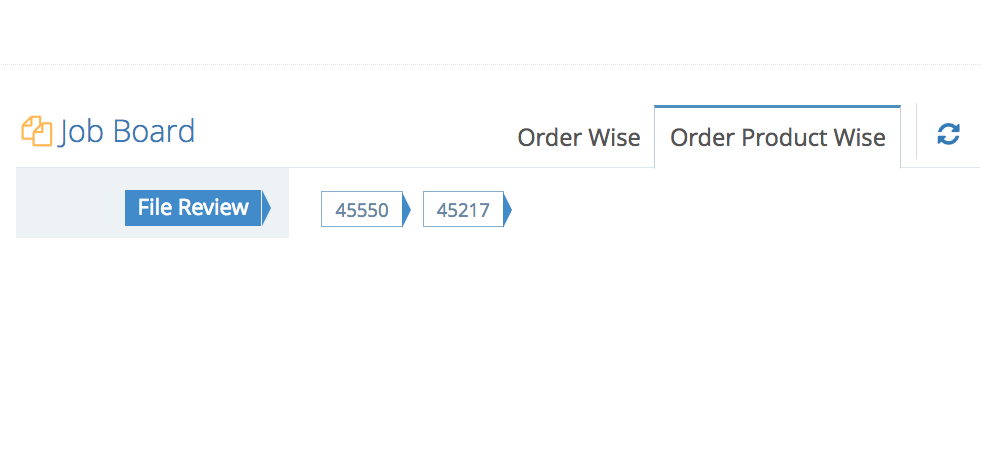
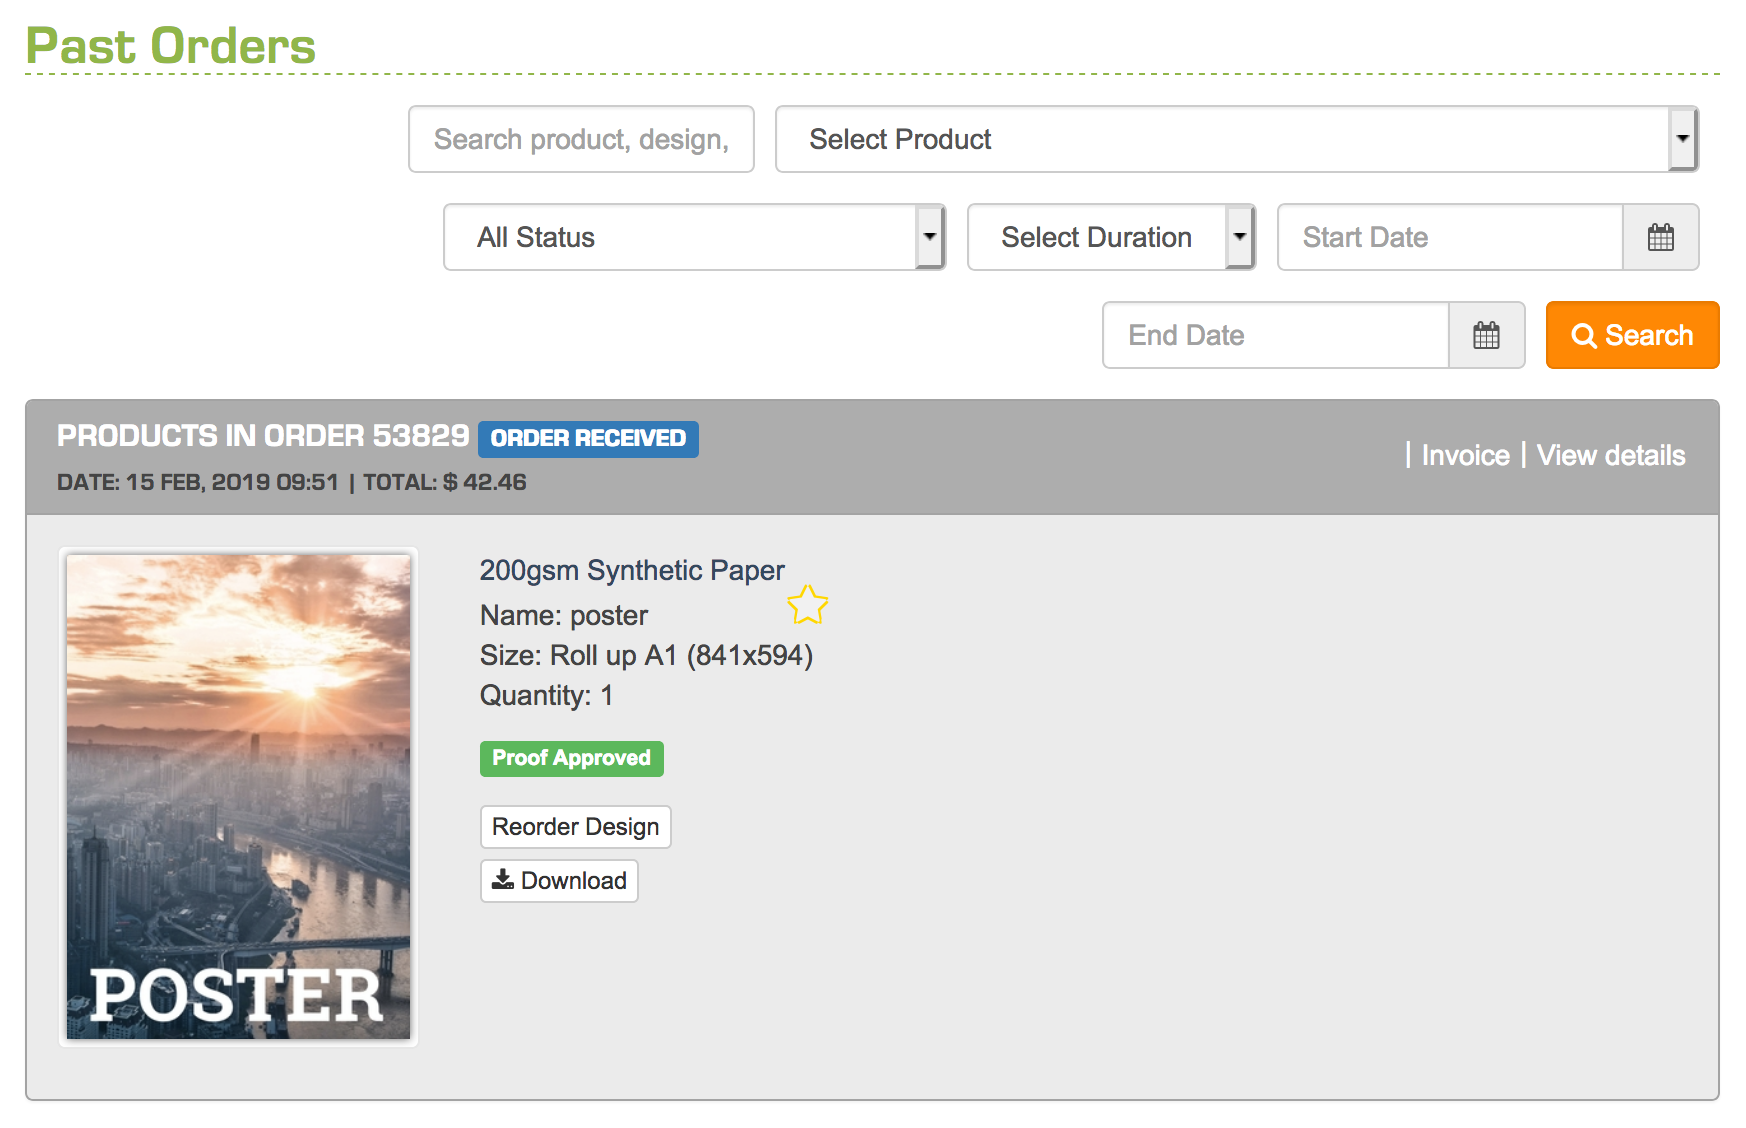
By default the order status will always be ‘order received’ and the job status will either be ‘file review’ – (when customers uploaded their own artwork) or ‘proof approved’ – (when customers using the online editor).

Admin will have full control of both order and job status or the non-IBS products order.

Tips: update the job status first before the order status as order status representing the whole order status. i.e. change the order status to complete once all jobs are completed under the order.

Edit / View the Order (IBS & Non-IBS product)

Edit / View the Order (IBS & Non-IBS product)

Step 1. From the home page, navigate to Orders section, then click List Orders.

Step 2. Look for the order. Please note that status of IBS orders are fixed while non-IBS offers more options. Click Action button and Select View/Update Order.

Step 3. In the View Order tab, you will see the status of the order, the billing/shipping information, product details, and the order history. If you wish to update something on the order, click the Action button and select Modify Order.

Step 4. Click Update Order button allows you to change shipping information and the order information such as: the status of the order, the due date, and the purchase order number, enter comments, and upload a file. Tick the notify box to send notification to the customer of the changes done on the order. Make sure to click Save button if you made some changes on the order.

Step 5. Update Order product shows the jobs inside the order, its current status, and the type of product. Notice the different current status of the order. IBS products by default has Proof Approved while Non-IBS has File Review as its current status. Set it to Proof Approved once done reviewing the artwork used and order will be processed accordingly. Add your comments, and/or upload a file if needed. Click Save changes button once done modifying the order.

Process Non-IBS order (Essential Plan)

Process Non-IBS order (Essential Plan)

Step 1. From the home page, navigate to Orders section, then click List Orders.

Step 2. Look for the order and click the Action button in line with the order.

Step 3. Click the following options: Download File, Download Shipping Label, and Print Job Ticket. Once you have these files, you can now send it to a third printer of your choice.  Make sure to update the status of the job and the order after.

Step 4. To change the order and job status, click the View/Update Order option under Action button.  Click Update Order Product tab to change the status of the order, then click Update Order Product tab to change the job status. Please note that once the order status is updated, it will automatically send an email and notify your customer about the status of the order.

Process Non-IBS order - Assign Job (Premium Plan)

Process Non-IBS order - Assign Job (Premium Plan)

Step 1. From the home page, navigate to Orders section >> List Orders >> List Orders.

Step 2. Look for the order. Click Action button and select Assign Job to Printer.

printer1


Step 3. Select the Printer from the list. Add comment and click Save & Back button to apply the changes and go to back to the main order page.

printer2


Note: These are outsourced or a third-party printer.

What is Archive Order

What is Archive Order

How to archive an order?

Step 1. From the home page, navigate to Orders section >> List Orders >> List Orders.

Step 2. Look for the order you wish to archive. Click Action and select Archive.

archive1


Step 3. A popup window will appear. Click Archive button to confirm and the order will be sent to “Archive Orders”

archive2


How to restore an archived order?

Step 1. From the home page, navigate to Orders section >> Archive Orders.

Step 2. Look for the order you wish to restore. Click Action and select Restore.

archive3


Note: If you choose View/Update Order, you can view the order details and you will have the option to Restore from there.

Coupon Creation

How To Create Coupon

Step 1. Login to your admin > navigate to Orders section, then click Coupons/Discount. This page shows all the coupons and discounts setup on the account. You can see the overview information about your discounts, you also have the control over the status of the discount as well by ticking and untick the status box.

Step 2. To add a new coupon, click Add button.

Step 3. Fill out this form:

Discount Title – This is the name of your coupon.
Type – Choose Coupon in this case.
Coupon Code – Enter your desired coupon code. If you leave this field blank, the system will generate the code for you.
Discount – You can choose between percentage (example: 10% OFF) or amount (example: $10 OFF)
Max. Discount – This is only applicable if you choose percentage in the Discount field. Basically, setting the maximum amount to give as a discount.
Validity – This is the period when the coupon can be use.
Product Specific Discount – You can choose to apply this coupon for all products or to specific ones.
Discount On – Choose where you want to apply the coupon. Will be it based on the product price or the shipping price.
Discount Usage – Set the usage of your coupon.
Coupon Max. Usages – The maximum number where the coupon can be used.
Customer Specific Discount – Choose which customer has the privilege to use this coupon.
Conditional Discount – This is additional option that will trigger how the coupon be applied.

coupons2


coupons3


Tips : create a conditional coupon that can works based on customer order count, by using the order count field at the bottom

This allows the customer to can only use the coupon when the order count is between a certain number to a certain number. There are couple more options of order count such as equal to, greater or equal to, less or equal to.

Step 4. Click Save & Back button to apply the changes and to go back to the main page.

Discount Creation

Discount Creation

Step 1. From the home page, navigate to Orders section, then click Coupons/Discount. This page shows all the coupons and discounts setup on the account.

Step 2. To add a coupon, click Add button.

coupons1


Step 3. Fill out this form:

Discount Title – This is the name of your discount.
Type – Choose Discount in this case.
Discount – You can choose between percentage (example: 10% OFF) or amount (example: $10 OFF)
Max. Discount – This is only applicable if you choose percentage in the Discount field. Basically, setting the maximum amount to give as a discount.
Validity – This is the period when the discount can be use.
Product Specific Discount – You can choose to apply this discount for all products or to specific ones.
Discount On – Choose where you want to apply the discount. Will be it based on the product price or the shipping price.
Conditional Discount – This is additional option that will trigger how the discount be applied.
Apply discount on – Choose between the base product price or apply the discount to the product subtotal (Including price of all additional option)

discount1


discount2


Step 4. Click Save & Back button to apply the changes and to go back to the main page.

Multiple Coupon Creation

Multiple Coupon Creation

Step 1. From the home page, navigate to Orders section, then click Coupons/Discount. This page shows all the coupons and discounts setup on the account.

Step 2. To add multiple coupons, click Import Coupon button.

multiplecoupon1


Step 3. Click Download Sample File button.

multiplecoupon2


Step 4. Open the sample file and edit the information based on the coupon information you want to use.

multiplecoupon3


At this point, go back to the import coupon page and click Next.

multiplecoupon4


This page will guide you through the process of updating the csv file. Just go over to the CSV Field Description.

multiplecoupon5


Note: Save this file as .csv format.

Step 4. On that same image above, click Next button.

Step 5. Click Import and upload your CSV file containing your coupons. Click Import button.

multiplecoupon6


Important Note: You might get something like this when you upload your csv file. It basically tells you that some fields are incorrect and need some checking. Only correct entries will be imported.

multiplecoupon7

Customer Group wise Discount/Coupon

Customer Group Wise Discount/Coupon

On this update, the admin can create a group for their customers and can create a discount/coupons specifically for a certain group.

For example, the admin wants to create a level group based on member benefits and need to set up 3 user group user who can benefit on discount/coupons specifically made for them.

To set up the user group you can:

Step 1. go to Customer > Website customer > on the customer name click Action> Edit

Step 2. There’s a field that called User Group, you can select on which User Group you want to put the customer into, After you’re done click Save.

Step 3. If you haven’t set up a user group yet, please follow step 4 through 7

Step 4. To make a new group you can click the + sign.

Step 5. In the Create new group pop up click +Add

Step 6. Put the name of the group and click Save

Step 7. Now you can put users into the user group you’ve just created.

Please see how to create coupon below here >

To set up a Coupon to a specific user group.

Step 1. Go to Orders > Coupons/Discounts > on the discount title click Action>Edit

Step 2. On the Discount Usage select Based On User Group

Step 3. Select the User Group you want the coupon is applied to

Step 4. After that Click Save.

Tips : when selecting customer specific discount you can select all retailer exclude group if you would like to create it exclusively for retailer. (only for per customer single usage and multiple usage only)

Reward Points

Set Website Reward Points

One of the most popular marketing feature in the admin side is reward points. The reward points allows you to set how the customers can earn an automated reward points and how they can spend it.

In order to utilise this, you have to activate the module first in the admin side.

Step 1. Login to you admin > navigate to the store management > configuration settings. The easiest way is to search the word ‘reward’ on the search box

Step 2. Change the drop down settings to ‘Yes’, click Save to save your changes.

Step 3. Refresh the admin page, navigate to orders > reward points.

Reward Points Page :

This page will display all the rewards points generated from the system automatically. There is also a settings for Reward Points Settings, History and Manage the Reward Points.

Reward Points Settings: the important page once you have activated the reward points module, this is the page where you can configure how the customer can earn reward points and how they can spend it.

how the customers can earn reward points :
there are 2 configuration where
1.  you can award your customers a certain points when they are registering on your website
2. when the customers placing an order on your website.

Based on the settings above, the system will start generating rewards points to your customers and display it on their account under the ‘My Accounts’ page (after the login).

The next one is how the customers can spend their reward points?
the process of using the reward points is the customers have to redeem the points they have and exchange it to a website coupon (the value of the coupon will be set in the ‘manage reward points settings’ under the how the customers can spend their reward points.

You can set the minimum and maximum points the customers can redeem and also the conversion of the reward points to dollar value.

Reward Points History :
This is a page where you can see how much reward points has been automatically generated from the system and how much points the customers has redeemed on the website.

tips : use the filter to find a specific reward points record (customer name, email address, time period, type of rewards points).

Manage Reward Points :
The last one will be Managing Reward Points, this feature will allows you to add reward points or coupon to your customers manually. Once it’s saved it will reflect on the customers side automatically.

Click Save to save the changes

Iprocess Order

Iprocess Order

Step 1. From the home page, navigate to Orders section > Add New Order

Step 2. Select the customer by Searching the Name & Email or you can simple click Add Customer button if this is a new customer.

Step 3. Choose the product.

Step 4. Add your Shipping & Payment details and click Confirm Order.

How to create Your Own Order Status

Create new order status

Step 1. Login to your Admin > Navigate to the left hand side navigation bar Orders > Order Status

Step 2. Click Add button to create your own status

orderstatus1


Step 3. Fill out this form:

Status Type – Choose if you want it to be an Order Status (Order itself) or an Order Product Status (Job).
Set as – Set the status as normal status update? completed, canceled or shipped (completed and canceled status will move the order to archive orders page) – Shipped status to indicate the order has been shipped.
Status Title – Add the title. (status of the order / jobs – i.e. awaiting payment, finishing,etc..)
Email Subject – Subject of the email when the status is triggered.
Email Message – Content of the email when the status is triggered.
Sort – Sort order of the status.
Color Class – Categorise the status by colour
Use on Job board – tick this box to display this status in job board at dashboard.

orderstatus3


orderstatus4


Step 4. Click Save & Back button to apply the changes and to go back to the main order page.

Order Status Management

Order Status Management

Step 1. From the home page, navigate to Orders section > Order Status

Step 2. In this page, you will see a list of the existing order status and order product status. To add a new status, click Add button.

Step 3. Fill out this form by selecting the status type, setting the status to normal, completed, etc. Add the status title, subject, message, and fill out the rest. Once done, click Save and Back button.

How to add payment request

How to add payment request

Step 1. From the home page, navigate to Orders section >> List Orders >> Payment Request.

Step 2. In the New Payment Request, enter the Order Number, Amount, add your remarks, enable Auto Credit Payon and click Save button.

Step 3. After saving it, the payment request will be added. You should be able to manage it by click Action button.

Order Management - Job Board Page

How to Manage Order using Job Board

There are 2 ways to get to the job boards page.

The first way is from the admin dashboard under the job board section (right side) > click  View All

Second way is from the Order Listing page. Navigate to the Orders from the left hand side admin navigation bar > List Orders > on the top right you can see ‘Job Board’.

How to manage your online orders from job board ?
you can use the job board to see all of your order based on the status (order status or job status). Order status represent the status of all jobs (if there are multiple jobs under 1 order) or job status / order product status is the status for each jobs.

Tips 1: On the top right of the ‘job board’ page you can see the ‘cog’ icon. once clicked it will pops up the job board preference where you can set the display of the job board on a specific time period or status (order or jobs).

Tips 2: Use the refresh button (next to the ‘cog’ icon) to update the page with the latest order.

Tips 3: Use the duration filter to filter the job for specific time period.

Tips 4: Click the order number as a shortcut to the order details.

Reward Points Expiry Date

How to Set Expiry Date for Reward Points

An extension to the existing reward points for your marketing needs. We have added the configuration for admin to set the expiry date for both the points and the coupon after the customer redeem it.

Step 1. Login to your admin side > navigate to the orders > reward points (please see the settings to activate reward points if you can’t see it in your admin – here >)

Step 2. In the reward points page > on the top right of the page you can see ‘reward points settings’

Step 3. On the first block ‘How the customer can earn reward points’ you can see at the very bottom where you can set the expiry time (in month).

Same thing as well in the next section for ‘How customer can spend reward points’ . At the very bottom you can see the configuration for the expiry time (in month)

Step 4. Click Save to save your changes.

Customer Side :

Under My Account Page > Reward Points, your customers can see the amount of the total reward points and also the expiry date as well.


When the customer redeemed the reward points they can also see the expiry date for the coupon

There will be an automated email triggers from the system as well to remind your customers that the reward points or coupon will be expired soon (when the time is close to the expiry date).

Customer Download Press Ready

How to Allow Customers to Download Press Ready Artwork

Step 1. Login to your website admin and navigate to the left hand side navigation bar (Orders > List Orders) or go straight to the order details of your specific orders (from dashboard or job board)

Step 2. On the ‘Update Order Product’ tab you can see the checkbox to allow the customers to download press ready artwork

Step 3. Click ‘Save’ to save the update

tips : untick the notification checkbox if you do not want to notify the customers.

note : if the notification is ticked, the email triggers from the system will be the ‘Order Status Update’ email.

Customer Front Side

Once the allow customer download feature is ticked, the customer can see the ‘download’ button in the past orders page as per below

Pay on Account Payment Status

How to manage pay on account payment status

First we need to activate the payment status configuration :

Step 1. Login to your website admin and navigate to the left hand side navigation bar to Store Management > Configuration Settings > search for ‘payment status’

Step 2. Change the dropdown to ‘Yes’

Step 3. Click Save to save your changes.

How to Manage your Order Pay on Account Payment Status?

Step 1. Login to your website admin and navigate to the left hand side navigation bar (Orders > List Orders) or go straight to the order details of your specific orders (from dashboard or job board)

Step 2. On the list orders page you can click the pencil icon next to the order status

or click the update order status inside the view / update details page.

Step 3. In the pop up box, you will see the ‘select payment status’

Change to paid when the order has been paid by the customer, or unpaid when it has not.

Step 4. Click Save to update the payment status

Other Training Module :

Admin Dashboard
Quote Management
Customers
Corporates
Products
Store Management
Templates
Content Management
SEO
Store Personalisation
Business Partners
Store Configuration
Designer Studio
Reports
Support

If you can't find what you want please let us know

Contact Us

We're currently offline. Send us an email and we'll get back to you, asap.

Send Message

Main Links

  • Demo
  • Feature Index
  • Our Plans
  • About Us
  • Terms and Conditions

Contact Info

  • 0414 586 892
  • peeter@editandprint.com.au

Fresh from blog

  • Online Editor Help Message Update
  • Content Structure
  • EditandPrint V.7 – Phase 2
  • Gearing up for Online Promotion
  • Personalised Job Board

Find Out More