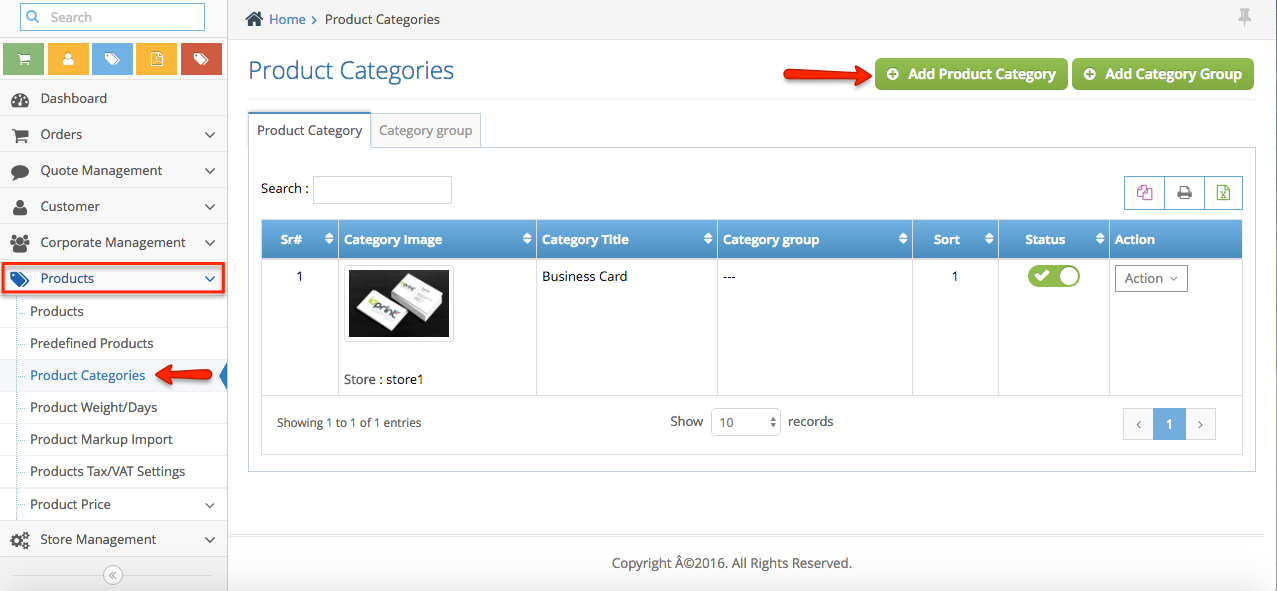
Step 1. From the dashboard, navigate to Products section and click Product Categories.
Step 2. Click Add Product Category button.
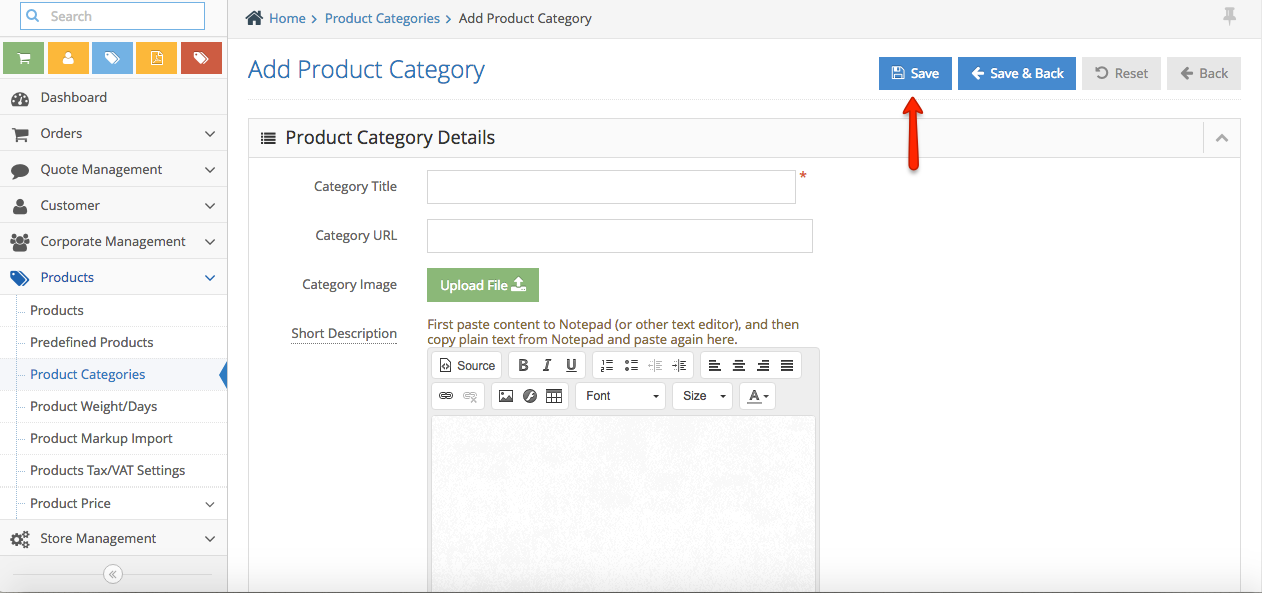
Step 3. Fill out the form and once you’re done, click Save button.
Step 1. From the dashboard, navigate to Products section and click Product Categories.
Step 2. Click Add Product Category button.
Step 3. Fill out the form and once you’re done, click Save button.
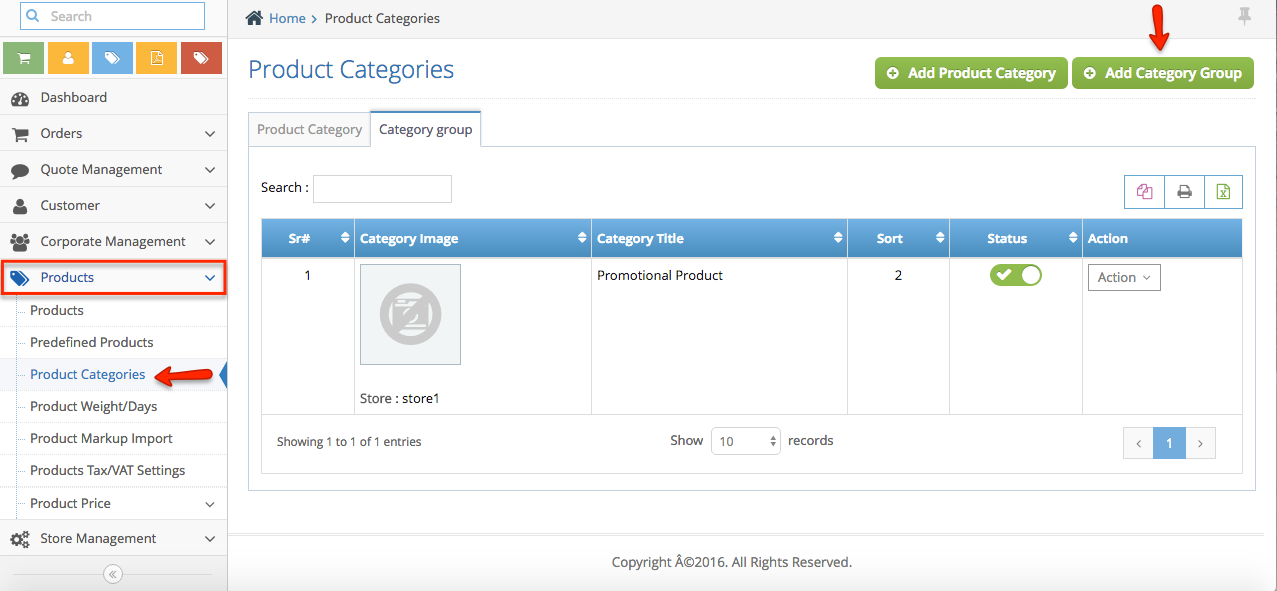
Step 1. From the dashboard, navigate to Products section and click Product Categories.
Step 2. Click Add Product Group button.
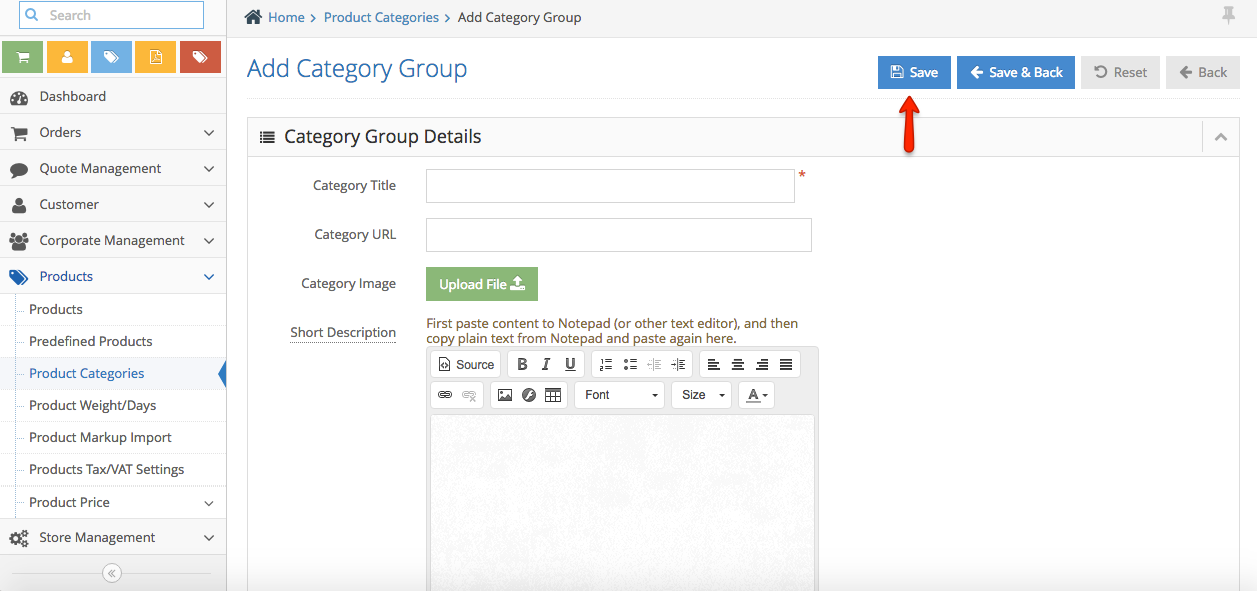
Step 3. Fill out the form and once you’re done, click Save button.
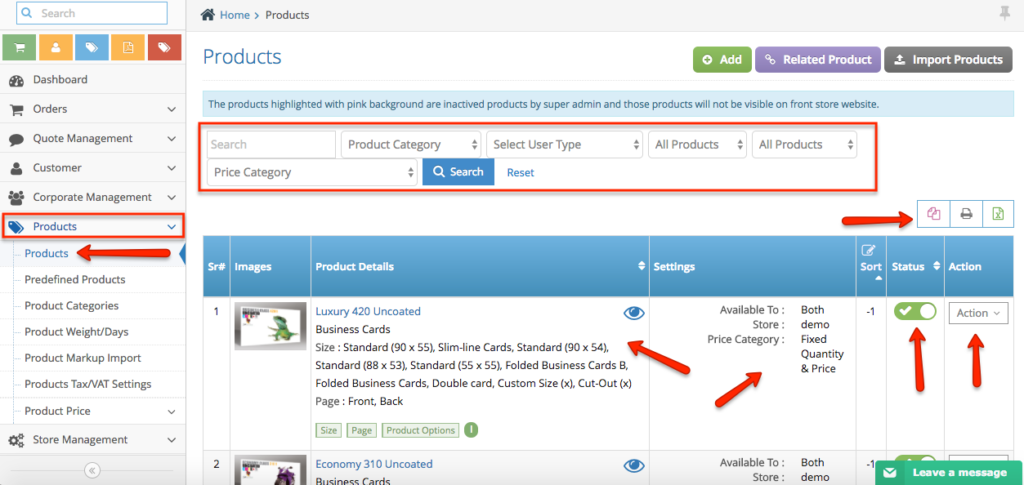
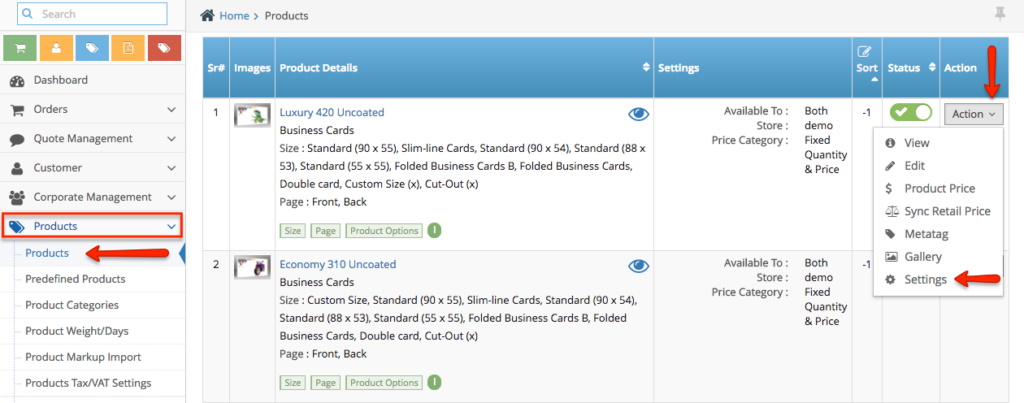
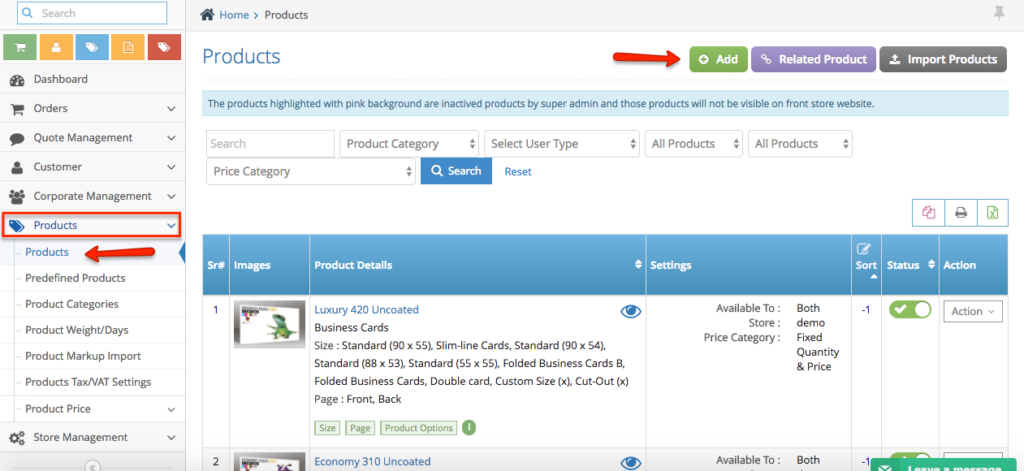
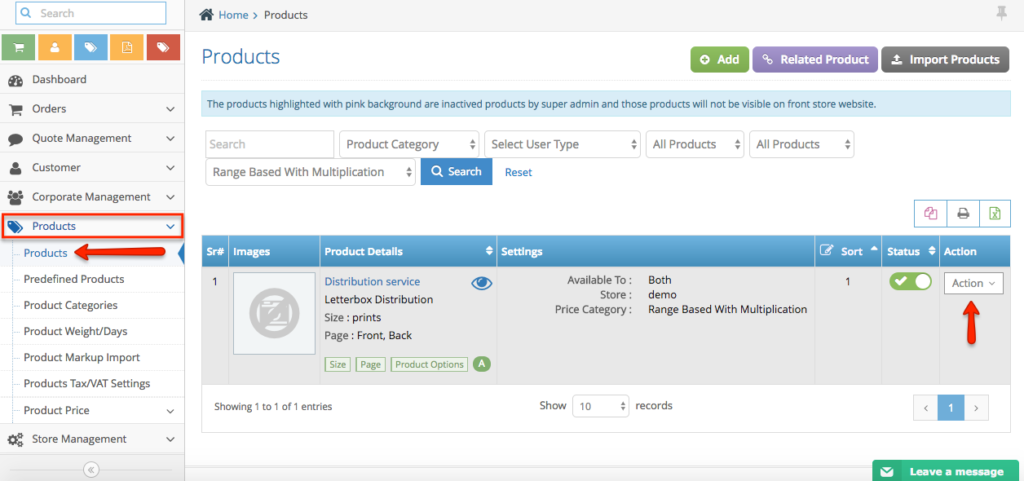
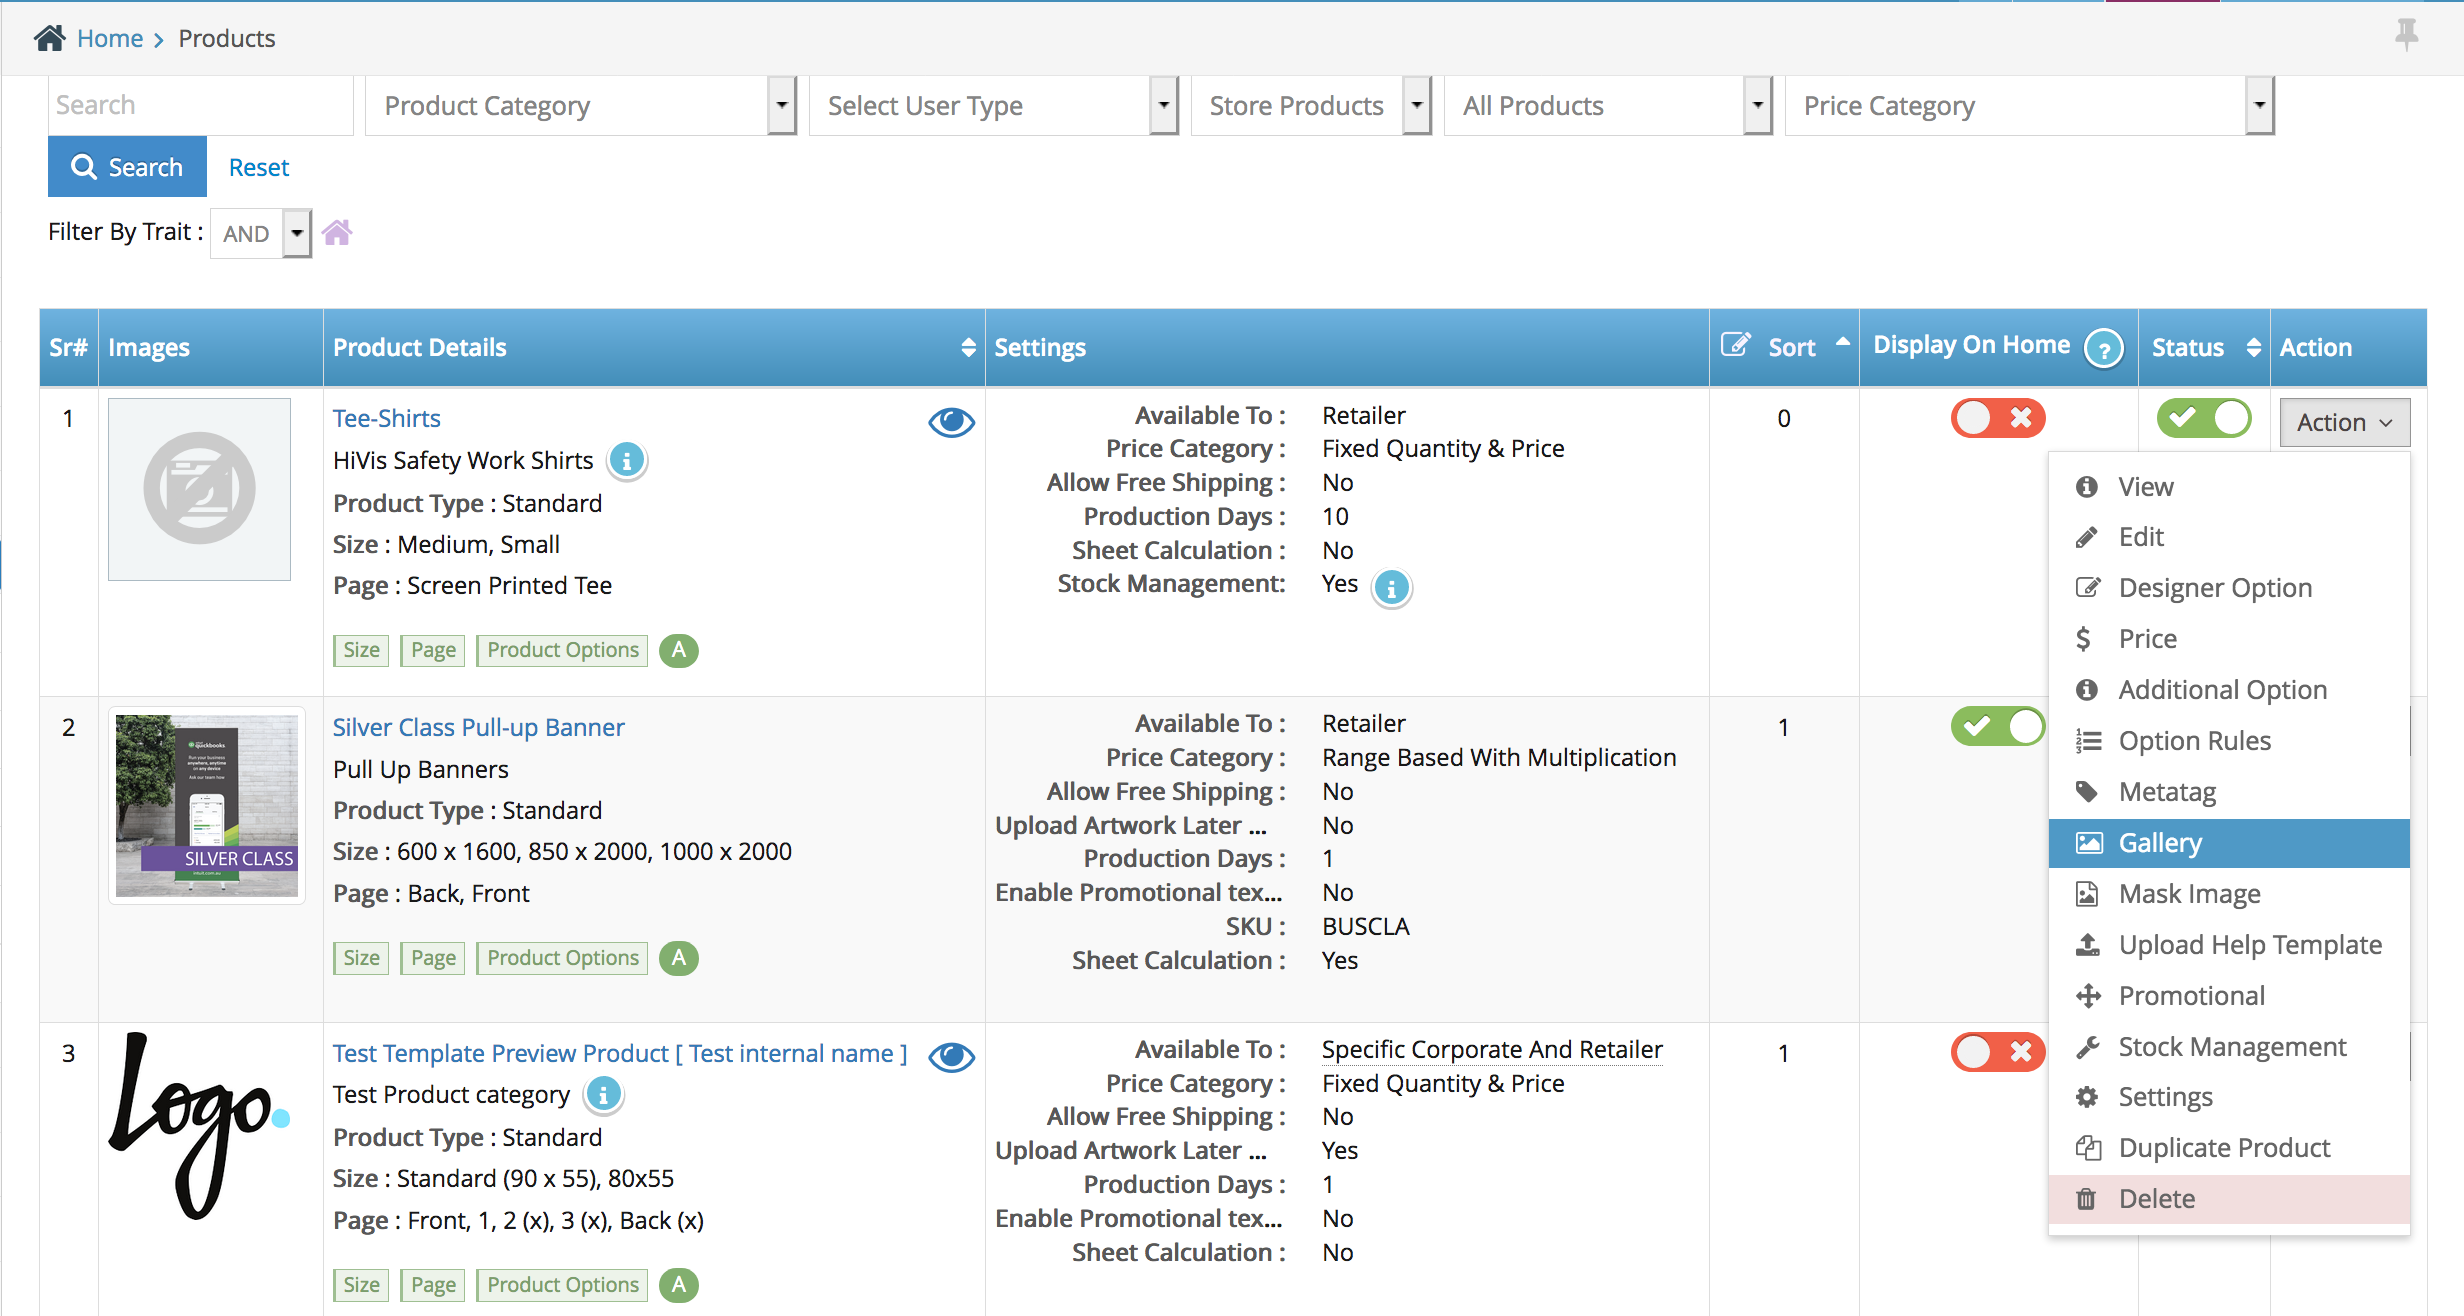
Step 1. From the home page, navigate to Products section >> Products
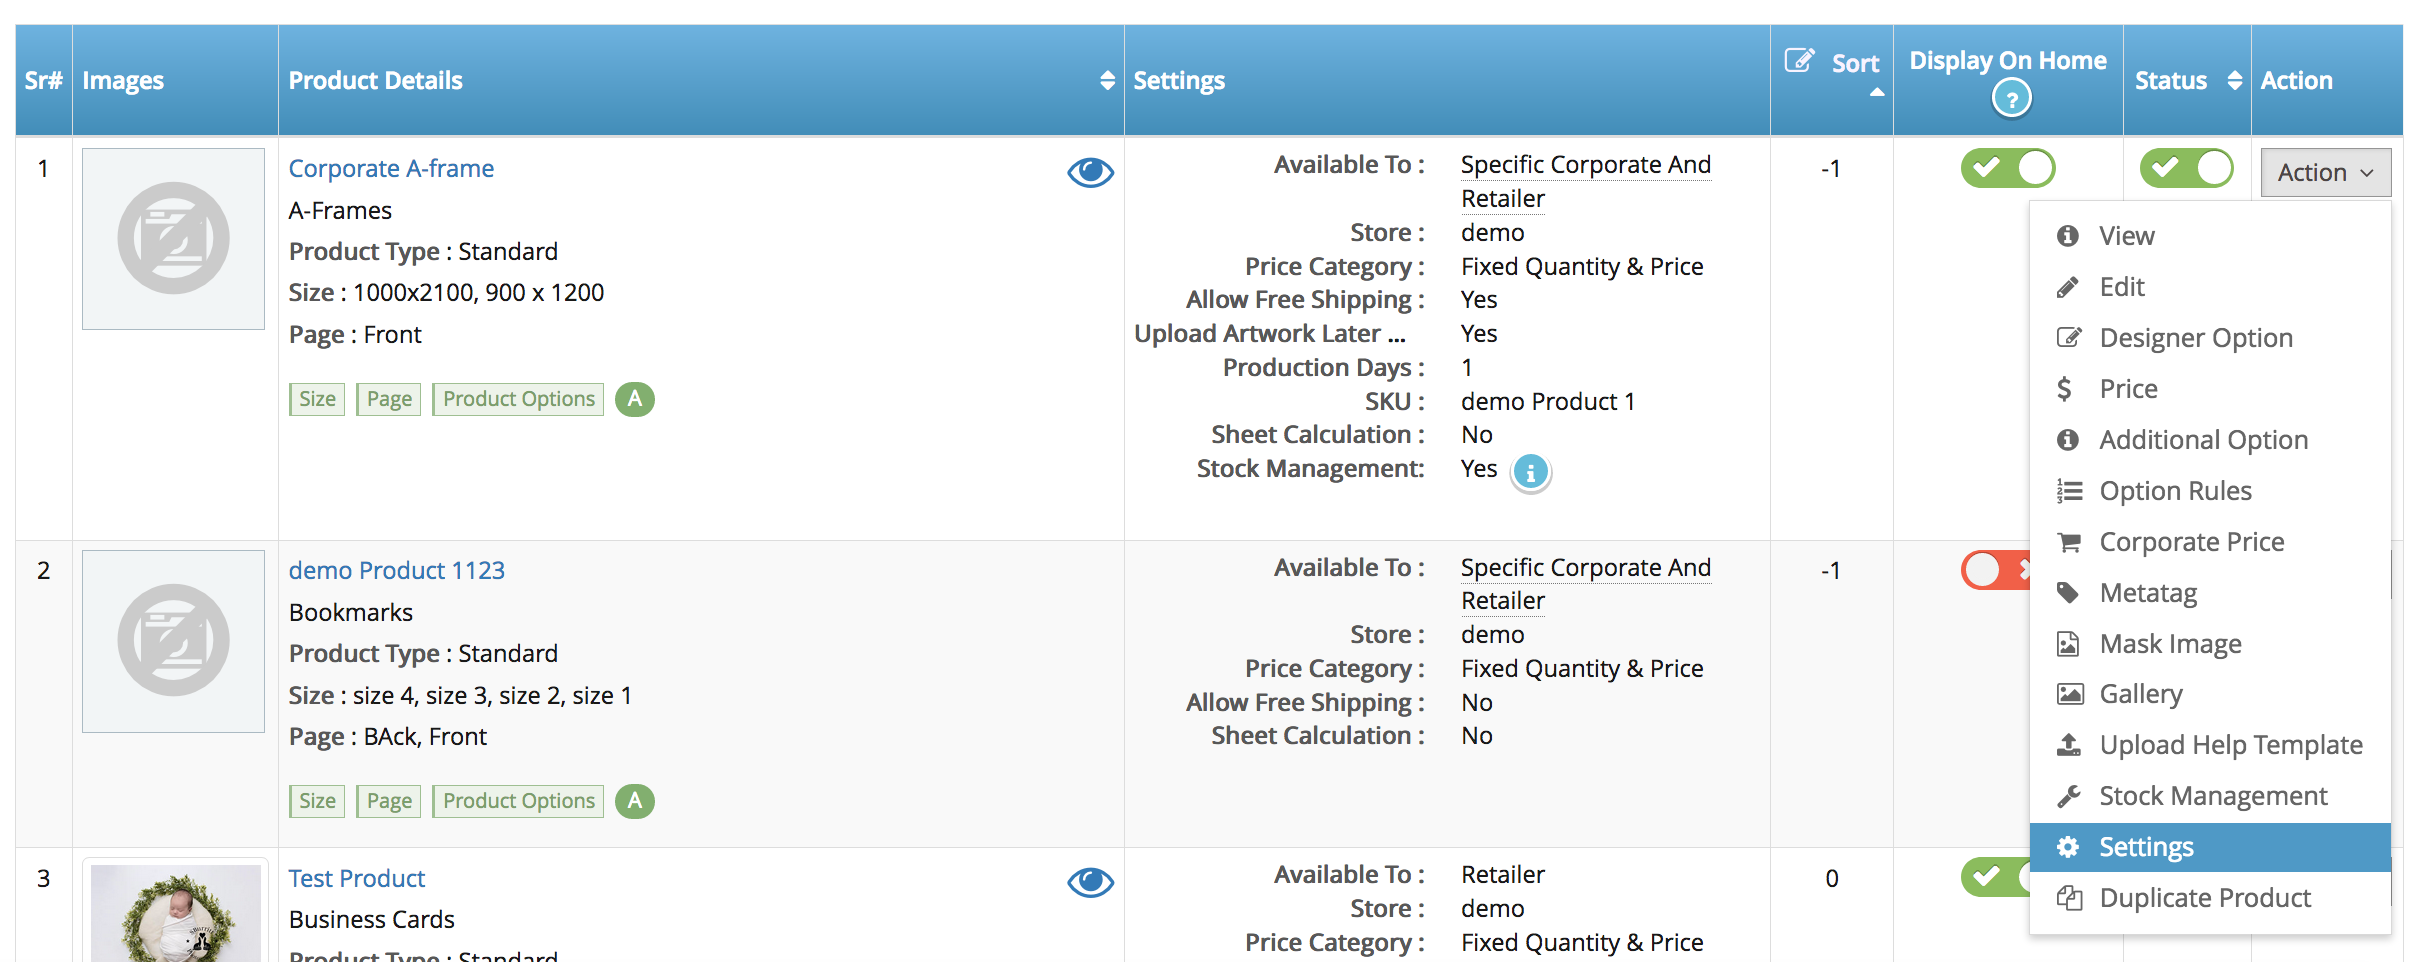
Step 2. This page shows the list of products available for your store. It shows product information such as product title, product category, the size, pages available, type of design, the availability of the product whether if it’s for a retailer or a specific corporate, an option to sort the product, and to set the status to active or inactive.
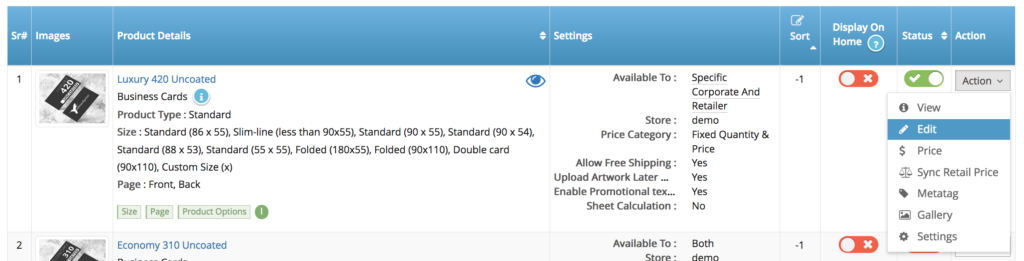
Step 2. To edit the product information, simply click the Action button next to the product you wish to update and you will be given several options.
Step 3. On the same page, type the keyword on the search box to do a quick search of a product. You can also make use of the available filter options to look for a product.
Step 4. Other options to manage the products page are also available on the same page which includes Add Product, Related Product, Import Products, Print, etc.
Step 1. Login to your admin dashboard, navigate to products > products
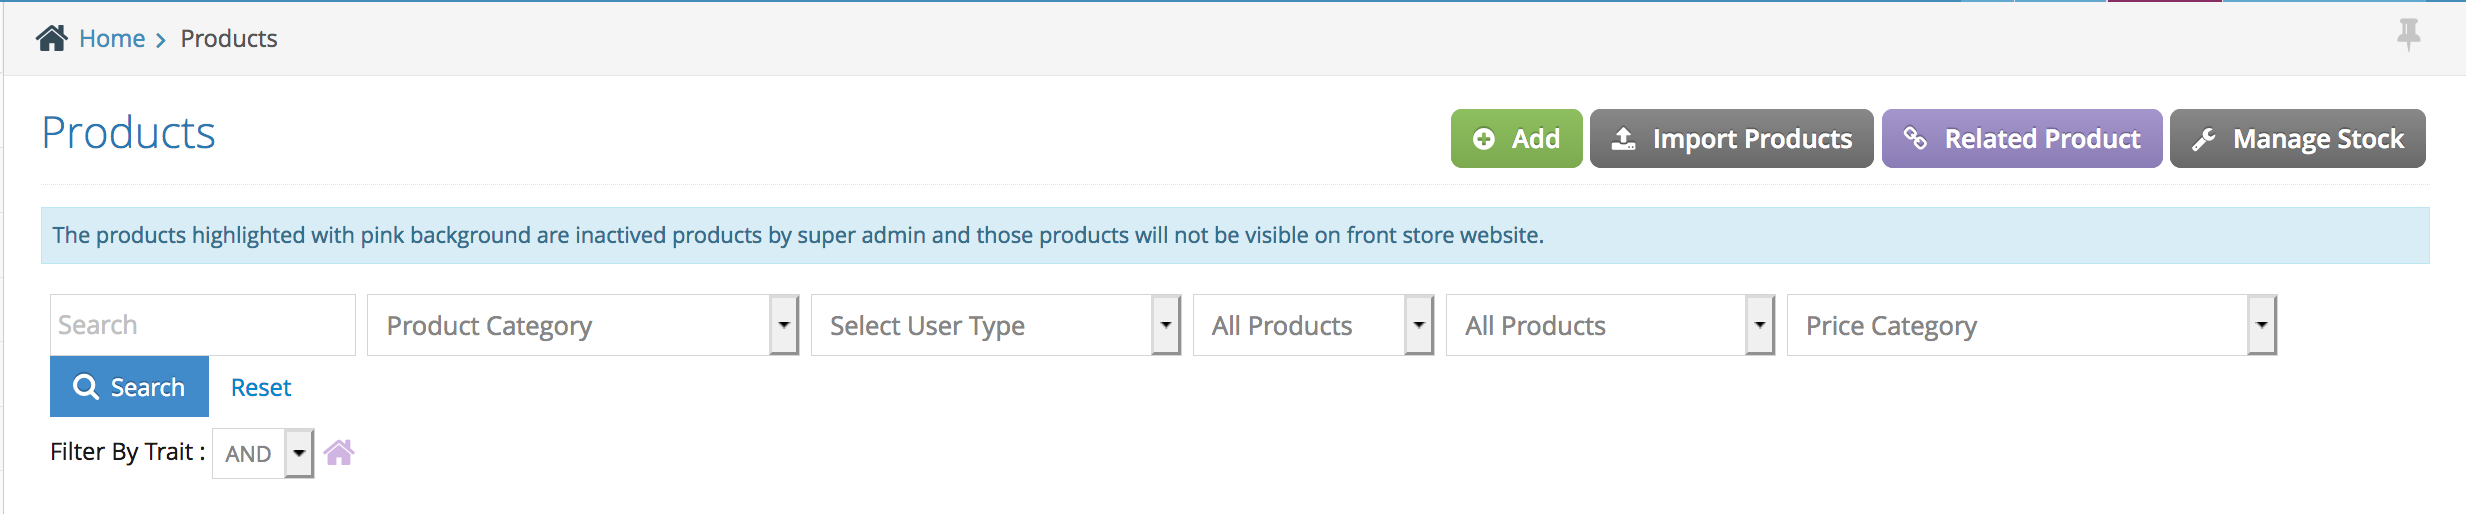
Step 2. Search for the product using the product search filter located at the top of the page
Step 3. Click the Status to make it active (Green= active, Red=inactive).

Once the product is active, you need to navigate to store management > store management and put a mark up – please refer to this training article about mark up
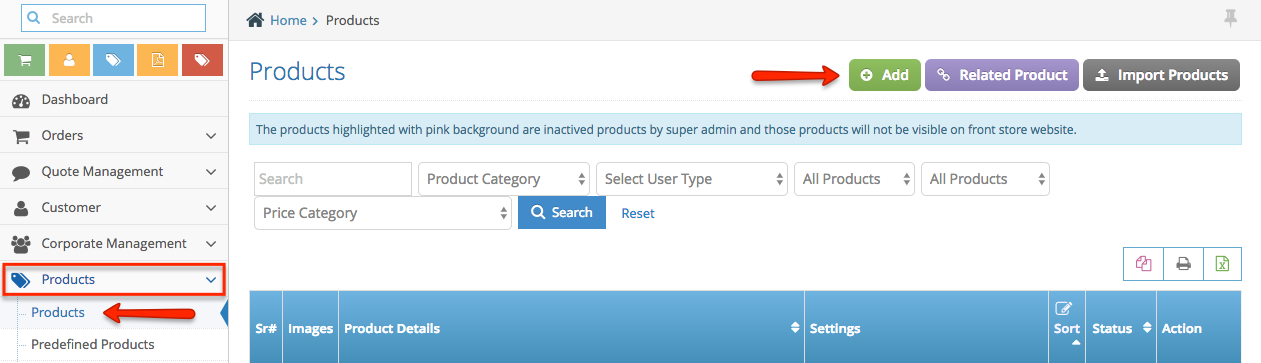
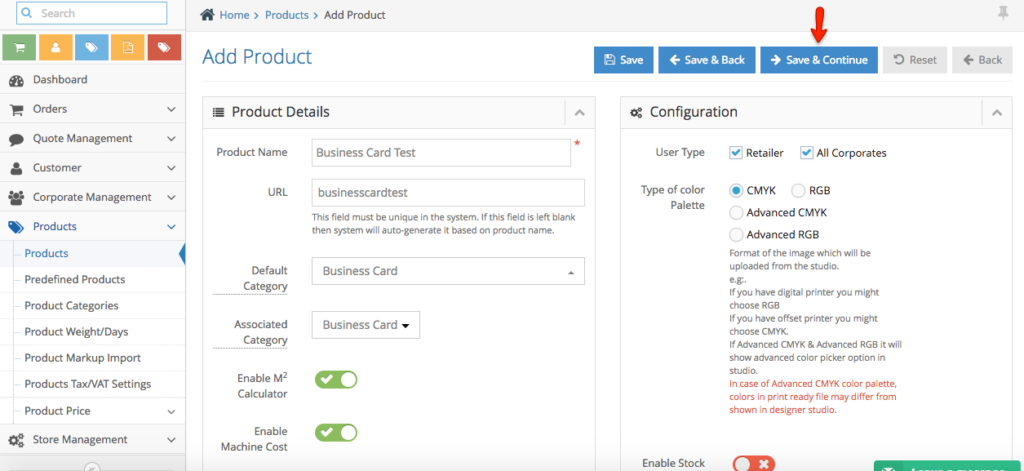
Step 1. From the home page, navigate to Products section, then select Products.
Step 2. To add a new product, click Add button.
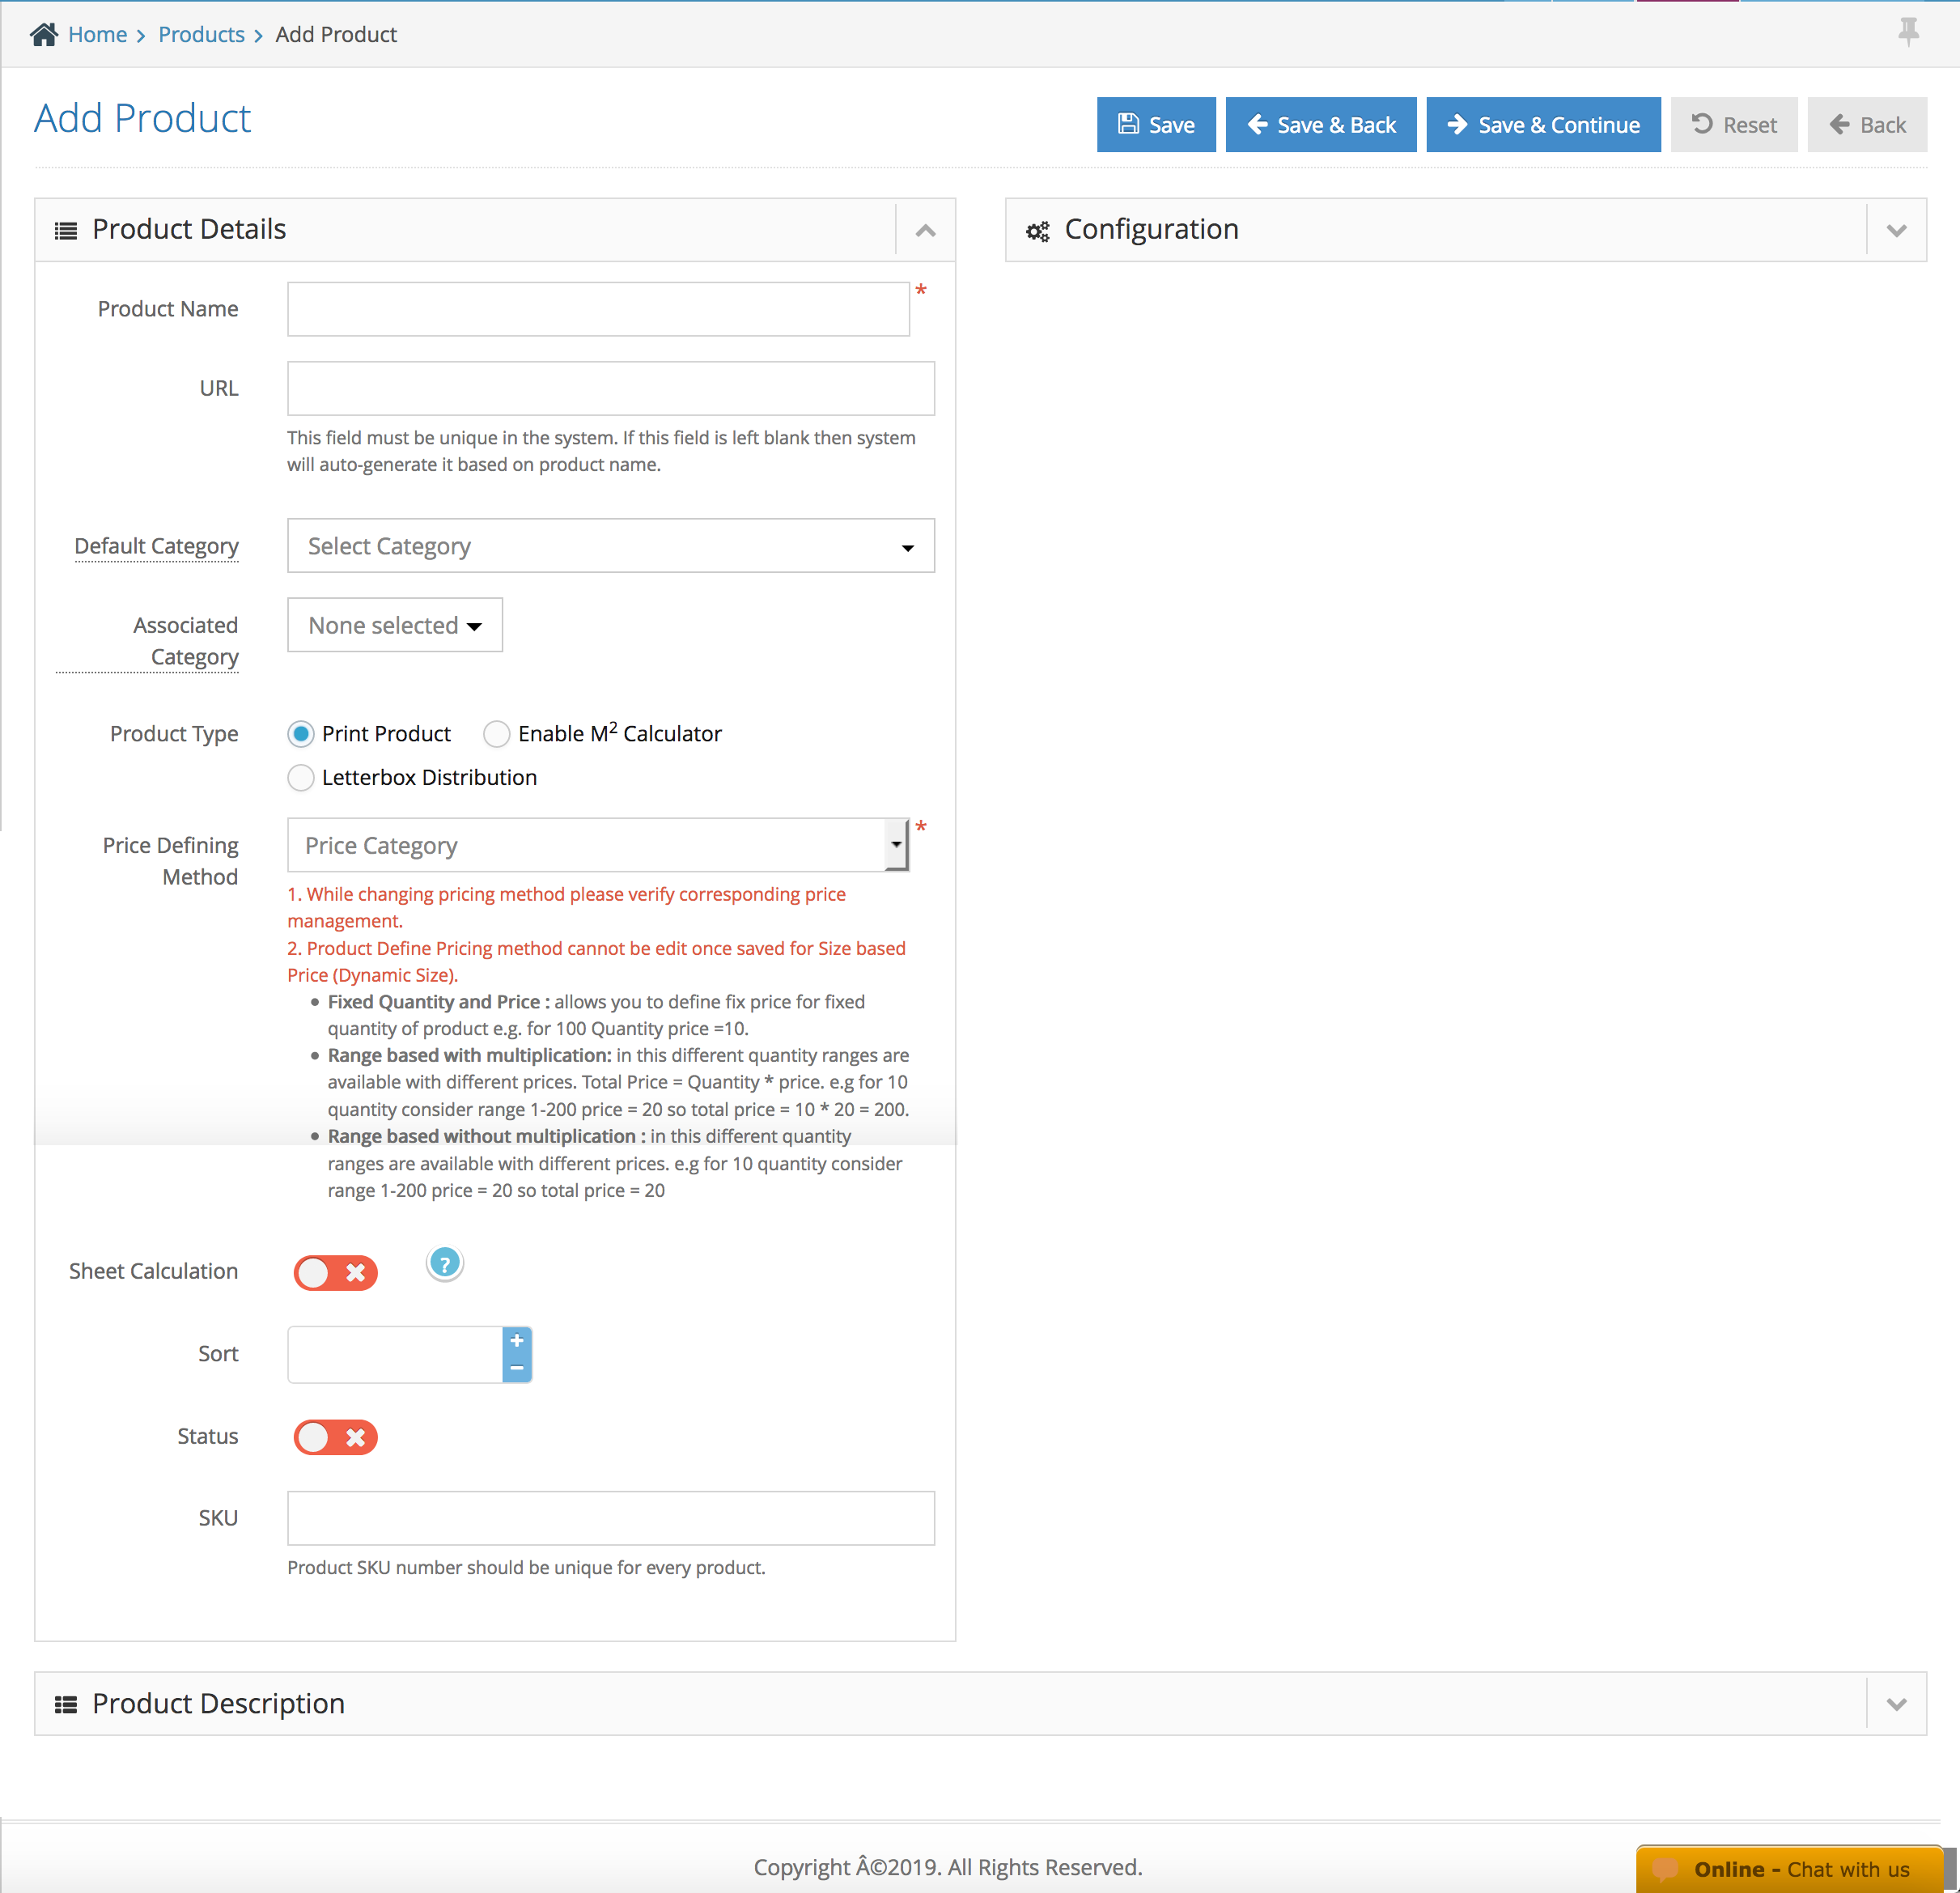
Step 3. Start by entering the Product Details :
Product Name (e.g. 310gsm uncoated, standard gloss, etc..)
Product URL (make sure no space, and better use ‘-‘ instead of using ‘_’)
Default Category (assign the product to a product category – if the category doesn’t exist you need to create one under the product category)
Associated Category (this section allows you to assign a product to be available on multiple categories)
Product Type (additional features of product set up where you can set a product as normal print products, large format square meter product or letterbox distribution products – each product type will have different way of calculation)
Price Defining Method (different way of pricing calculation – fix price, or range based calculation)
Sheet Calculation (feature to allow the system to calculate the product based on sheets)
Sort Order (manage the order of the products under the category assigned)
Status (control the status of the products when you would like the product to be inactive temporarily for editing purposes)
SKU (field for your Stock Keeping Unit)
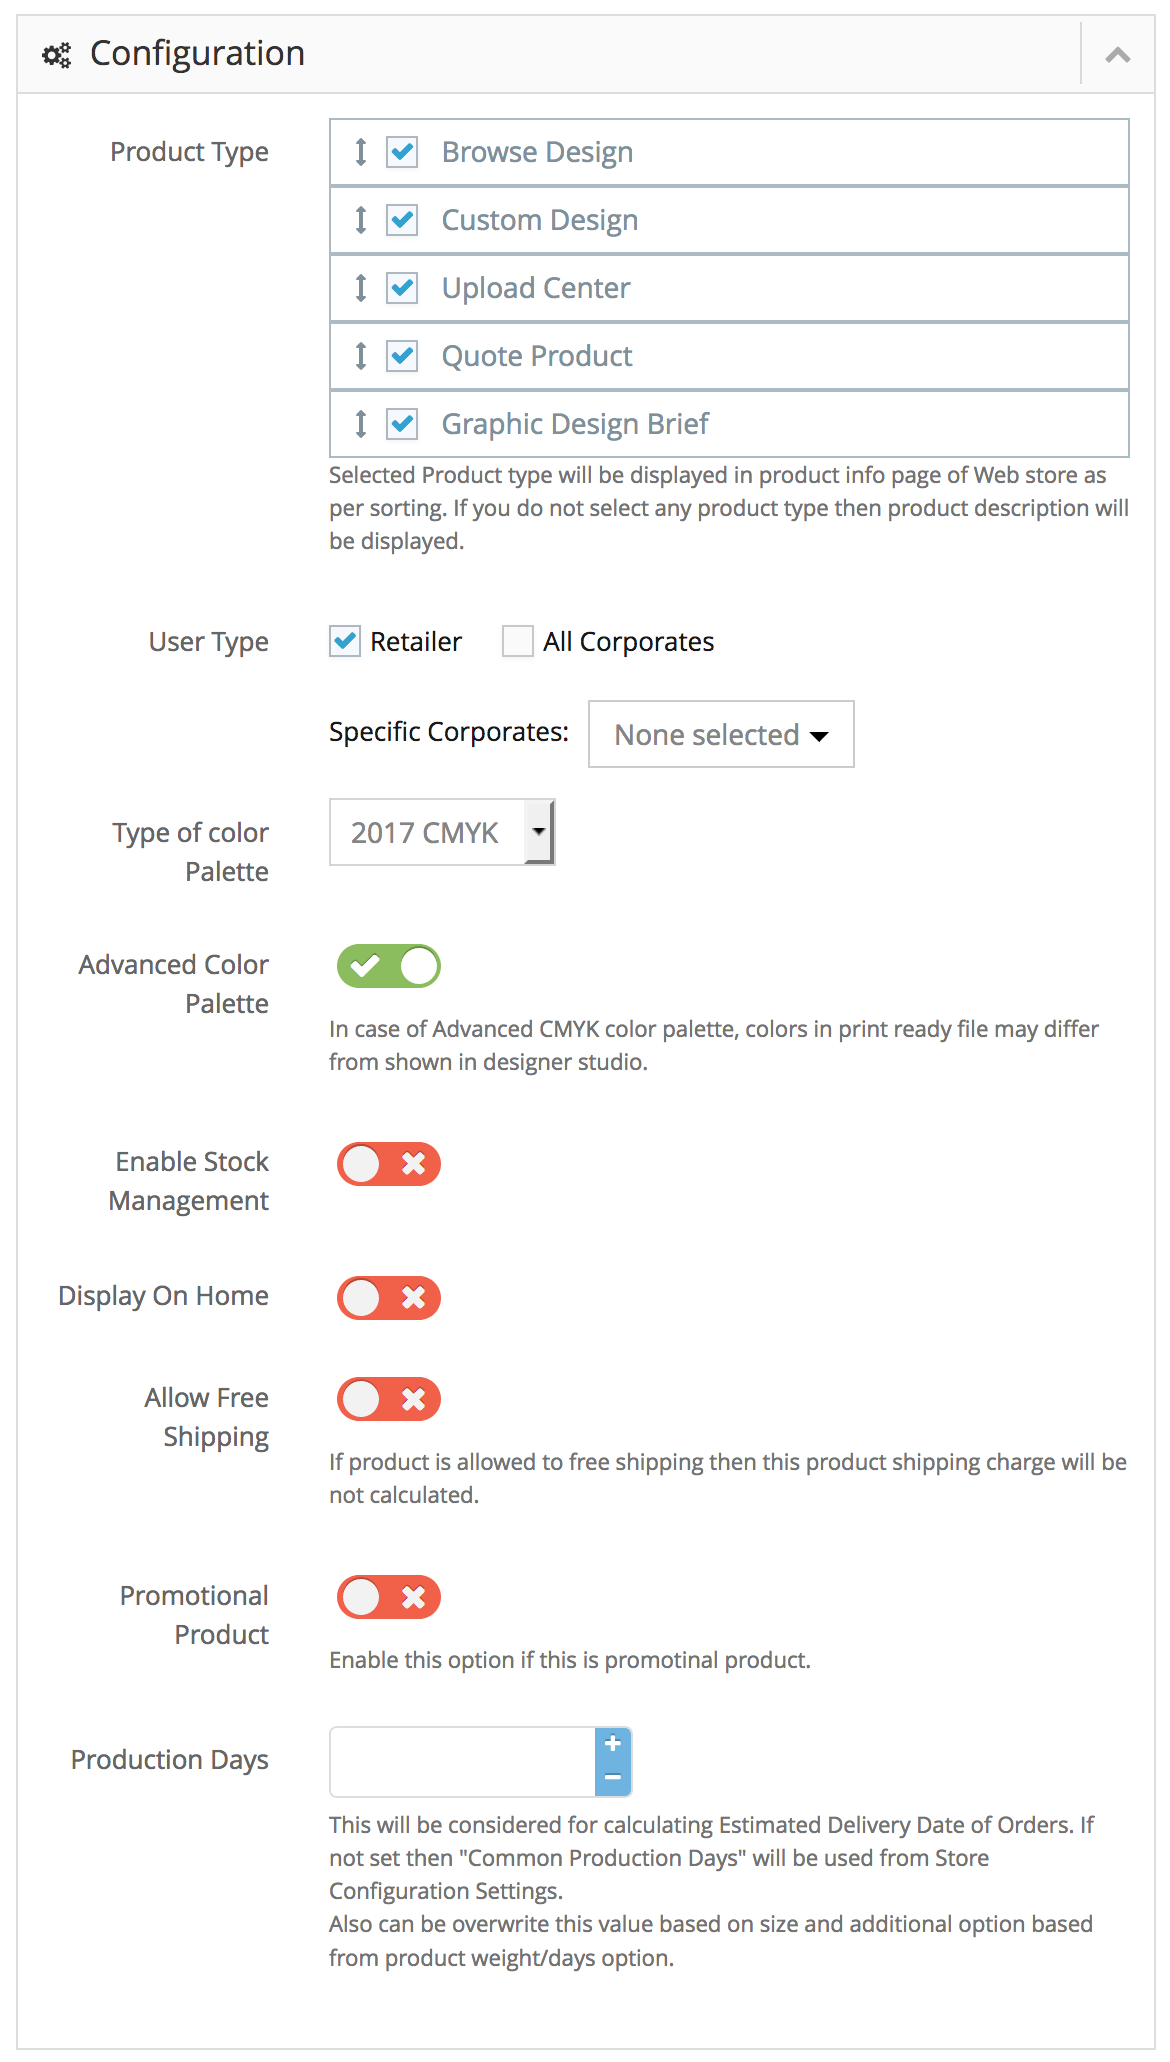
Step 4. Next is to enter the Product ‘Configuration’ :
Product Type (choose the type of the actions that will be available for customers to choose in a product page of your website)
User Type (assign the product to be available for your specific corporate, only retailer, or both users)
Type of Colour Palette (select a colour range that will be available on the online editor of the product)
Advanced Color Palette (a feature to allow you customers to be able to select more colour range in the online editor)
Enable Stock Management (settings to activate a stock management feature for you to manage the stock of the products)
Display on Home (If your settings for ‘Display type of middle area on Homepage – Front’ set for the ‘product’ – you can manage whether the product visible in the homepage or not)
Allow Free Shipping (product settings for you to set the product to have a free shipping by passing the default website shipping configuration)
Promotional Products (feature to set the product to have promotional product online editor)
Production Days (settings to set the production days of the products – this will be related to the product EDD on your website)
Step 5. Entering Product Descriptions for your customers to understand more about the products. Start by uploading the small image : image appearing as a product thumbnail
large image : image displaying on the product info page
short description : details info under the product thumbnail
long description : details of the products on the product info page
upload description : details of the products requirements for customers who wants to upload their own artwork
browse design description : details information for design gallery of the products (under the browse templates page)
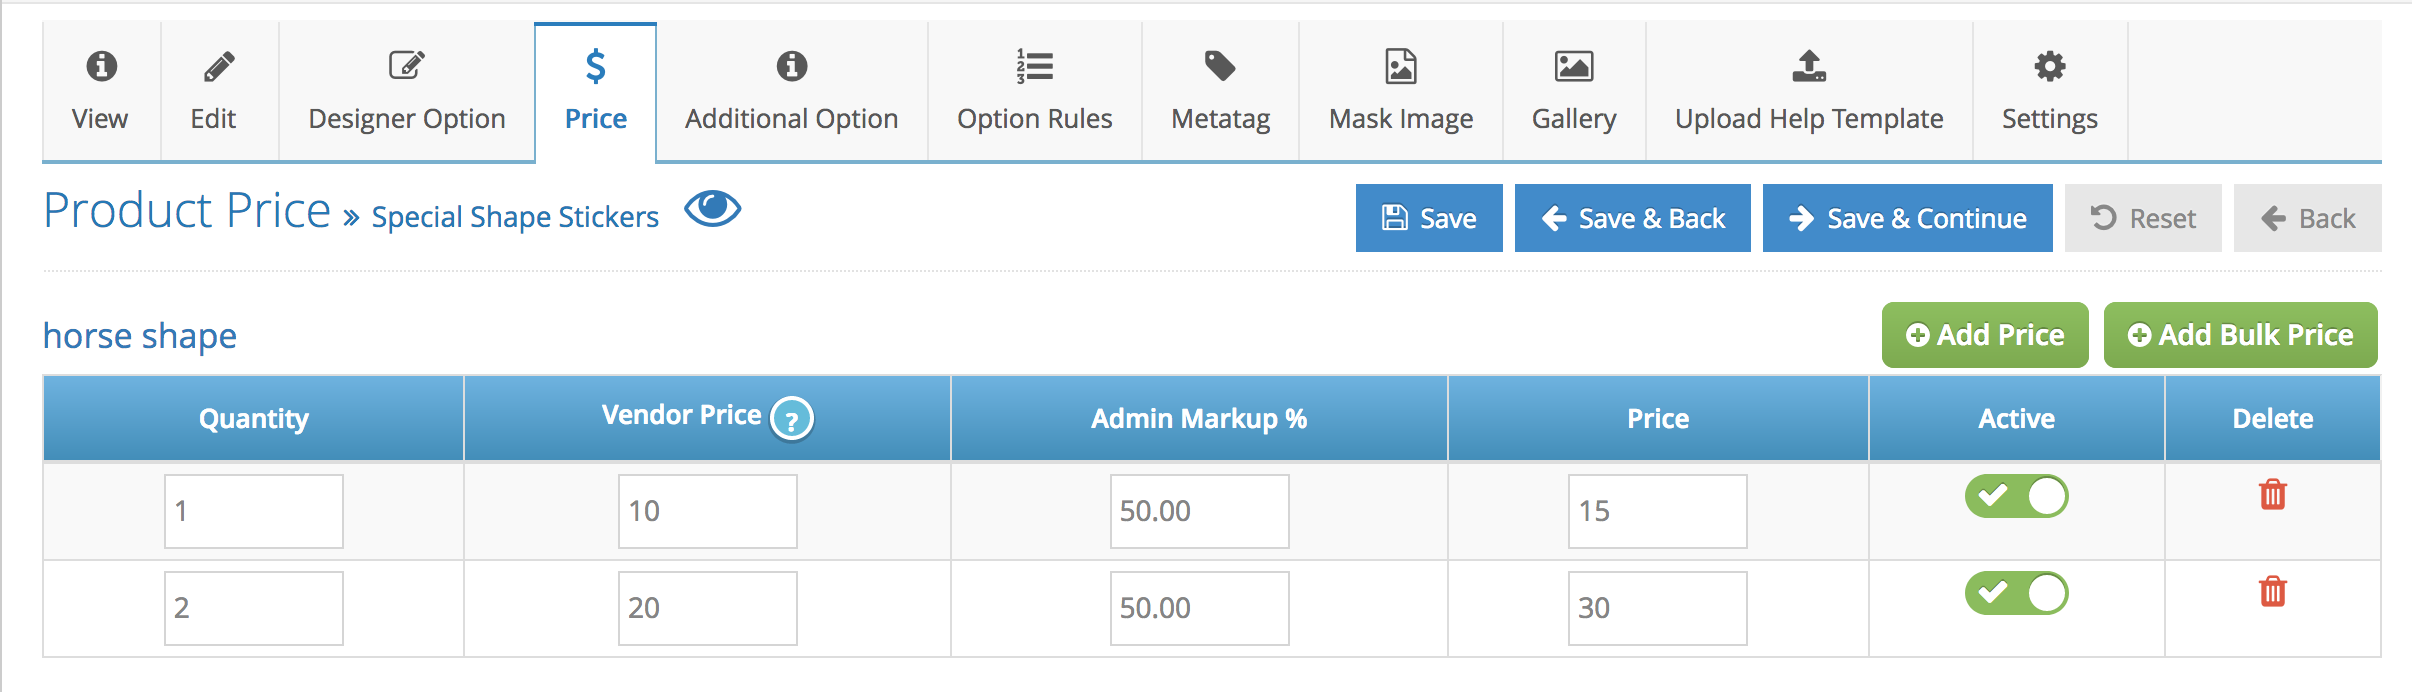
Price Defining Method – Fixed Quantity & Price allows you to set a product to have a fixed / pre-configured qty with fixed prices. Example below for the admin price settings as per below
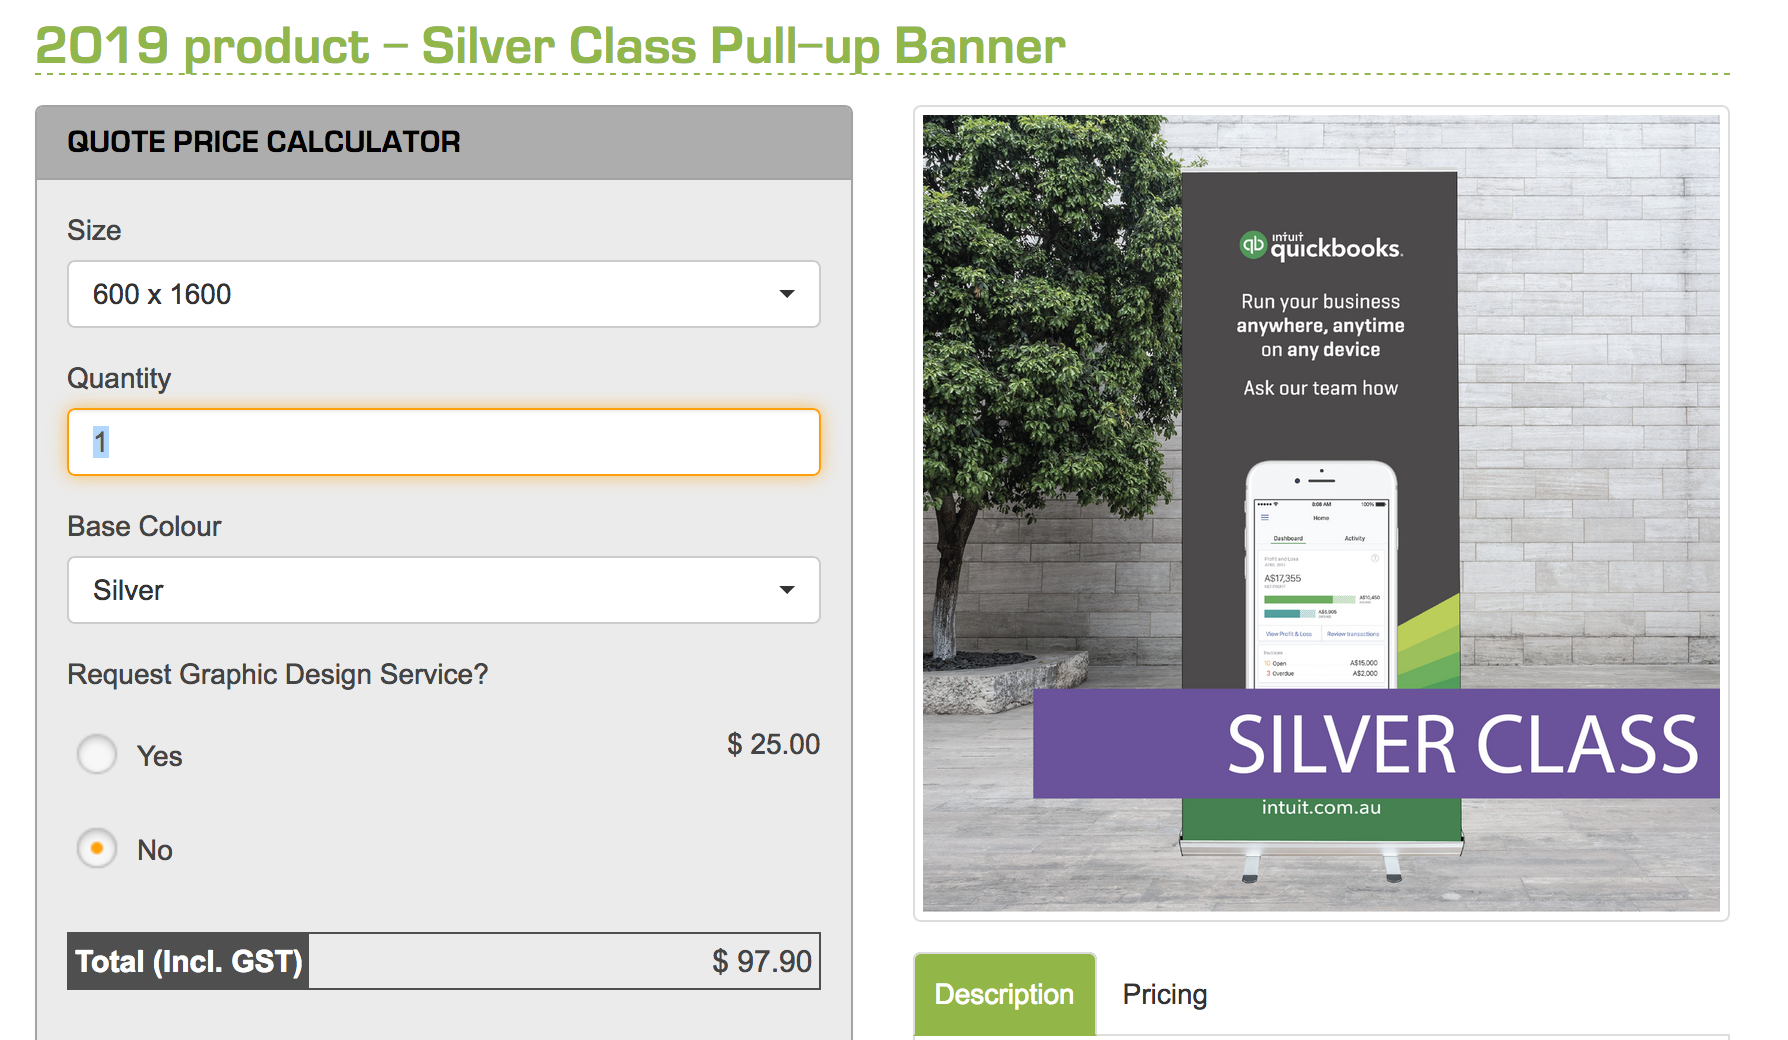
The Front end display for the calculator as per below

The calculator will display the qty as a dropdown and not allowing the customers to be able to put any odd qty they want.
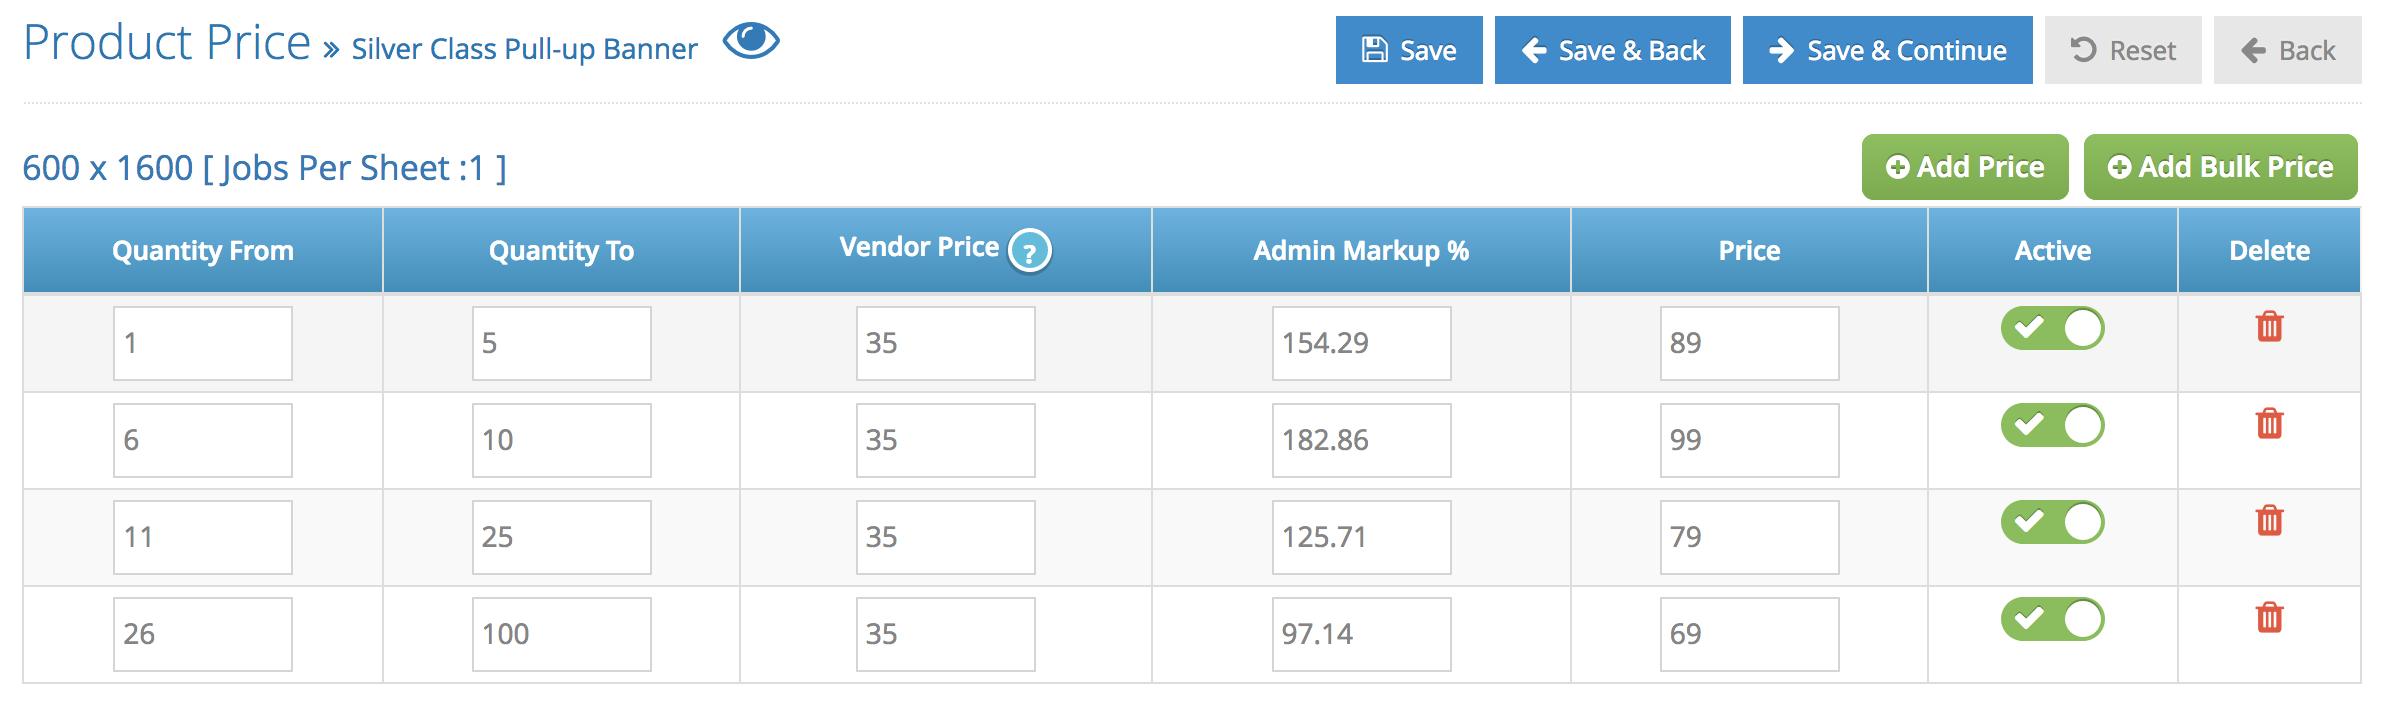
Price Defining Method – Range Based with Multiplication allows your customers to order an odd quantity they want in the product price calculator and the price will be calculated by multiplying the qty the customers wants to order by the unit price set by the admin.
In the admin product price settings you will see the qty from and qty to for you to create the range based qty – this allows you to create a scale discount.
In the front end side your customers will be able to see a box where they can put any qty they would like to order – this gives the customers a more flexible ordering process.
Price Defining Method – Range Based without Multiplication allows your customers to order an odd quantity they want in the product price calculator but in this case the price will not be calculated by multiplying the qty the customers instead it will be a fixed price based on the price you have set up on the qty range you have set in the product price set up.
In the admin product price page you will see a similar set up with the range based with multiplication
Same with the front end product calculator as well, it will shows the textbox on the product qty where the customers can put any qty they would like to order. The difference will be how the product price calculated.
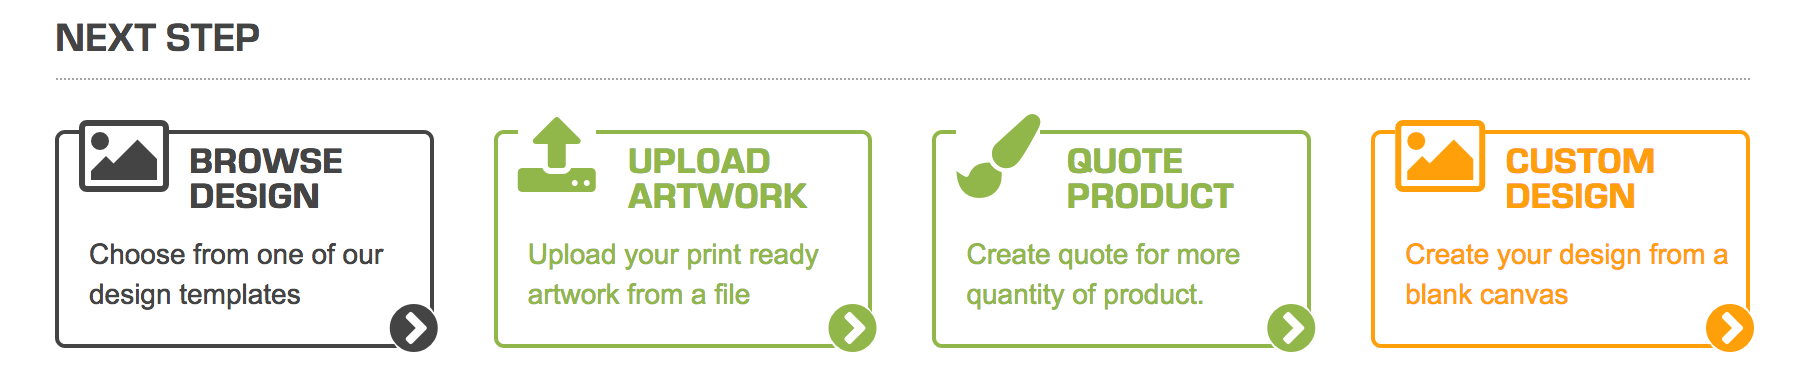
Product Service Type allows you to control the options of the online services you would like to offer your customers. There are options such as below :
Browse Design : offer your customers access to the customisable design gallery.
Custom Design : option to allow your customers to design their own from scratch using the online editor
Upload Center : option for customers to upload their own artwork online
Quote Product : option for customers to submit an online quote request.
Graphic Design Brief : option for customers to request a graphic design enquiry (will display in the price calculator)
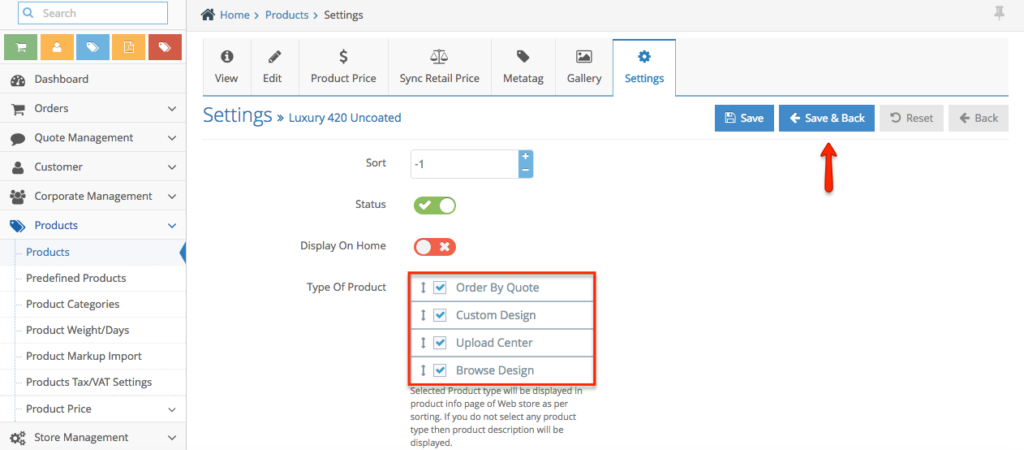
Step 3. On “Type of Product”, it offers several options which you can check/uncheck depending on what you wish to be displayed in product info page. You can also set the order level using the sort order option.
Step 4. Click Save & Back button once done.
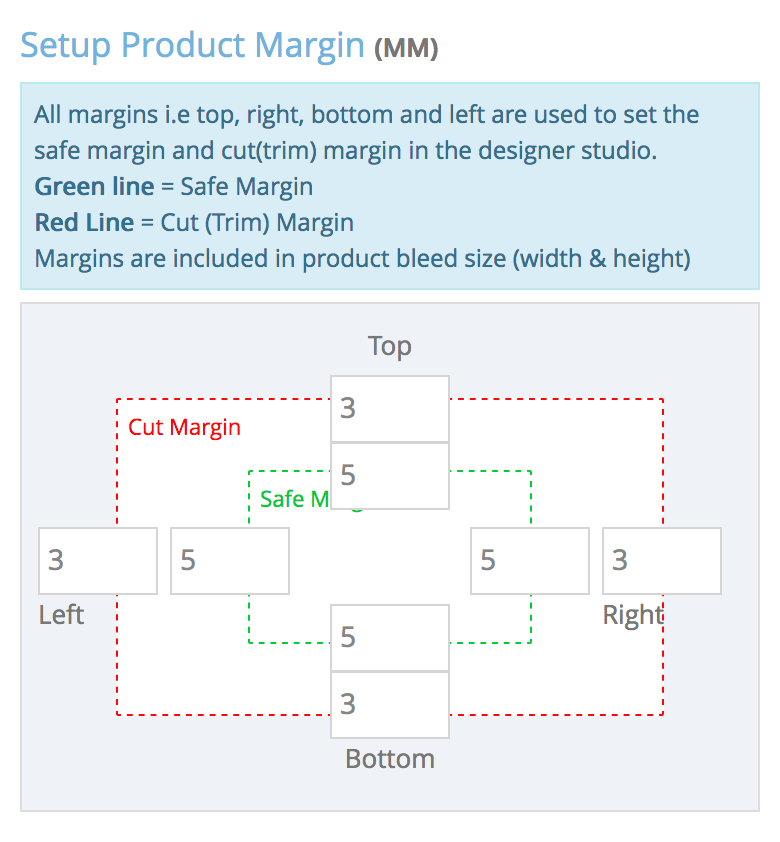
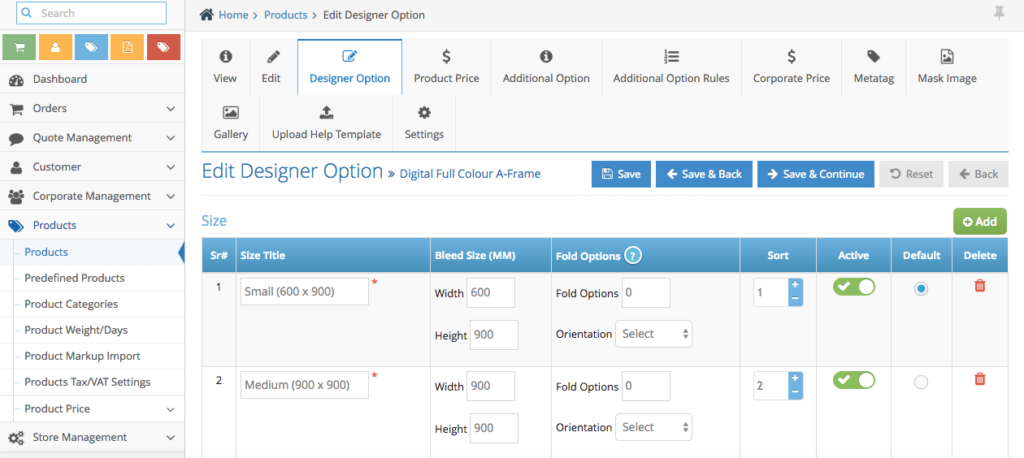
The next step of product creation is setting up the product size and margin.
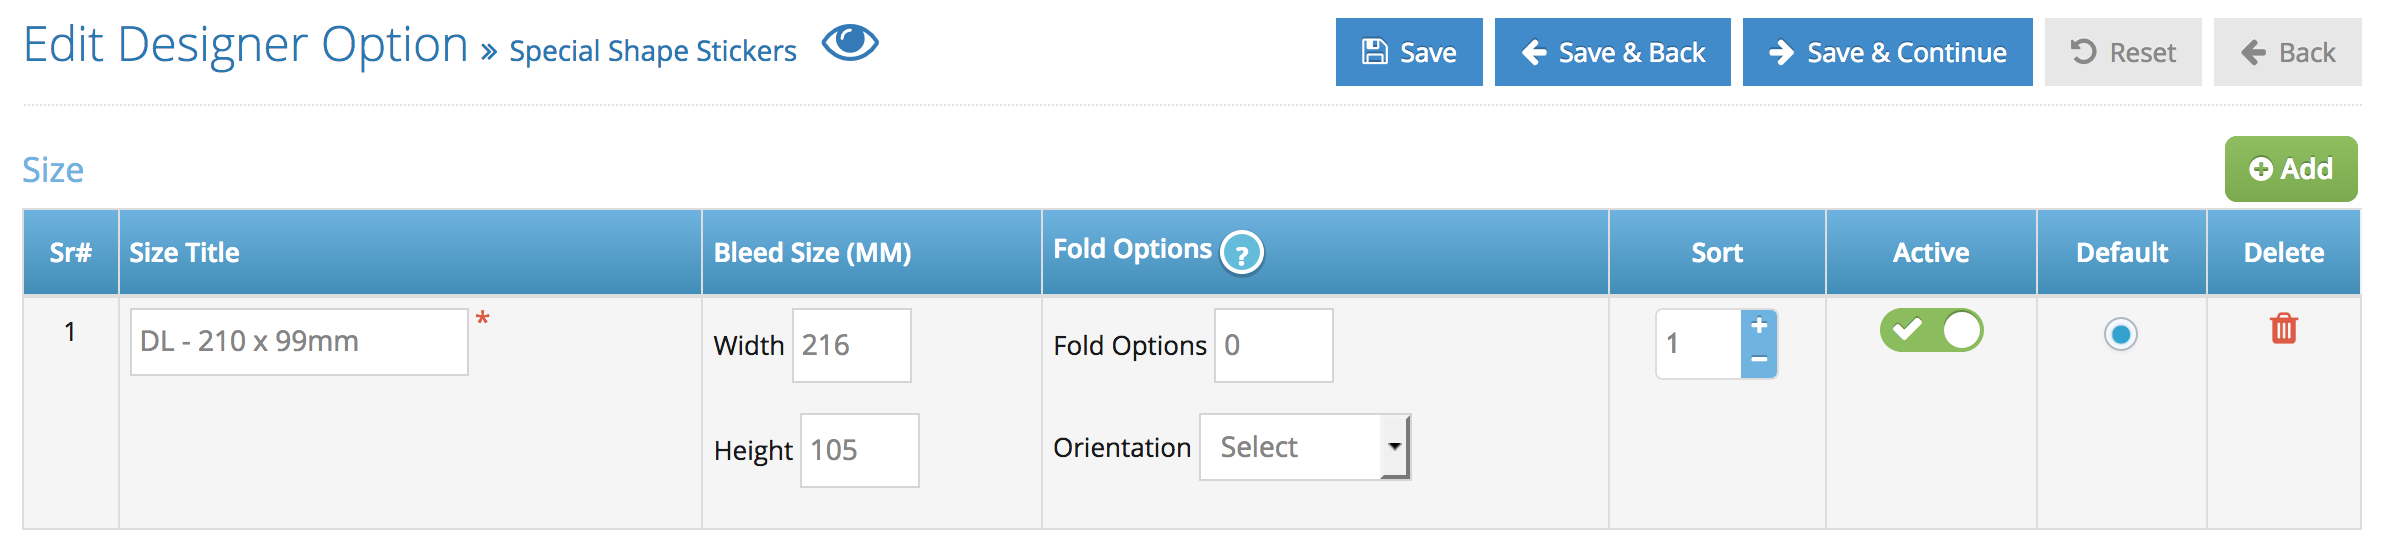
Step 1. with the product sizes you can name the size title anything you want – this size title will be displaying in the price calculator.
Step 2. Set the product bleed size by inputting the size including the bleed. e.g. 210 x 99mm to 216 x 105mm if the bleed is 3mm all around.
Step 3. Fold Options – this is a settings where you have a products that have a folding option, the settings in here allows you to set how many folding on this particular product size (click the ‘?’ to see an example). Also you can control the orientation of the folding whether its portrait or landscape.
Step 4. Other settings are also available such as size status, sort order of the size if you have multiple sizes available, default sizes that will be appearing in the calculator (if you have more than 1 sizes) and delete option.
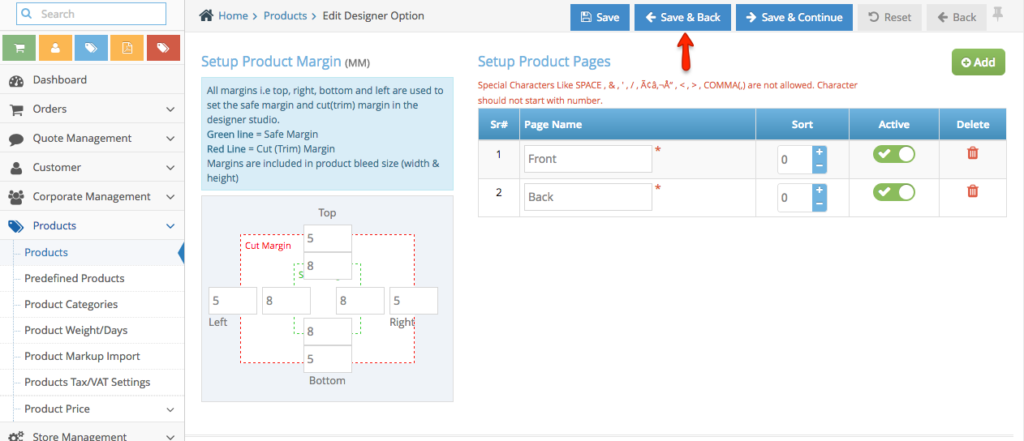
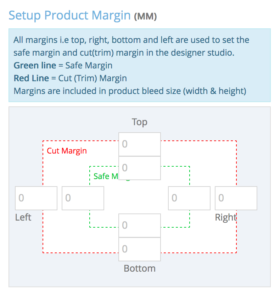
The Next thing is to set up the margin for the product – this margin guidelines will be appearing on the online editor. Below is an example if the product have 3mm bleed and 2mm internal bleed – 5 is from 3mm + 2mm bleed.
Step 1. From the home page, navigate to Products section, then select Products.
Step 2. To add a new product, click Add button.
Step 3. Fill out the product details, description and configuration. Click Save & Continue button.
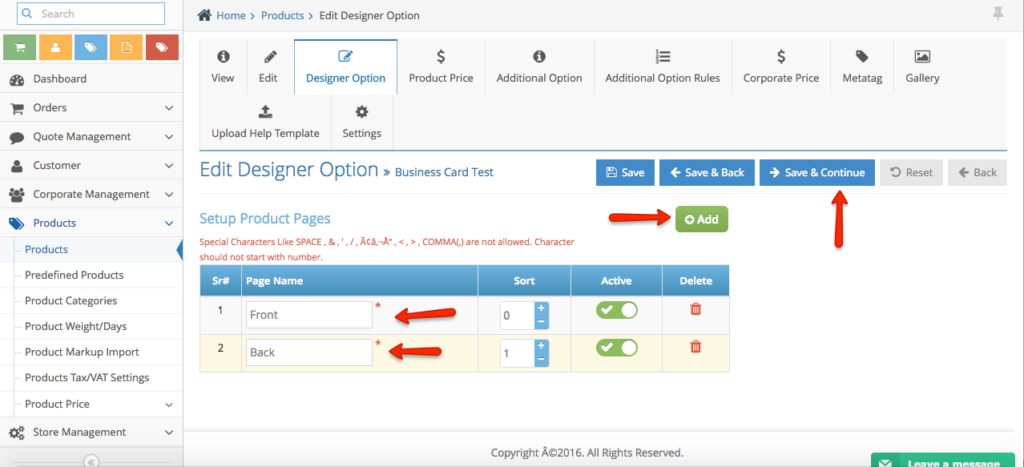
Step 4. Setup product pages. To add another one, click Add button. Set the Sort Order and click Save & Continue button to complete the rest of the setup.
Step 1. From the home page, navigate to Products section, then select Products.
Step 2. Look for the product, click Action button and select Edit Designer Option.

Step 3. On this page, you can set the size for the configuration of the online editor. You can adjust the size to 100% or lower depending on the size of your product. Setup product margin and pages.
Step 4. Click the Save & Back or Continue button once done.
Third Step of Product Creation is the Product Qty and Prices.
Step 1. on this page you will be able to see all sizes you have created on the previous tab
Step 2. Depends on the price method you have selected on the first step, you will see different interface.
Fix Qty or Range based (qty from and qty to) – below is an example of product with fixed qty and prices
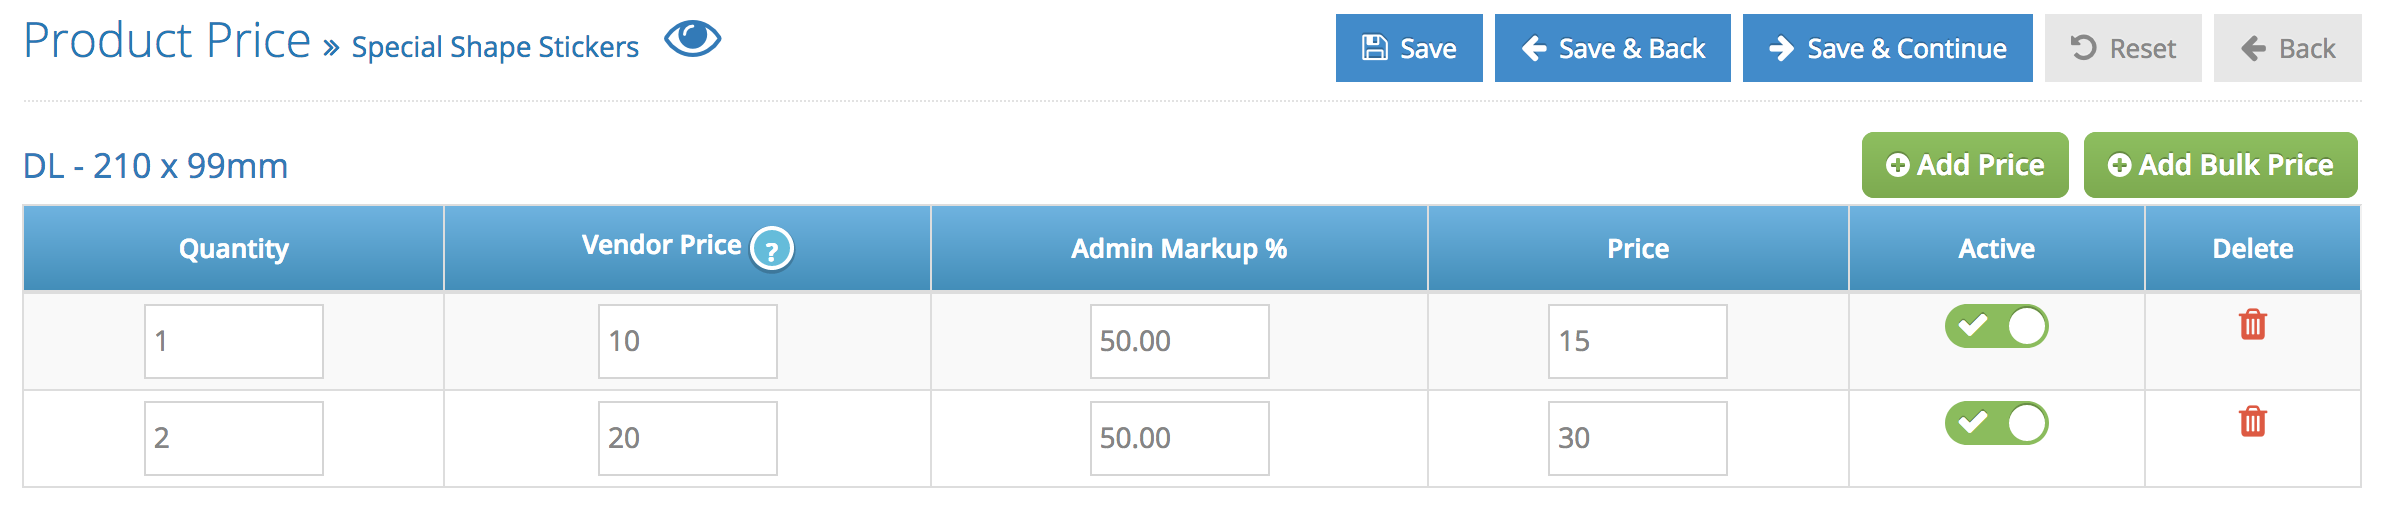
To start working on your product qty and price you can start by putting your minimum qty on the qty box > put up the vendor price (your suppliers price – this will let the system to calculate the profit) – mark up the vendor price to let the system automatically calculate the retail price.
Step 3. adding more qty by clicking ‘add price’ button.
note : the price that you put in here is what we call the base price.
the last qty will be the maximum qty the customers can order.
when you are working on your existing price excel it’s best to make the cheapest one as the best price as the total price i calculated by adding the base price + total of additional options price
Admin can set a production days based by product’s quantity.
To do this please follow this step,
Step 1. From the home page, navigate to Products section, then select Products.
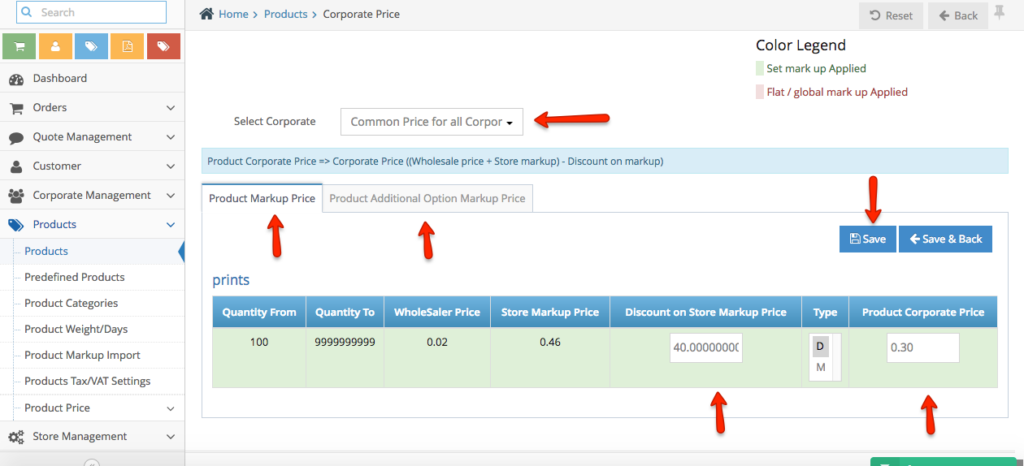
Step 2. Search for the product you wish to update. Click Action button and select Corporate Price.
Step 3. Select the corporate or apply the same price for all corporates.
Step 4. Add the markup and the price will be calculated automatically. Click Save button to apply changes.
Step 1. From the home page, navigate to Products section, then select Products.
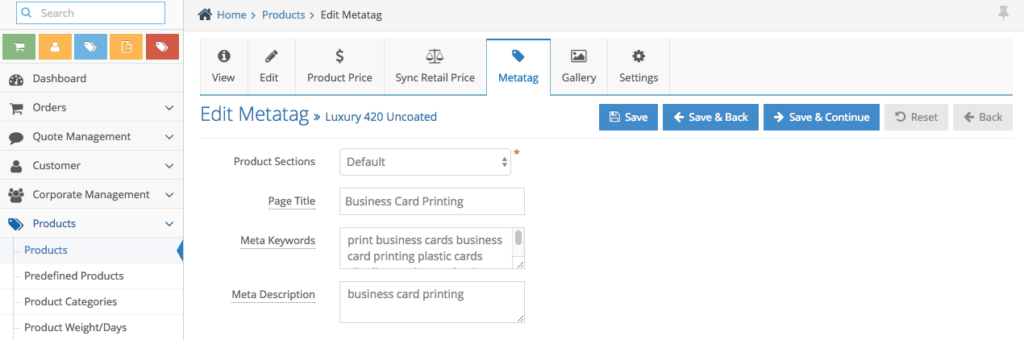
Step 2. Look for the product, click Action button and select Metatags.
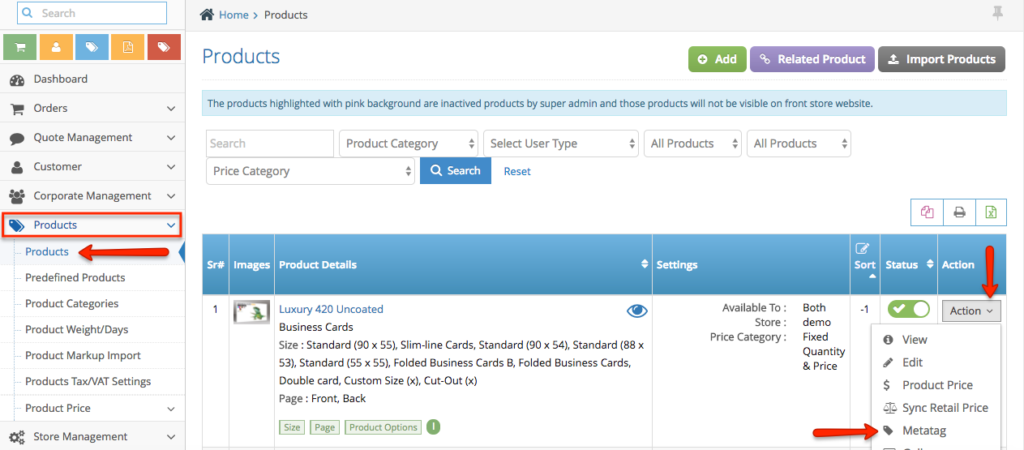
Step 3. Under Product Sections, you have options such as Default Metatags, Upload Design, Browse Design, and Custom Design. On the same page, you can also add your Page title, keywords to use for the search engine optimization, and the description.
Step 4. Click the Save & Back button once done.
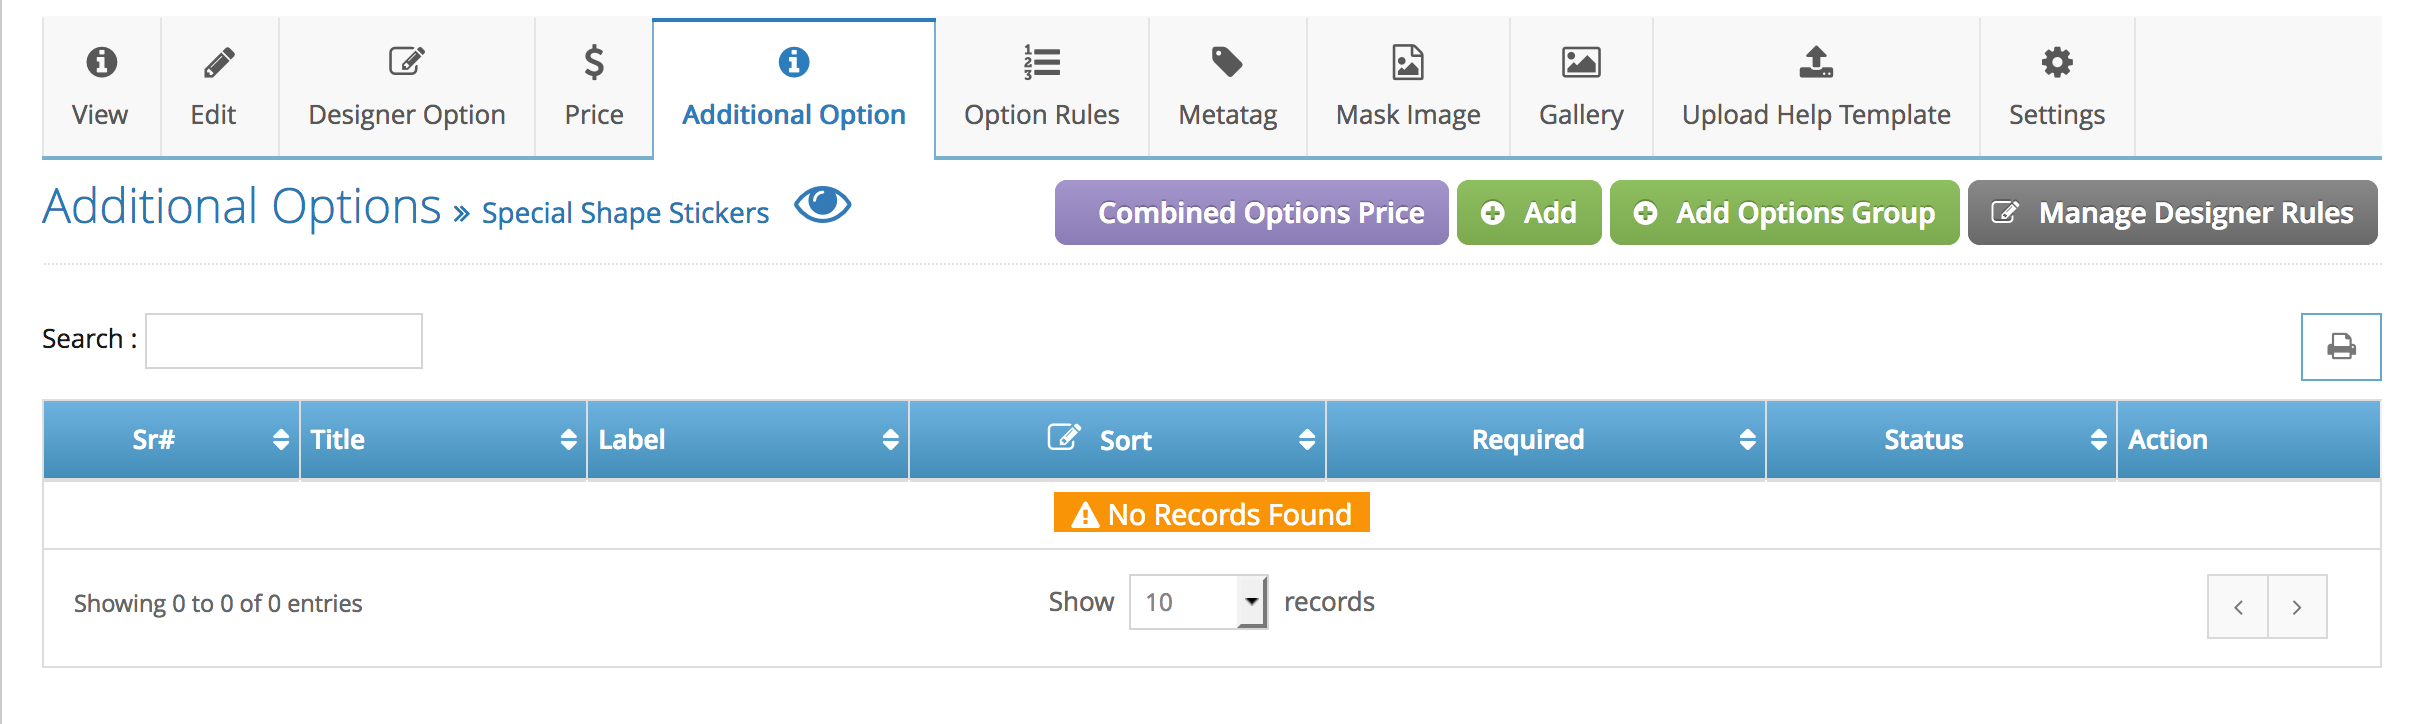
If you want to set your product with an additional options / extras, you can set it up under the product > action > additional options. This can only be done once you have completed the first couple steps of product creation (description, size, base qty and price)
Step 1. To create your first additional option / product extras – click ‘Add’ (green button) on the product additional options page
Step 2. set the details of your additional options title & description. The title will be displaying in the price calculator. For the example below we are creating an additional options for ‘colour printing options’
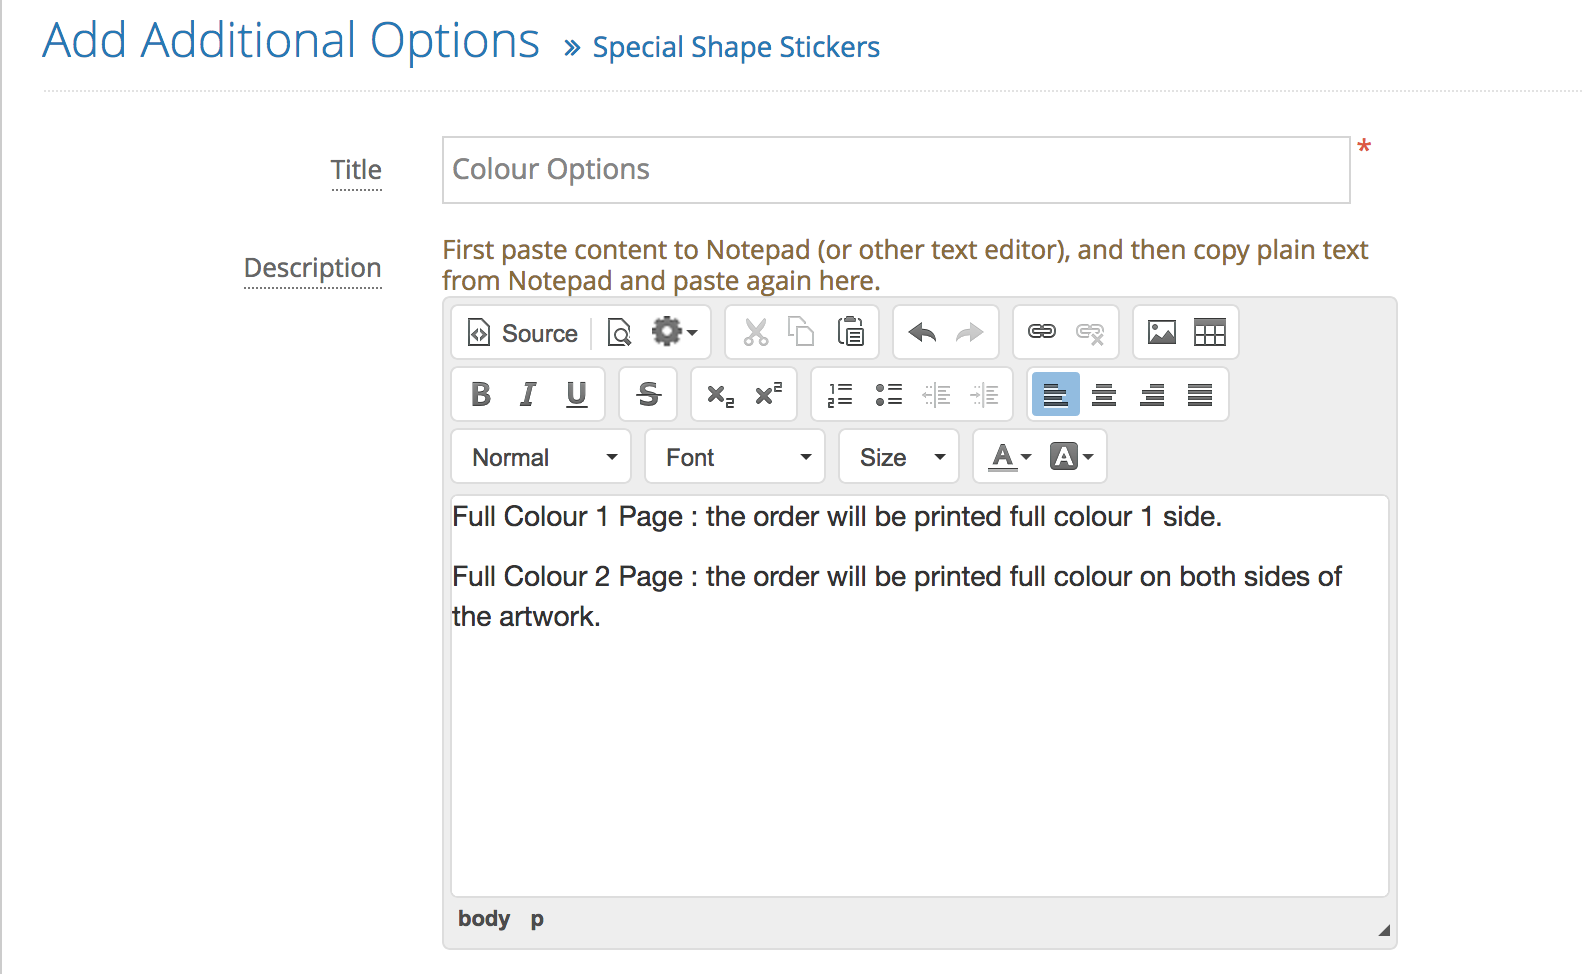
Underneath this you will be able to see more settings for the product additional options such as
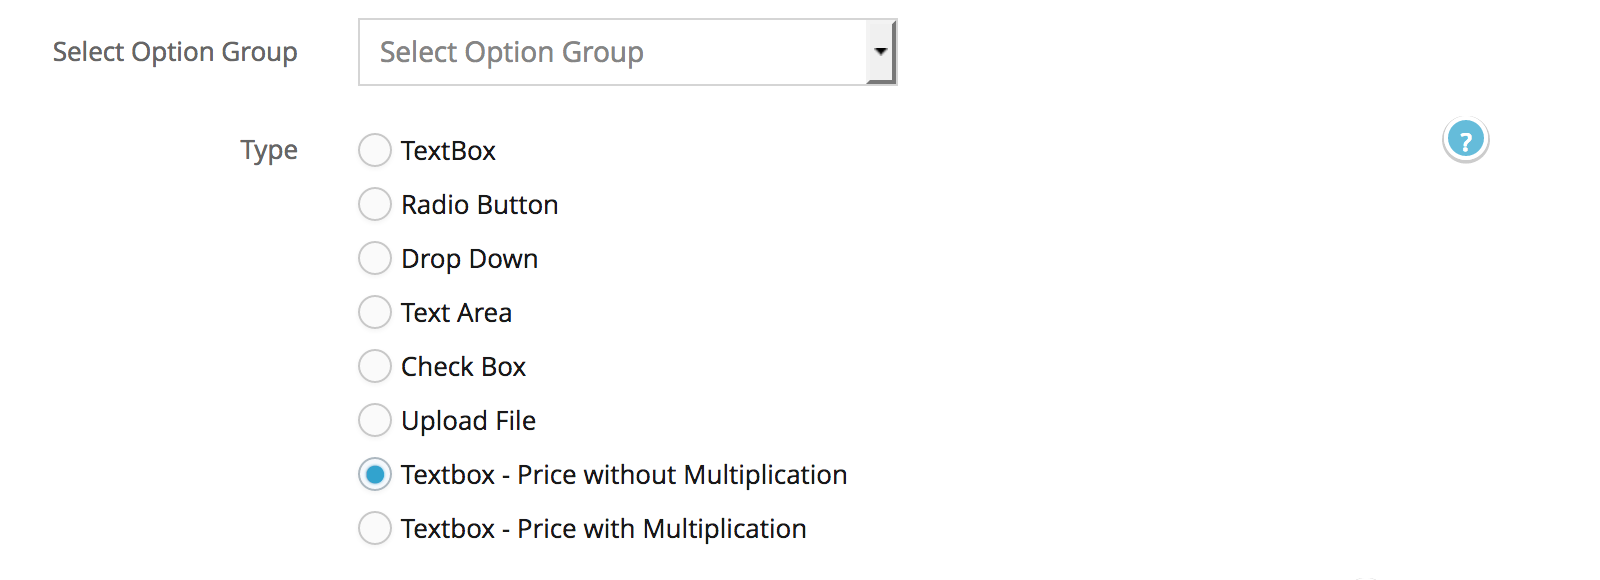
Select Option Group – this is not mandatory, but if you would like to group your additional options for filtering purposes in the admin side.
Type – different display type of additional options :
Textbox : empty box where the customers can put anything (numbers or letters) in the box field – this usually suitable for a questions with a short answer e.g. yes / no questions.
Radio Button : type of options allows the user to choose only one of a predefined set of mutually exclusive options.
Dropdown : type of option allows the user to choose one value from a list. When a drop-down list is inactive, it displays a single value.
Text Area : a text field allows the customers to be able to write a paragraph of text, this will be suitable for a questions such as special instructions.
Checkbox : type of additional options where customers can select multiple options of a pre-defined options in a checkbox.
Upload File : type of additional options to allow the user to upload a supporting file such as image, or proof, etc..
Textbox Price with & without Multiplication : additional options that allows the customers to input any number that will be calculated by the price set up in the admin (multiply or not will be depends whether the options is set with or without multiplication)
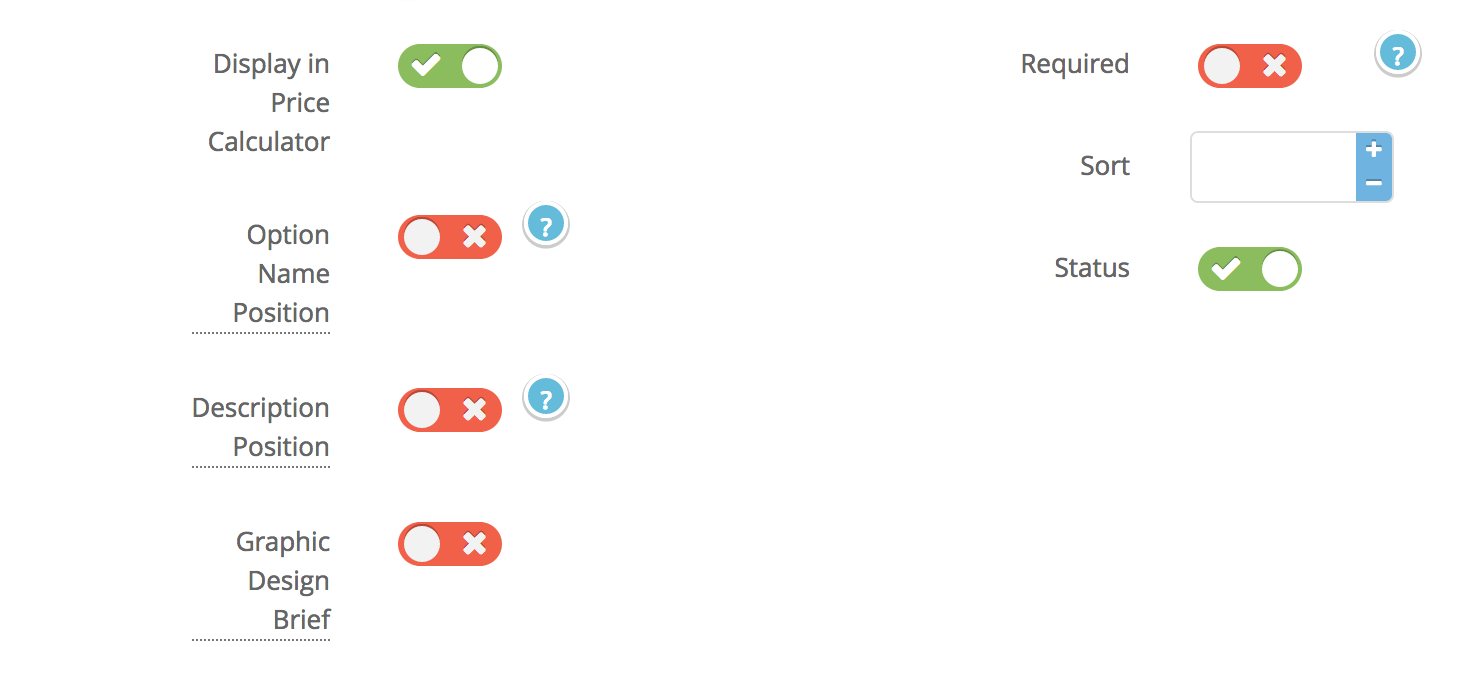
The last configuration of the additional options will be
Option name position : set the position of the option name whether it will position next on the additional option or underneath it.
Required : set the additional options whether it is mandatory or not.
Description Position : option to set the additional options as a pop up or always displaying underneath the additional options.
Sort Order : manage the order of the additional options
Graphic Design Brief : option to include this additional options as part of the graphic design brief process.
Status : manage the status of additional options just in case if you want to turn it off temporarily.
Depends on the Additional Options, on some of the options such as textbox and text area you don’t need to set an additional options attribute. However if you choose an option such as radio button, checkbox, and dropdown you will need to set an additional options attribute – you can set as many attribute as you want and this options will be displaying in the front end side as an options.
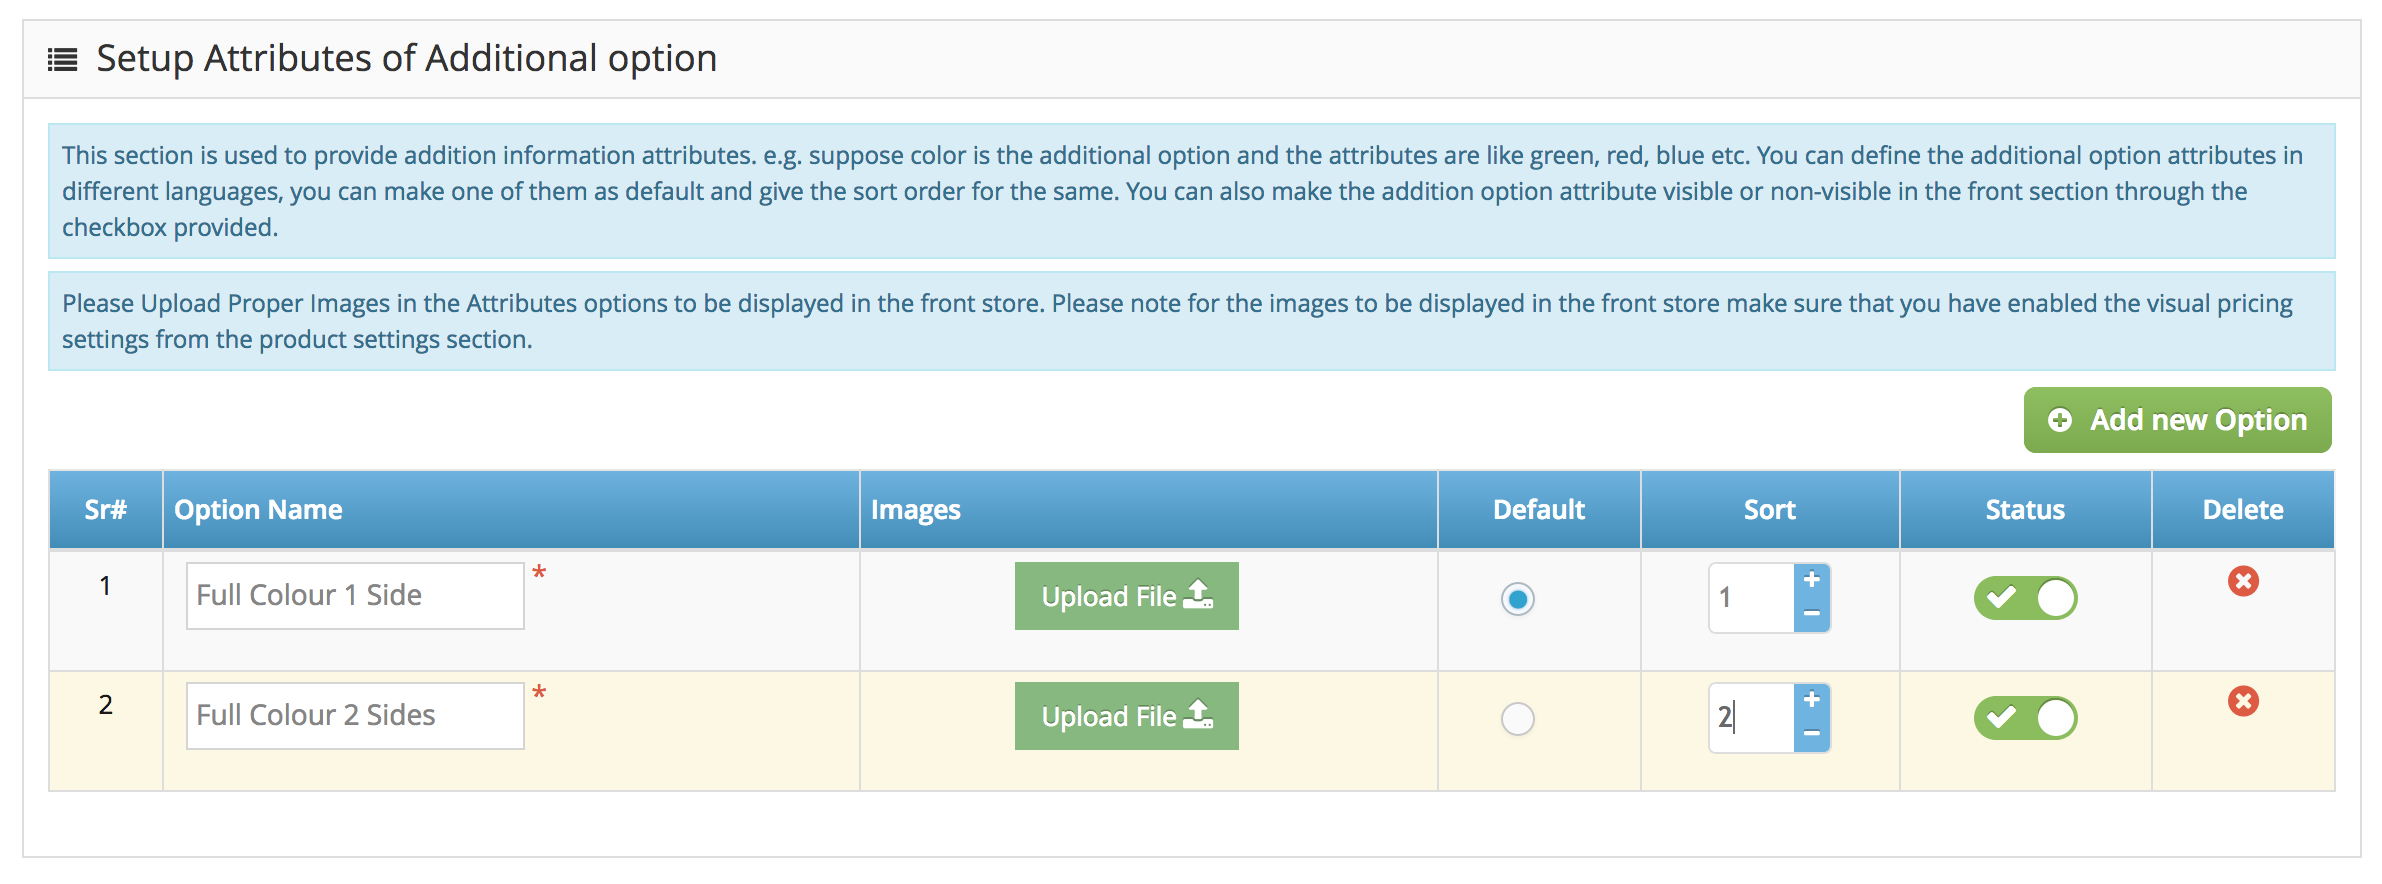
Once you have set the attribute, you also have the ability to add an extra charge for each of the attributes by clicking the ‘save and continue’ button at the top
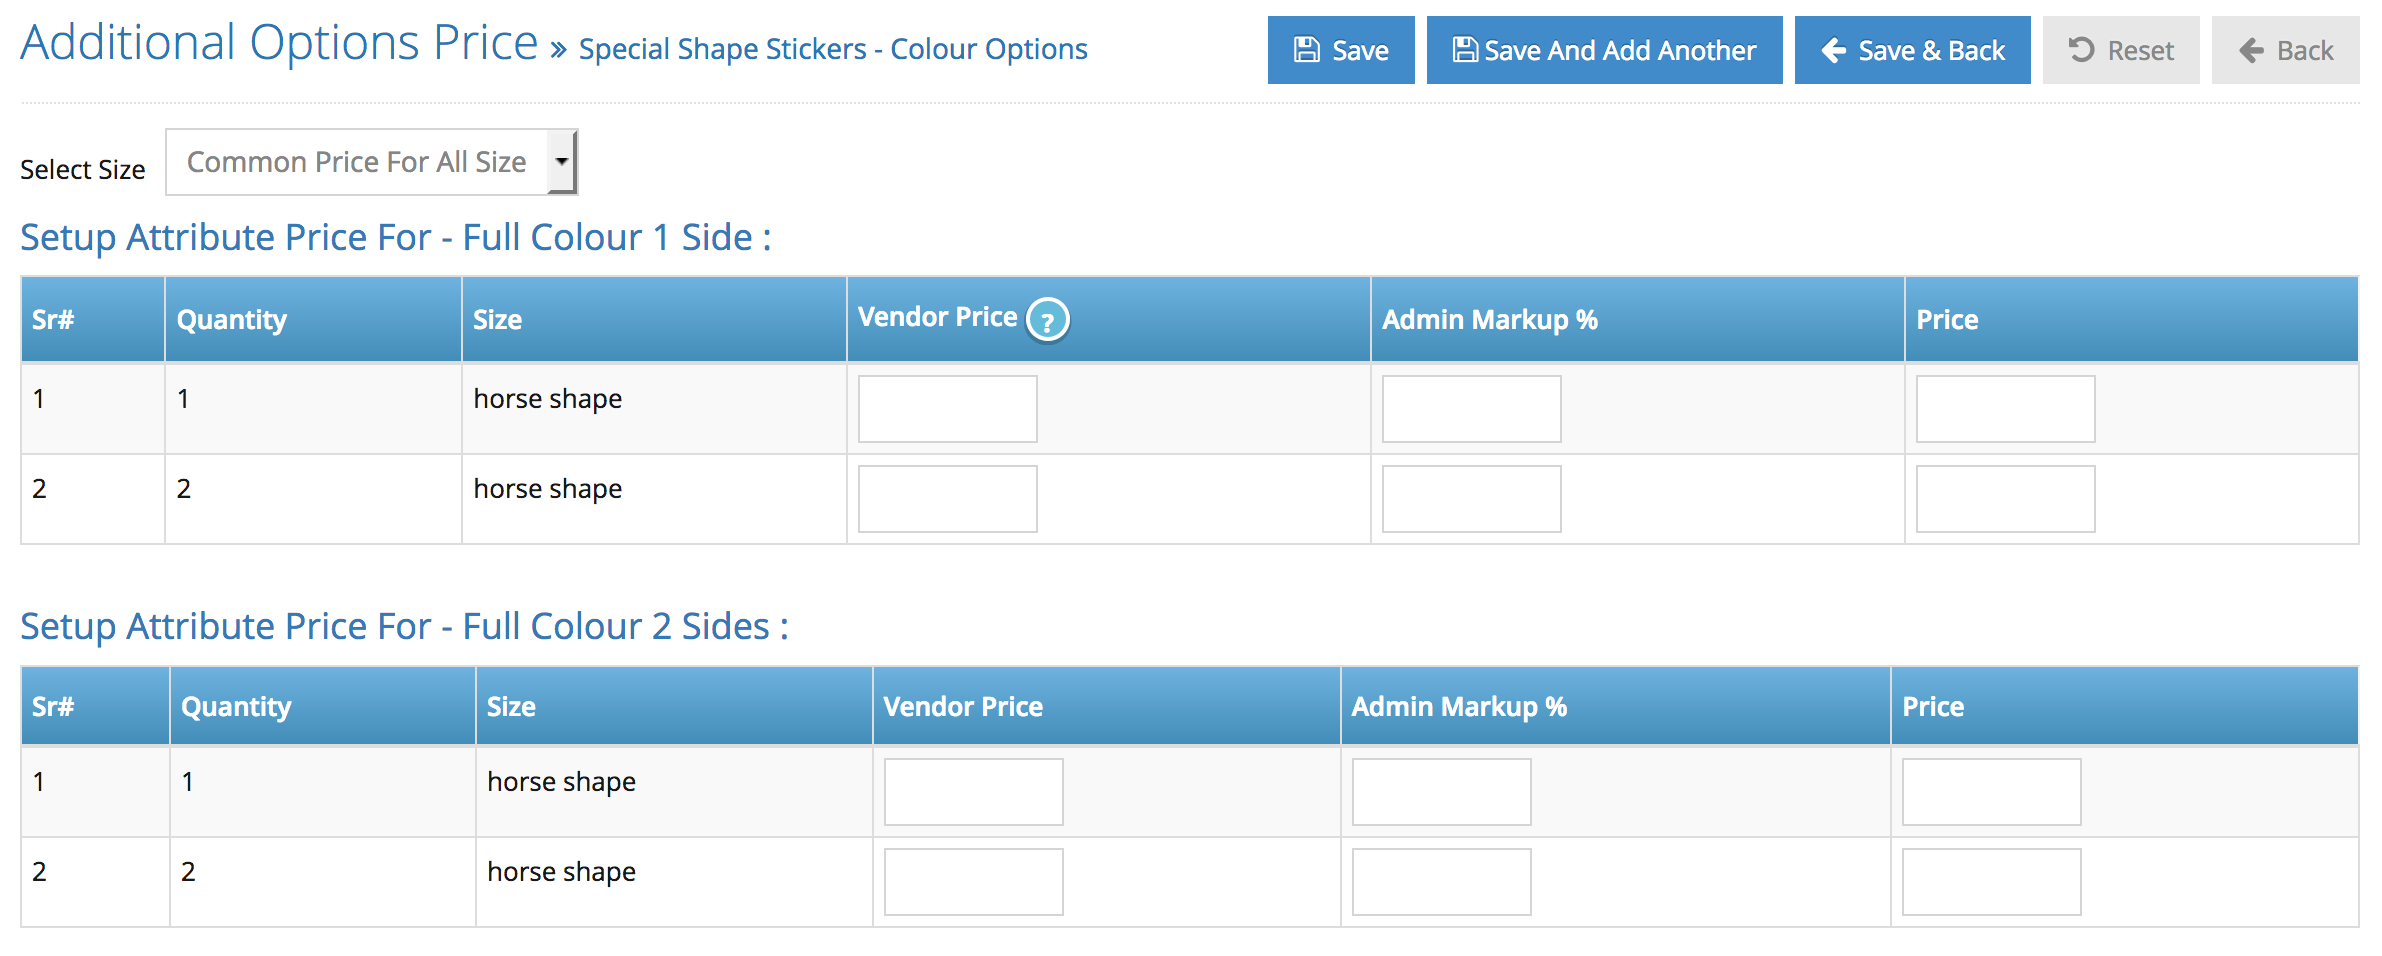
note : the total price will be calculated on base price + total of additional options = total price, all the price in the admin side is Ex GST.
Step 1. From the home page, navigate to Products section, then select Products.
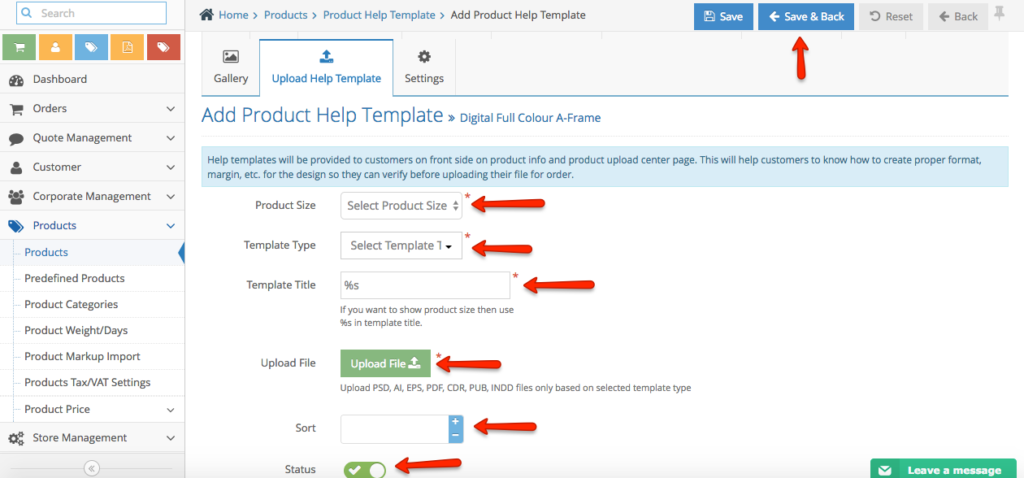
Step 2. Look for the product, click Action button and select Upload Help Template.
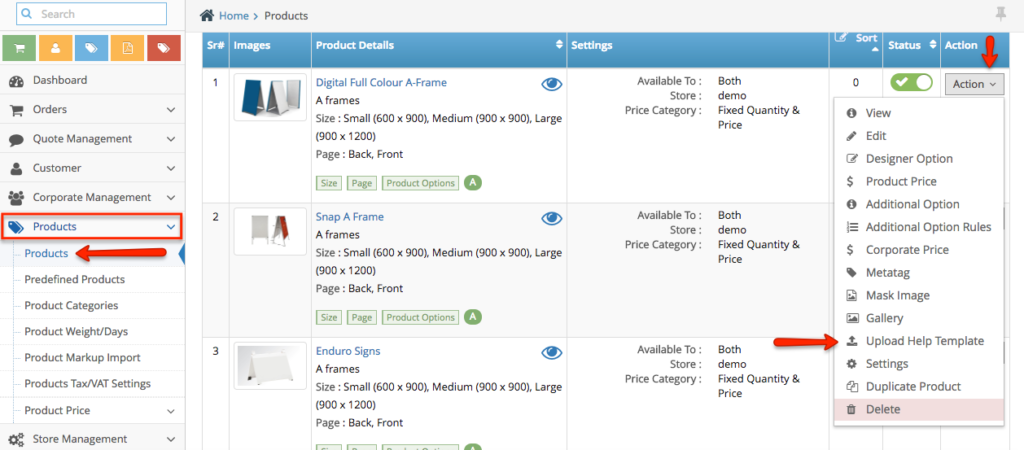
Step 3. Click Add button.
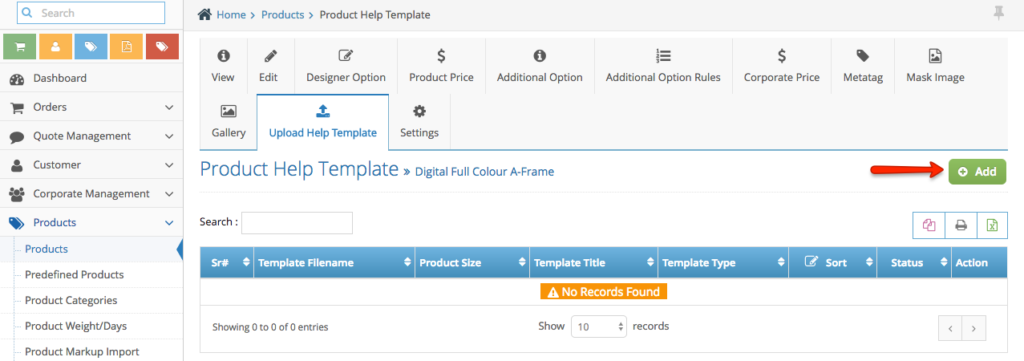
Step 4. Upload the template and click Save & Back button once done.
Step 1. Login to your admin side and navigate to the products > products
Step 2. Select the product you would like to set the mask image, Click Action > Mask Image
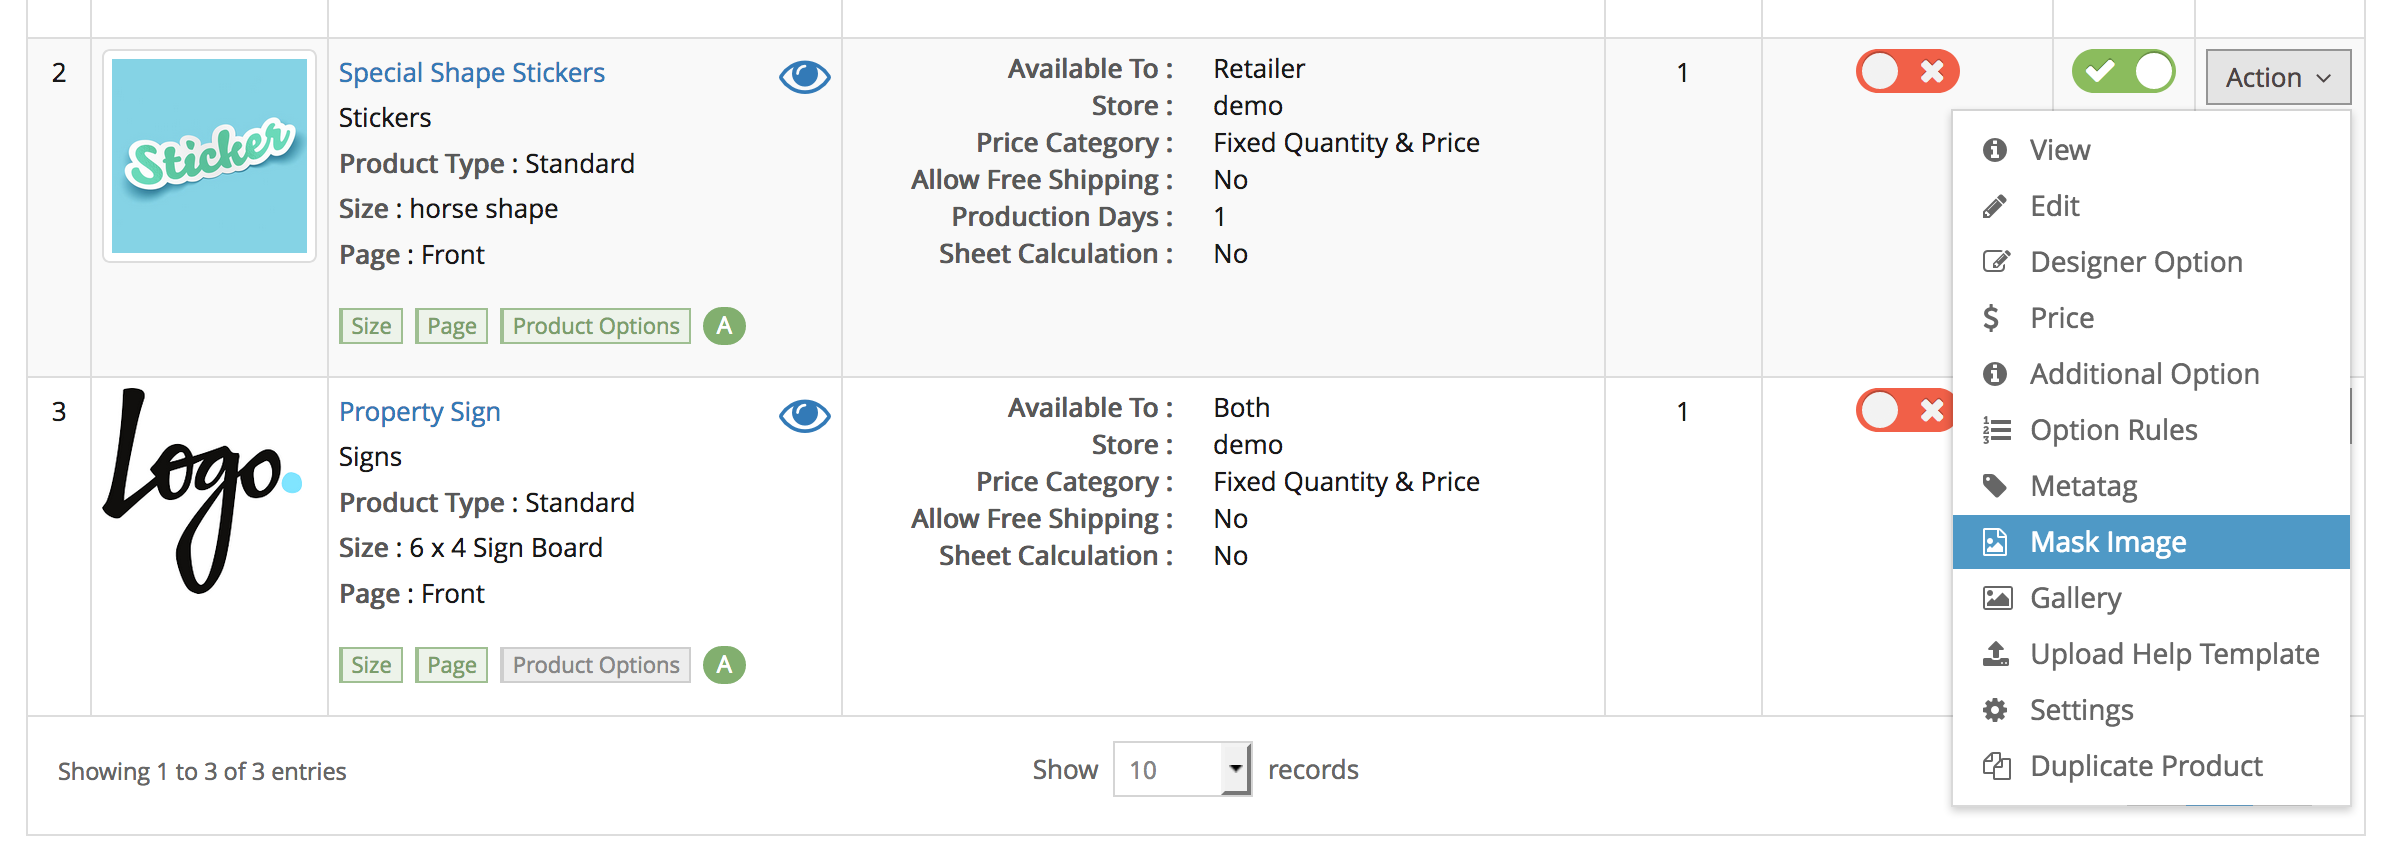
Step 3. Click Add to add a new mask imagee
Step 4. Select the Product Size and the sides (front and back)
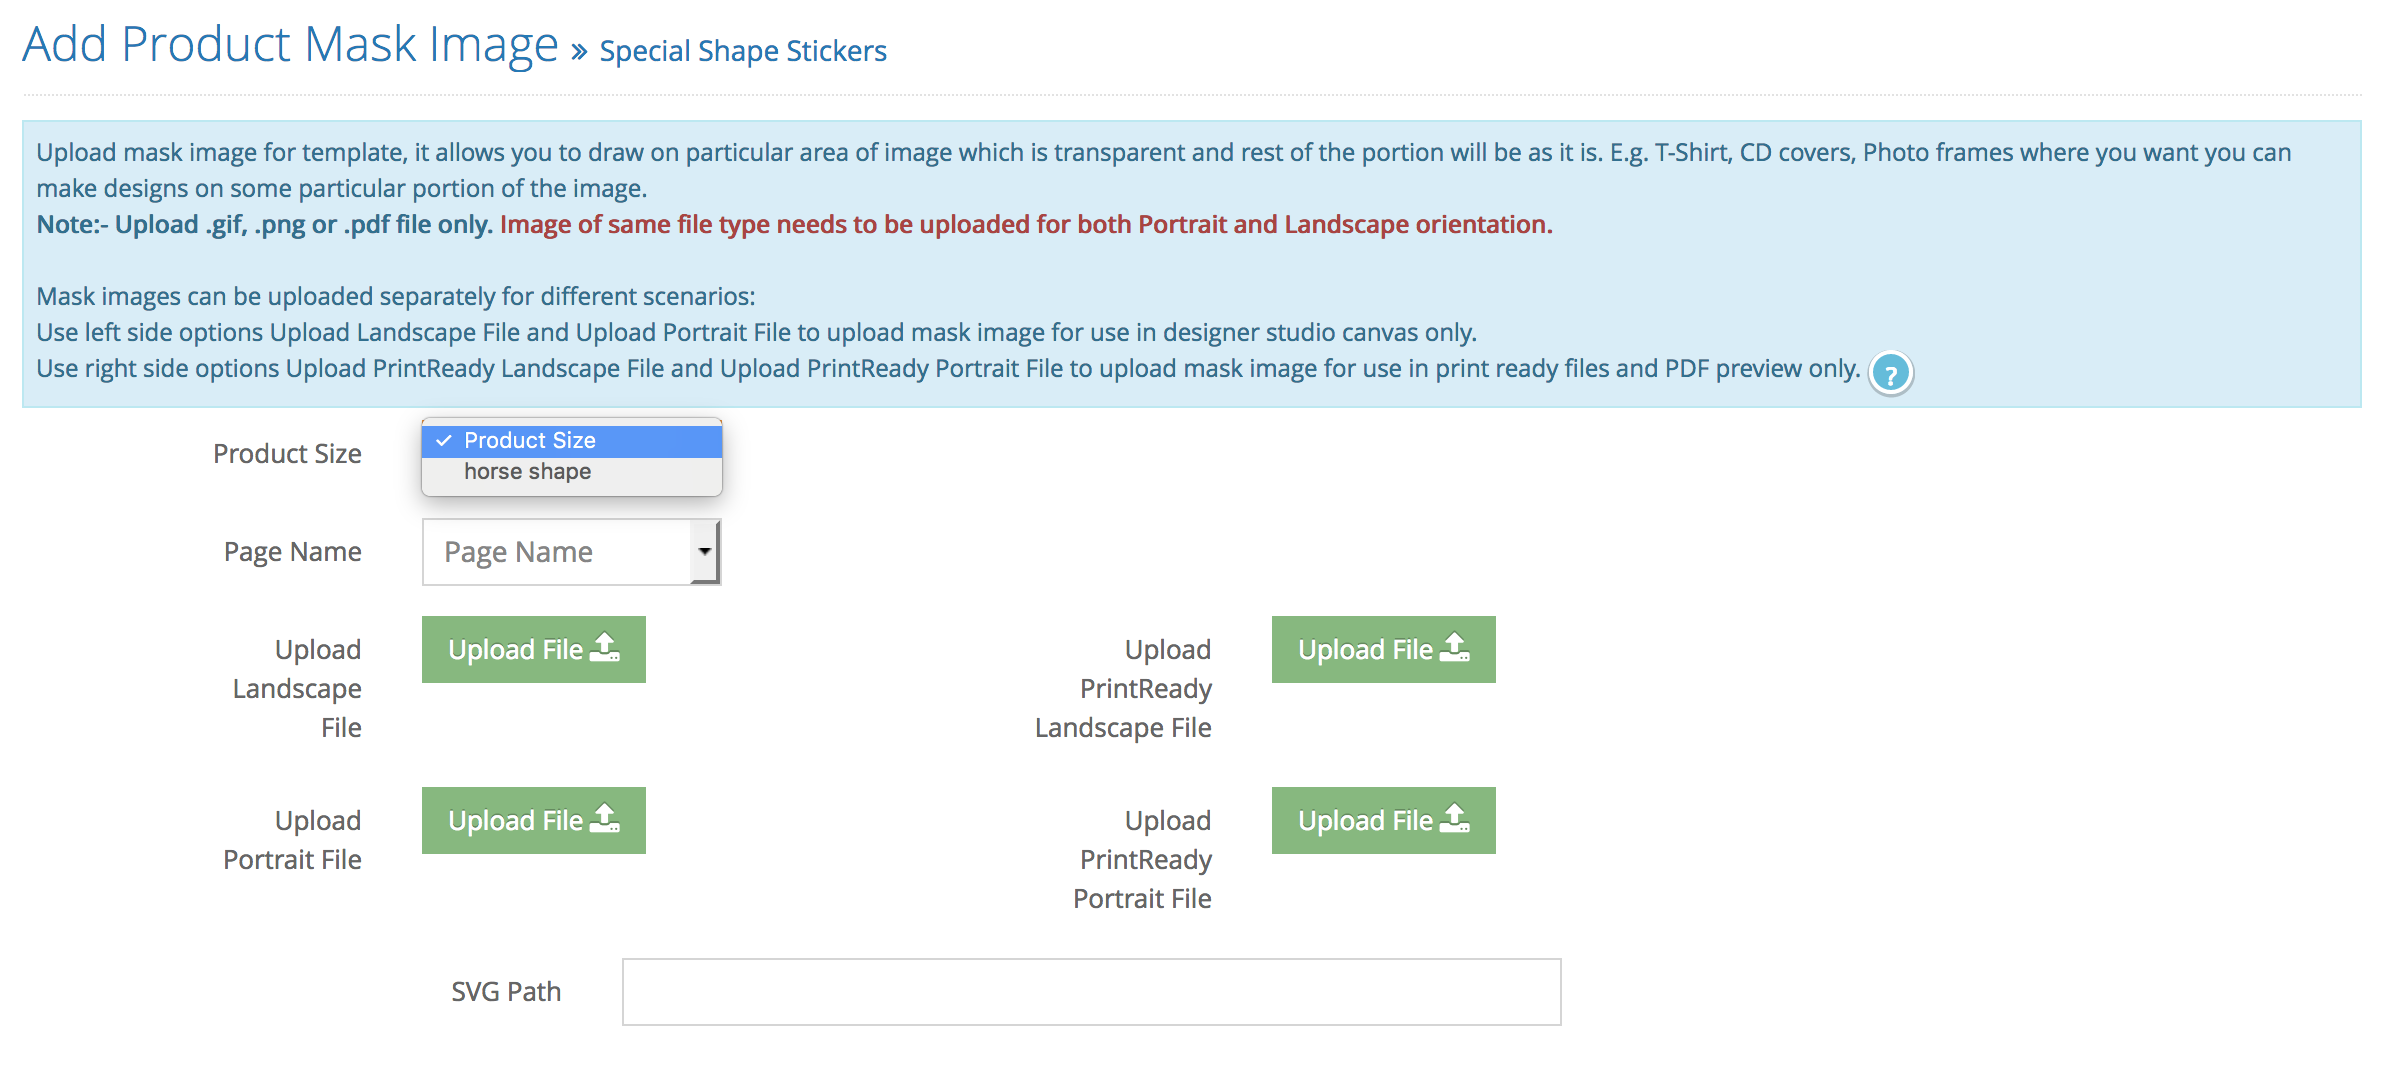
Step 5. Upload the Landscape File and Portrait File. (mandatory)
Step 6. Upload the Print Ready File / Proof – this mask image uploaded will be included as part of the final file generated from the system.
Step 7. Click Save to save you changes.
important note :
a. When you create the product with the special shape we are suggesting to not have any margin set up in the ‘designer options’ page – the reason being is because it will be confusing and better of to create it as part of the mask image
b. the size of the mask image have to be the same as the size of the canvas when you create the product

c. When creating the image please make sure you put the grey background image (not the canvas) with a 50% transparency so the customers still can see an object when it falls behind the background
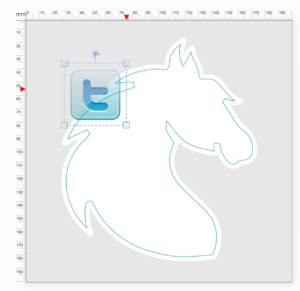
d. file recommended for mask image is gif and png.
Step 1. Login to your admin side > navigate to your left hand side navigation bar Products > Products > select the products > Action > Settings.
Step 2. you will see numbers of settings you can set on this page.
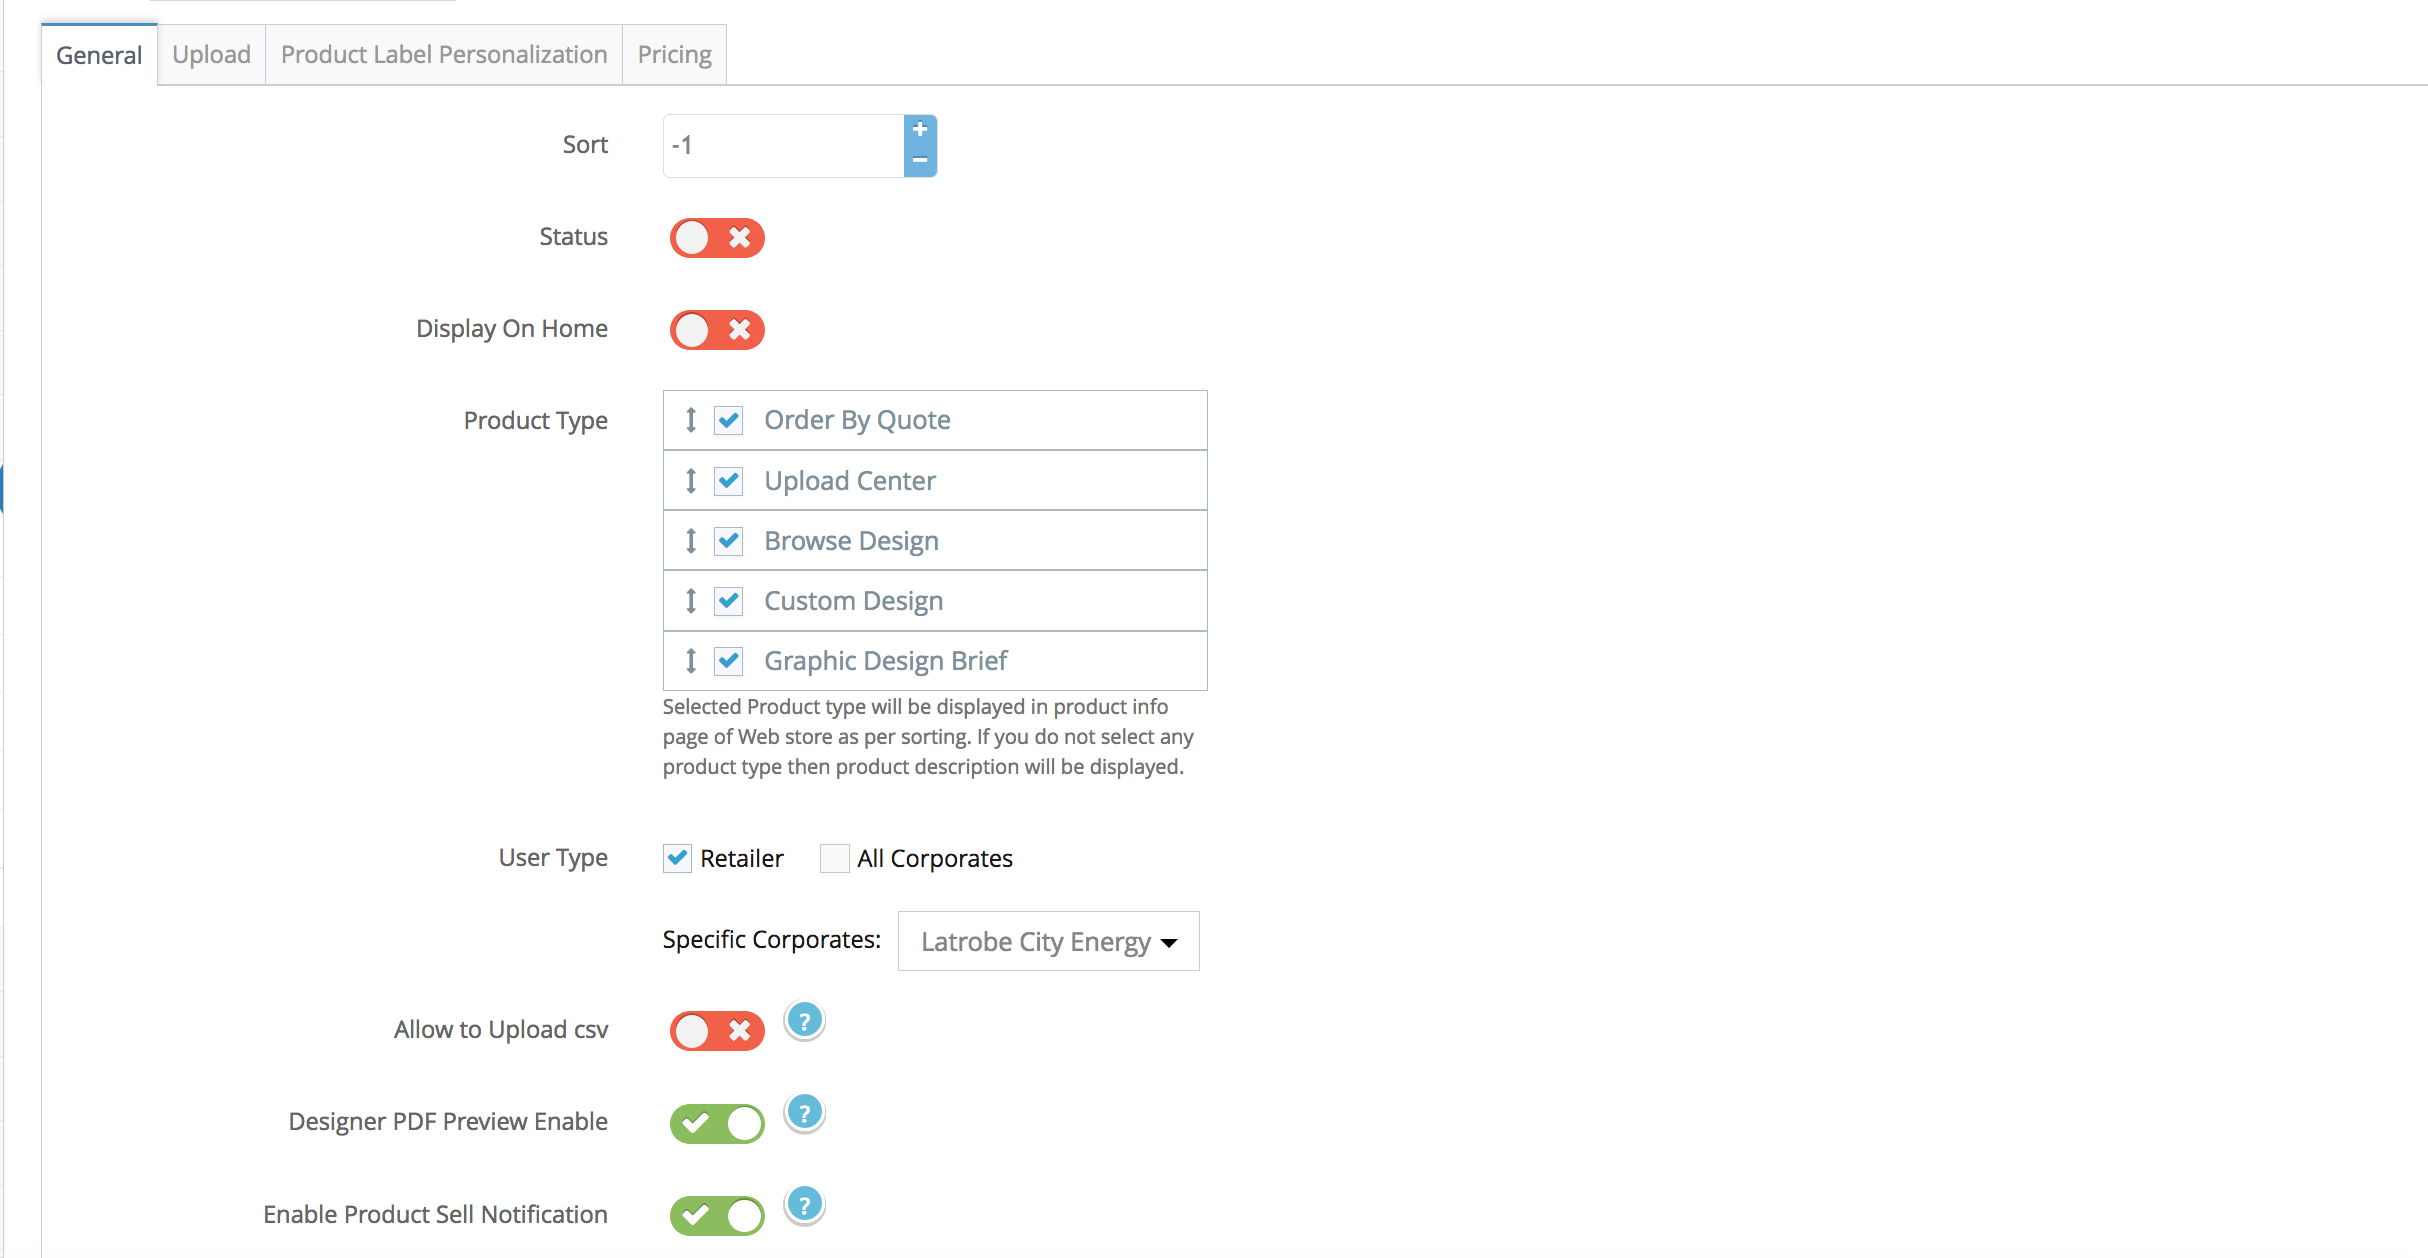
Sort order: setting up the sort order of the products under the category assigned to this product
Status: feature to set the products temporarily inactive – not displaying in the front end (red means inactive, green means active)
Display on Home: set the product to be displaying on home (only when the ‘Display type of middle area on Homepage – Front’ under the store configuration sets to products)
Product Type: settings to change the sort order of the type of services button – upload artwork, browse design, create design, quote, graphic design (drag and drop the option) – also the ability to turn it on / off by ticking or untick the option.
User Type: settings to assign the product to be available on retailer or all / certain corporate
Allow Upload CSV: to enable the data variable feature where customer can upload a CSV file and allow the system to automatically generate the artwork (only works on customisable template)
Designer PDF preview Enable: allow the customers to be able to generate a PDF preview when creating or editing their artwork in the online editor
Enable Product Sell Notification: allow the system to be able to send a notification to a certain email when this particular products was ordered by the customers (this is an additional feature – contact support@editandprint.com.au for more information)
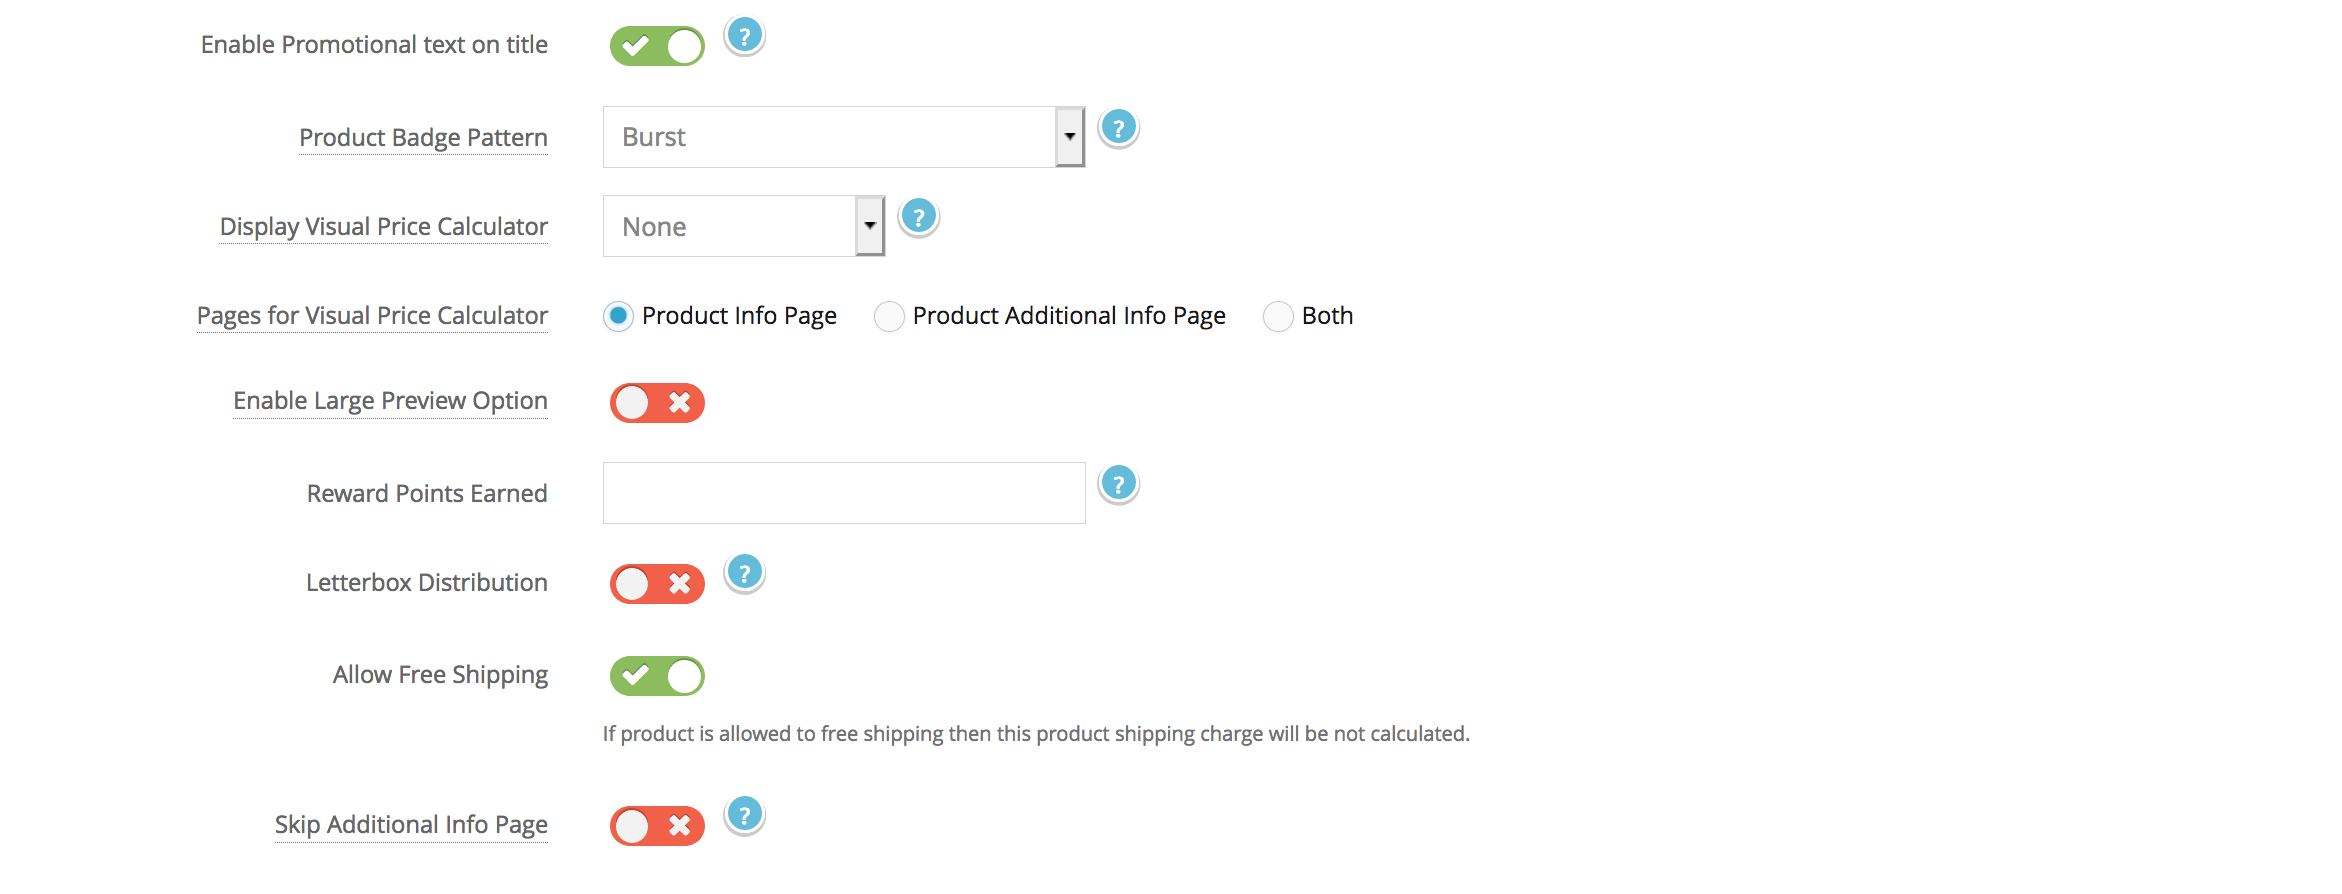
Enable Promotional Text on Title: settings to enable the product badge
Product Badge Pattern: drop down settings to choose the type of product badge
Display Visual Price in Calculator: settings to set whether visual on the calculator will be on size, option or size and option level.
Pages for Visual Price Calculator: settings whether the visual will be available on a certain page
Enable Large Preview Option: settings to enable for the visual in the calculator to be large previewed by clicking the image.
Reward Points Earned: settings to set the points earned when the order placed (works only when you activate the reward points)
Letterbox Distribution: settings to enable the letterbox drop feature on the products (this is an additional feature – contact support@editandprint.com.au for more information).
Allow Free Shipping: settings to set a free shipping on this particular product.
Skip Additional Info Page: settings to bypass the additional info page (page before shopping cart) – allows user to go straight to the shopping cart after uploading the artwork.
Step 3. Click Save to save your changes.
Step 1. Login to your Admin Dashboard > navigate to your left-hand side navigation Products > Products > Select the Product > Action > Gallery
Step 2. Upload your first image by start filling out the title, sort order and upload the file. Click Save to add the image
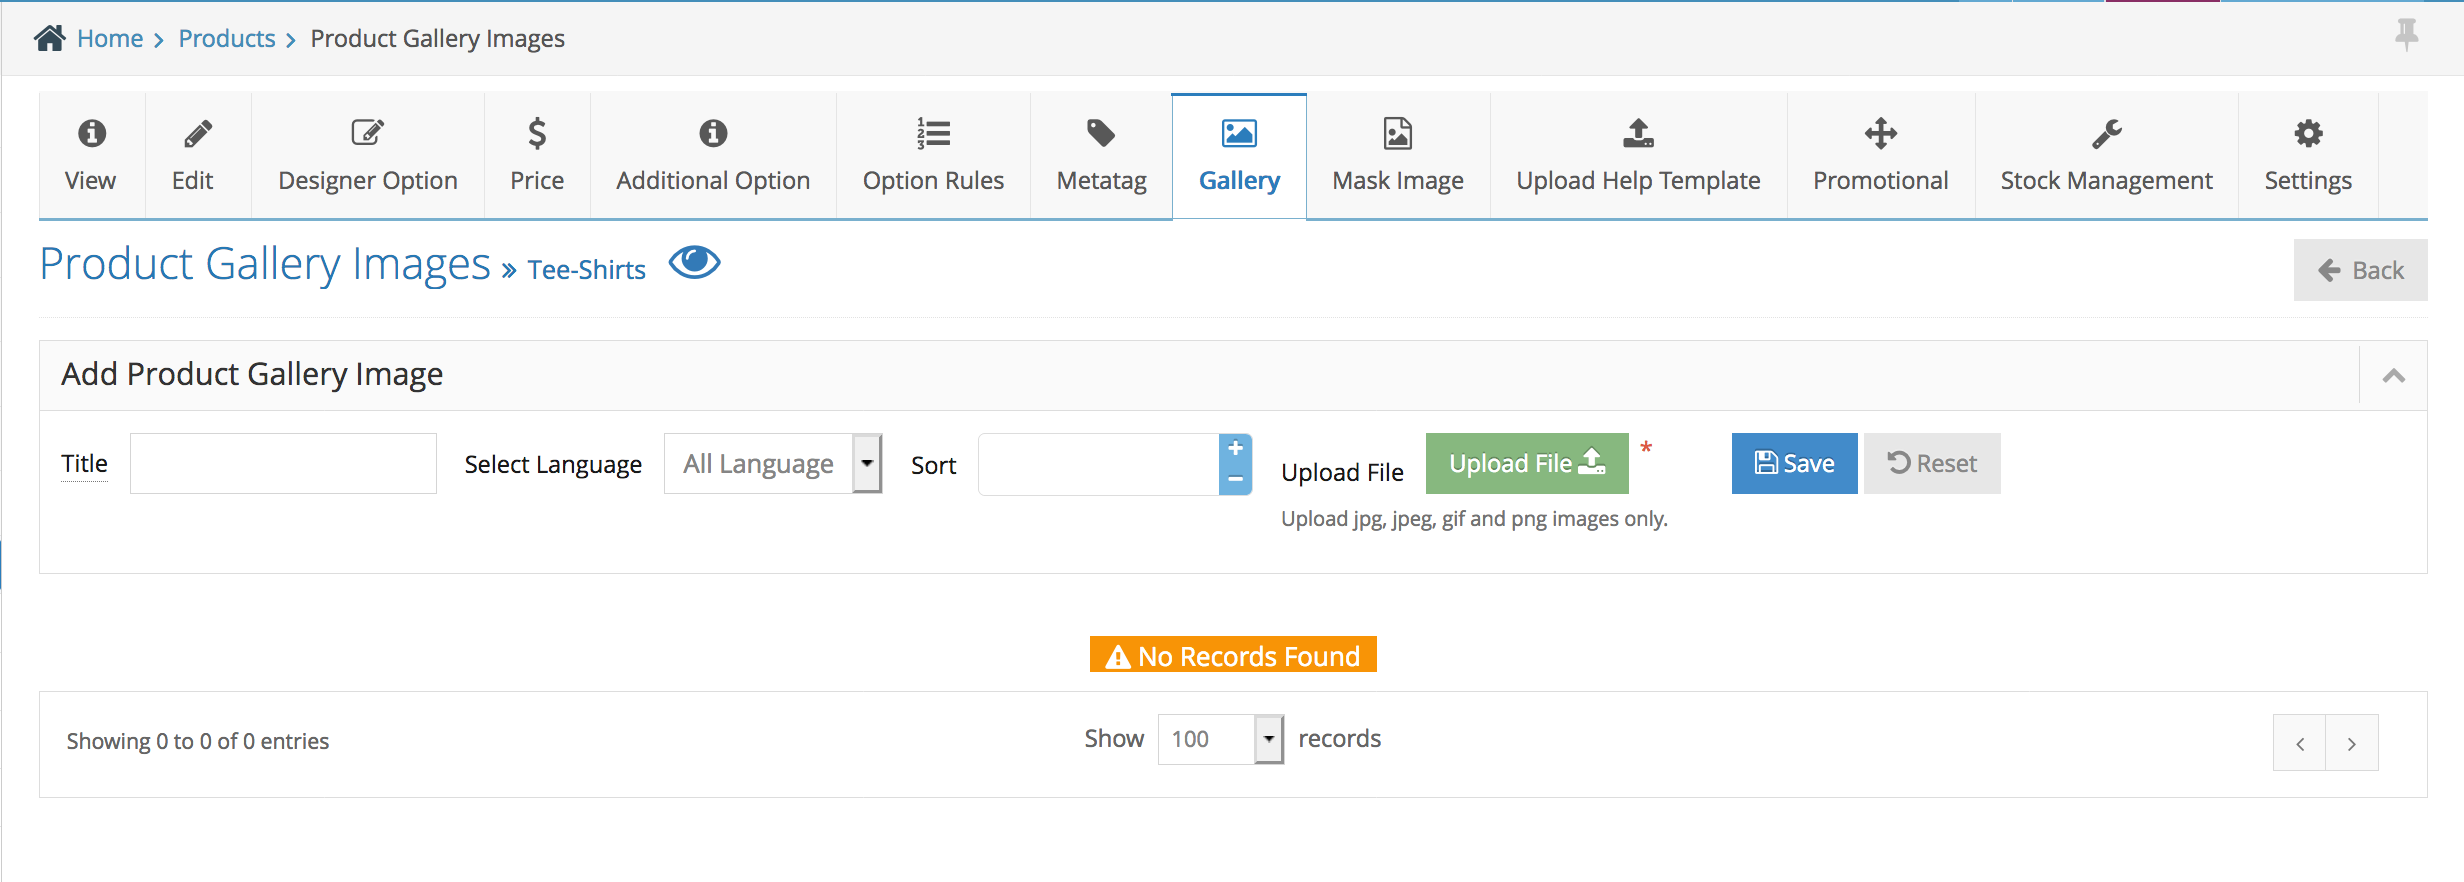
Step 3. If you have multiple images, you just need to upload the rest of the images by following the previous step.
note: once you have uploaded multiple images, the system will automatically generate a slideshow in the product details page.
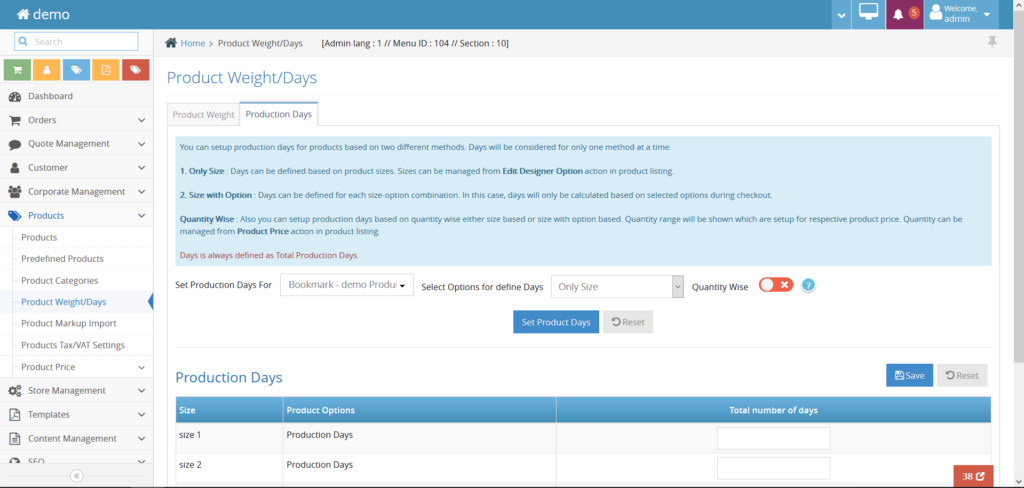
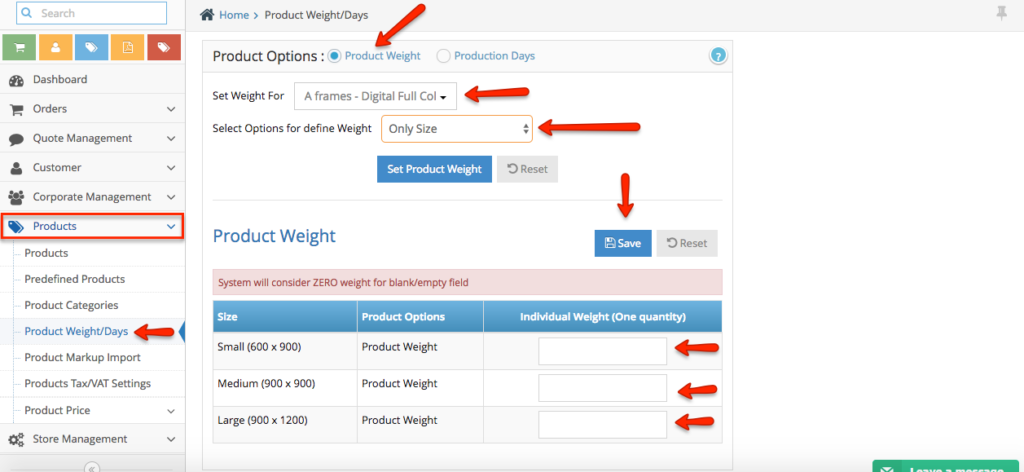
Step 1. From the home page, navigate to Products > Product Weight/Days.
Step 2. In Product Option, select Product Weight.
Step 3. Select the product in “Set Weight For” and Select Options for define Weight.
Step 4. Add the weight and click Save button.
Step 1. Login to your admin and navigate to Products > Products on the left hand side navigation bar
Step 2. Under the Products > select Products > click Action > select Settings
Step 3. Click the Pricing tab to display the options for product default qty & minimum price
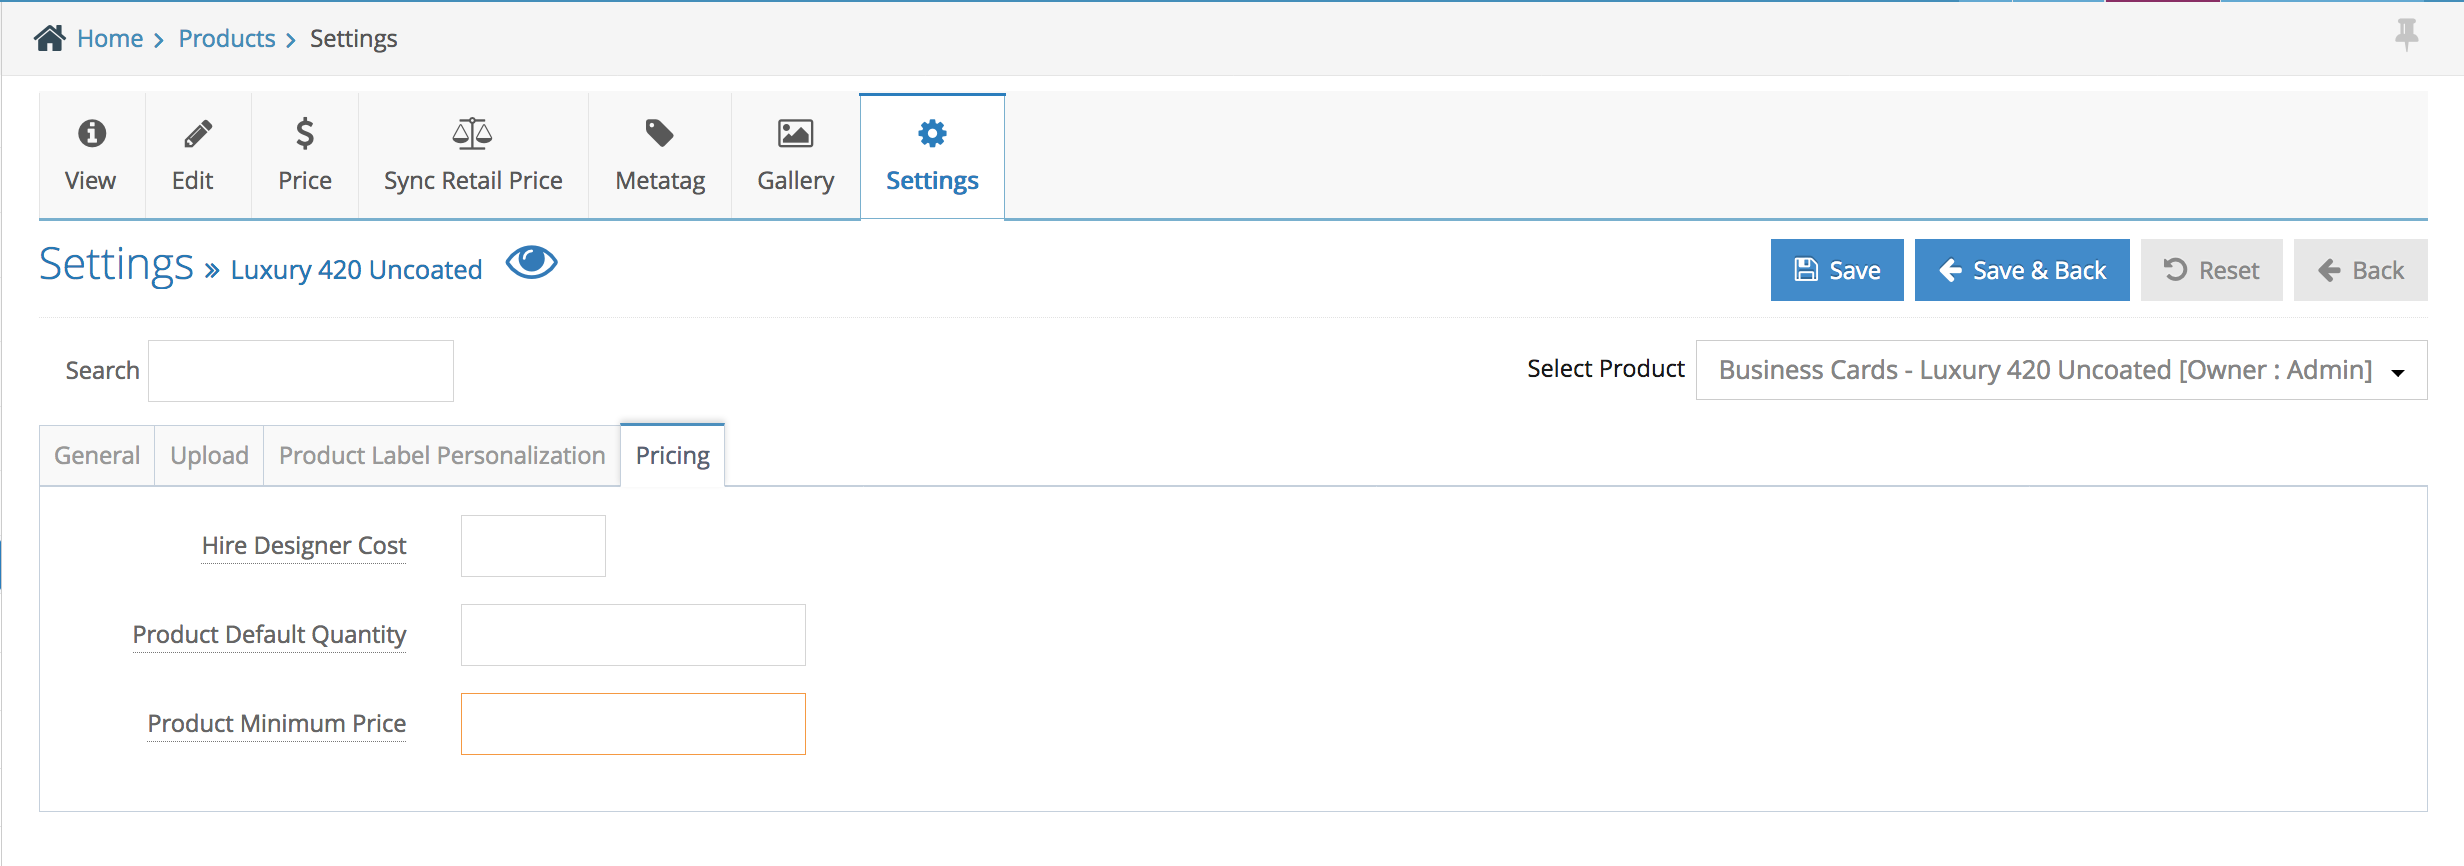
Step 4. Set the default qty on this product – please see more detail below
If your product pricing has been set up as ‘fix qty and price’ – you must put the qty available on your website, otherwise it will set to the minimum qty.
If your product pricing has been set up as ‘range based’ – you can put any qty you want as a default.
Step 5. Set the minimum price (the price set up here is a ex GST – GST will be added in the front end).
Step 6. Click ‘Save’ to save your changes
Step 1. Login to your admin and navigate to Products > Products on the left hand side navigation bar
Step 2. Under the Products > select Products > select the Product you would like to activate the ‘multiple order’ feature
Step 3. click Action > Settings
Inside the product setting page you can see the ‘Upload’ tab, click the Upload tab in order to show the ‘multiple file upload’ feature settings
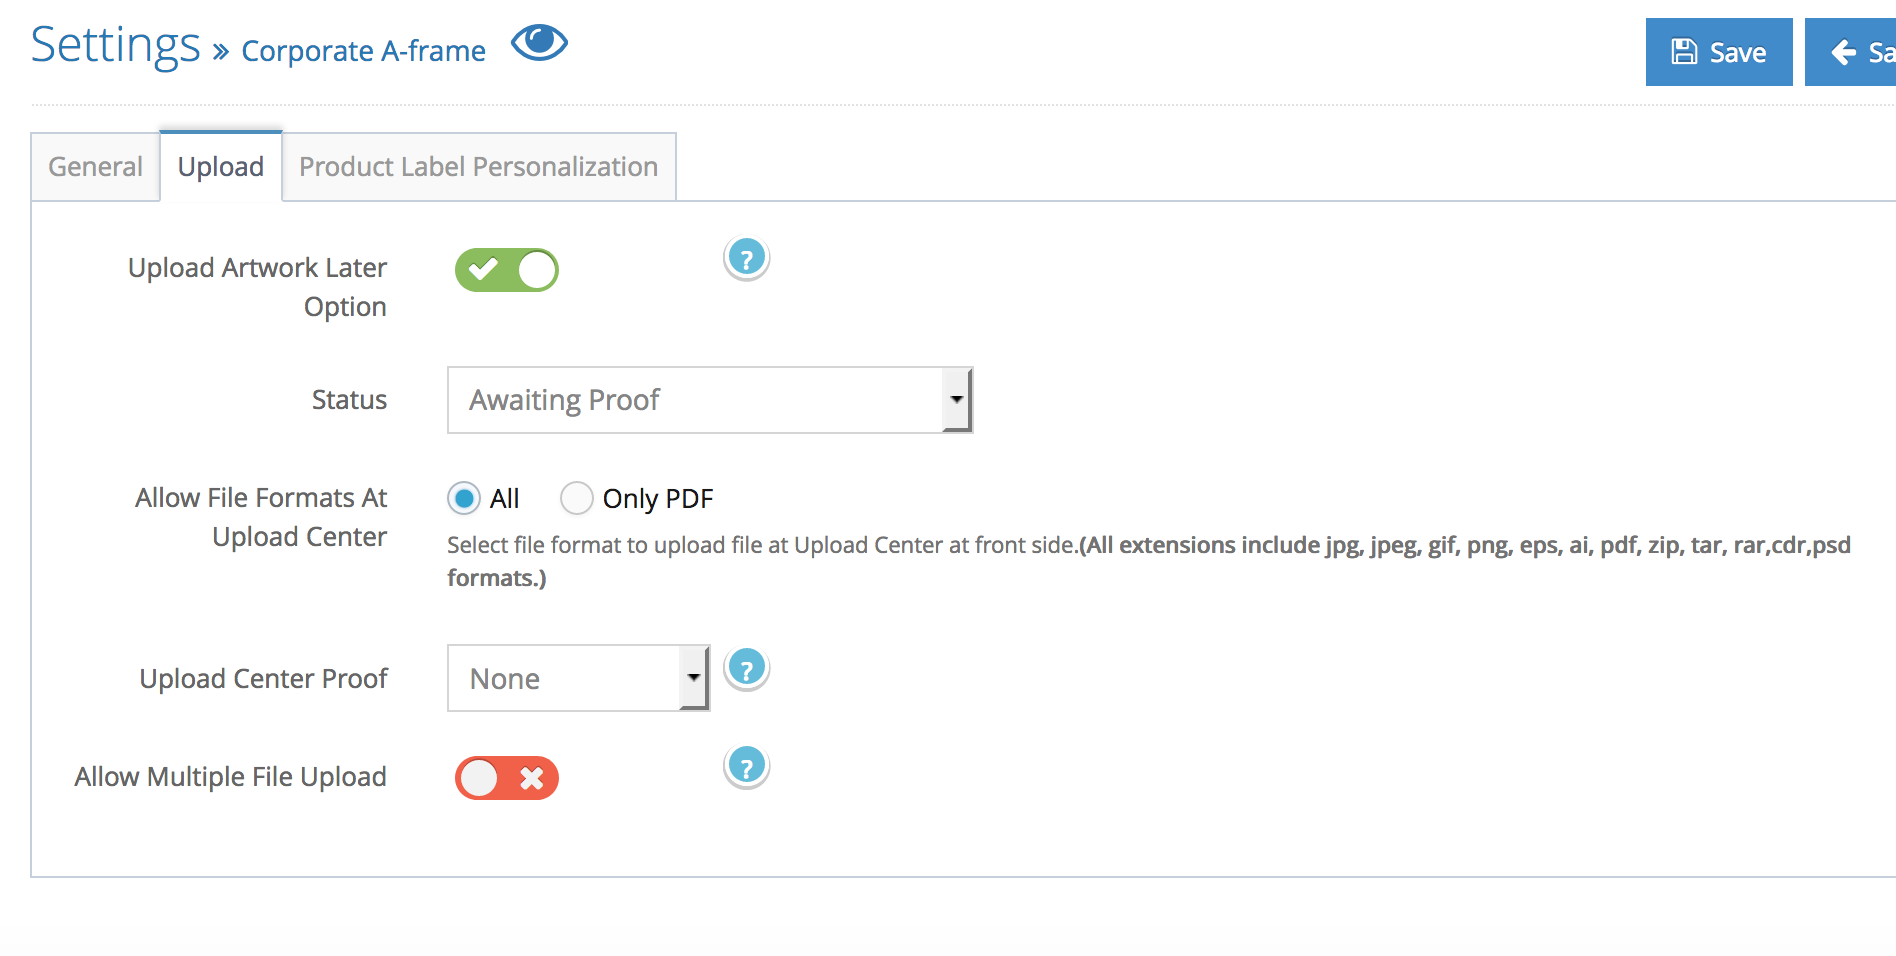
Step 4. Turn on the ‘multiple file upload’ settings
Step 5. Click Save to save your changes
Step 1. Login to your admin side and navigate to Product > Product Price on the left-hand side navigation.
Step 2. Inside the page you will see the product filter dropdown

Step 3. First to select the product (e.g. 310gsm uncoated business cards)
Step 4. The page will automatically loads the pricing for retailer and product price
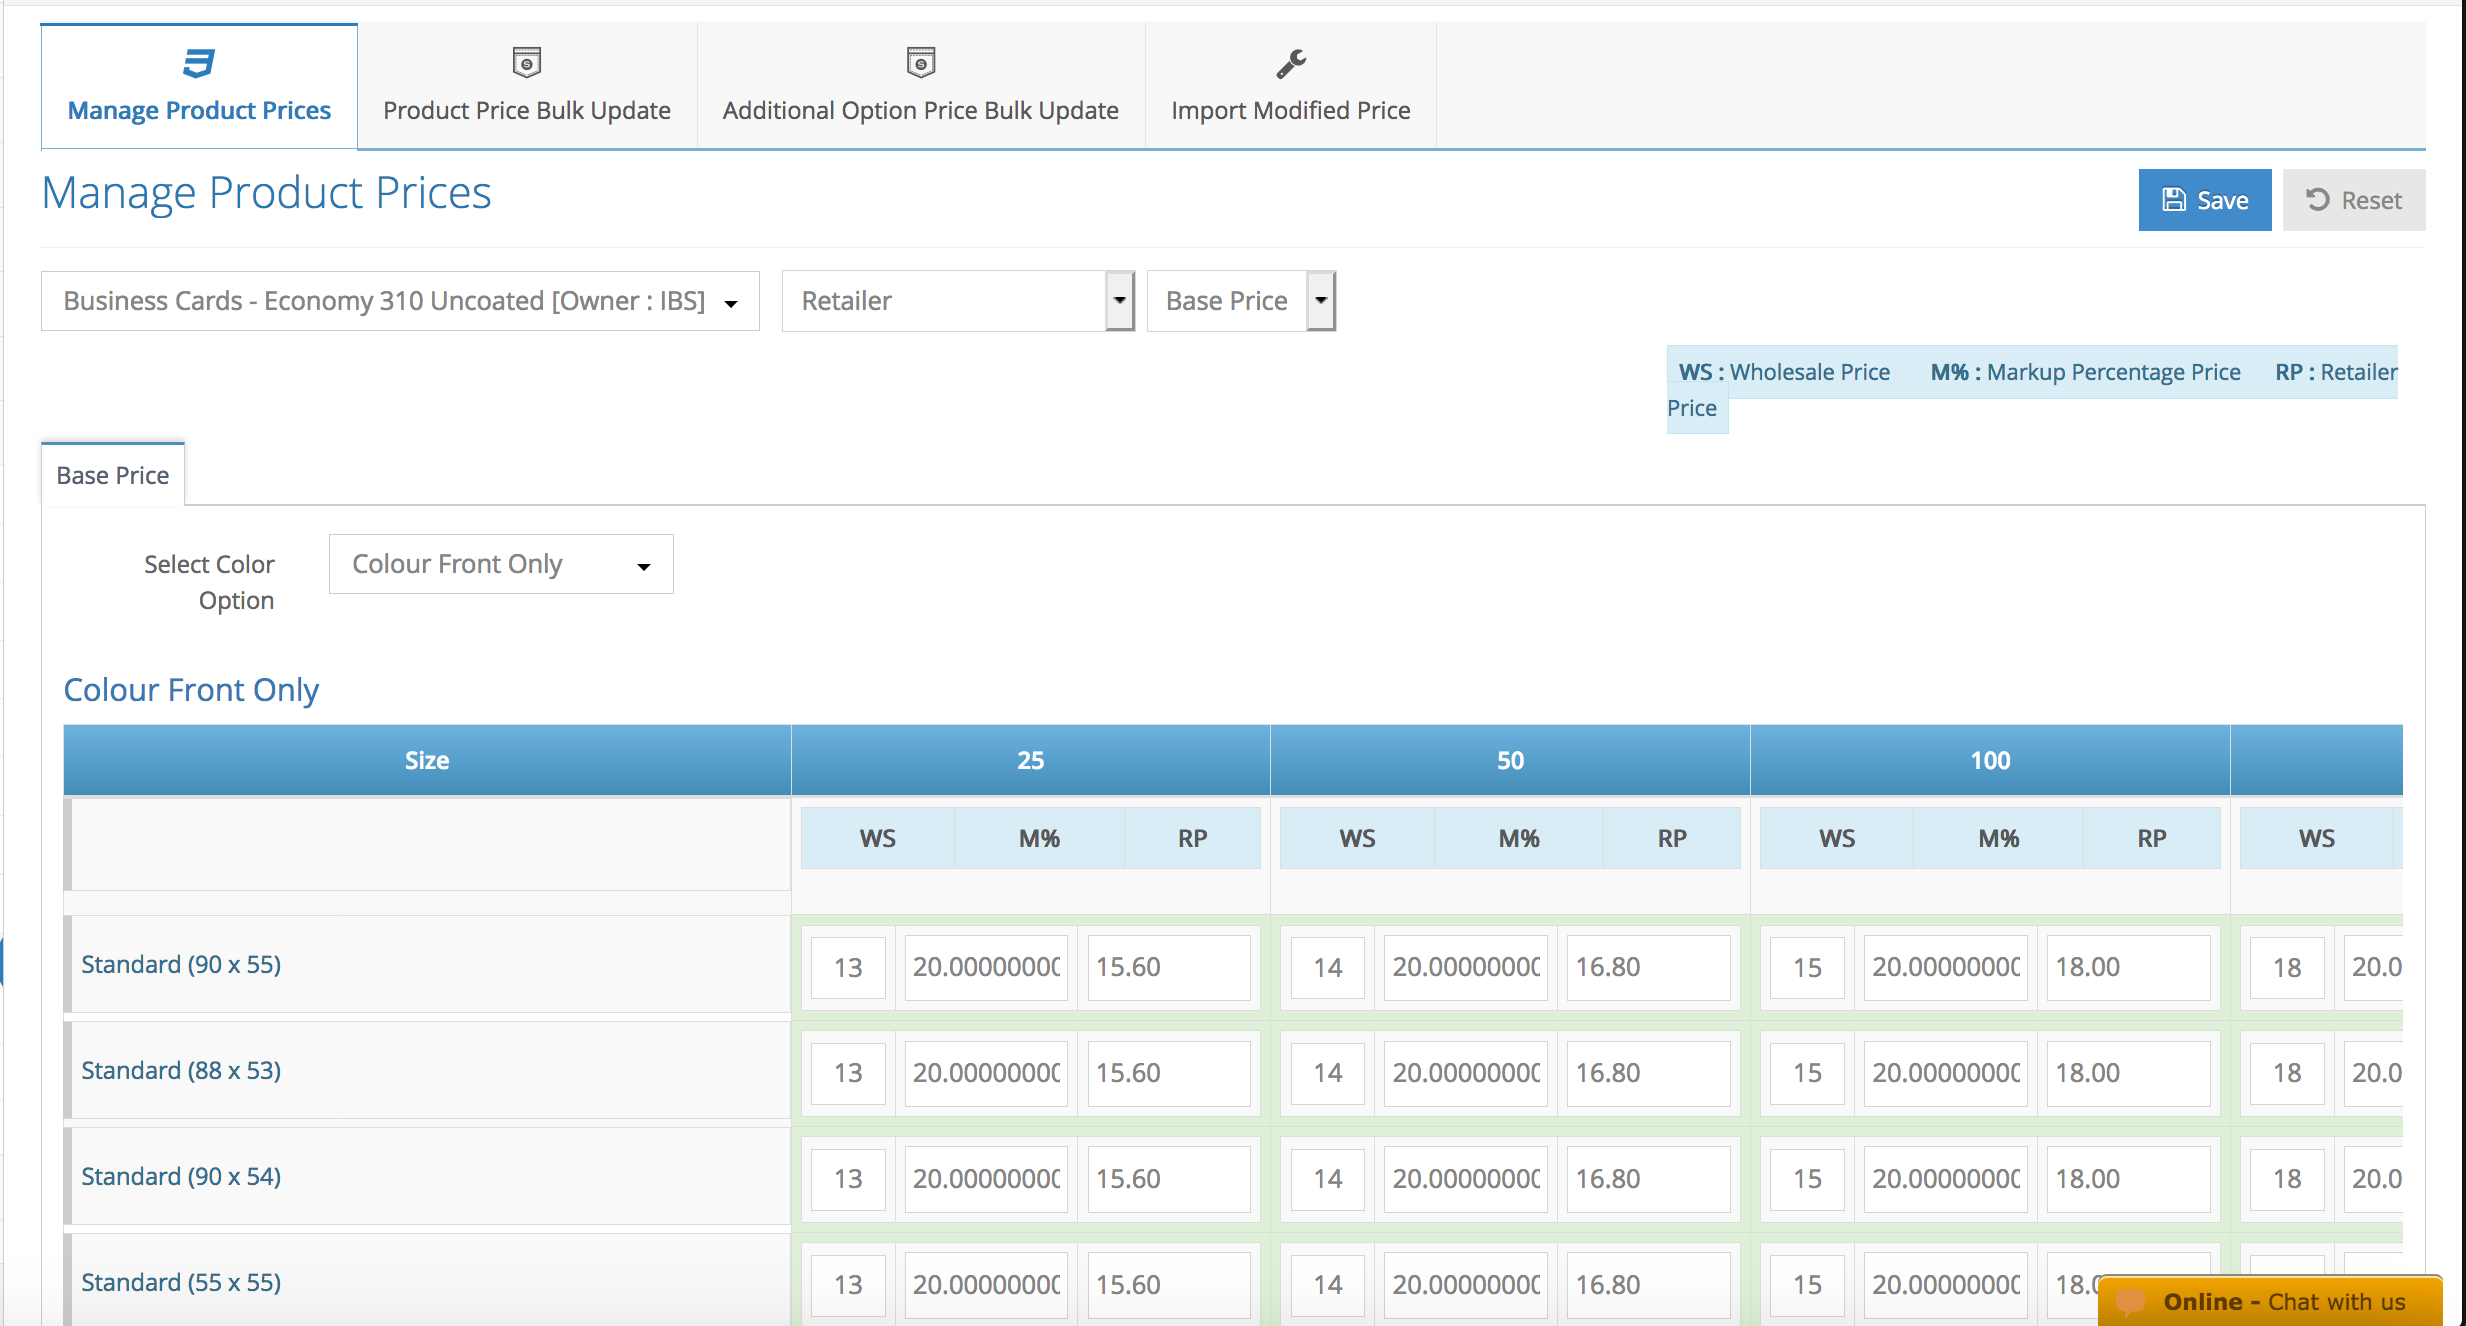
note : you can change the user type from retailer to a specific corporate to view their price here (Admin Products Only), You can also view the product extras available by changing the dropdown from baseprice for extras.
Step 5. If you selected the Admin Products (IBS) you can change the ‘Select Colour Option’ dropdown to other colour option to view the price for the other options. (full colour front > full colour front and back)
Step 6. If you would like to edit the product mark up / retail price manually simply put your mouse and highlight the mark up box / retail price box, update the mark up percentage and retail price will adjust automatically same goes with the updating the retail price, mark up percentage will adjust automatically.
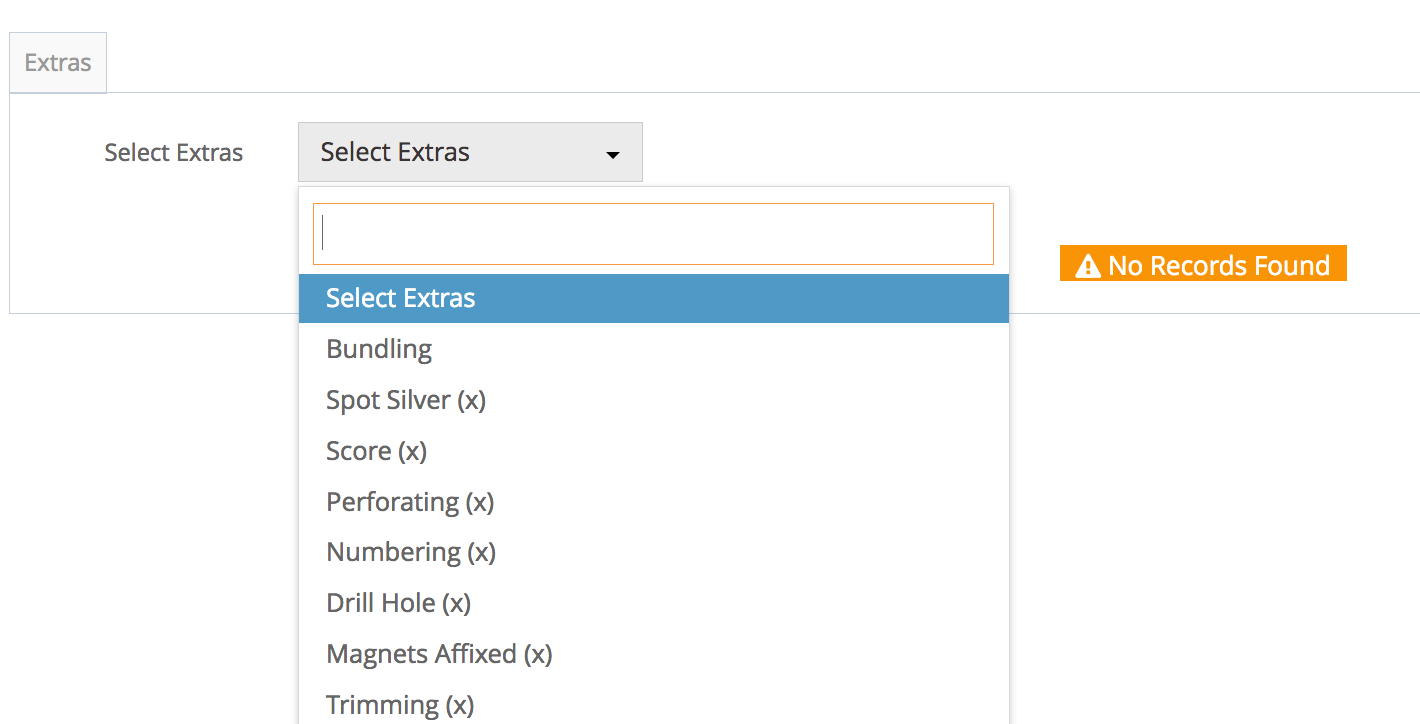
Step 7. (Admin Products Only) by default all of the product extras are turned off, you will need to activate the extras by selecting extras on the dropdown

Step 8. Select which extras you would like to activate on your website, if you see ‘(x)’ symbol means the extras are inactive – not available online for your customers.
Step 9. Once you have selected, you will need to tick the button on the left hand side to activate it
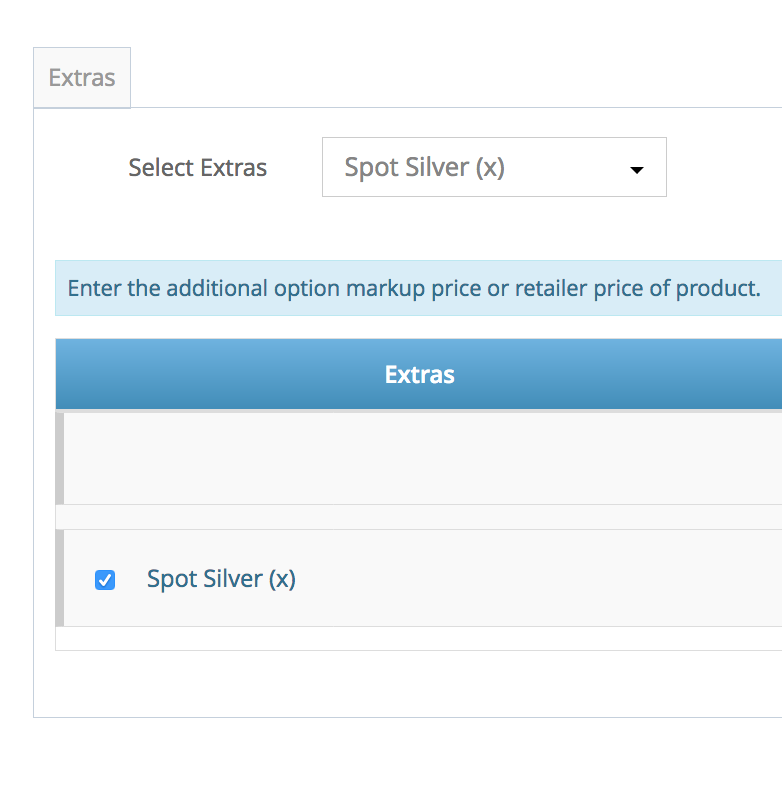
Step 10. Review the prices and mark up
Step 11. Click Save at the top to save your changes.
Predefined Products, often known as Non-customized Products, are products that are ready to order without needing any customization as the customization is already being made by the admin. Customers who purchased the Predefined Product only need to select the size, quantity, and additional options available and then place an order.
Predefined Products Menu
Similar to Products, Predefined Products also have the following options on the top right

Add: Adding new Predefined Products to the store
Import Products: Import products allows for value editing using Office Applications that can be reimported to apply all the changes made.
Related Products: Admins can assign products that are related to certain items for an easier shortcut.
The related product will appear in the “Related Product” area. You can add that area to the product layout page.
Manage Stock: useful if admins would like to keep track of products that require inventory management.
Predefined Product Search Filtering

In the Search Bar, there are various options that you can filter
Step 1. From the home page, navigate to Products > Products.
Step 2. Click the Pencil icon in Sort column.
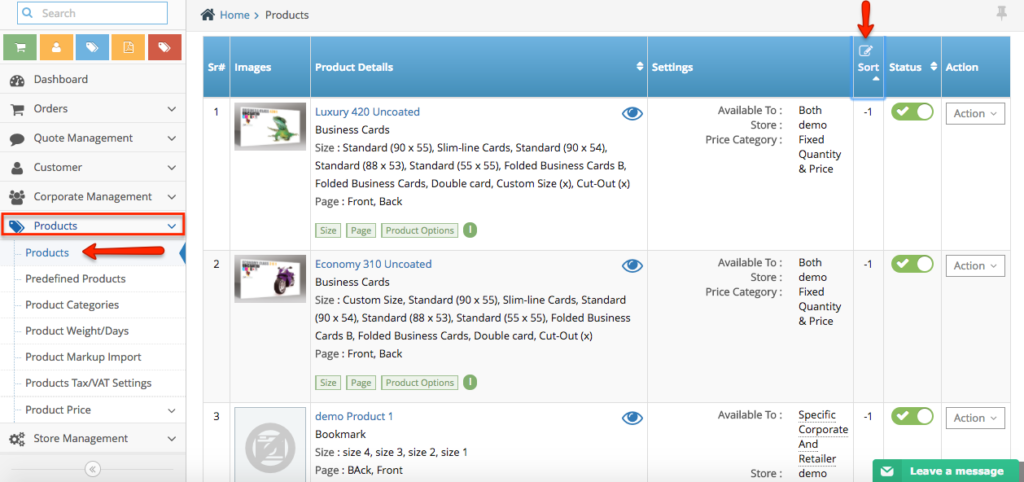
Step 3. Update the sort number according to how would you like the products to display in order and click Save icon.

Step 1. From the home page, navigate to Products > Product Mark up Import
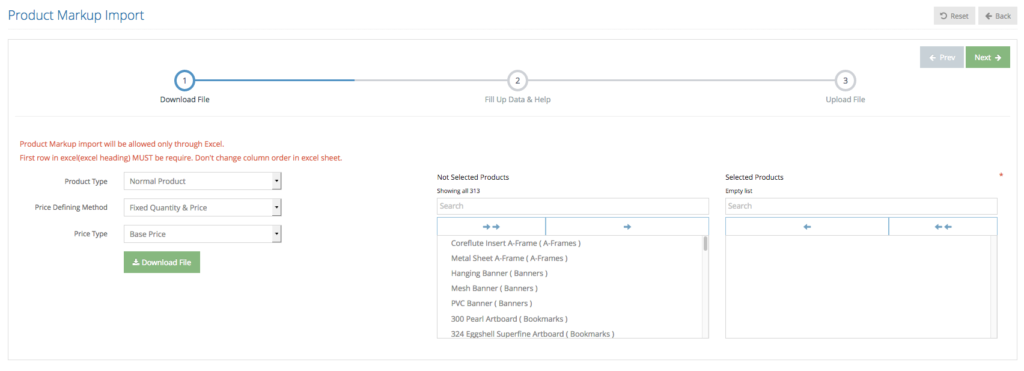
Step 2. On this page you will be able to see the 3 steps how to import the pricing – the first step will be download the sample file.
Step 3. In order to download the sample file of the correct product you’d like to edit, you need to follow these steps
3a. first you need to choose the product type.
Normal Product : product that was created from the product listing page.
Pre-defined Product : Promotional Product catalog – additional feature
b. Choose the pricing method whether the product belongs to below calculation method.
Fix Quantity & Pricing (all IBS Products has this method)
Range Based Qty with Multiplication
Range Based Qty without Multiplication
c. Choose you would like to edit the base price or the extras (option price) or combination price (if you have).
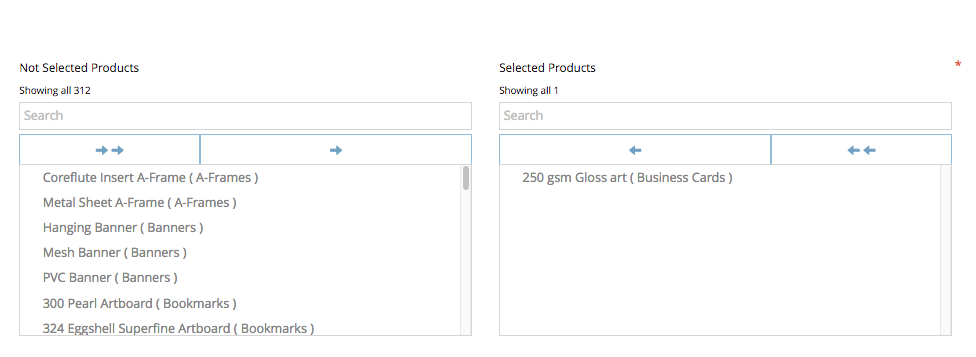
d. Once you have filtered the product based on the dropdown – you will see all of the products under those dropdown selected. The next step it to move the product from left (not selected) to the right (selected) before you click the ‘download file’ button.
Step 4. Open the excel sheet on your computer to edit the pricing.
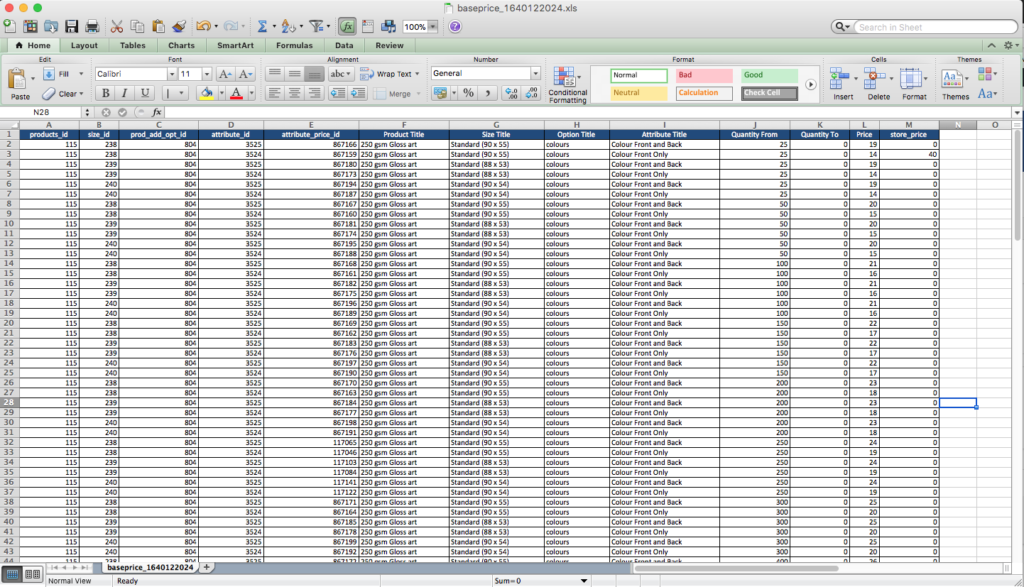
Step 5. On the excel sheet you will be able to see the details of the product such as the product IDs, product name, sizes, colour options, qty, price, and store price. The column ‘price’ here is the IBS prices and the ‘store price’ column is your pricing.
Tips : You can apply excel formula on the ‘store price’ column for a quick edit on your pricing.
formula example for 60% mark up : = L2*1.6
Step 6. Going back to the admin side – we have provided help information about the excel sheet on the step 2 of the import feature.
Step 7. On the last step of the product import – you need to upload the edited excel import online
Step 8. In order for the system to populate the correct data – you need to select the correct price type whether you’re going to upload the base price or option price excel sheet pricing.
Step 9. Click ‘Upload File’ to upload your excel
Step 10. System will mapped out the excel and letting you know whether there are any incorrect data or all the data is correct.

Step 11. To finish the step you need to click ‘import’ button on the top right of the page. Once it has been updated you will see the sign that the data has been imported successfully.
Step 12. To check it you can go to the products > product price page.
Step 1. Login to your admin and navigate to Products on the left hand side navigation bar
Step 2. Under the Products > select Products > select the Product you would like to activate the ‘graphic design service’
Step 3 For IBS Products, click Action > Settings

Inside the settings page you will see the ‘Product Type’ section where you can manage the type of services you’d like to offer to your customer and the sort order of the options.
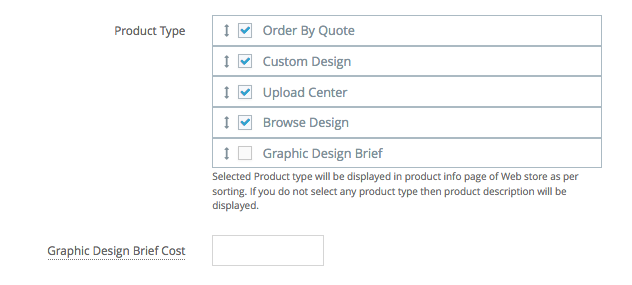
Step 4 Check the ‘Graphic Design Brief’ check box to activate the graphic design option.
Step 5. Right underneath it you’ll also see the ‘Graphic Design Brief Cost’ box, this allows you to put a fix cost of the graphic design service for each of your product.
Step 6. Click Save to save your changes.
Step 1. Login to your admin and navigate to Products on the left hand side navigation bar
Step 2. Under the Products > select Products > select the Product you would like to activate the ‘graphic design service’ feature
Step 3 For Store / Affiliate own Products, click Action > Edit

Inside the edit page you will see the ‘Product Type’ section where you can manage the type of services you’d like to offer to your customer and the sort order of the options.
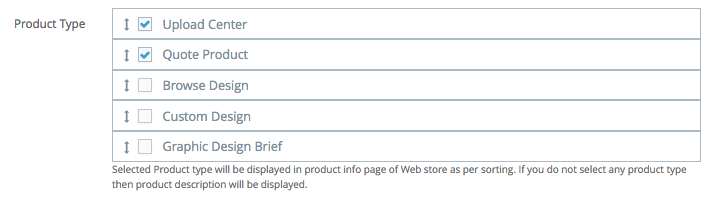
Step 4 Check the ‘Graphic Design Brief’ check box to activate the graphic design option.
Step 5. Click Save to save your changes
Step 6. At the top product navigation bar, click ‘Settings’ tab

Step 7. On this page you will see the box to input the fix graphic design service fee.

Step 8. Click Save to save your changes.
Step 1. Login to your admin and navigate to Products on the left hand side navigation bar
Step 2. Under the Products > select Products > select the Product you would like to activate the ‘product badge’ feature
Step 3. click Action > Edit
 Inside the edit page at the very bottom you will see ‘Product Promotional Text’ textbox

Step 4. Write down your promotional text on the text box – i.e. SALE, HOT, NEW
Step 5. Click Save to save your changes
Step 6. At the top product navigation bar, click ‘Settings’ tab
Step 7. On this page you will see the ‘Enable Promotional Text on Title’ settings, turn it on to enable it.

Step 8. Right underneath it you also will see the different type of badge pattern – please see below the difference of all badge.
![]()
Step 9. Click Save to save your changes
Step 1. Login to your admin and navigate to Products on the left hand side navigation bar
Step 2. Under the Products > select Products > select the Product you would like to activate the ‘product badge’ feature
Step 3. click Action > Settings
Inside the product setting page you can see the ‘enable promotional text on title’, ‘product promotional text’ and ‘product badge parttern’
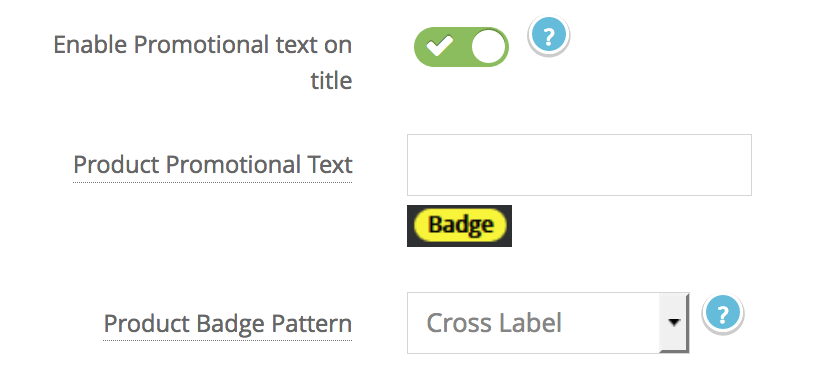
Step 4. Turn on the ‘enable promotional text on title’
Step 5. Write down your promotional text on the text box – i.e. SALE, HOT, NEW
Step 6. Select the ‘Product Badge Pattern’ – see below for the options
![]()
Step 9. Click Save to save your changes