• Main Menu
    • Feature
    • Showcase
    • Plans
  • Demo
  • Full Suite of Features
  • Inclusions
  • Blog
  • About Us
  • FAQ
  • Contact Us
  • Terms and Conditions
Editandprint
  • Overview
  • Features
  • Showcase
  • Plans

Customer Management

  • Website Customers' Page
  • Add Single Customer
  • Add Multiple Customer
  • Guest Customer
  • Newsletter Subscriber
  • Customer Templates
  • Edit Customers Details

Website Customers' Page

Website Customers' Page

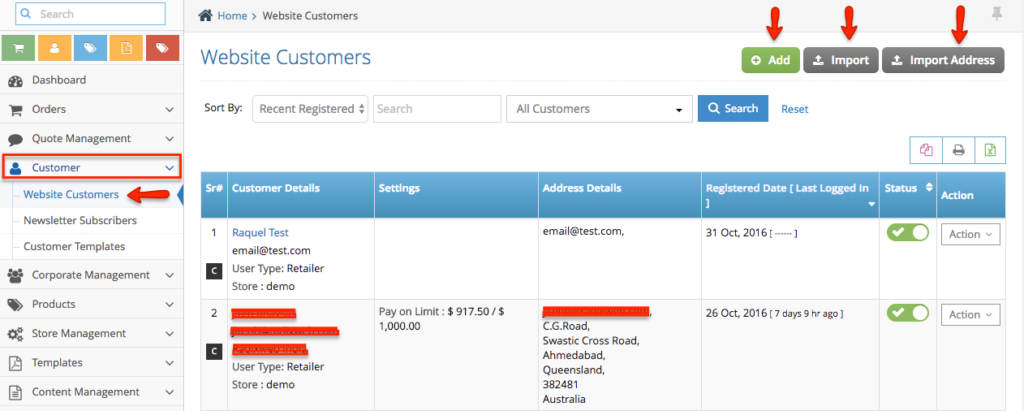
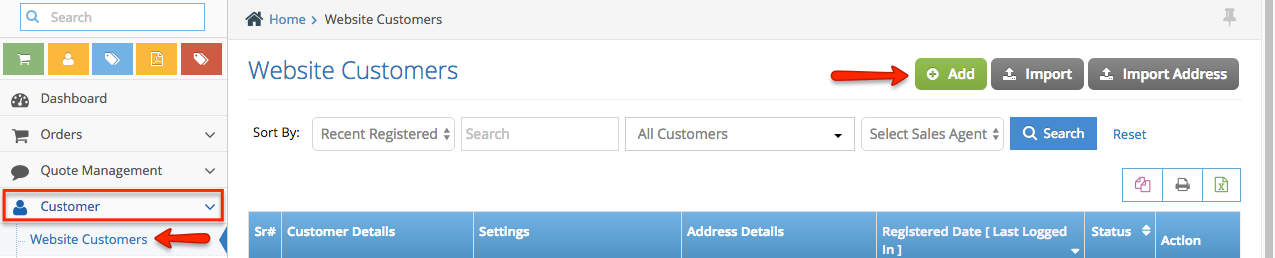
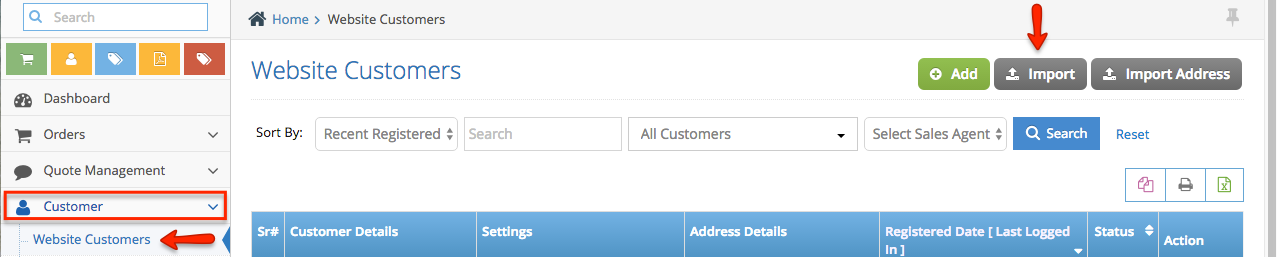
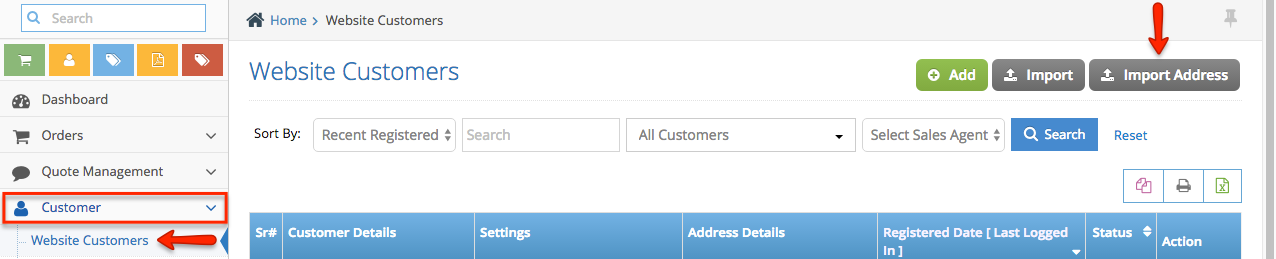
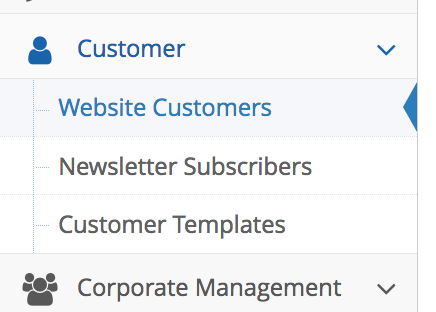
Step 1. From the home page, navigate to Customer section, then select Website Customers. This page shows the customer’s name, the company they are connected with, the affiliate website, their physical address, phone number, and the day they signed up. User Type section indicates either Retailer which means that the customer signed up and places an order through an affiliate site, while all other types means that the customer has been added through a Corporate. Status indicates the status of the customer’s account. It can be set to Active or Inactive.

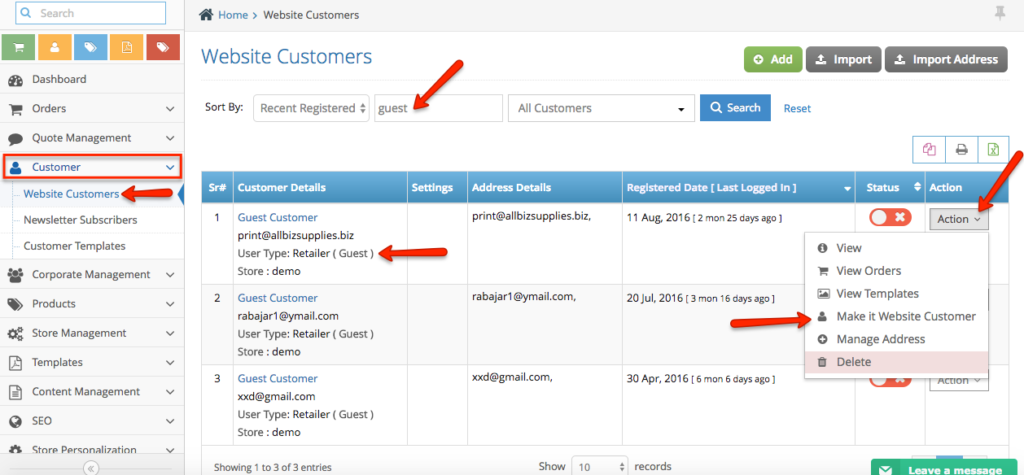
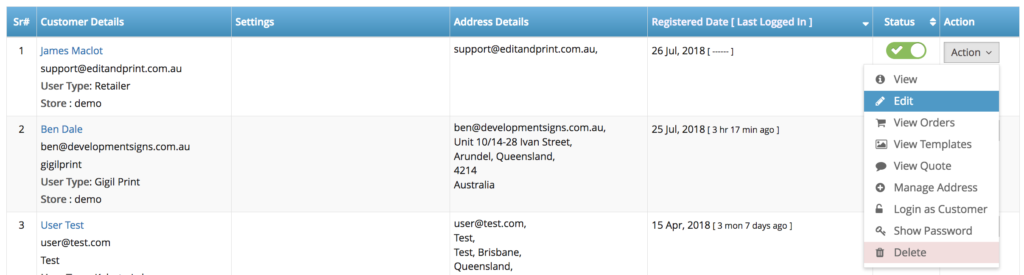
Step 2. The Action button in line with the account provides several options such as View Profile for you to view the customer’s profile, Edit, Delete, View Orders, View Templates, View Quotes, and Login as Customer.

Add Single Customer

Add Single Customer

Step 1. From the home page, navigate to Customer section and select Website Customers.

Step 2. Click Add button.

webcust-s1


Step 3. Fill out the form with the new customer information:

Customer Details – Enter the name, email and password of the customer. Select the user type and sales agent.
Address Details – Enter the address of the customer and the phone number.
Customer Settings – In this section, you can set the status of this customer to active/inactive, enabled notificatios, make him/her pay on account, allowing tax exemption and subscribe him/her to the newsletter.

webcust-s2


webcust-s3


webcust-s5


Step 4. Once all done, click Save & Back button to apply the changes and go back to the main customer page.

Add Multiple Customer

Add Multiple Customer

Step 1. From the home page, navigate to Customer section and select Website Customers.

Step 2. Click Import button.

webcust-m1


Step 3. Download the Sample File and click Next button.

webcust-m2


Note: In this page, you will be given some details and description in order to fill out the sample file correctly.

webcust-m4


Step 4. Open the Sample File and add your customers. Just follow the format in the excel sheet and save it as csv file.

webcust-m3


Step 5. Go back to the page and click Next button.

Step 6. Upload the CSV file. In this part, you should see an import data summary. It will tell you if the import has error or all correct.

webcust-m5


Step 7. If everything is good, click Import button and these customers will be added accordingly.

Step 8. Click Save & Back button to apply the changes and go back to the main customer page.

Addition Option: Import Address
The process is basically the same with our illustration above.

webcust-ma1

Guest Customer

Guest Customer

Step 1. From the home page, navigate to Customer section, then click Website Customers. Search for Guest Customer using the filter search.

This page will show the list of customers who placed an order but did not signed up an account. It also shows the customer’s name, email address, the affiliate website, their physical address, and the day they signed up.

Step 2. The Action button in line with the account provides several options. Select Make it Website Customer and the account will be switched to a website customer.

Newsletter Subscriber

Newsletter Subscriber

Step 1. From the home page, navigate to Customer section and select Newsletter Subscribers. This page will show the list of customers who subscribe to your newsletter.

subscribe1


Step 2. Click the Action button next to the customer’s account should you wish to delete his subscription.

Step 3. Click the Download Subscribe button if you wish to export the list of subscribers.

subscribe

Customer Templates

Customer Templates

Step 1. From the home page, navigate to Customer section, then click Customer Template. This page will show the list of all templates uploaded by your customers.

Step 2. Click the Action button next to the template if you want to Edit the design or download the file. You can also remove the template by clicking the Delete button.

Edit Customers Details

How to edit existing Customers

Step 1. From the home page, navigate to Customer section, then click Website Customers. This page will show the list of all customers on your website.

Step 2. Search your customers by using the search filter.

Step 3. Once you have found the user > click action >edit

Step 4. Inside the Customers Details page you can manage the Customer Details, Address Details & Customers Settings

Customer Details : This section allows you to edit their
user type –  whether you’d like to assign the user to a specific corporate / as a retailer.
users name  – updating their first name and last name
sales agent – assigning the user to a specific sales agent
email & password – updating their email & password
group – grouping your customers to a certain customers group for discount purposes

Address Details – This section allows you to manage their default shipping address

Customer Settings – This last section allows you to manage their online account settings such as below
status – make your customers active / inactive
pay on account – assign your customers to have an account in your website
allow tax exemption – allowing the system to exempt the tax for online test ordering purposes.

Once you have made the changes – don’t forget to click save or save & back

Other Training Module :

Order Management
Quote Management
Customers
Corporates
Products
Store Management
Templates
Content Management
SEO
Store Personalisation
Business Partners
Store Configuration
Designer Studio
Reports
Support

If you can't find what you want please let us know

[contact-form-7 404 "Not Found"]

Contact Us

We're currently offline. Send us an email and we'll get back to you, asap.

Send Message

Main Links

  • Demo
  • Feature Index
  • Our Plans
  • About Us
  • Terms and Conditions

Contact Info

  • 0414 586 892
  • peeter@editandprint.com.au

Fresh from blog

  • Online Editor Help Message Update
  • Content Structure
  • EditandPrint V.7 – Phase 2
  • Gearing up for Online Promotion
  • Personalised Job Board

Find Out More